17. Tower Configuration
You can configure various Tower settings within the Settings screen in the following tabs:

Each tab contains fields with a Reset button, allowing you to revert any value entered back to the default value. Reset All allows you to revert all the values in the Edit Tower Configuration to their factory default values.
Save applies changes you make, but it does not exit the edit dialog. To return to the Configure Tower screen, click the Settings (![]() ) icon from the left navigation bar or use the breadcrumbs at the top of the current view.
) icon from the left navigation bar or use the breadcrumbs at the top of the current view.
17.1. Authentication
Through the Tower user interface, you can set up a simplified login through various authentication types: GitHub, Google, LDAP, RADIUS, and SAML. After you create and register your developer application with the appropriate service, you can set up authorizations for them. Since configuration files are now saved to the PostgreSQL DB in Ansible Tower 3.1 instead of flat files, setting up authorizations in the Ansible Tower User Interface is the recommended method.
From the left navigation bar, hover over the Settings (
 ) icon and select Authentication or click the Authentication tab from the Settings screen.
The Authentication window opens. Select the appropriate authentication type from the row of tabs across the top of the window.
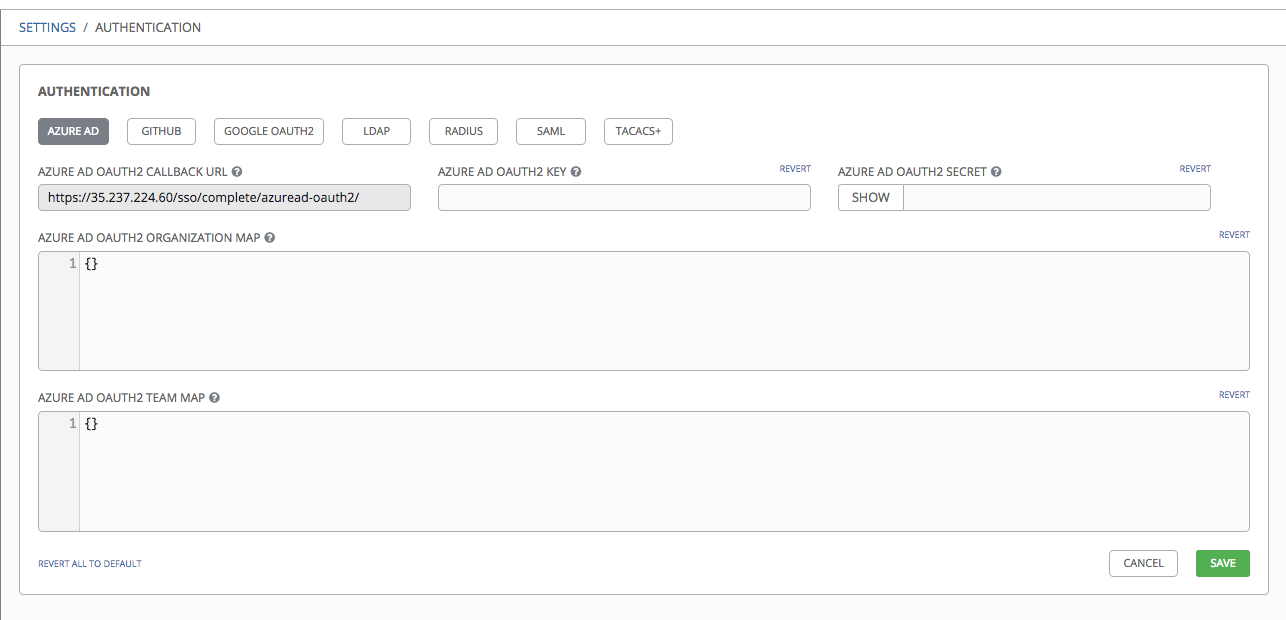
Different authentication types require you to enter different information. Be sure to include all the information as required.
Note
For more detail about each authentication type, refer to the Setting Up Authentication section of the Administration Guide.
Click Save to apply the settings or Cancel to abandon the changes.
17.2. Jobs
The Jobs tab allows you to configure the types of modules that are allowed to be used by Tower’s Ad Hoc Commands feature, set limits on the number of jobs that can be scheduled, define their output size, and other details pertaining to working with Jobs in Tower.
From the left navigation bar, hover over the Settings (
) icon and select Jobs or click the Jobs tab from the Settings screen.Set the configurable options from the fields provided. Click the tooltip
 icon next to the field that you need additional information or details about. Refer to the Isolated Instance Groups section for details about configuring durations for isolated instance groups. Refer to the Ansible Galaxy Support section for details about configuring Galaxy settings.
Note
The value for Default Job Timeout is in seconds.

Click Save to apply the settings or Cancel to abandon the changes.
17.3. System
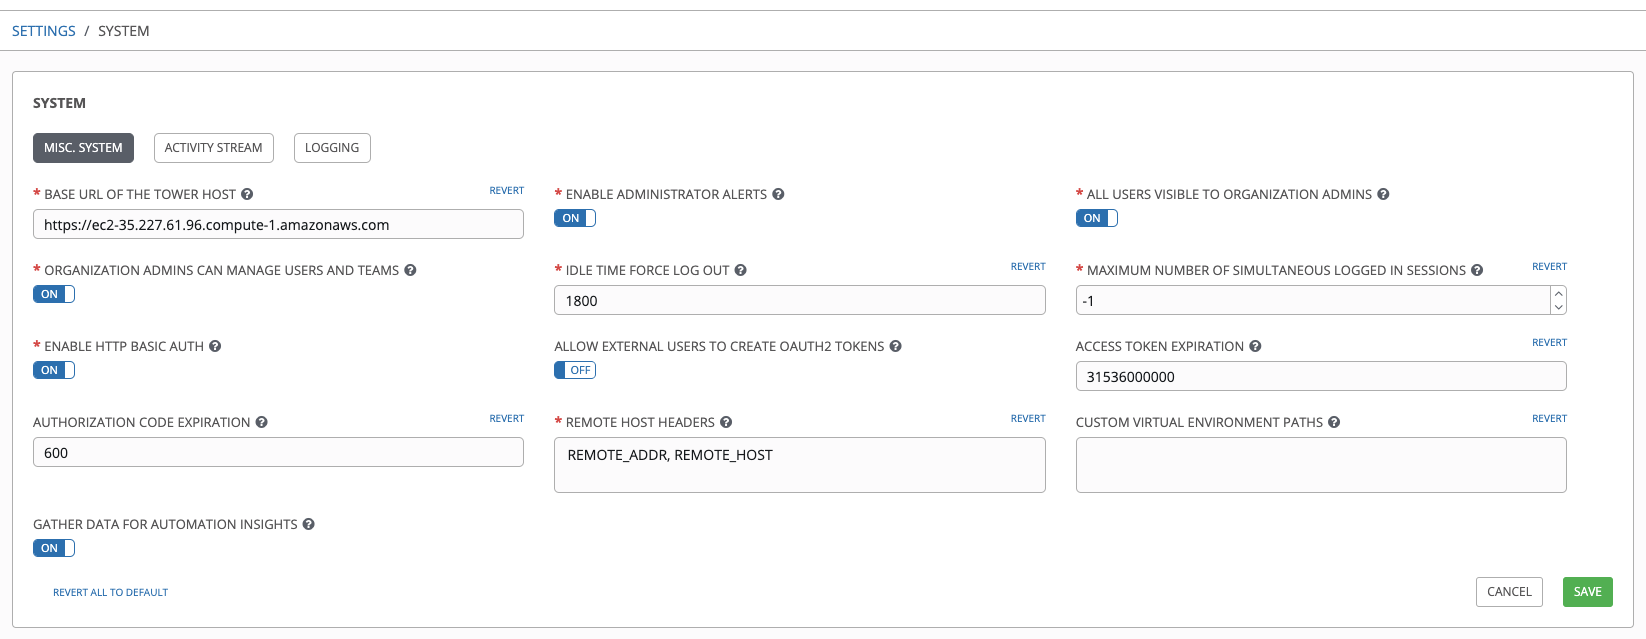
The System tab allows you to define the base URL for the Tower host, configure alerts, enable activity capturing, control visibility of users, enable certain Tower features and functionality through a license file, and configure logging aggregation options.
From the left navigation bar, hover over the Settings (
) icon and select System or click the System tab from the Settings screen.The System window opens. Select an option from the row of tabs across the top of the window:
Misc. System: define the base URL for the Tower host, enable tower administration alerts, and allow all users to be visible to organization administrators.
Activity Stream: enable or disable activity stream.
Logging: configure logging options based on the type you choose:
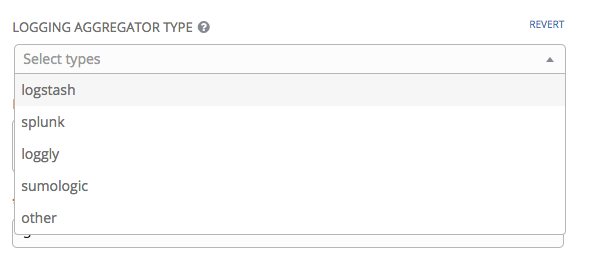
For more information about each of the logging aggregation types, refer to the Tower Logging and Aggregation section of the Ansible Tower Administration Guide.
Set the configurable options from the fields provided. Click the tooltip
icon next to the field that you need additional information or details about.
Note
The Allow External Users to Create Oauth2 Tokens setting is disabled by default. This ensures external users cannot create their own tokens. If you enable then disable it, any tokens created by external users in the meantime will still exist, and are not automatically revoked.
Click Save to apply the settings or Cancel to abandon the changes.
17.4. User Interface
The User Interface tab allows you to set Tower analytics settings, as well as configure custom logos and login messages.
Access the User Interface settings by hovering over the Settings (![]() ) icon from the left navigation bar and select User Interface or click the User Interface tab from the Settings screen.
) icon from the left navigation bar and select User Interface or click the User Interface tab from the Settings screen.

17.4.1. Usability Analytics and Data Collection
Usability data collection is included with Tower to collect data to better understand how Tower users specifically interact with Tower, to help enhance future releases, and to continue streamlining your user experience.
Only users installing a trial of Tower or a fresh installation of Tower are opted-in for this data collection.
If you want to change how you participate in this analytics collection, you can opt out or change your settings using the Configure Tower user interface, accessible from the Settings (![]() ) icon from the left navigation bar.
) icon from the left navigation bar.
Ansible Tower collects user data automatically to help improve the Tower product. You can control the way Tower collects data by setting your participation level in the User Interface tab in the settings menu.
Select the desired level of data collection from the User Analytics Tracking State drop-down list:
Off: Prevents any data collection.
Anonymous: Enables data collection without your specific user data.
Detailed: Enables data collection including your specific user data.
Click Save to apply the settings or Cancel to abandon the changes.
For more information, see the Red Hat privacy policy at https://www.redhat.com/en/about/privacy-policy.
17.4.2. Custom Logos and Images
Ansible Tower supports the use of a custom logo. You can add a custom logo by uploading an image; and supply a custom login message from the User Interface settings of the Settings (![]() ) menu.
) menu.
For the custom logo to look its best, use a .png file with a transparent background. GIF, PNG, and JPEG formats are supported.
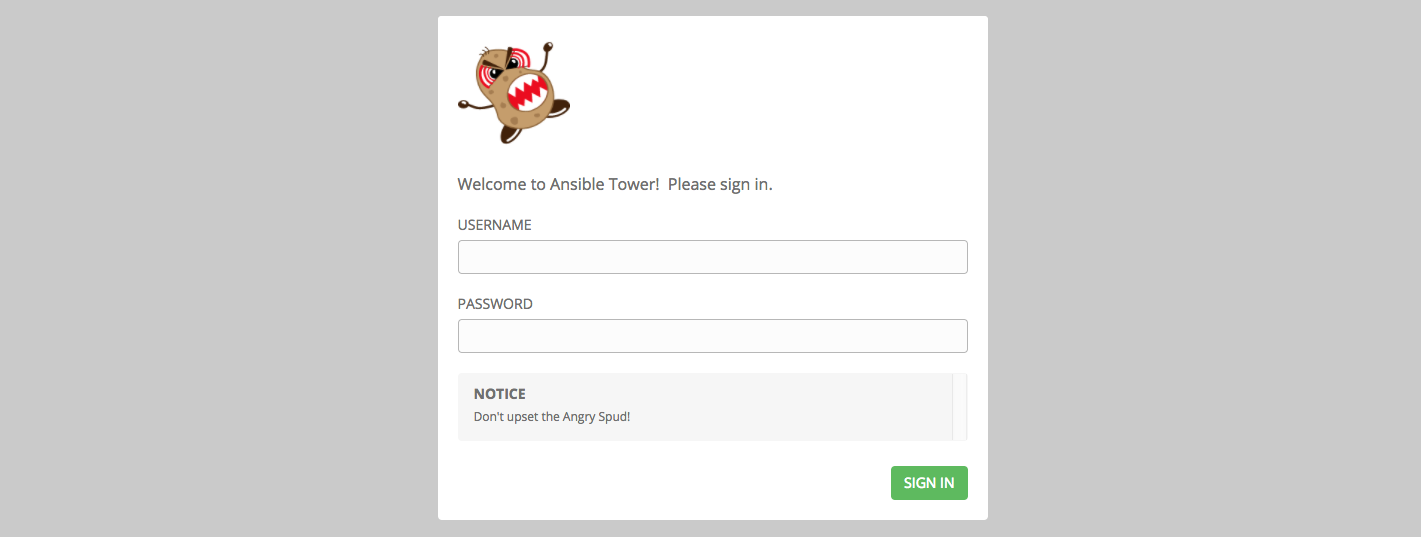
If needed, you can add specific information (such as a legal notice or a disclaimer) to a text box in the login modal by adding it to the Custom Login Info text field.
For example, if you uploaded a specific logo, and added the following text:
The Tower login dialog would look like this:
Selecting Revert will result in the appearance of the standard Ansible Tower logo.
17.5. License
Tower requires a valid license to run. If you do not already have one, request one from the initial screen when you launch Tower. If you did not receive a license from Ansible directly or via email, or have issues with the license you received, refer to http://www.ansible.com/license for free and paid license options (including free trial licenses) or contact Ansible via the Red Hat Customer portal at https://access.redhat.com/.
Note
To successfully add your license, you must be logged on as the Superuser. Otherwise, the operation will fail.
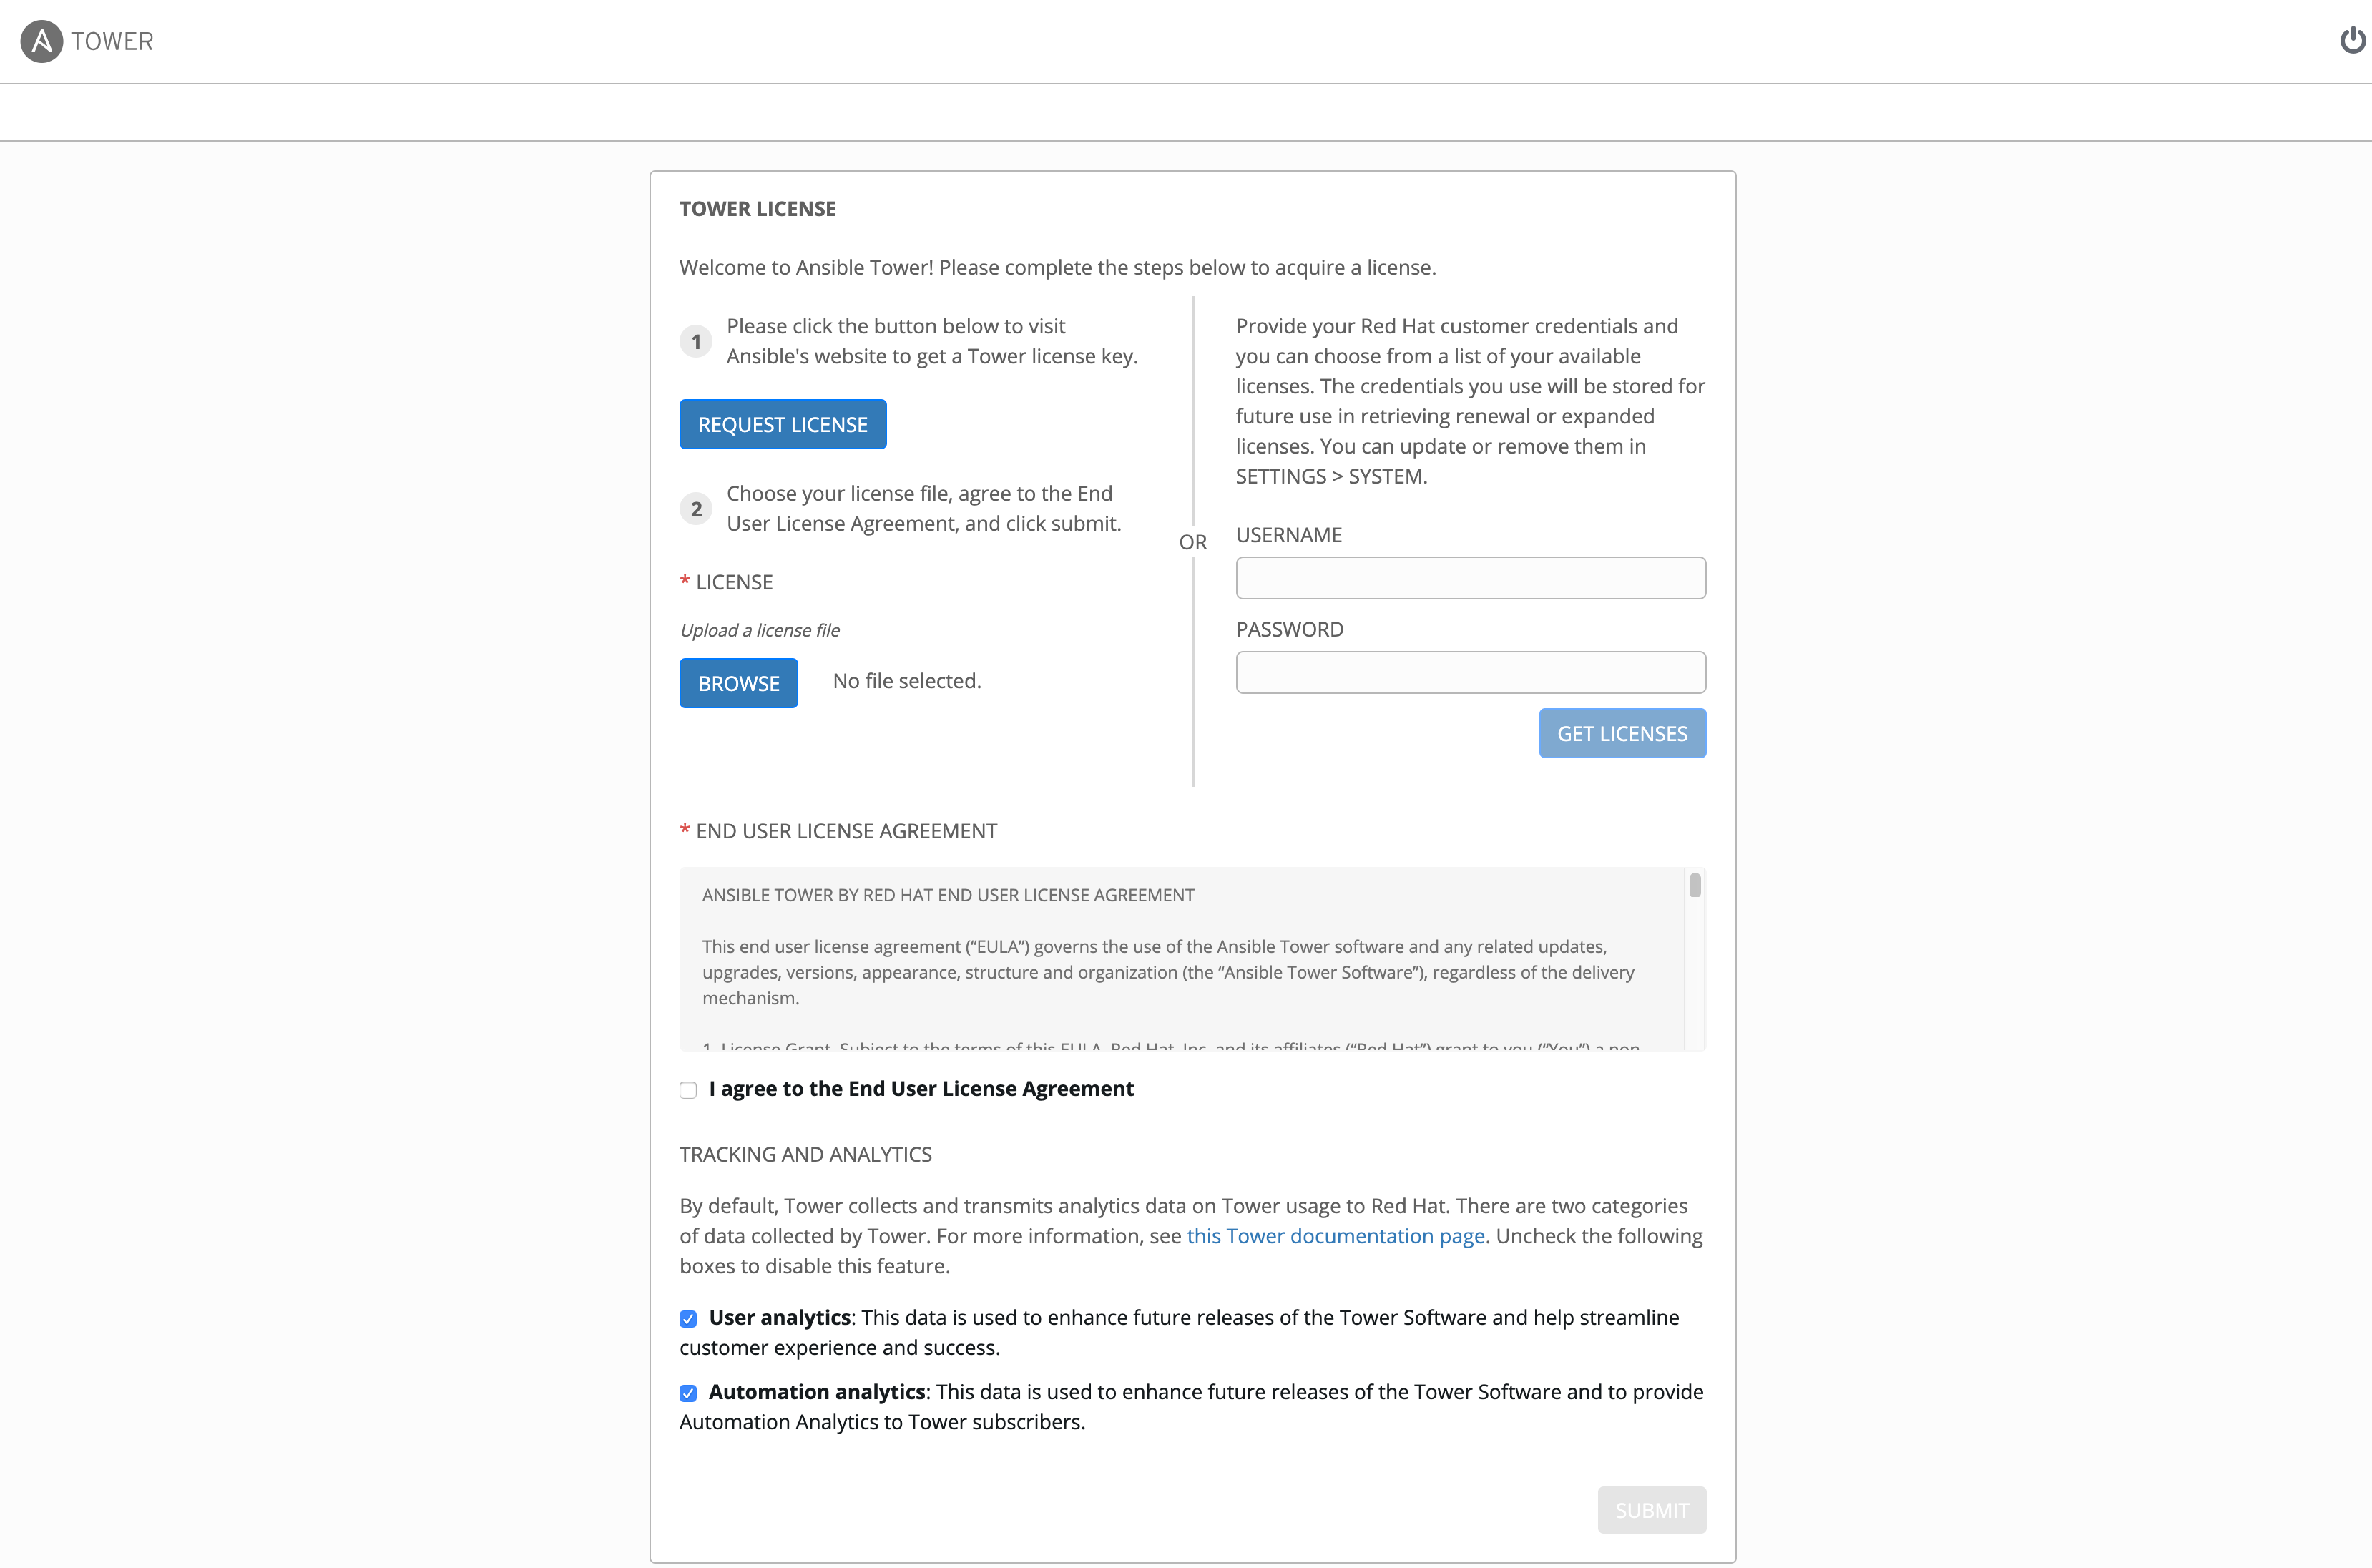
When Tower launches for the first time, the license screen automatically displays. Use your Red Hat credentials to retrieve and import your subscription, or import the license key you received from Red Hat:
Enter your Red Hat customer credentials on the right side of the screen. Alternatively, if you have a license file, click the Browse button and navigate to the location where the license file is saved to upload it. The uploaded license may be a plain text file or a JSON file, and must include properly formatted JSON code.
Note
The license import will work for Tower nodes with RHEL only. For non-RHEL (e.g. CentOS based Tower nodes), activate the license using the license file instead. When using Red Hat customer credentials, you must use your Red Hat username and password, not your Red Hat account email address and password.
If you entered your credential information, click Get Licenses.
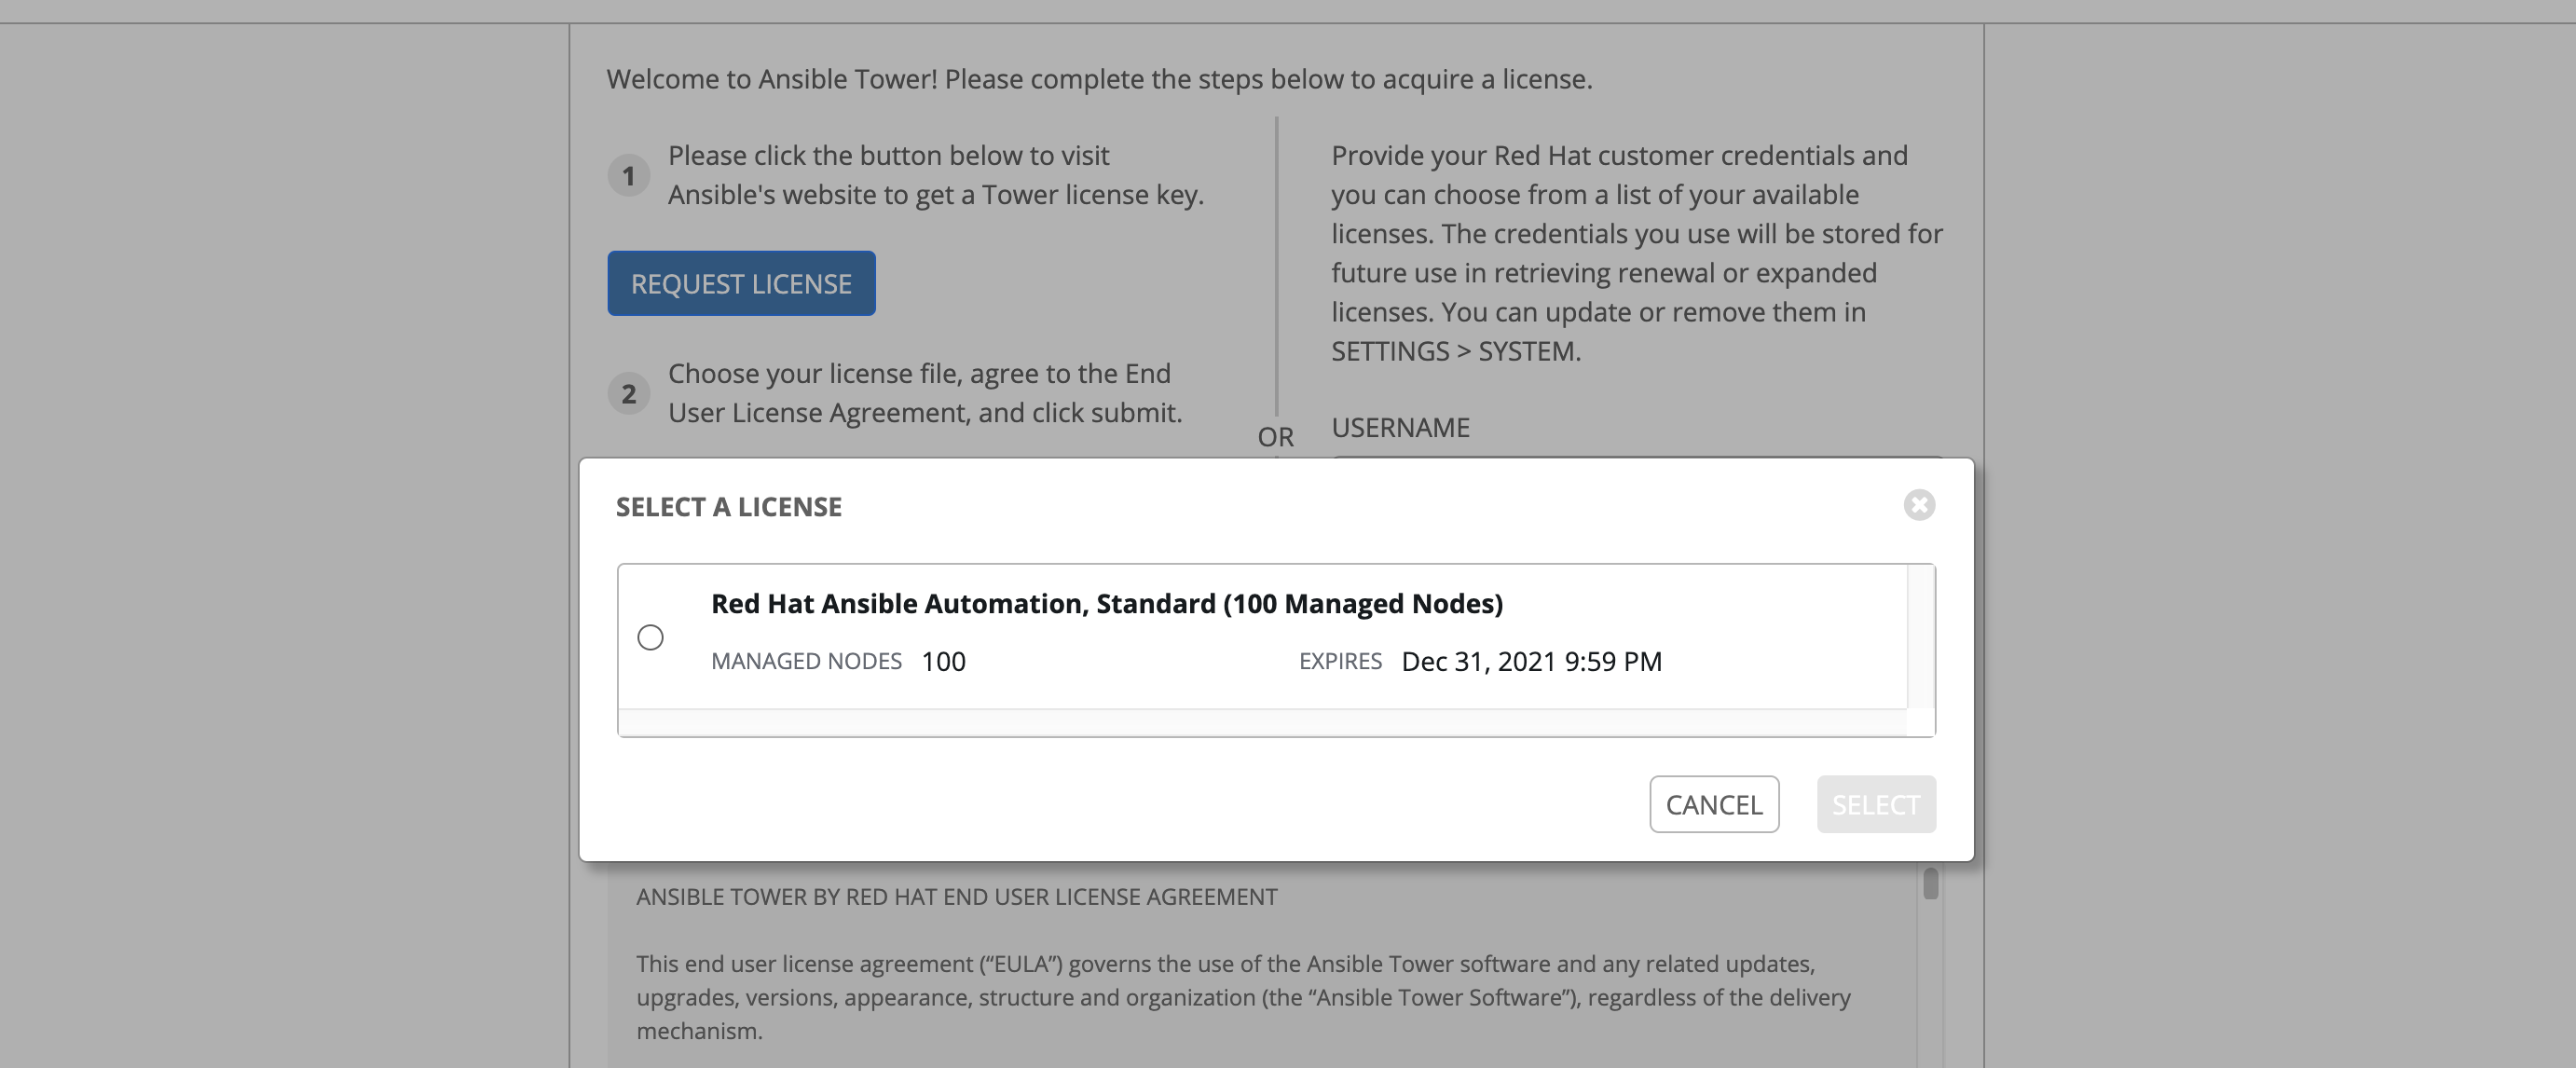
Once your credential information (or license) is recognized, and you are on RHEL 7 and later, you will see a prompt with your Red Hat subscription(s). Choose the subscription you want to run (the example below has only one subscription). You can log in over time and retrieve new subscriptions if you have renewed.
Other non-RHEL subscribers, after uploading the license file, proceed by checking the End User License Agreement.
The bottom half of the license screen involves analytics data collection. This helps Red Hat improve the product by delivering you a much better user experience. For more information about data collection, refer to Usability Analytics and Data Collection. This option is checked by default, but you may opt out of any of the following:
User analytics collects data from the Tower User Interface.
Automation analytics provides a high level analysis of your automation with Ansible Tower, which is used to help you identify trends and anomalous use of Tower. For opt-in of Automation Analytics to have any effect, your instance of Ansible Tower must be running on Red Hat Enterprise Linux. See instructions described in the Automation Analytics section.
Note
At this time, Automation Insights is not supported when Ansible Tower is running in the OpenShift Container Platform. You may change your analytics data collection preferences at any time, as described in the Usability Analytics and Data Collection section.
After you have specified your tracking and analytics preferences, click Submit.
Once your license has been accepted, Tower briefly displays the license screen and navigates you to the Dashboard of the Ansible Tower interface (which you can access by clicking on the Ansible Tower logo at the top left of the screen as well).
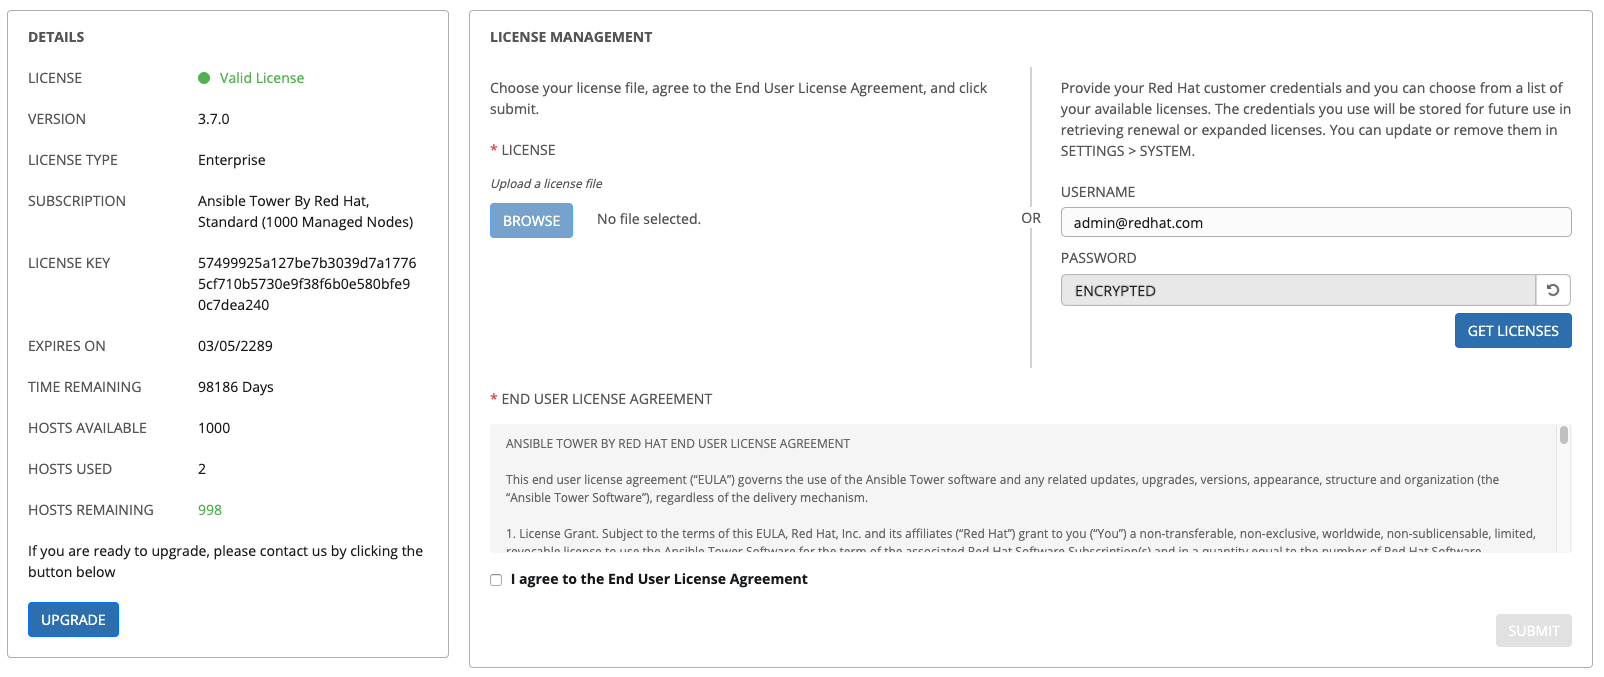
For later reference, you can return to the license screen by clicking the Settings (![]() ) icon from the left navigation bar and select the License tab from the Settings screen.
) icon from the left navigation bar and select the License tab from the Settings screen.