14. Execution Environments
自動化用に Python 仮想環境をビルドおよびデプロイできる機能は、Ansible 実行環境に置き換えられました。レガシーの仮想環境とは異なり、システムレベルの依存関係やコレクションベースのコンテンツを組み込むことができるコンテナーイメージがあります。各実行環境では、ジョブを実行するためのカスタマイズされたイメージを使用できます。また、各実行環境には、ジョブの実行時に必要なものだけが含まれ、それ以上のものは含まれていません。
14.1. Execution Environment のビルド
デフォルト以外の依存関係 (カスタムの仮想環境) に依存する Ansible コンテンツの使用には注意が必要です。パッケージは各ノードにインストールされ、ホストシステムにインストールされている他のソフトウェアとうまく連携し、同期を保つ必要があります。以前は、ジョブはデフォルトで /var/lib/awx/venv/ansible の仮想環境内で実行されていました。これには、ansible-runner と、Ansible コントロールマシンで使用される特定のタイプの Ansible コンテンツの依存関係がプリロードされていました。
このプロセスを簡素化するために、Ansible として機能するコンテナーイメージをビルドできます`control nodes <https://docs.ansible.com/ansible/latest/network/getting_started/basic_concepts.html#control-node>`_。これらのコンテナーイメージは自動化 execution environments と呼ばれ、ansible-builder で作成してから、ansible-runner でこれらの画像を利用できます。
14.1.1. ansible-builder のインストール
イメージをビルドするには、podman または docker のいずれかを ansible-builder Python パッケージとともにインストールする必要があります。--container-runtime オプションは、使用する予定の Podman / Docker 実行可能ファイルに対応している必要があります。
PyPi からインストールする場合:
$ pip install ansible-builder
メインライン開発ブランチからインストールする場合:
$ pip install https://github.com/ansible/ansible-builder/archive/devel.zip
特定のタグまたはブランチからインストールする場合は、以下の例で <ref> を置き換えます。
$ pip install https://github.com/ansible/ansible-builder/archive/<ref>.zip
14.1.2. execution environment のビルド
execution environment の作成に ansible-builder を使用します。
execution environment には以下が含まれると想定されます。
Ansible
Ansible Runner
Ansible コレクション
以下のPython および/またはシステムの依存関係
コレクション内のモジュール/プラグイン
ansible-base のコンテンツ
カスタムのユーザーニーズ
Building a new execution environment involves a definition (a .yml file) that specifies which content you would like to include in your execution environment, such as collections, Python requirements, and system-level packages. The content from the output generated from migrating to execution environments has some of the required data that can be piped to a file or pasted into this definition file. See レガシー virtualenv を execution environments に移行する for more detail. If you did not migrate from a virtual environment, you can create a definition file with the required data outlined in Execution environment 定義.
コレクション開発者は、適切なメタデータを提供することにより、コンテンツの要件を宣言できます。詳細については、「コレクションレベルのメタデータ¶」を参照してください。
14.1.3. ビルダーの実行
定義を作成したら、この手順を使用して execution environment を作成します。
ansible-builder build コマンドは、execution environment 定義を入力として受け取ります。execution environment イメージのビルドに必要なビルドコンテキストを出力し、そのイメージのビルドを続行します。イメージは他の場所のビルドコンテキストで再ビルドでき、同じ結果を生成します。デフォルトでは、現在のディレクトリーで execution-environment.yml という名前のファイルを検索します。
説明のために、以下のサンプル execution-environment.yml ファイルを開始点として使用します。
---
version: 1
dependencies:
  galaxy: requirements.yml
requirements.yml のコンテンツ
---
collections:
  - name: awx.awx
上記のファイルを使用して execution environment をビルドするには、以下を実行します。
$ ansible-builder build
...
STEP 7: COMMIT my-awx-ee
--> 09c930f5f6a
09c930f5f6ac329b7ddb321b144a029dbbfcc83bdfc77103968b7f6cdfc7bea2
Complete! The build context can be found at: context
すぐに使用できるコンテナーイメージの生成に加え、ビルドコンテキストが保持されます。これは、docker build または podman build などの選択したツールを使用して、別の時間や場所で再ビルドすることができます。
14.2. ジョブで execution environment を使用する
execution environment をグローバルに使用できるようにするか、組織に関連付けるかによって、ジョブで execution environment を使用するには、適切なレベルの管理者権限が必要です。組織に関連付けられた Execution environments では、組織管理者がそれらの execution environments でジョブを実行できる必要があります。
execution environment をジョブで使用するには、ansible-builder を使用して作成しておく必要があります。詳細は「execution environment のビルド」を参照してください。execution environment が作成されると、これを使用してジョブを実行できます。automation controller ユーザーインターフェースを使用して、ジョブテンプレートで使用する execution environment を指定します。
左側のナビゲーションバーから Execution Environments をクリックします。
追加 ボタンを選択して execution environment を追加します。
以下のフィールドに該当する詳細を入力します。
Name: execution environment の名前を入力します (必須)。
Image: イメージ名を入力します (必須)。イメージ名には、正確な場所 (リポジトリー)、レジストリー、イメージ名、およびバージョンタグが
quay.io/ansible/awx-ee:latestrepo/project/image-name:tagのサンプル形式で必要です。Job Type: オプションで、ジョブの実行時にプルのタイプを選択します。
Always pull container before running: コンテナーの最新のイメージファイルをプルします。
No pull option has been selected: プルが指定されていません。
Never pull container before running: コンテナーイメージの最新バージョンをプルしないでください。
Description: オプション。
Organization: オプションで、この execution environment を明確に使用するように組織を割り当てます。複数の組織にまたがって execution environment を使用できるようにするには、このフィールドを空白のままにします。
Registry credential: イメージに保護されたコンテナーレジストリーがある場合は、それにアクセスするための認証情報を提供します。
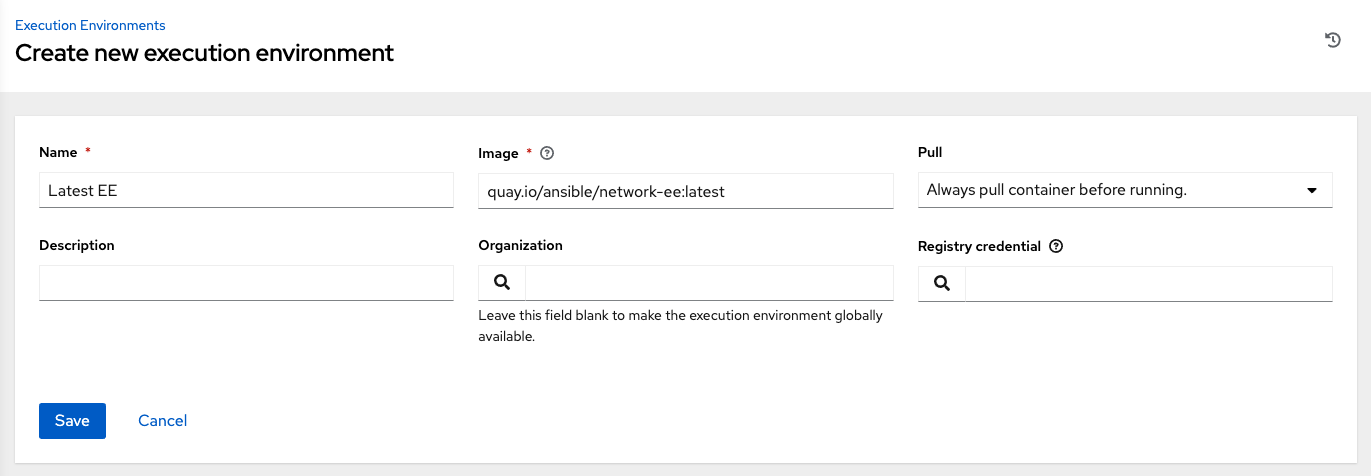
保存 をクリックします。
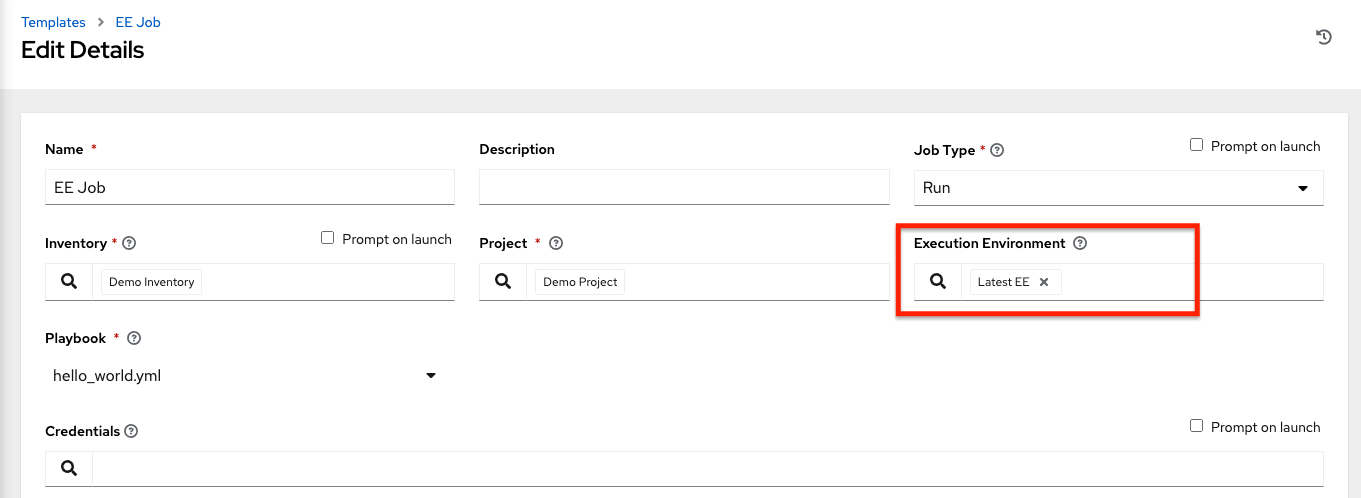
新しく追加された execution environment は、ジョブテンプレートで使用できるようになりました。ジョブテンプレートに execution environment を追加するには、以下の例に示すようにジョブテンプレートの Execution Environment フィールドで指定します。ジョブテンプレートの設定の詳細については、『Automation Controller User Guide』の「ジョブテンプレート」を参照してください。
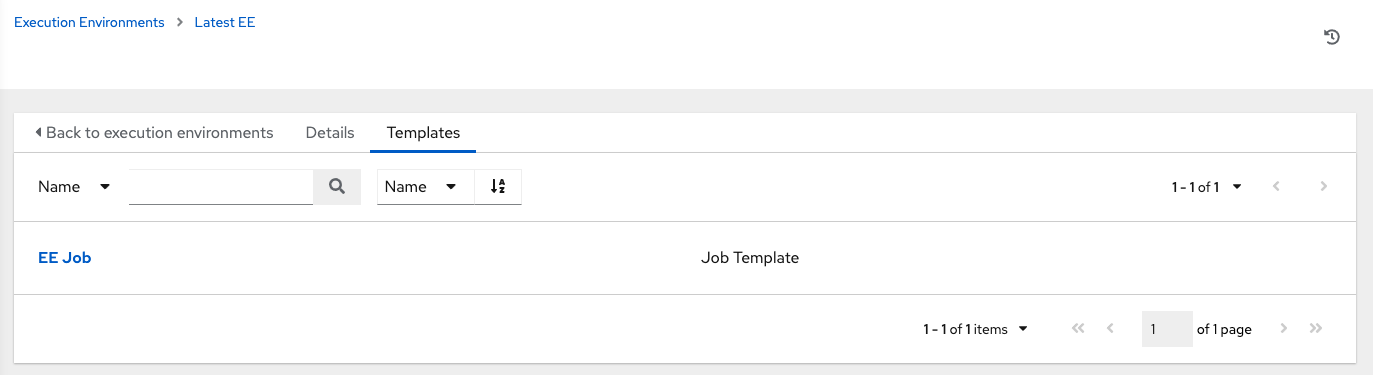
execution environment をジョブテンプレートに追加すると、execution environment の Templates タブにそれらのテンプレートが一覧表示されていることを確認できます。
14.3. Execution Environment mount options
Rebuilding an execution environment is one way to add certs, but inheriting certs from the host provides a more convenient solution. For VM-based installs, the controller automatically mounts the system trust store in the execution environment when jobs run.
Additionally, you may customize execution environment mount options and mount paths in the Paths to expose to isolated jobs field of the Job Settings page, where it supports podman-style volume mount syntax. Refer to the Podman documentation for detail.
In some cases where the /etc/ssh/* files were added to the execution environment image due to customization of an execution environment, an SSH error may occur. For example, exposing the /etc/ssh/ssh_config.d:/etc/ssh/ssh_config.d:O path allows the container to be mounted, but the ownership permissions are not mapped correctly.
If you encounter this error, or have upgraded from an older version of the controller (e.g. 3.8.x), perform the following steps:
Change the container ownership on the mounted volume to
root.In the Paths to expose to isolated jobs field of the Job Settings page, using the current example, expose the path as such:
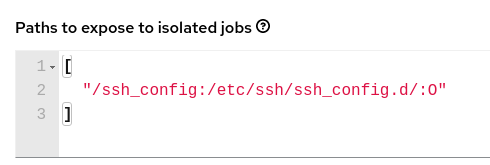
注釈
The :O option is only supported for directories. It is highly recommended that you be as specific as possible, especially when specifying system paths. Mounting /etc or /usr directly have impact that make it difficult to troubleshoot.
This informs podman to run a command similar to the example below, where the configuration is mounted and the ssh command works as expected.
podman run -v /ssh_config:/etc/ssh/ssh_config.d/:O ...