3. Execution Environments へのアップグレード
古いバージョンの automation controller から 4.0 以降にアップグレードする場合、コントローラーは組織、インベントリー、およびジョブテンプレートに関連付けられた以前のバージョンの仮想環境を検出することができ、新規の execution environment モデルに移行する必要があることを知らせます。automation controller の新規インストールは、インストール時に 2 つの virtualenv を作成します。その 1 つはコントローラー自身の実行に使用され、もう 1 つは Ansible の実行に使用されます。従来の仮想環境と同様に、execution environments を使用すると、コントローラーが安定した環境で実行でき、必要に応じて execution environment にモジュールを追加または更新して Playbook を実行することができます。詳細は Automation Controller User Guide の Execution Environments を参照してください。
重要
アップグレード時には、常に使用しているプラットフォームバージョンに対応するベース execution environment の上に再ビルドすることが強く推奨されます。詳細は、「Execution Environment のビルド」を参照してください。
3.1. レガシー virtualenv を execution environments に移行する
新しい execution environment にセットアップを移行することで、以前のカスタムの仮想環境とまったく同じセットアップを execution environment に設定することができます。このセクションの awx-manage コマンドを使用して、以下を実行します。
現在のすべてのカスタムの仮想環境とそのパスの一覧 (
list_custom_venvs)特定のカスタムの仮想環境に依存するリソースの表示 (
custom_venv_associations)特定のカスタムの仮想環境の execution environment (
export_custom_venv) への移行に使用可能な形式へのエクスポート
移行前に、
awx-manage listコマンドを使用して、現在実行しているカスタムの仮想環境をすべて表示することが推奨されます。
$ awx-manage list_custom_venvs
以下は、このコマンドの出力例です。
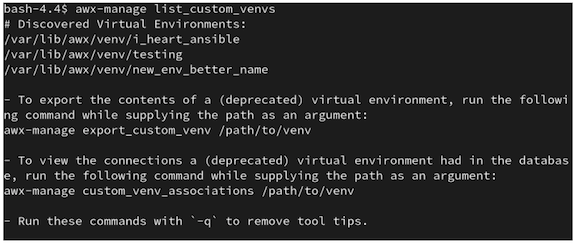
この出力には、3 つのカスタムの仮想環境とそのパスが表示されます。デフォルトの /var/lib/awx/venv/ ディレクトリーパス内にないカスタムの仮想環境がある場合は、ここには含まれません。
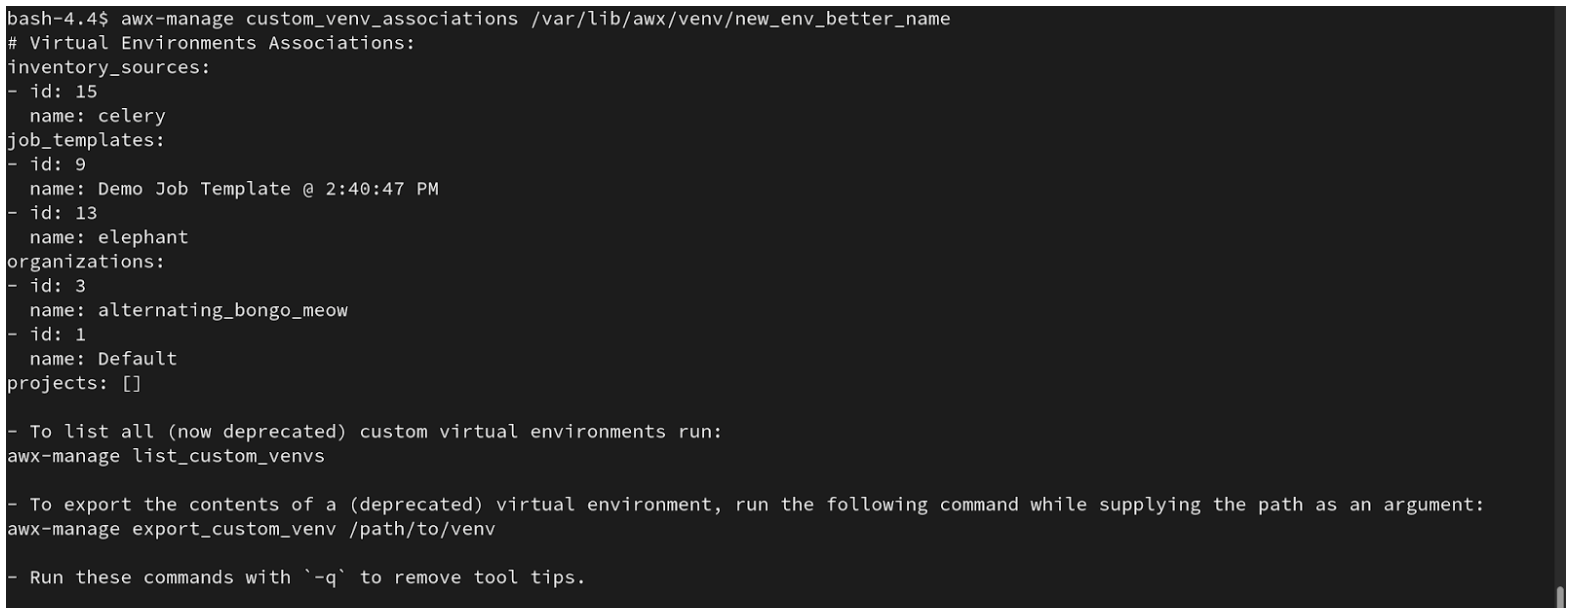
_associationsコマンドを使用して、カスタムの仮想環境が関連付けられている組織、ジョブ、およびインベントリーソースを表示し、それらに依存しているリソースを判別します。
$ awx-manage custom_venv_associations /this/is/the/path/
以下は、このコマンドの出力例です。
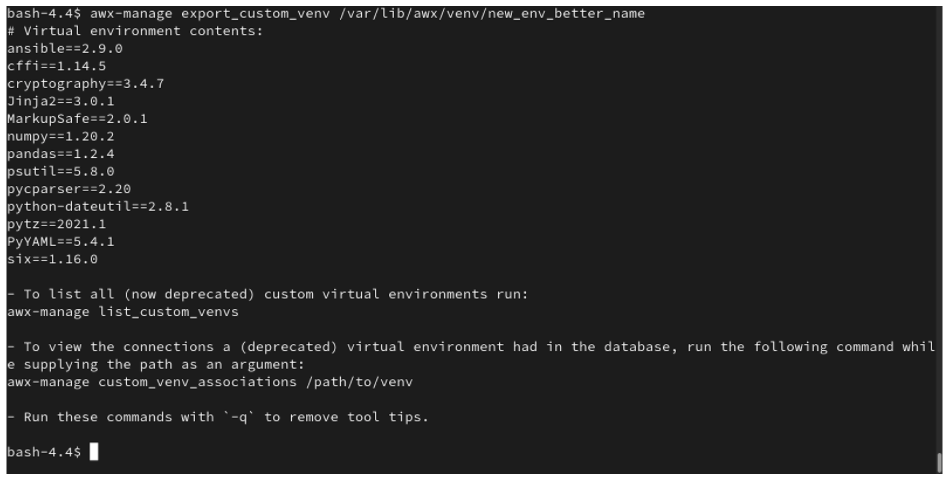
移行する仮想環境のパスを選択し、
awx-manage exportコマンドで指定します。
$ awx-manage export_custom_venv /this/is/the/path/
その結果の出力は基本的に pip freeze コマンドの実行の結果になります。以下の例は、選択したカスタム仮想環境のコンテンツを示しています。
注釈
これらのコマンドはすべて、-q オプションで実行可能です。このオプションは、各出力で提供される説明コンテンツを削除します。
この pip freeze データからの出力が得られたので、ansible-builder を使用して新しい execution environment を起動するために使用できる定義ファイルに貼り付けることができます。誰でも (通常ユーザーと管理者の両方) ansible-builder を使用して execution environment を作成できます。詳細は Automation Controller User Guide の Execution Environment のビルド を参照してください。
3.2. 分離インスタンスの実行ノードへの移行
分離インスタンスグループから実行ノードに移動すると、インバウンドまたはアウトバウンド接続が有効になります。一方、バージョン 3.8 以前では、コントローラーノードから分離ノードへのアウトバウンド接続のみが許可されていました。
4.1 の automation controller メッシュアーキテクチャーで適切に機能するためにレガシーの分離インスタンスグループを実行ノードに移行するのは、基本的に古いファイルに基づいてインベントリーファイルを作成するインストーラーのプリフライト機能です。.ini と .yml ファイル形式の両方が受け入れ可能ですが、生成されるファイルの出力は現時点で .ini ファイルのみになります。
プリフライトチェックは Ansible を活用し、Ansible は子の概念をフラット化します。これは、個々のインベントリーファイルをすべて正確に複製できるわけではありませんが、それに非常に近いことを意味します。機能的には Ansible と同じですが、異なって見える場合もあります。自動プリフライト処理は、ヒューリスティックをもとにベストエフォートで子関係を作成しますが、ツールには人間のユーザーが持つニュアンスや判断がないことに注意してください。したがって、ファイルを作成しても、そのまま**使用しないでください**。ファイルを確認し、これをテンプレートとして使用して、ユーザーと Ansible Engine の両方に対して適切に機能することを確認します。
プリフライトチェック前後の例を、以下に示します。Ansible がインベントリーファイルをフラット化する方法と、インストーラーが新しいインベントリーファイルを再構築する方法が示されています。Ansible にとって、これらのファイルはどちらも基本的に同じです。
(Ansible ドキュメントからの)古いスタイル |
(インストーラーで生成される)新しいスタイル |
|---|---|
[tower]
localhost ansible_connection=local
[database]
[all:vars]
admin_password='******'
pg_host=''
pg_port=''
pg_database='awx'
pg_username='awx'
pg_password='******'
rabbitmq_port=5672
rabbitmq_vhost=tower
rabbitmq_username=tower
rabbitmq_password='******'
rabbitmq_cookie=cookiemonster
# Needs to be true for fqdns and ip addresses
rabbitmq_use_long_name=false

[isolated_group_restrictedzone]
isolated-node.c.towertest-188910.internal

[isolated_group_restrictedzone:vars]
controller=tower
|
[all:vars]
admin_password='******'
pg_host=''
pg_port=''
pg_database='awx'
pg_username='awx'
pg_password='******'
rabbitmq_port=5672
rabbitmq_vhost='tower'
rabbitmq_username='tower'
rabbitmq_password='******'
rabbitmq_cookie='cookiemonster'
rabbitmq_use_long_name='false'
# In AAP 2.X [tower] has been renamed to [automationcontroller]
# Nodes in [automationcontroller] will be hybrid by default, capable of executing user jobs.
# To specify that any of these nodes should be control-only instead, give them a host var of `node_type=control`
[automationcontroller]
localhost
[automationcontroller:vars]
# in AAP 2.X the controller variable has been replaced with `peers`
# which allows finer grained control over node communication.
# `peers` can be set on individual hosts, to a combination of multiple groups and hosts.
peers='instance_group_restrictedzone'
ansible_connection='local'
# in AAP 2.X isolated groups are no longer a special type, and should be renamed to be instance groups
[instance_group_restrictedzone]
isolated-node.c.towertest-188910.internal
[instance_group_restrictedzone:vars]
# in AAP 2.X Isolated Nodes are converted into Execution Nodes using node_state=iso_migrate
node_state='iso_migrate'
# In AAP 2.X Execution Nodes have replaced isolated nodes. All of these nodes will be by default
# `node_type=execution`. You can specify new nodes that cannot execute jobs and are intermediaries
# between your control and execution nodes by adding them to [execution_nodes] and setting a host var
# `node_type=hop` on them.
[execution_nodes]
[execution_nodes:children]
instance_group_restrictedzone
|
3.3. メッシュトポロジーの表示
mesh トポロジーを設定している場合、インストーラーは生成されたグラフレンダリングツールを使用してメッシュ設定をグラフィカルに検証できます。グラフは、インベントリーファイルの内容を読み取ることで生成されます。詳細については、`Red Hat Ansible Automation Platform automation mesh guide <https://access.redhat.com/documentation/en-us/red_hat_ansible_automation_platform/2.1/html/red_hat_ansible_automation_platform_automation_mesh_guide/index>`を参照してください。
すべてのインベントリーファイルには、少なくとも 1 つのコントロール node によって制御される、何らかの実行能力が必要です。つまり、コントロールのみのノード、実行のみのノード、またはホップのみのノードだけが含まれるインベントリーファイルを生成することは受け入れられません。コントロールノードと実行ノードの間には密接な関係があり、いつでも考慮する必要があります。インベントリーファイルが適切に定義されていない場合、インストーラーは失敗します。このルールに対する唯一の例外は単一のハイブリッドノードで、ここではコントロールと実行に関する制約が満たされます。
実行ノードでジョブを実行するには、インストーラーがノードを事前登録するか、ユーザーが PATCH 要求を /api/v2/instances/N/ に提出して、enabled フィールドを true に変更する必要があります。
If you have already deployed a mesh topology and want to view node type, node health, and specific details about each node, see Topology Viewer in the Automation Controller Administration Guide.