24. ジョブ
job は、Ansible Playbook をホストのインベントリーに対して起動する automation controller のインスタンスです。
The Jobs link displays a list of jobs and their statuses--shown as completed successfully or failed, or as an active (running) job. The default view is collapsed (Compact) with the job name, status, job type, and start/finish times, but you can expand to see more information. You can sort this list by various criteria, and perform a search to filter the jobs of interest.
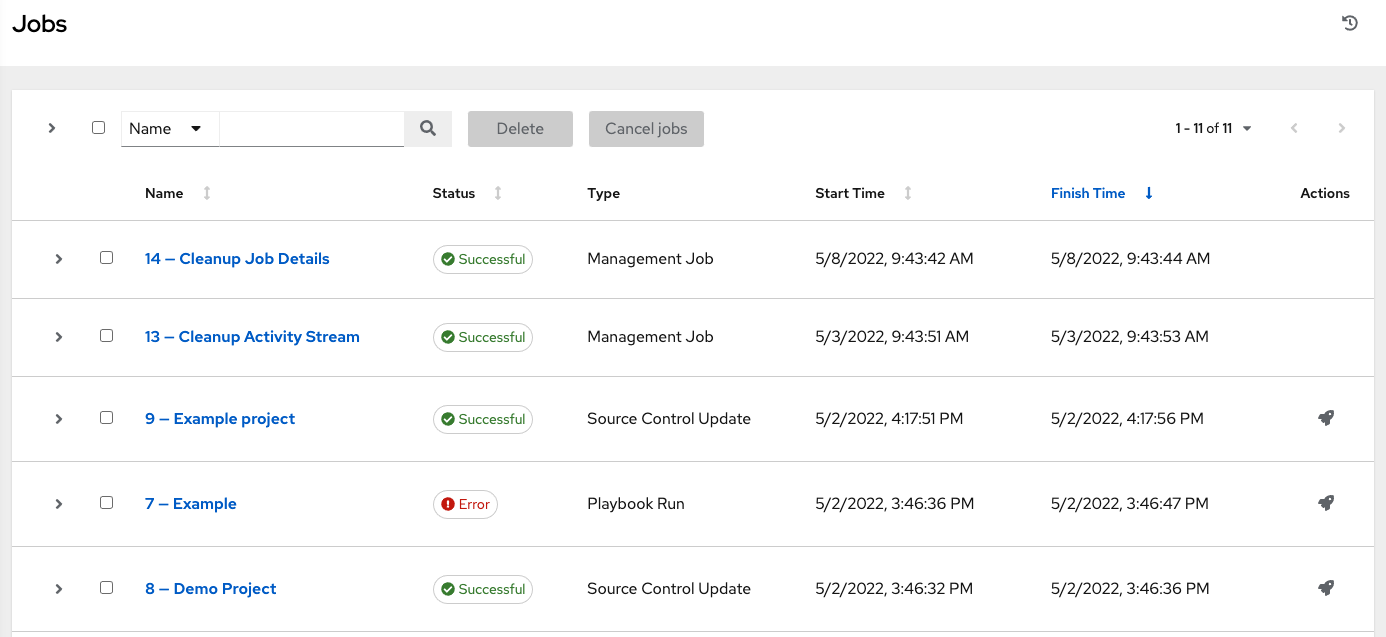
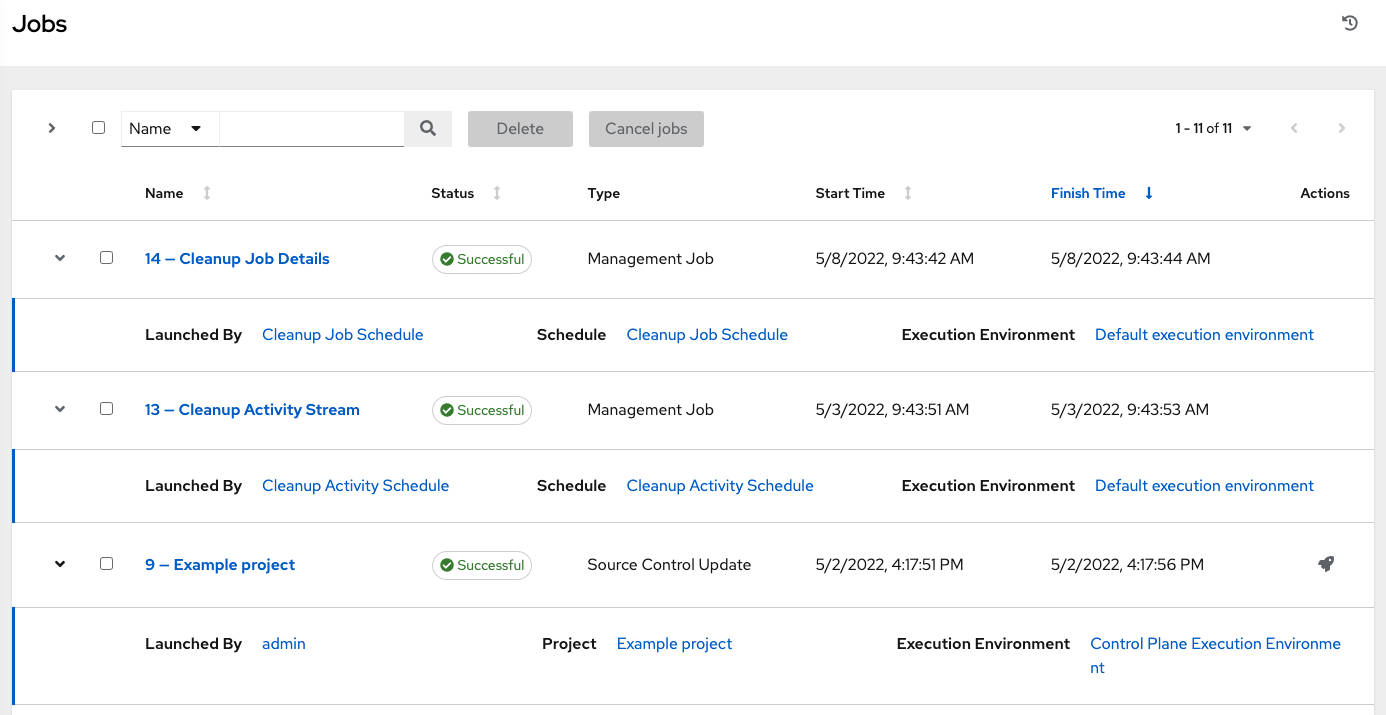
Actions you can take from this screen include viewing the details and standard output of a particular job, relaunching ( ) jobs, or removing selected jobs. The relaunch operation only applies to relaunches of playbook runs and does not apply to project/inventory updates, system jobs, workflow jobs, etc.
When a job relaunches, you are directed the Jobs Output screen as the job runs. Clicking on any type of job also takes you to the Job Output View for that job, where you can filter jobs by various criteria:
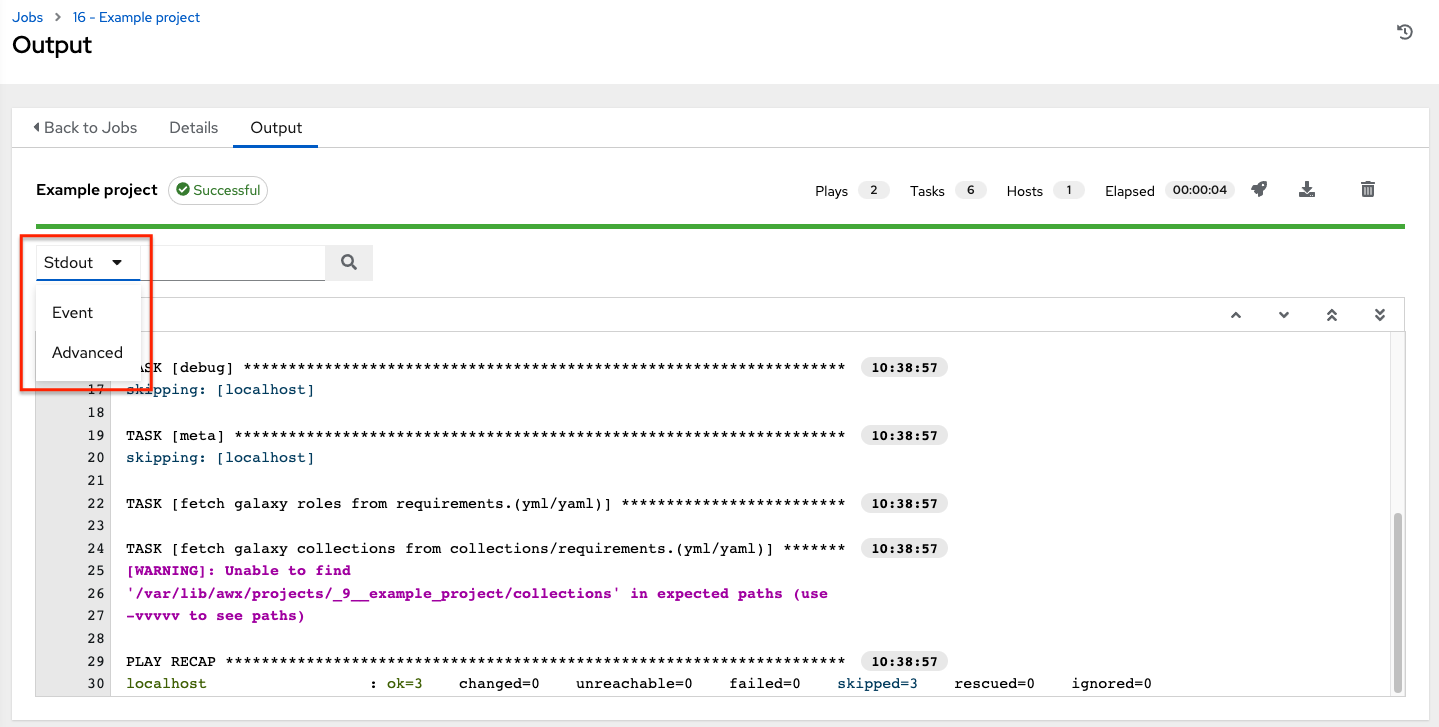
The Stdout option is the default display that shows the job processes and output
The Event option allows you to filter by the event(s) of interest, such as errors, host failures, host retries, items skipped, etc. You can include as many events in the filter as necessary.

The Advanced option is a refined search that allows you a combination of including or excluding criteria, searching by key, or by lookup type. For details about using Search, refer to the 検索 chapter.
24.1. Inventory Sync Jobs
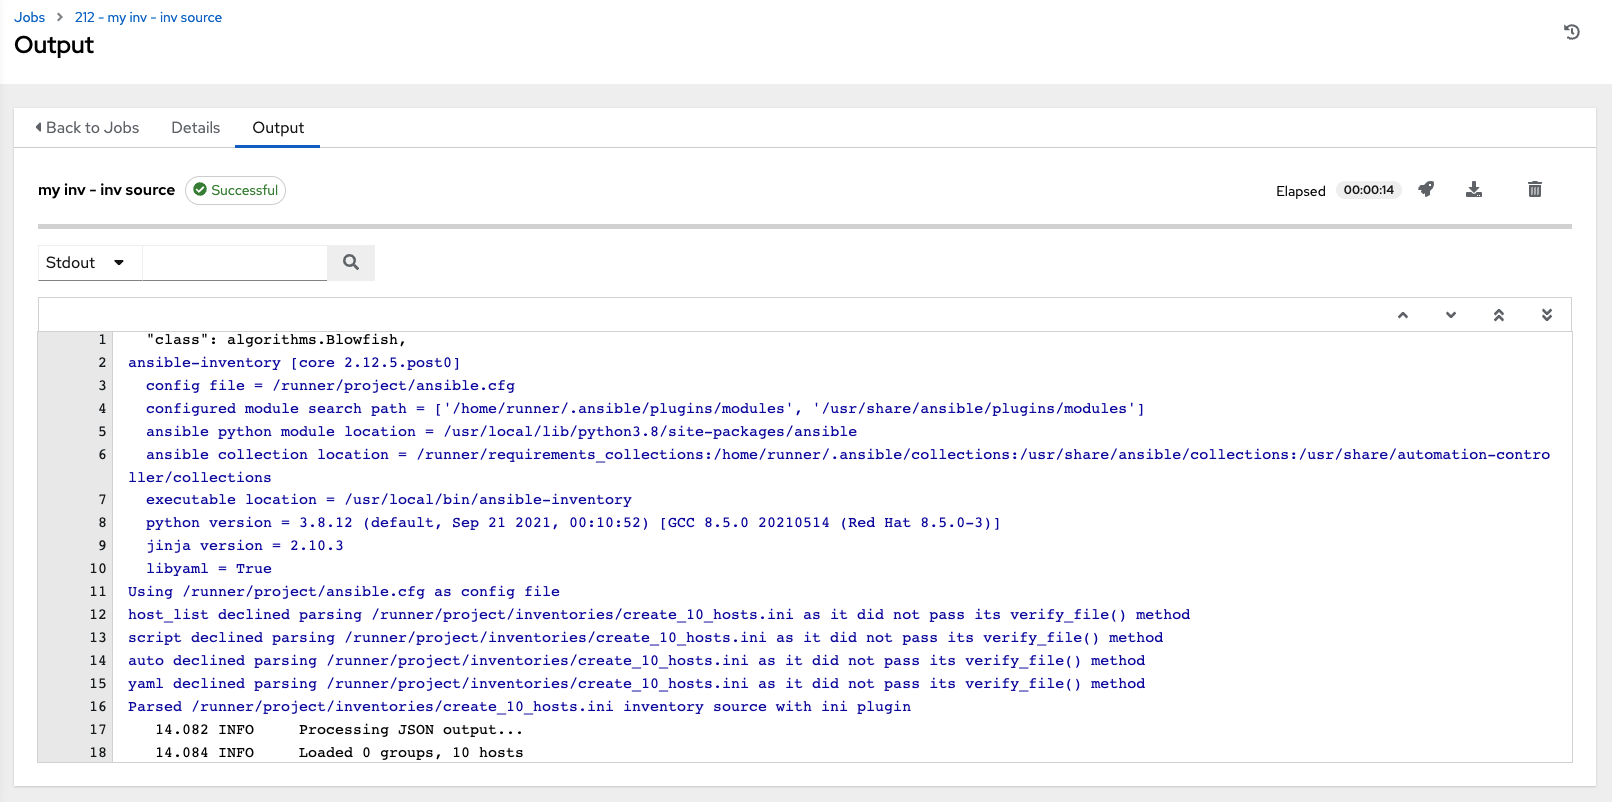
When an inventory sync is executed, the full results automatically display in the Output tab. This shows the same information you would see if you ran it through the Ansible command line, and can be useful for debugging. The ANSIBLE_DISPLAY_ARGS_TO_STDOUT is set to False by default for all playbook runs. This matches Ansible's default behavior. This does not display task arguments in task headers in the Job Detail interface to avoid leaking certain sensitive module parameters to stdout. If you wish to restore the prior behavior (despite the security implications), you can set ANSIBLE_DISPLAY_ARGS_TO_STDOUT to True via the AWX_TASK_ENV configuration setting. For more details, refer to the ANSIBLE_DISPLAY_ARGS_TO_STDOUT.
The icons at the top right corner of the Output tab allow you to relaunch (), download ( ) the job output, or delete (
 ) the job.
注釈
An inventory update can be performed while a related job is running. In cases where you have a big project (around 10 GB), disk space on /tmp may be an issue.
24.1.1. Inventory sync details
Access the Details tab to provide details about the job execution.
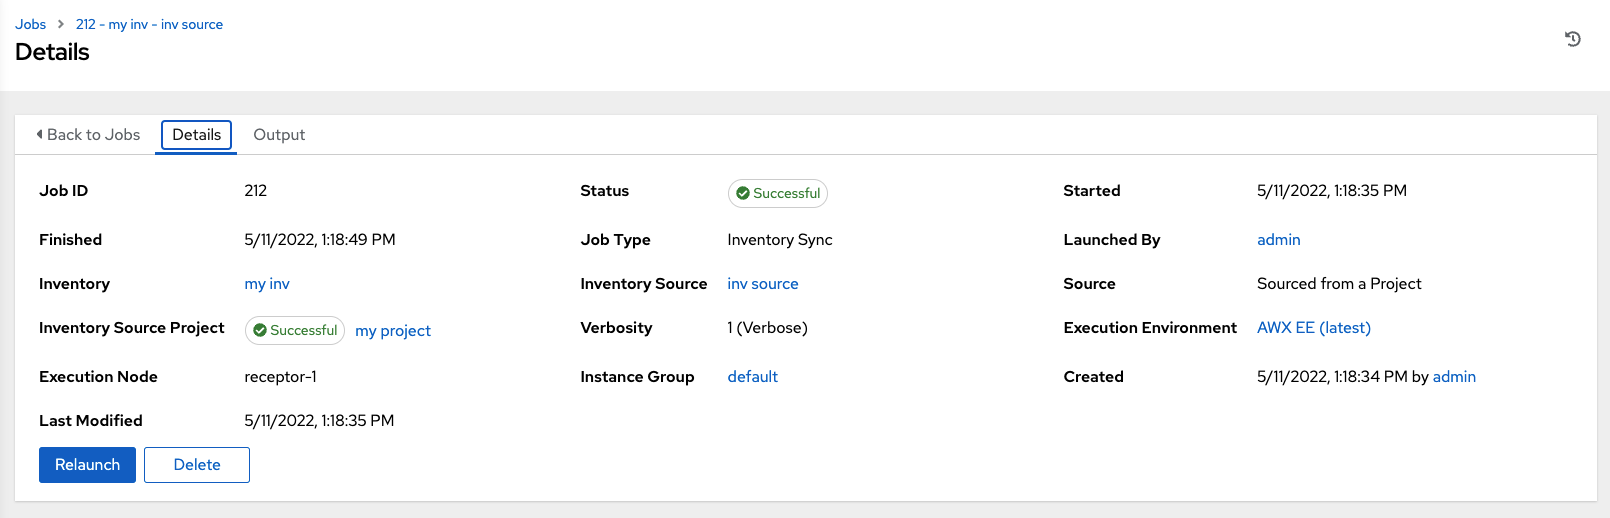
Notable details of the job executed are:
ステータス: 以下のいずれかになります。
保留中: インベントリーの同期は作成されていますが、まだキューに入れられていないか、または開始されていません。すべてのジョブ (インベントリーソースの同期に限らない) はシステムで実際に実行可能になるまで保留中の状態になります。インベントリーソースの同期が準備できる状態でない理由として、依存関係が現在実行中であるか (次の手順に進む前にすべての依存関係の実行が完了していなければならない)、または設定先で実行する容量が足りないなどが挙げられます。
待機中: インベントリーの同期はキューに入れられており、実行を待機中です。
実行中: インベントリーの同期が進行中です。
成功: インベントリー同期ジョブが成功しました。
失敗: インベントリーの同期ジョブが失敗しました。
インベントリー: 関連付けられたインベントリーグループの名前。
ソース: クラウドインベントリーのタイプ。
Inventory Source Project: The project used as the source of this inventory sync job.
Execution Environment: The execution environment used.
実行ノード: ジョブの実行に使用されるノード。
インスタンスグループ: このジョブで使用されるインスタンスグループの名前 (コントローラーはデフォルトのインスタンスグループ)。
これらの項目をクリックすると、適切な場合には該当するジョブテンプレート、プロジェクト、およびその他のオブジェクトが表示されます。
24.2. SCM Inventory Jobs
When an inventory sourced from an SCM is executed, the full results automatically display in the Output tab. This shows the same information you would see if you ran it through the Ansible command line, and can be useful for debugging. The icons at the top right corner of the Output tab allow you to relaunch (), download () the job output, or delete () the job.
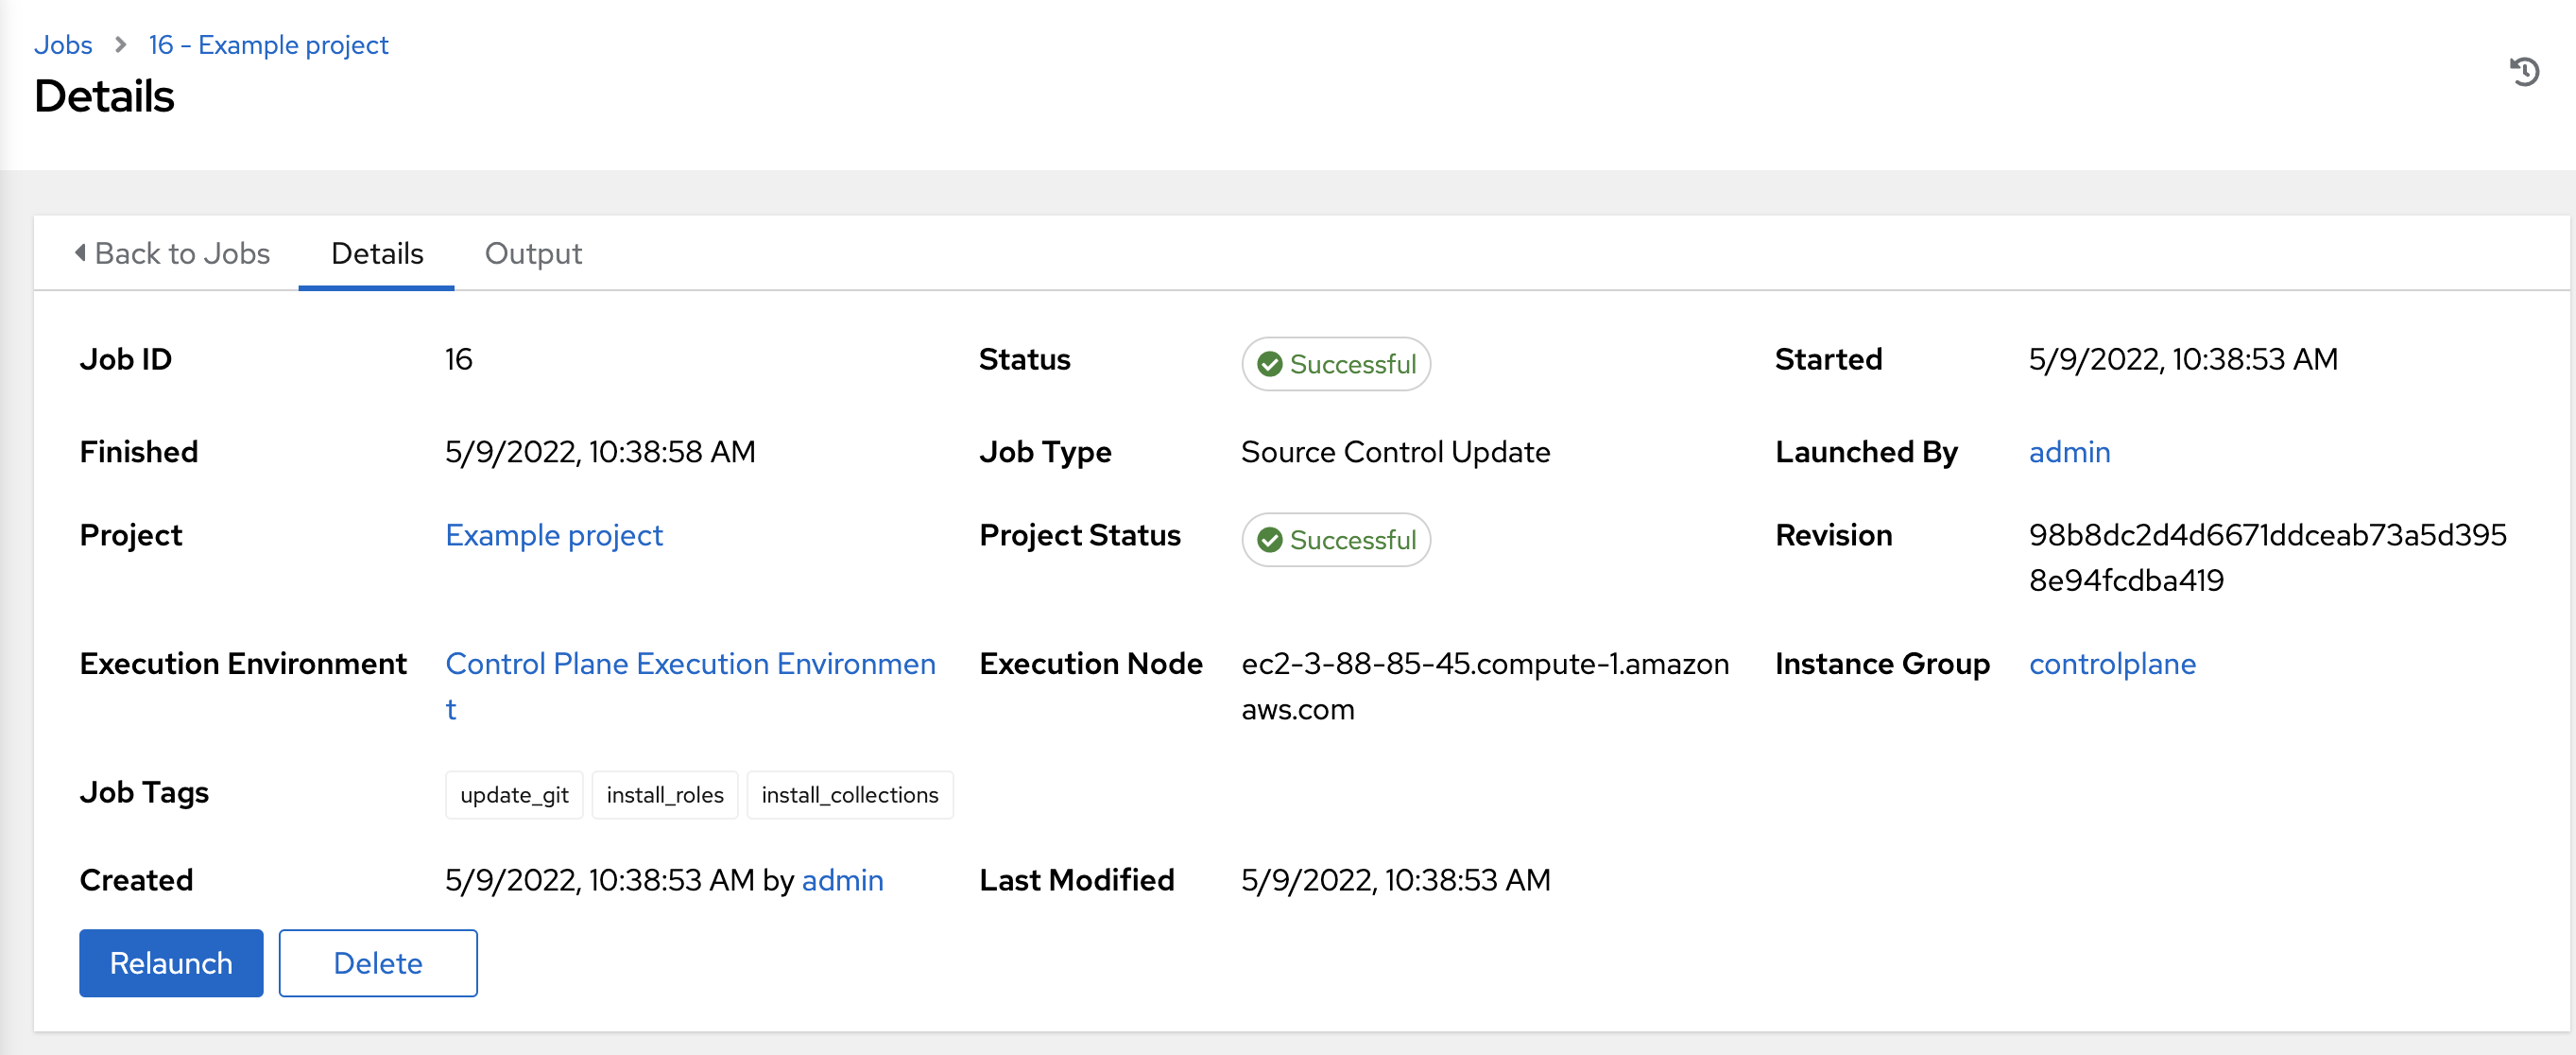
24.2.1. SCM inventory details
Access the Details tab to provide details about the job execution and its associated project.
Notable details of the job executed are:
ステータス: 以下のいずれかになります。
保留中: SCM ジョブは作成されていますが、まだキューに入れられていないか、または開始されていません。すべてのジョブ (SCM ジョブに限らない) はシステムで実際に実行可能になるまで保留中の状態になります。SCM ジョブが準備できる状態でない理由として、依存関係が現在実行中であるか (次の手順に進む前にすべての依存関係の実行が完了していなければならない)、または設定先で実行する容量が足りないなどが挙げられます。
待機中: SCM ジョブはキューに入れられており、実行を待機中です。
実行中: SCM ジョブが進行中です。
成功: 直前の SCM ジョブが成功しました。
失敗: 直前の SCM ジョブが失敗しました。
Job Type: SCM jobs display Source Control Update.
プロジェクト: プロジェクトの名前。
Project Status: Indicates whether the associated project was successfully updated.
Revision: Indicates the revision number of the sourced project that was used in this job.
Execution Environment: Specifies the execution environment used to run this job.
Execution Node: Indicates the node on which the job ran.
Instance Group: Indicates the instance group on which the job ran, if specified.
Job Tags: Tags show the various job operations executed.
これらの項目をクリックすると、適切な場合には該当するジョブテンプレート、プロジェクト、およびその他のオブジェクトが表示されます。
24.3. Playbook Run Jobs
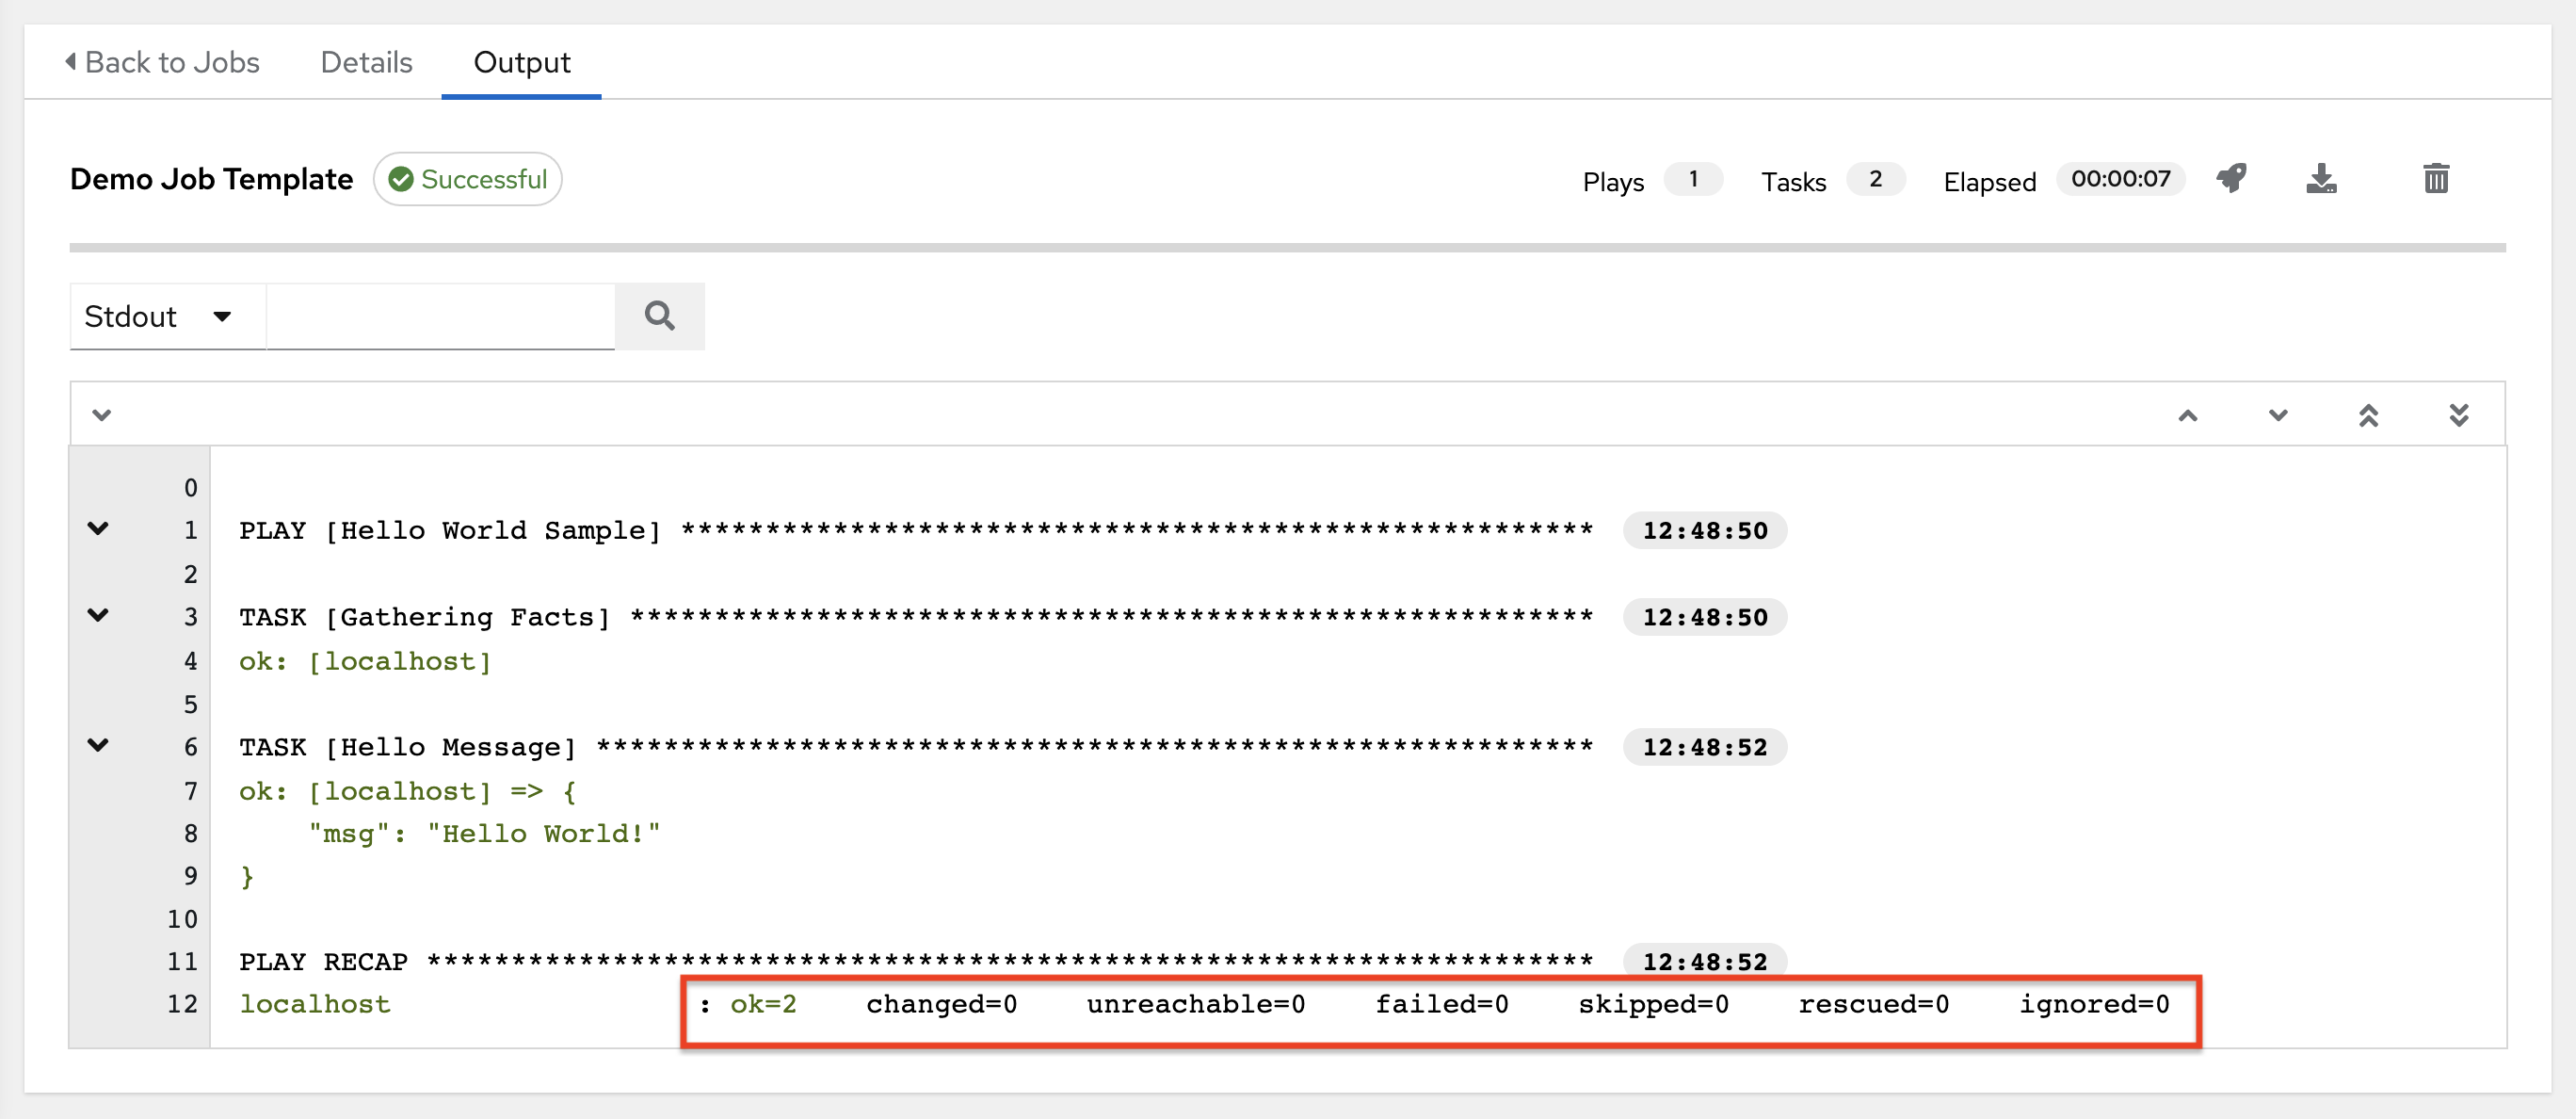
When a playbook is executed, the full results automatically display in the Output tab. This shows the same information you would see if you ran it through the Ansible command line, and can be useful for debugging.
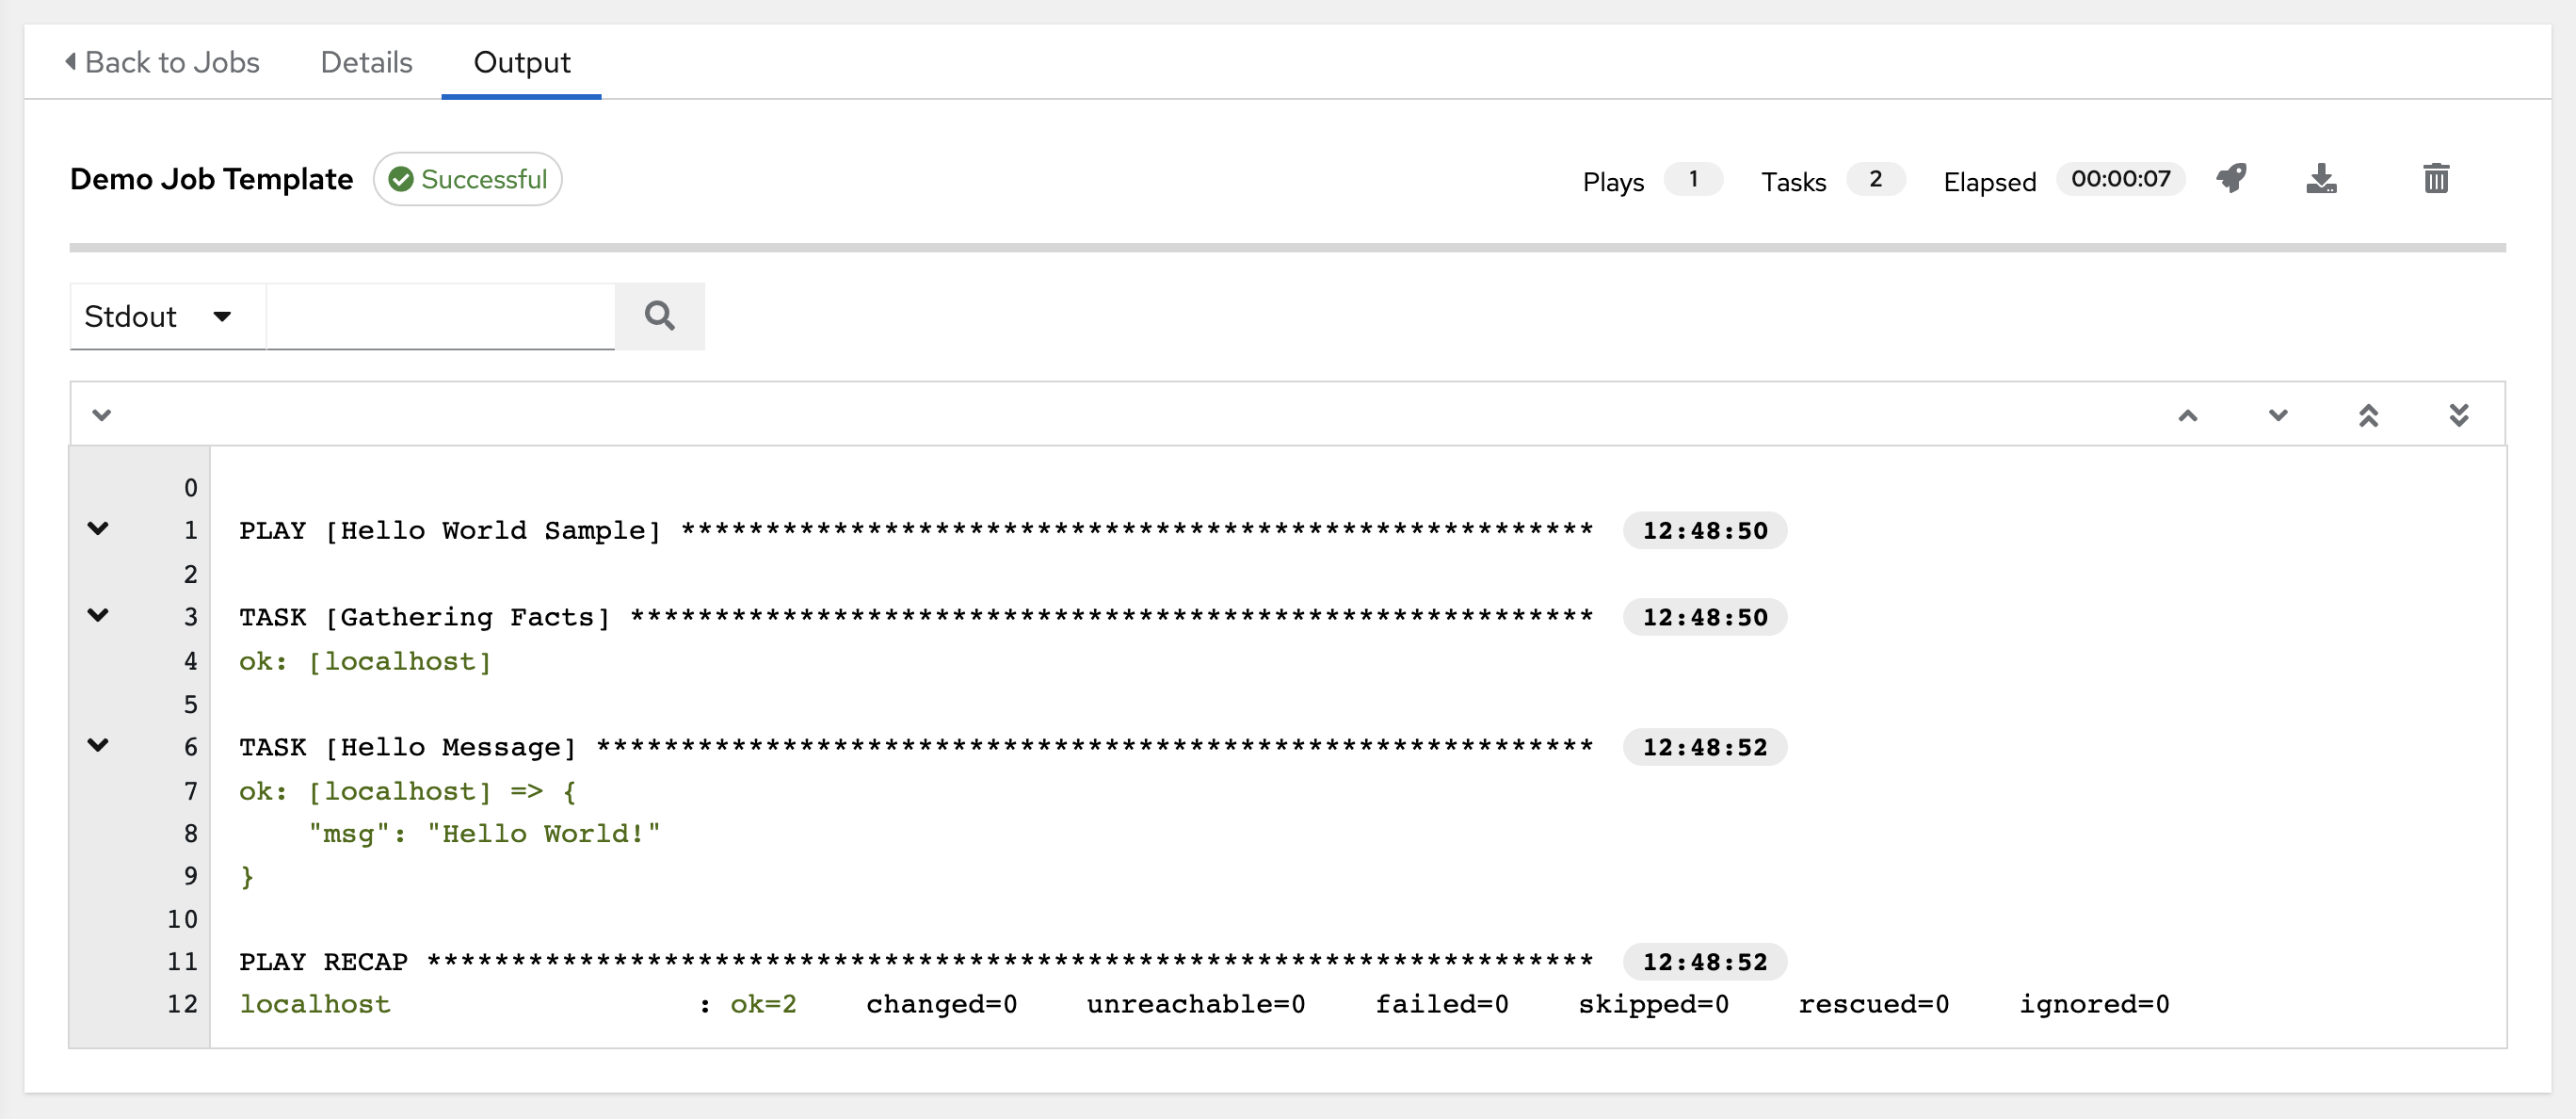
イベントの概要では、この Playbook の一部として実行されたイベントの集計が表示されます。
the number of times this playbook has ran in the Plays field
the number of tasks associated with this playbook in the Tasks field
the number of hosts associated with this playbook in the Hosts field
the amount of time it took to complete the playbook run in the Elapsed field

The icons next to the events summary allow you to relaunch (), download () the job output, or delete () the job.
The host status bar runs across the top of the Output view. Hover over a section of the host status bar and the number of hosts associated with that particular status displays.

The output for a Playbook job is also accessible after launching a job from the Jobs tab of its Job Templates page.
Clicking on the various line item tasks in the output, you can view its host details.
24.3.1. 検索
検索を使用して、特定のイベント、ホスト名、およびそれらのステータスを検索します。特定のステータスのホストにのみフィルターを設定するには、以下の有効なステータスのいずれかを指定します。
OK: Playbook タスクは「Ok」を返しました。
変更済み: 実際に実行された Playbook タスク。Ansible タスクはべき等になるように作成される必要があるため、タスクはホストに何も実行せずに正常に終了させることができます。これらの場合に、タスクは Ok を返しますが、Changed (変更済み) は返しません。
失敗: 失敗したタスク。このホストについての追加の Playbook の実行は停止しました。
Unreachable (到達不可): ホストはネットワークからアクセスできないか、またはこれに関連した別の致命的なエラーが発生しました。
Skipped (スキップ): ホストがターゲットの状態に到達するために変更が不要だったので、Playbook のタスクが省略されました。
Rescued: Ansible 2.8 で導入されたこのオプションは、失敗したタスクを表示してから、レスキューセクションを実行します。
Ignored: Ansible 2.8 で導入されたこのオプションは失敗したタスクを表示してから、
ignore_errors: yesを設定します。
These statuses also display at bottom of each Stdout pane, in a group of "stats" called the Host Summary fields.
The example below shows a search with only unreachable hosts.

検索の使用についての詳細は、「検索」の章を参照してください。
標準出力ビューには、特定のジョブで発生するイベントすべてが表示されます。デフォルトでは、すべての行で全詳細が表示されるように展開されています。すべて折り畳む (![]() ) を使用して、プレイおよびタスクのヘッダーのみを含むビューに切り替えます。標準出力のすべての行を表示するには、(
) を使用して、プレイおよびタスクのヘッダーのみを含むビューに切り替えます。標準出力のすべての行を表示するには、(![]() ) ボタンをクリックします。
) ボタンをクリックします。
または、それぞれのプレイやタスクの横にある矢印アイコンをクリックすると、その詳細をすべて表示することができます。矢印をクリックして横向きから下向きに切り替えると、プレイまたはタスクに関連付けられている行が拡大されます。矢印をもう一度クリックして横向きの位置に戻すと、折りたたみ表示になり、行が非表示になります。
拡張/縮小モードで詳細を表示する際の留意点:
縮小表示されない行で、対応する行番号と開始時間を含む、表示されたそれぞれの行。
プレイまたはタスクの完了後のプレイまたはタスクの開始時の拡張/縮小アイコン。
特定のプレイまたはタスクのクエリーを実行する場合、それは完了したプロセスの最後に縮小表示されます。
エラーメッセージは、出力が大きすぎて表示できないことを示すエラーメッセージが表示される場合があります。これは、4000 を超えるイベントがある場合に生じます。エラーをバイパスするために、特定イベントについての検索およびフィルターを使用します。
標準出力 ペインからイベントの行をクリックすると、ホストイベント ダイアログが別のウィンドウに表示されます。このウィンドウでは、特定のイベントの影響を受けるホストが表示されます。
注釈
Ansible Automation Platform の最新バージョンにアップグレードするには、すべての過去の Playbook の出力とイベントを段階的に移行する必要があります。この移行プロセスは段階的に行われ、インストールが完了するとバックグラウンドで自動的に実行されます。過去のジョブ出力が非常に大量にある (数十 GB、または数百 GB の出力) と、移行が完了するまでジョブの出力が欠落する可能性があります。最新のデータは出力上部に表示され、その後に古いイベントが表示されます。大規模ジョブを移行する場合は、ジョブが小規模の場合に比べて時間がかかる場合があります。
24.3.2. Host Details
The Host Details dialog shows information about the host affected by the selected event and its associated play and task:
ホスト
ステータス
the type of run in the Play field
the type of Task
適用可能な場合、タスクの Ansible モジュール、およびモジュールのすべての 引数
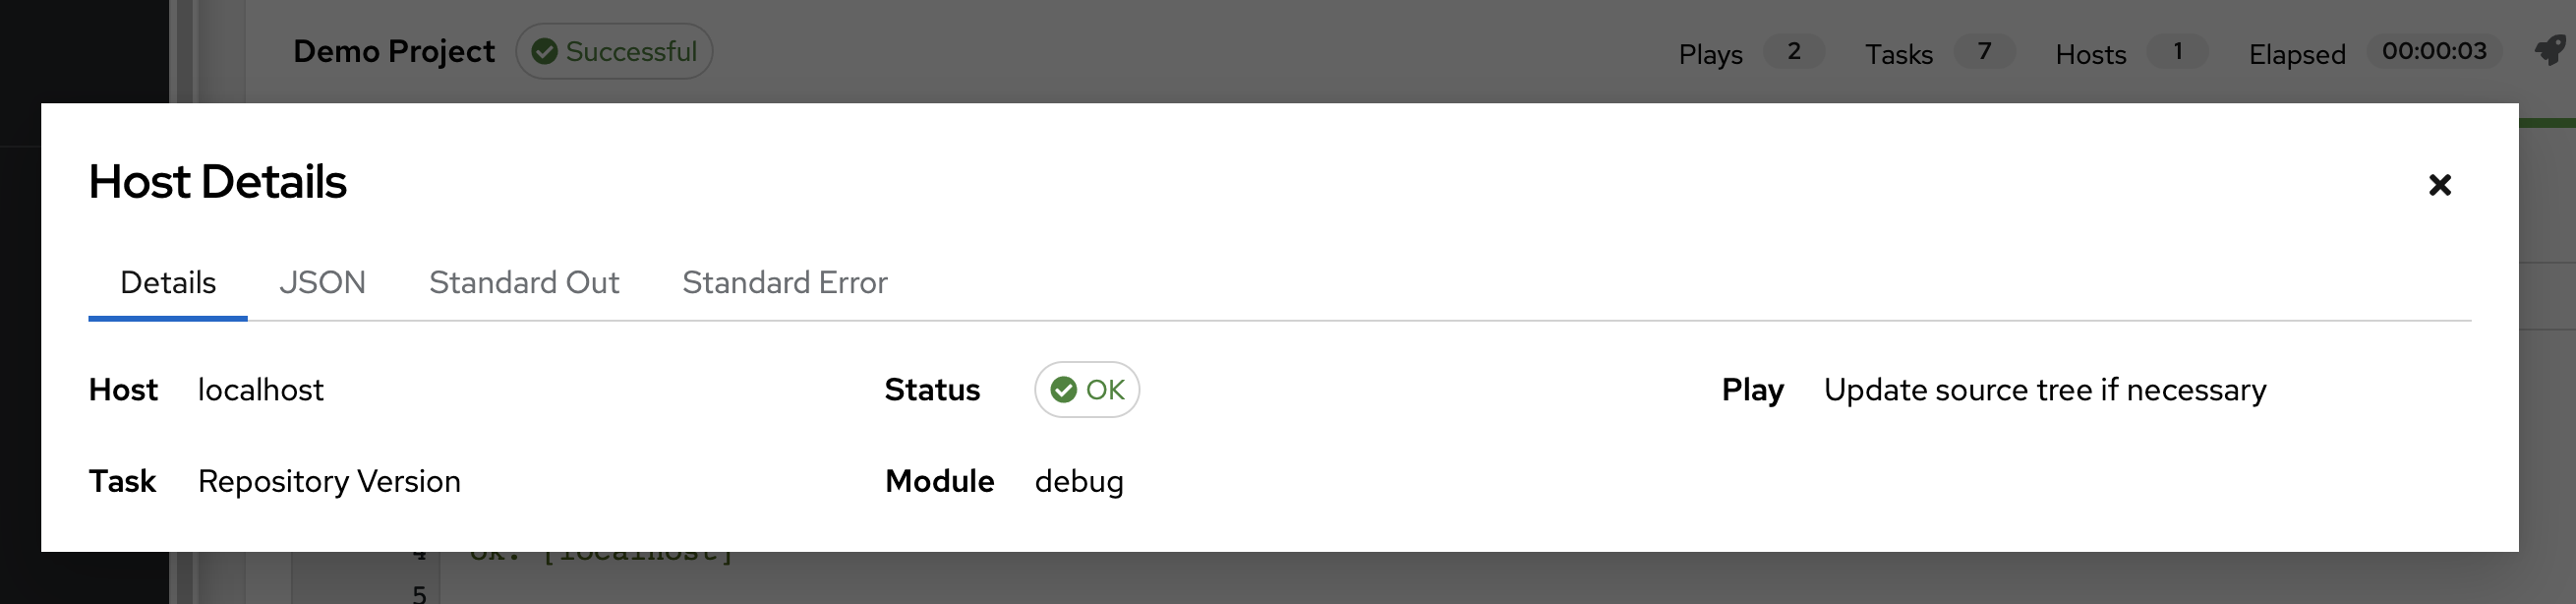
To view the results in JSON format, click on the JSON tab. To view the output of the task, click the Standard Out. To view errors from the output, click Standard Error.
24.3.3. Playbook run details
Access the Details tab to provide details about the job execution.
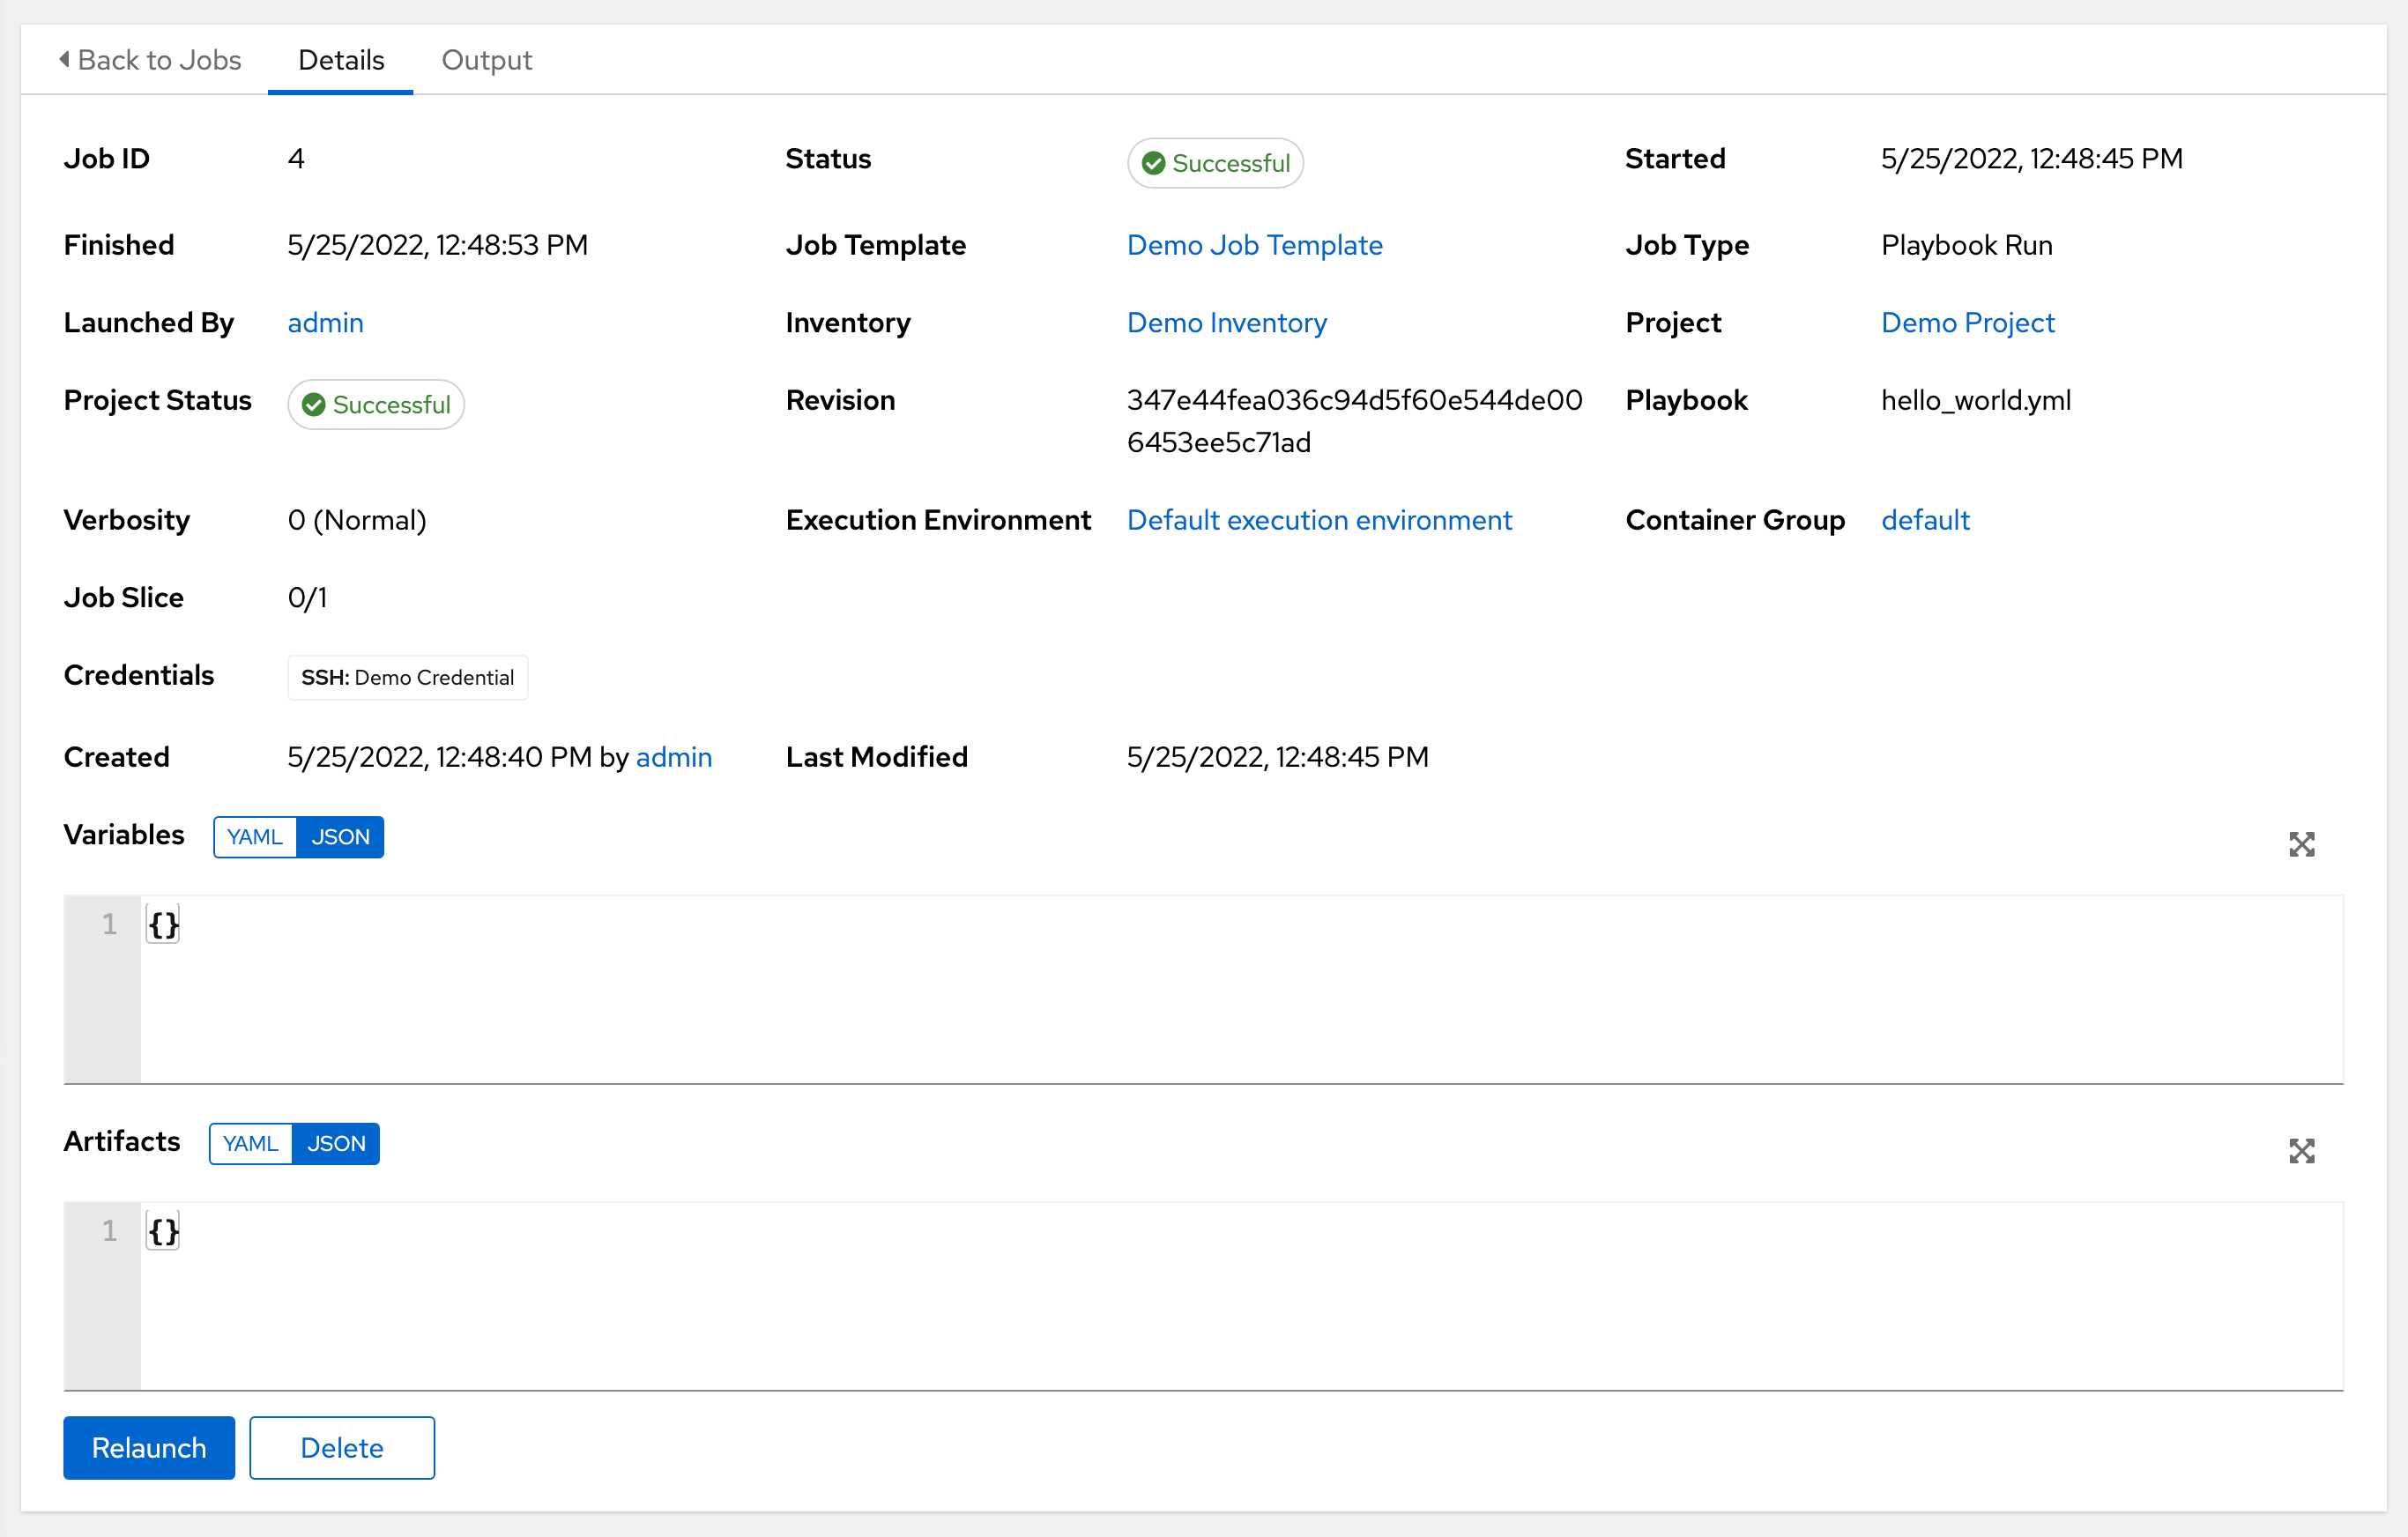
Notable details of the job executed are:
ステータス: 以下のいずれかになります。
Pending - The playbook run has been created, but not queued or started yet. Any job, not just playbook runs, will stay in pending until it is actually ready to be run by the system. Reasons for playbook runs not being ready include dependencies that are currently running (all dependencies must be completed before the next step can execute), or there is not enough capacity to run in the locations it is configured to.
待機中: Playbook 実行はキューに入れられており、実行を待機中です。
実行中: Playbook 実行が進行中です。
成功: 直前の Playbook 実行が成功しました。
失敗: 直前の Playbook 実行が失敗しました。
Job Template: The name of the job template from which this job was launched.
インベントリー: このジョブを実行するために選択されたインベントリー。
Project: The name of the project associated with the launched job.
Project Status: The status of the project associated with the launched job.
Playbook: The playbook used to launch this job.
Execution Environment: The name of the execution environment used in this job.
Container Group: The name of the container group used in this job.
Credentials: The credential(s) used in this job.
追加変数: ジョブテンプレートの作成時に渡される追加変数がここに表示されます。
これらの項目をクリックすると、適切な場合には該当するジョブテンプレート、プロジェクト、およびその他のオブジェクトが表示されます。
24.4. Automation controller Capacity Determination and Job Impact
このセクションでは、インスタンスグループの容量とそのジョブへの影響を判断する方法を説明します。コンテナーグループについては、Automation Controller Administration Guide の コンテナーの容量制限 を参照してください。
automation controller 容量システムは、インスタンスで利用可能なリソース量や、実行中のジョブのサイズ (影響 と呼ぶ) をもとに、インスタンスでいくつのジョブを実行可能か判断します。これを判断するのに使用するアルゴリズムは、2 つのアイテムだけをベースとします。
システムで利用可能なメモリー容量 (
mem_capacity)システムで利用可能な CPU 数 (
cpu_capacity)
容量は、インスタンスグループにも影響があります。グループはインスタンスで構成されるので、インスタンスを複数のグループに割り当てることができます。つまり、インスタンス 1 台への影響が、他のグループ全体の容量に影響を与える可能性があります。
インスタンスグループ (インスタンス自体ではなく) は、さまざまなレベルのジョブで使用するために割り当てることができます (Clustering 参照)。タスクマネージャーはグラフを作成し、ジョブの実行先のグループや、起動の準備ができていないジョブに対してインスタンスグループの容量をコミットするかどうかを判断します。
最終的に、小規模な構成で、ジョブ実行に利用可能なインスタンスが 1 台しかない場合には、タスクマネージャーは、インスタンスが容量を超えていても、インスタンスでジョブが実行できるようにします。こうすることで、プロビジョニングが十分でないシステムでも、ジョブが停止しないようになります。
このように、容量および影響は、ジョブやインスタンス/インスタンスグループに対してゼロサムシステムではありません。
スライスされたジョブおよび容量への影響に関する情報は、「ジョブスライスの実行動作」を参照してください。
24.4.1. 容量アルゴリズムに向けたリソースの判断
容量アルゴリズムは、システムで同時に実行可能なフォーク数を判断するために定義します。これにより、Ansible 自体が同時に通信するシステム数を制御します。通常、automation controller システムが実行するフォーク数が増えると、並行して作業が実行され、ジョブの実行速度がをより早くなります。代わりに、システムの負荷が増加し、全体的な作業速度が遅くなってしまう可能性があります。
Automation controller は、容量の判断時に、2 つのモードで稼働します。mem_capacity (デフォルト) では、システムでメモリーがなくならないようにする一方で、CPU をオーバーコミットできます。作業の多くが CPU に依存していない場合には、このモードを選択して、フォーク数を最大化します。
24.4.1.1. メモリー対容量
mem_capacity は、フォークごとに必要なメモリー容量に対して、計算されます。内部コンポーネントのオーバーヘッドを考慮すると、これは、フォークごとに約 100 MB になります。Ansible ジョブで利用可能なメモリー容量を検討する場合、容量アルゴリズムでは、他のサービスが存在することを考慮し、メモリー 2 GB を確保します。これに関するアルゴリズムの公式は以下のようになります。
(mem - 2048) / mem_per_fork
以下に例を示します。
(4096 - 2048) / 100 == ~20
このように、メモリー 4GB のシステムは、フォーク 20 個分実行することができます。mem_per_fork の値は、設定値 (または環境変数) SYSTEM_TASK_FORKS_MEM (デフォルト値は 100) を設定して制御できます。
24.4.1.2. CPU 対容量
頻繁に、Ansible のワークロードが CPU に大きく依存する場合があります。このような場合には、同時の実行するワークロードを減らして、タスクの実行速度を高め、これらのジョブの平均完了時間を短縮することができる場合があります。
mem_capacity アルゴリズムでフォークごとに必要なメモリー容量を使用するように cpu_capacity アルゴリズムも、フォークごとに必要な CPU リソース数に着目します。このベースラインの値として、コアごとのフォーク数が 4 つとなります。CPU のアルゴリズムの公式は以下のとおりです。
cpus * fork_per_cpu
たとえば、4 つのコアが搭載されているシステムの場合:
4 * 4 == 16
fork_per_cpu の値は、設定値 (または環境変数) SYSTEM_TASK_FORKS_CPU (デフォルト値は 4) を設定して制御できます。
24.4.2. ジョブが影響を与える容量
容量を選択する場合に、各ジョブタイプがどのように容量に影響を与えるかを理解することが重要です。
Ansible におけるフォークの意味を理解しておくと役に立ちます (https://www.ansible.com/blog/ansible-performance-tuning の「Know Your Forks」セクションを参照)。
Ansible のデフォルトのフォーク値は 5 ですが、automation controller では実際には 5 台未満のシステムに対して実行していることを認識しているため、実際の同時並行処理の値は 5 よりも少なくなります。
ジョブ実行時に、Ansible の親プロセスに対応するために、automation controller はフォークの選択数に 1 つ追加します。そのため、フォークの値が 5 のシステム 5 台に対して、Playbook を実行する場合は、ジョブの影響に関する実際のフォーク値が 6 になります。
24.4.2.1. 自動コントローラーのジョブタイプの影響
ジョブとアドホックのジョブは、上記のモデル (フォーク + 1) を採用します。ジョブテンプレートでフォークの値を設定する場合は、ジョブの容量値は指定のフォーク最小値、使用するホスト数に 1を加えた数値になります。1 を加えることで、親 Ansible プロセスに対応します。
インスタンスの容量で、どのジョブを特定のインスタンスに割り当てるかを決定します。フォークの値が高く指定されている場合には、ジョブとアドホックコマンドは、より多くの容量を使用します。
他のジョブタイプへの影響は固定されています。
インベントリーの更新: 1
プロジェクトの更新: 1
システムジョブ: 5
ジョブテンプレートにフォークの値を設定しない場合には、ジョブは Ansible のデフォルトのフォーク値 4 を使用します。Ansible のデフォルト値はフォーク 5 ですが、ジョブのホストが 5 台未満の場合には、フォークの使用数は少なくなります。一般的に、フォークの値に、システムの機能より高い数値を設定すると、メモリーが足りなくなったり、CPU をオーバーコミットしたりする問題が発生する可能性があります。個別のシステムではそれほど容量がないにも拘わらず、Playbook でフォーク 1000 個を使用する場合には、システムのサイズが小さすぎたり、パフォーマンスやリソースの問題のリスクが発生したりします。
24.4.2.2. 適切な容量の選択
CPU バインドまたはメモリーバインドの容量制限から容量を選択するのは、実質的には、フォーク数の最小数または最大数を選択していることになります。上記の例では、CPU の容量でフォーク数を最大 16 個許容し、メモリー容量では 20 個許容できます。システムによっては、これらの差異は大きくなる可能性があり、多くの場合にこれらの 2 つの間でバランスを取っていくと良いでしょう。
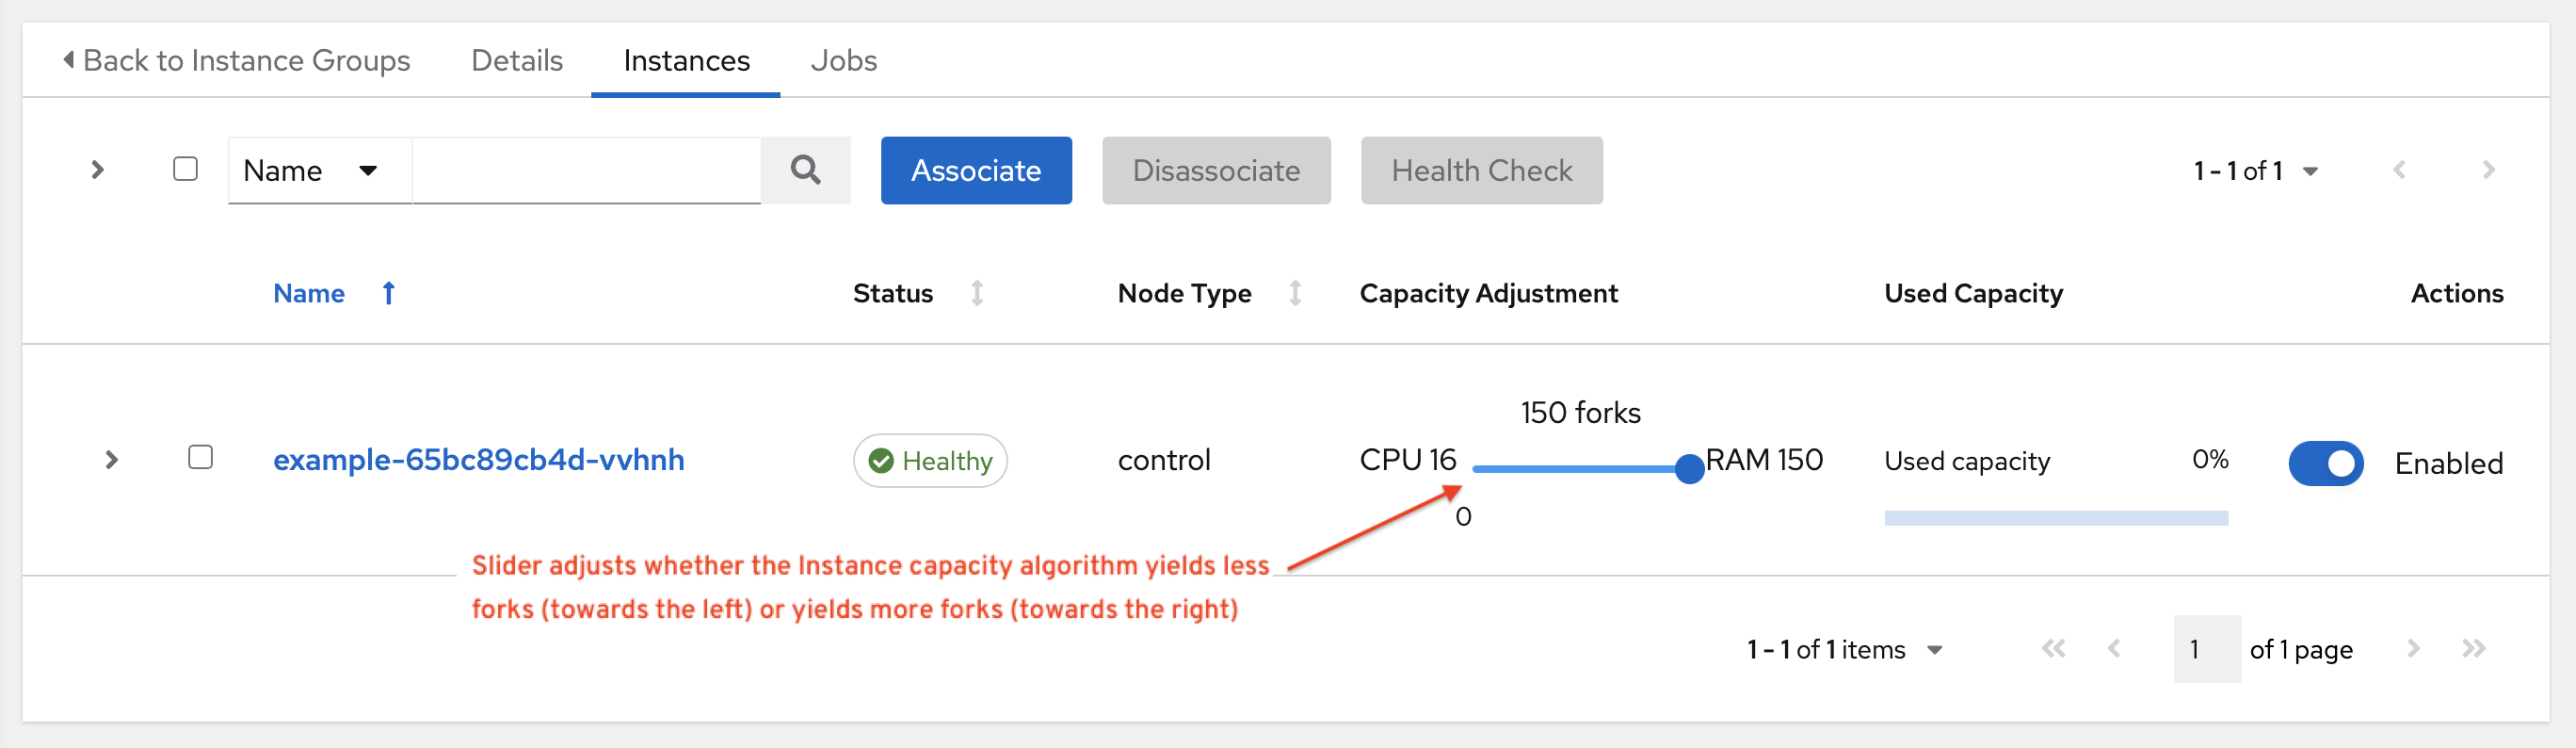
インスタンスフィールド capacity_adjustment では、どちらをどの程度考慮するかを選択できます。これは、0.0 から 1.0 の値で表します。値を 1.0 に設定すると、最大値が使用されます。上記の例では、メモリー容量となるので、フォークの値を 20 が選択されます。値を 0.0 に設定すると、最小値が使用されます。また、0.5 は 2 つのアルゴリズムを 50/50 の割合で使用することになり、フォーク数は 18 になります。
16 + (20 - 16) * 0.5 == 18
ユーザーインターフェースで容量を表示または編集するには、インスタンスグループの インスタンス タブを選択します。
24.5. ジョブブランチの上書き
プロジェクトでは、ブランチ、タグ、または参照が scm_branch フィールドで指定されます。以下で示されているように、これらは、プロジェクトの詳細のフィールドで指定された値で表示されます。
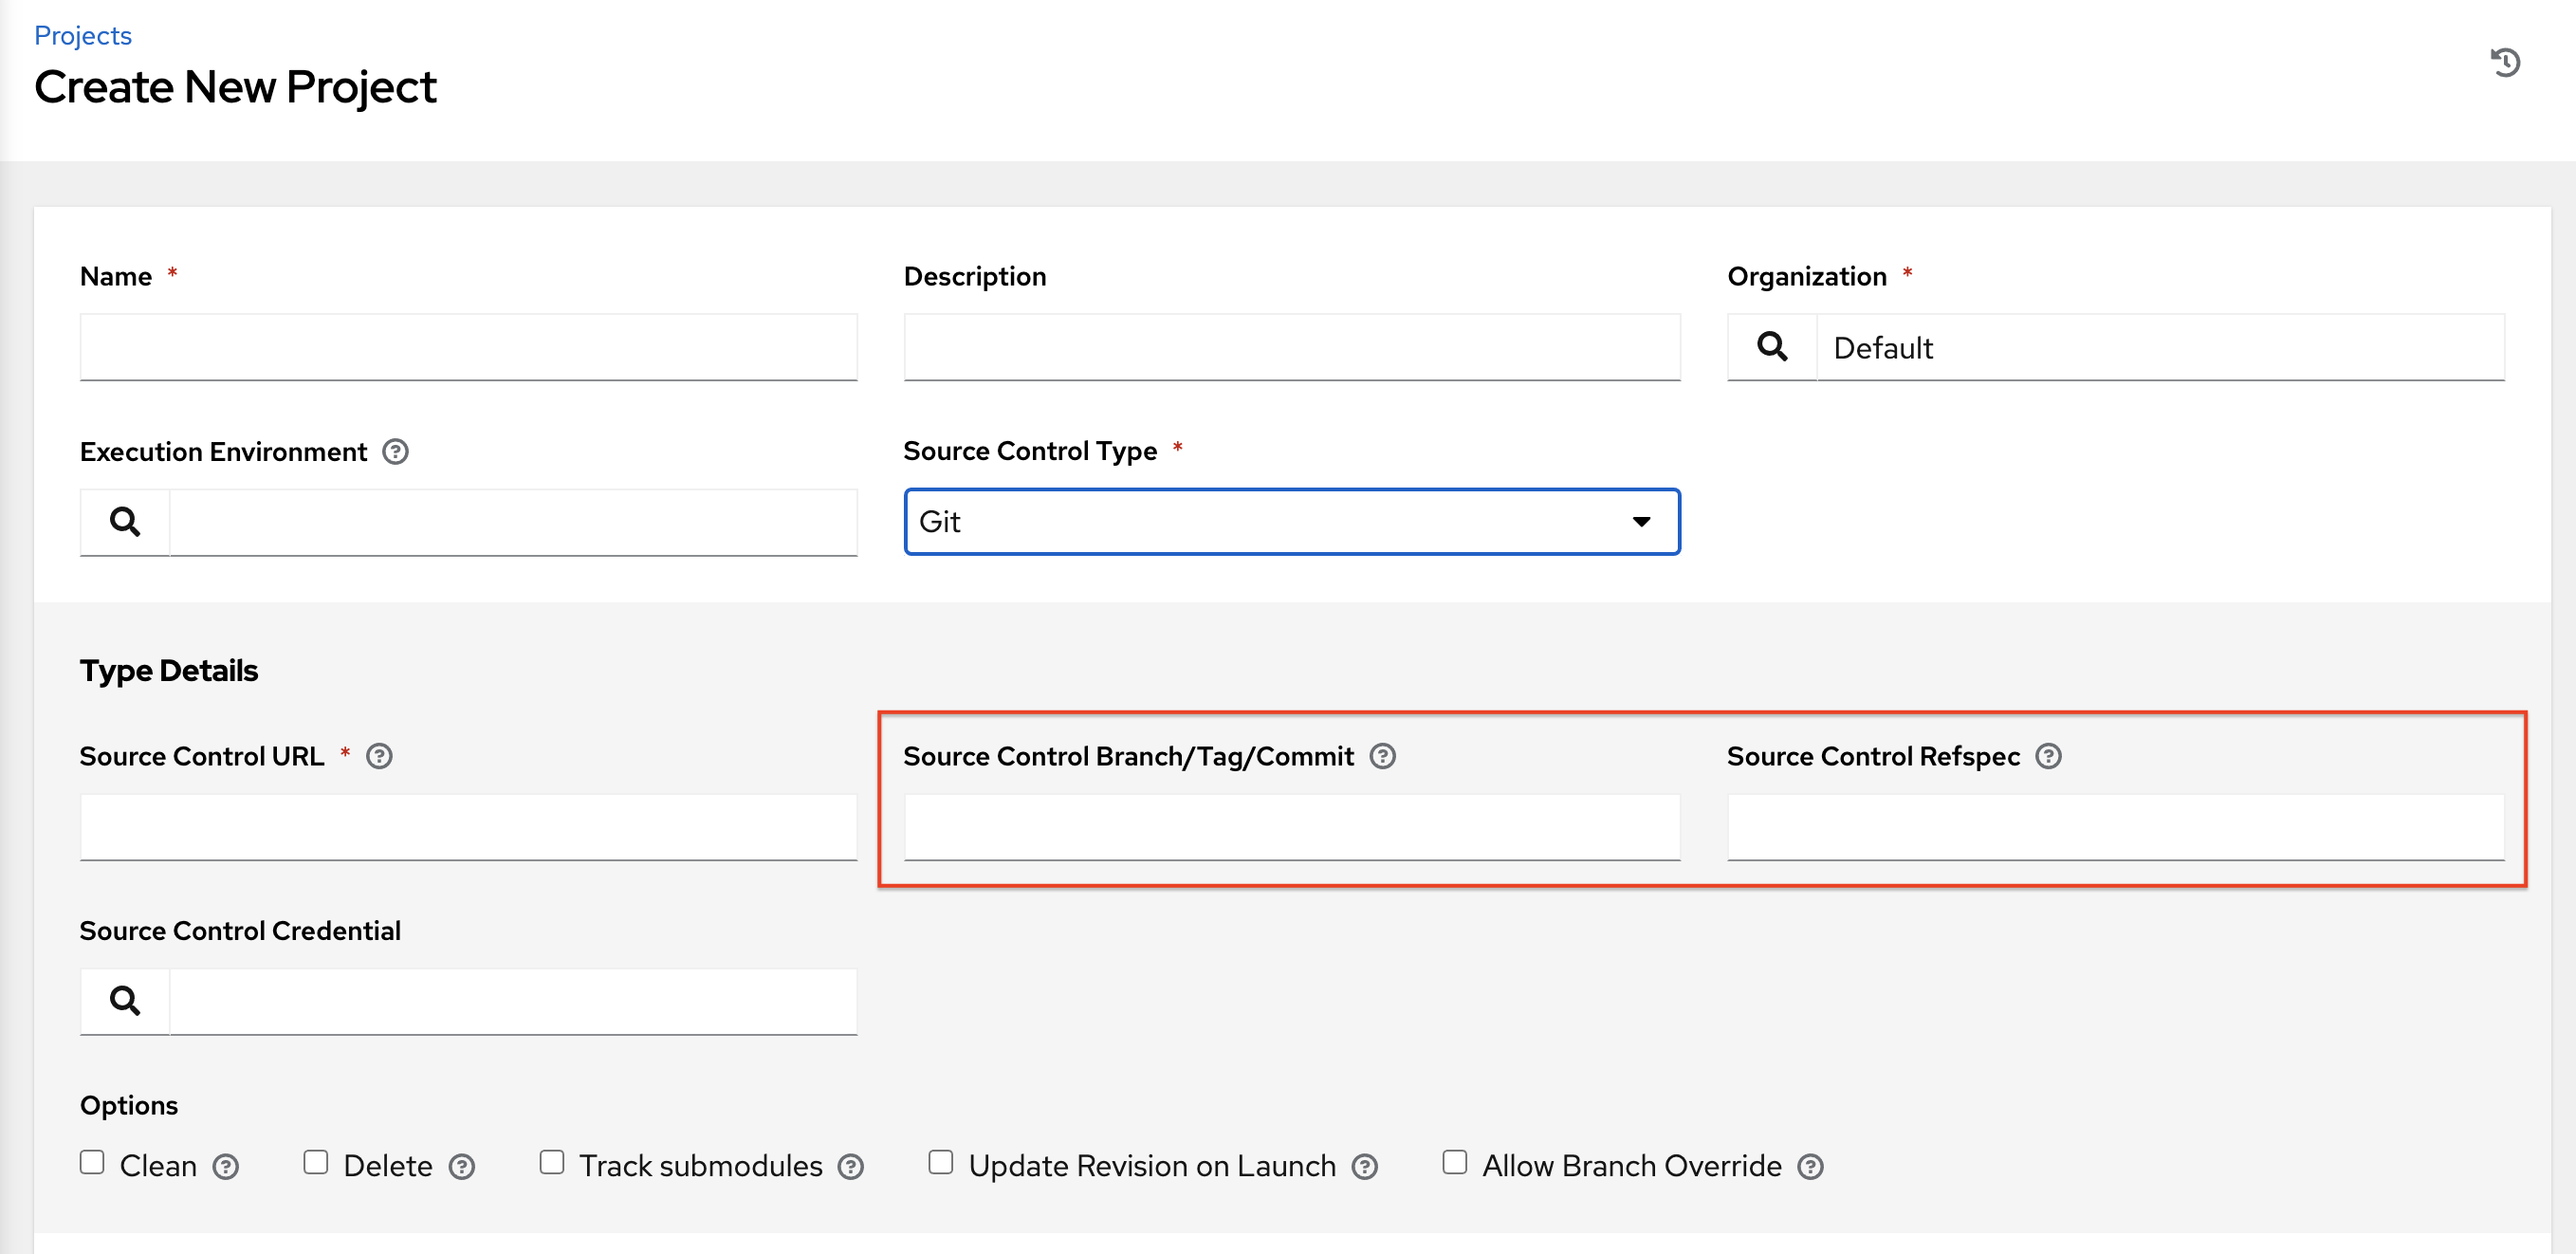
プロジェクトには、「ブランチの上書きを許可する」オプションがあります。このオプションを選択すると、プロジェクト管理者は、そのプロジェクトを使用するジョブテンプレートに対して、ブランチの選択を委任できます (プロジェクトの use_role のみが必要)。

24.5.1. ソースツリーのコピー動作
すべてのジョブ実行には、独自のプライベートデータディレクトリーがあります。このディレクトリーには、このジョブが実行されている指定された scm_branch のプロジェクトソースツリーのコピーが含まれています。ジョブは、プロジェクトフォルダーを自由に変更し、実行中にそれらの変更を自由に使用できます。このフォルダーは一時的なものであり、ジョブ実行の終了時にクリーンアップされます。
クリーニング を選択している場合、automation controller は、git および Subversion に関連した各 Ansible モジュールの force パラメーターを使用して、リポジトリーのローカルコピーにある変更ファイルを破棄します。

24.5.2. プロジェクトのリビジョンの動作
Typically, during a project update, the revision of the default branch (specified in the SCM Branch field of the project) is stored when updated, and jobs using that project will employ this revision. Providing a non-default SCM Branch (not a commit hash or tag) in a job, the newest revision is pulled from the source control remote immediately before the job starts. This revision is shown in the Source Control Revision field of the job and its respective project update.

そのため、デフォルト以外のブランチではオフラインジョブを実行できません。タグを使用するか、ハッシュをコミットを使用して、ジョブが確実にソースコントロールからの静的バージョンを実行するようにします。プロジェクトの更新では、すべてのブランチのリビジョンは保存されず、プロジェクトのデフォルトブランチのみが保存されます。
** SCM ブランチ** フィールドは検証されないため、プロジェクトを更新して有効であることを確認する必要があります。このフィールドが指定されたり、要求されたりした場合には、ジョブテンプレートの Playbook フィールドは検証されず、 ジョブテンプレートを起動して、必要とされる Playbook が存在するかを確認する必要があります。
24.5.3. Git Refspec
SCM Refspec フィールドは、更新がリモートからダウンロードする必要がある追加の参照を指定します。以下に例を示します。
refs/*:refs/remotes/origin/*: リモートのリモートを含む、すべての参照を取得
refs/pull/*:refs/remotes/origin/pull/*(GitHub 専用): すべてのプル要求に対して、すべての参照を取得
refs/pull/62/head:refs/remotes/origin/pull/62/head: 対象の GitHub プル要求に対して、参照を取得
プロジェクトの規模が大きく、本書で紹介する 1 例目と 2 例目を使用する場合には、パフォーマンスへの影響を考慮する必要があります。
SCM Refspec パラメーターは、プロジェクトブランチの可用性に影響するものであり、他の場合には利用できない参照へのアクセスを許可できます。上記の例では、ユーザーは SCM ブランチ からのプル要求を指定できますが、これは SCM Refspec フィールドがなければ不可能です。
Ansible git モジュールはデフォルトで refs/heads/* を取得します。つまり、SCM Refspec が空の場合には、プロジェクトのブランチとタグ (およびその中のコミットハッシュ) を SCM ブランチとして使用できます。SCM Refspec フィールドで指定された値は、オーバーライドとして使用できる SCM ブランチ フィールドに影響します。プロジェクトの更新 (任意のタイプ) は、追加の git fetch コマンドを実行して、リモートからその refspec をプルします。
たとえば、1 番目または 2 番目の refspec の例でブランチの上書きを許可するプロジェクトを設定したとします -> ** SCMブランチ** を要求するジョブテンプレートでこれを使用します -> ジョブテンプレートを起動すると、新しいプル要求が作成された場合に、ブランチ pull/N/head が指定されます -> ジョブテンプレートは、指定された GitHub プル要求の参照に対して実行されます。
Ansible git モジュールの詳細は、https://docs.ansible.com/ansible/latest/modules/git_module.html を参照してください。