3. Execution Environments 업그레이드
이전 버전의 |at|를 4.0 이상으로 업그레이드하면 컨트롤러에서 조직, 인벤토리, 작업 템플릿과 연결된 이전 버전의 가상 환경을 탐지하고 새 |ee| 모델로 마이그레이션해야 함을 알릴 수 있습니다. |at|를 새로 설치하면 설치하는 동안 virtualenvs 두 개가 생성됩니다. 하나는 컨트롤러 자체를 실행하는 데 사용되고, 다른 하나는 Ansible을 실행하는 데 사용됩니다. 레거시 가상 환경과 마찬가지로 |ees|에서는 컨트롤러를 안정적인 환경에서 실행하면서도 플레이북을 실행하는 데 필요한 만큼 |ee|에 모듈을 추가하거나 업데이트할 수 있습니다. 자세한 내용은 |atu|의 :ref:`ug_execution_environments`을 참조하십시오.
중요
업그레이드 시 사용 중인 플랫폼 버전에 해당하는 기본 execution environment 위에 항상 다시 빌드하는 것이 좋습니다. 자세한 내용은 :ref:`ug_build_ees`를 참조하십시오.
3.1. 레거시 venvs를 |ees|에 마이그레이션
이전의 사용자 정의 가상 환경을 새 |ee|로 마이그레이션하여 |ee|에서 이전과 동일한 설정을 유지할 수 있습니다. 이 섹션의 awx-manage 명령을 사용하여 다음을 수행합니다.
현재 사용자 정의 가상 환경 및 해당 경로 모두 나열(
list_custom_venvs)특정 사용자 정의 가상 환경(
custom_venv_associations)를 사용하는 리소스 보기특정 사용자 정의 가상 환경을 |ee|(
export_custom_venv)로 마이그레이션하는 데 사용할 수 있는 형식으로 내보내기
마이그레이션하기 전에
awx-manage list명령을 사용하여 현재 실행 중인 모든 사용자 정의 가상 환경을 확인하는 것이 좋습니다.
$ awx-manage list_custom_venvs
다음은 이 명령을 실행할 때의 출력 예입니다.
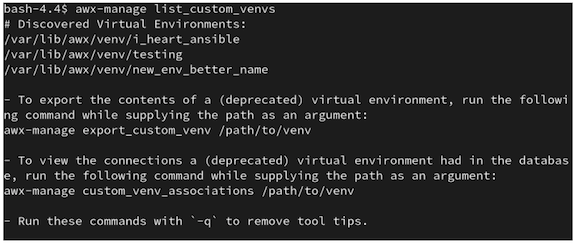
위 출력에는 사용자 정의 가상 환경 세 개와 해당 경로가 표시되어 있습니다. 기본 /var/lib/awx/venv/ 디렉터리 경로 내에 없는 사용자 정의 가상 환경이 있는 경우 여기에 포함되지 않습니다.
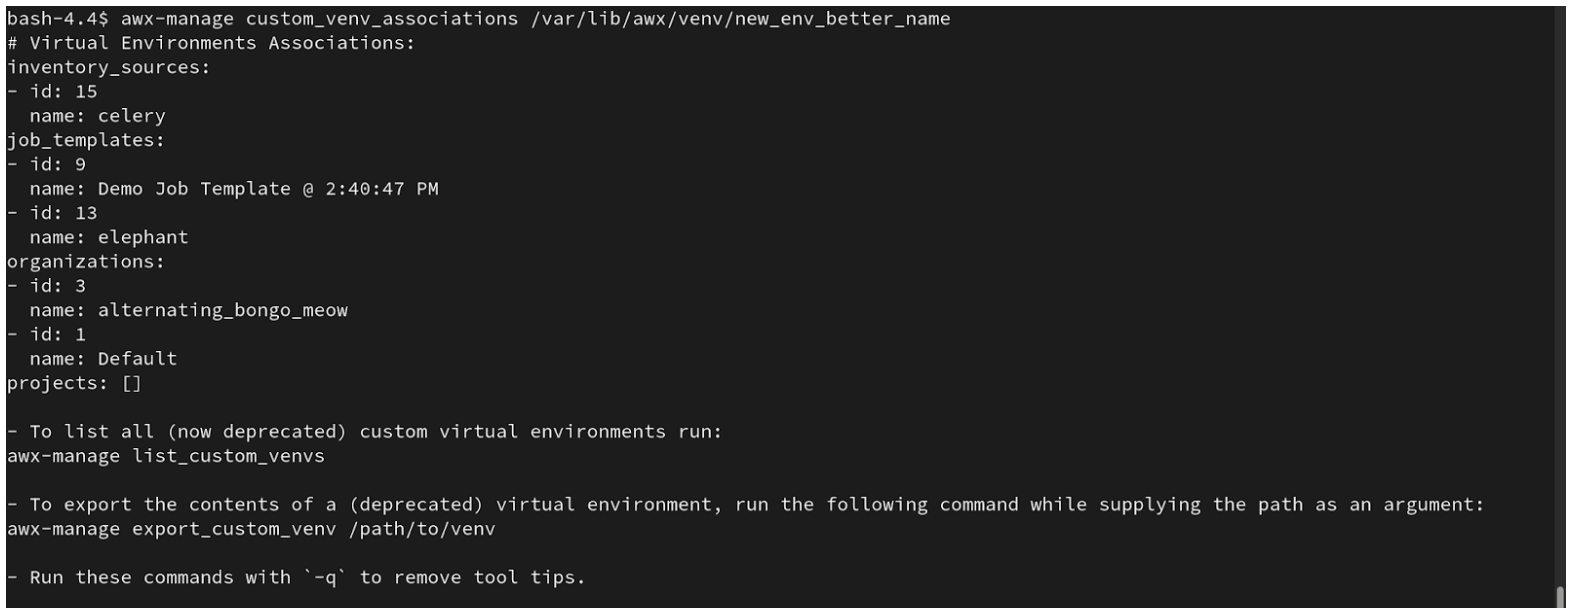
_associations명령을 사용하여 사용자 정의 가상 환경이 연결된 조직, 작업, 인벤토리 소스를 확인하여 이에 의존하는 리소스를 파악합니다.
$ awx-manage custom_venv_associations /this/is/the/path/
다음은 이 명령을 실행할 때의 출력 예입니다.
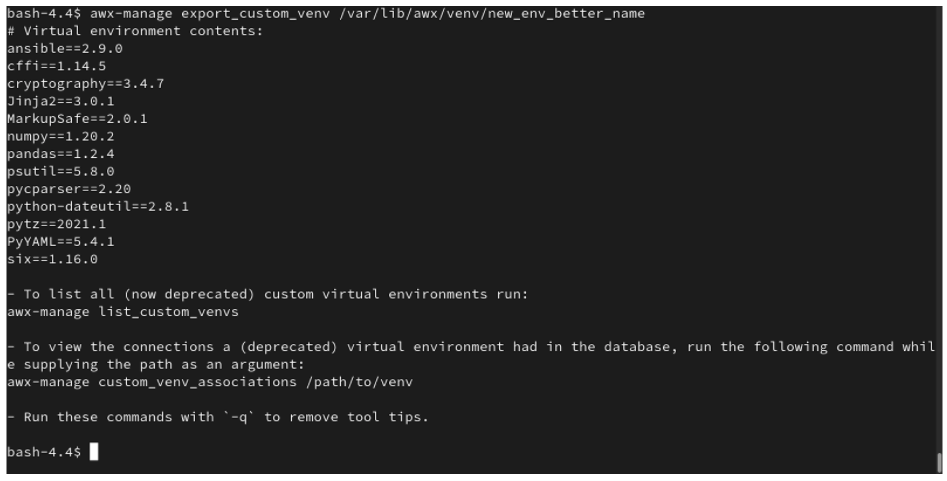
마이그레이션할 가상 환경의 경로를 선택하고
awx-manage export명령에 지정합니다.
$ awx-manage export_custom_venv /this/is/the/path/
결과 출력은 기본적으로 pip freeze 명령을 실행한 결과입니다. 이 예제에서는 선택한 사용자 정의 가상 환경의 콘텐츠를 보여줍니다.
참고
이러한 명령은 모두 -q 옵션과 함께 실행할 수 있으며, 이 옵션은 각 출력에 제공된 지침 콘텐츠를 제거합니다.
이 pip freeze 데이터의 출력이 생성되었으므로 |ab|를 사용하여 새 |ee|를 실행하는 데 사용하는 정의 파일에 이 출력을 붙여넣을 수 있습니다. 일반 사용자 및 관리자 모두 |ab|를 사용하여 |ee|을 생성할 수 있습니다. 자세한 내용은 |atu|의 :ref:`ug_build_ees`를 참조하십시오.
3.2. 격리된 인스턴스를 실행 노드에 마이그레이션
격리된 인스턴스 그룹에서 실행 노드로 이동하면 인바운드 또는 아웃바운드 연결이 가능합니다. 이는 컨트롤러 노드에서 격리된 노드로의 아웃바운드 연결만 허용된 3.8 이하 버전과 대조됩니다.
기존의 격리된 인스턴스 그룹을 4.1의 automation controller 메시 아키텍처에서 제대로 작동하도록 실행 노드로 마이그레이션하는 것은 기본적으로 이전 파일을 기반으로 인벤토리 파일을 생성하는 설치 프로그램의 실행 전 기능입니다. .ini 및 .yml 파일 형식 모두 계속 허용되지만 현재 생성된 파일 출력은 .ini 파일뿐입니다.
실행 전 검사에서는 Ansible을 활용하고 Ansible은 하위라는 개념을 병합합니다. 즉, 모든 단일 인벤토리 파일을 정확하게 복제할 수는 없지만 거의 비슷합니다. Ansible과 기능적으로 동일하지만 사용자에게 다르게 표시될 수 있습니다. 자동화된 실행 전 처리는 경험적 접근을 기반으로 하위 관계를 최대한 생성하지만, 이 툴에는 인간 사용자가 가지고 있는 뉘앙스와 판단력이 없다는 점에 유의하십시오. 따라서 파일이 생성되면 그대로 사용하지 마십시오. 파일을 검사하고 템플릿으로 사용하여 사용자와 Ansible 엔진 모두에 대해 제대로 작동하는지 확인하십시오.
다음은 실행 전 확인을 수행하기 전후의 예로, Ansible에서 인벤토리 파일을 병합하는 방법과 설치 프로그램에서 새 인벤토리 파일을 재구성하는 방법을 보여줍니다. Ansible의 경우 이 두 파일은 기본적으로 동일합니다.
이전 스타일(Ansible 문서) |
새 스타일(설치 프로그램에서 생성) |
|---|---|
[tower]
localhost ansible_connection=local
[database]
[all:vars]
admin_password='******'
pg_host=''
pg_port=''
pg_database='awx'
pg_username='awx'
pg_password='******'
rabbitmq_port=5672
rabbitmq_vhost=tower
rabbitmq_username=tower
rabbitmq_password='******'
rabbitmq_cookie=cookiemonster
# Needs to be true for fqdns and ip addresses
rabbitmq_use_long_name=false

[isolated_group_restrictedzone]
isolated-node.c.towertest-188910.internal

[isolated_group_restrictedzone:vars]
controller=tower
|
[all:vars]
admin_password='******'
pg_host=''
pg_port=''
pg_database='awx'
pg_username='awx'
pg_password='******'
rabbitmq_port=5672
rabbitmq_vhost='tower'
rabbitmq_username='tower'
rabbitmq_password='******'
rabbitmq_cookie='cookiemonster'
rabbitmq_use_long_name='false'
# In AAP 2.X [tower] has been renamed to [automationcontroller]
# Nodes in [automationcontroller] will be hybrid by default, capable of executing user jobs.
# To specify that any of these nodes should be control-only instead, give them a host var of `node_type=control`
[automationcontroller]
localhost
[automationcontroller:vars]
# in AAP 2.X the controller variable has been replaced with `peers`
# which allows finer grained control over node communication.
# `peers` can be set on individual hosts, to a combination of multiple groups and hosts.
peers='instance_group_restrictedzone'
ansible_connection='local'
# in AAP 2.X isolated groups are no longer a special type, and should be renamed to be instance groups
[instance_group_restrictedzone]
isolated-node.c.towertest-188910.internal
[instance_group_restrictedzone:vars]
# in AAP 2.X Isolated Nodes are converted into Execution Nodes using node_state=iso_migrate
node_state='iso_migrate'
# In AAP 2.X Execution Nodes have replaced isolated nodes. All of these nodes will be by default
# `node_type=execution`. You can specify new nodes that cannot execute jobs and are intermediaries
# between your control and execution nodes by adding them to [execution_nodes] and setting a host var
# `node_type=hop` on them.
[execution_nodes]
[execution_nodes:children]
instance_group_restrictedzone
|
3.3. 메시 토폴로지 보기
mesh 토폴로지를 구성한 경우 설치 프로그램은 생성된 그래프 렌더링 툴을 통해 메시 구성을 그래픽으로 검증할 수 있습니다. 그래프는 인벤토리 파일의 내용을 읽고 생성합니다. 자세한 내용은 `Red Hat Ansible Automation Platform automation mesh guide <https://access.redhat.com/documentation/en-us/red_hat_ansible_automation_platform/2.1/html/red_hat_ansible_automation_platform_automation_mesh_guide/index>`_를 참조하십시오.

지정된 인벤토리 파일에는 하나 이상의 제어 :term:`node`에서 관리하는 일종의 실행 용량이 포함되어야 합니다. 즉, 제어 전용 노드, 실행 전용 노드 또는 홉 전용 노드만 포함하는 인벤토리 파일을 생성하는 것은 허용되지 않습니다. 제어 노드와 실행 노드 사이에는 밀접하게 연결된 관계가 있으며 항상 준수해야 합니다. 인벤토리 파일이 올바르게 정의되지 않은 경우 설치 프로그램이 실패합니다. 이 규칙의 유일한 예외는 단일 하이브리드 노드이며, 제어 및 실행 제약 조건을 충족하기 때문입니다.
실행 노드에서 작업을 실행하려면 설치 프로그램에서 노드를 사전 등록하거나, 사용자가 ``/api/v2/instances/N/``에 패치를 요청하여 활성화된 필드를 True로 변경해야 합니다.
If you have already deployed a mesh topology and want to view node type, node health, and specific details about each node, see Topology Viewer in the Automation Controller Administration Guide.