
10. Inventories
An inventory is a collection of hosts against which jobs may be launched. Inventories are divided into groups and these groups contain the actual hosts. Groups may be sourced manually, by entering host names into Tower, or from one of Ansible Tower’s supported cloud providers.
Note
If you have a custom dynamic inventory script, or a cloud provider that is not yet supported natively in Tower, you can also import that into Tower. Refer to the Tower Administration Guide.
This tab displays a list of the inventories that are currently available. The inventory list may be sorted and searched by Name or Organization, and filtered by inventories with external sources, inventories with external sources that have failed to update, and inventories whose hosts have failed jobs.

The list of inventories includes:
Status: This includes the status of inventory synchronization for inventories configured with cloud sources, and the status of recent jobs for this inventory.
Name: The inventory name. Clicking the Inventory name navigates to the properties screen for the selected inventory, which shows the inventory’s groups and hosts. (This view is also accessible from the Action menu.)
Organization: The organization to which the inventory belongs.
Actions: The following actions are available for the selected inventory:
- Edit: Edit the properties for the selected inventory
- Delete: Delete the selected inventory. This operation cannot be reversed!
Buttons located in the upper right corner of the Inventories tab provide the following actions:
- Create a new inventory
- View Activity Stream
10.1. Add a new inventory
To create a new inventory click the  button, which opens the Create Inventory window.
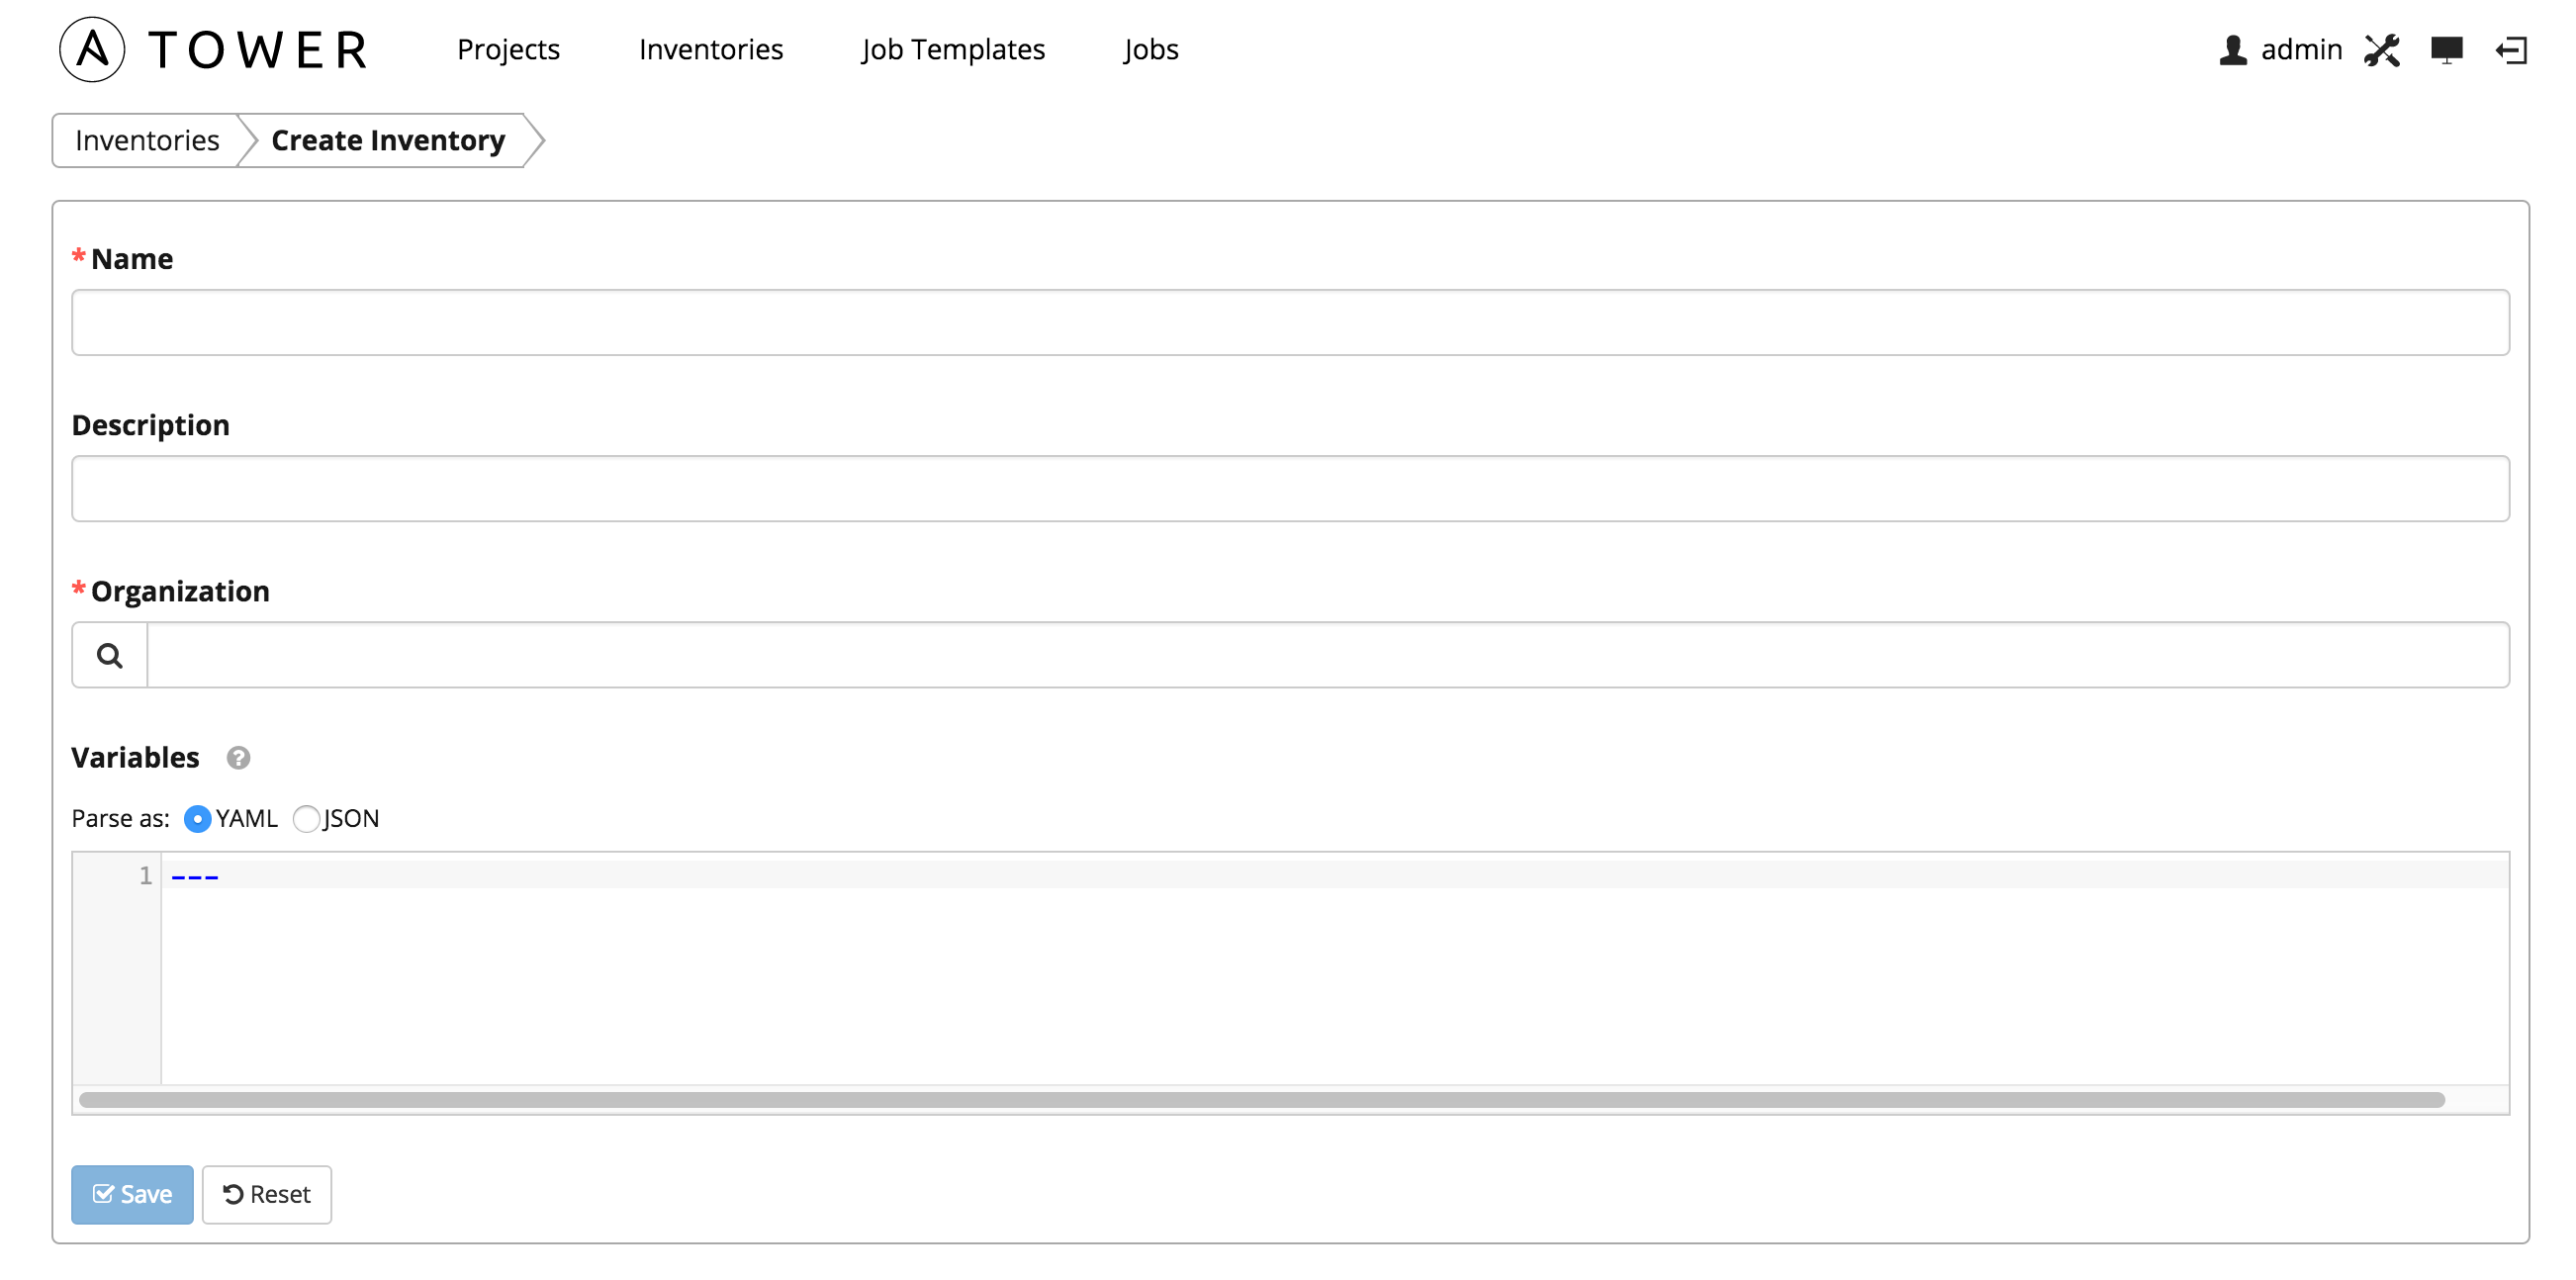
Enter the appropriate details into the following fields and select Save:
- Name: Enter a name appropriate for this inventory.
- Description: Enter an arbitrary description as appropriate.
- Organization: Choose among the available organizations.
- Variables: Variable definitions and values to be applied to all hosts in this inventory. Enter variables using either JSON or YAML syntax. Use the radio button to toggle between the two.
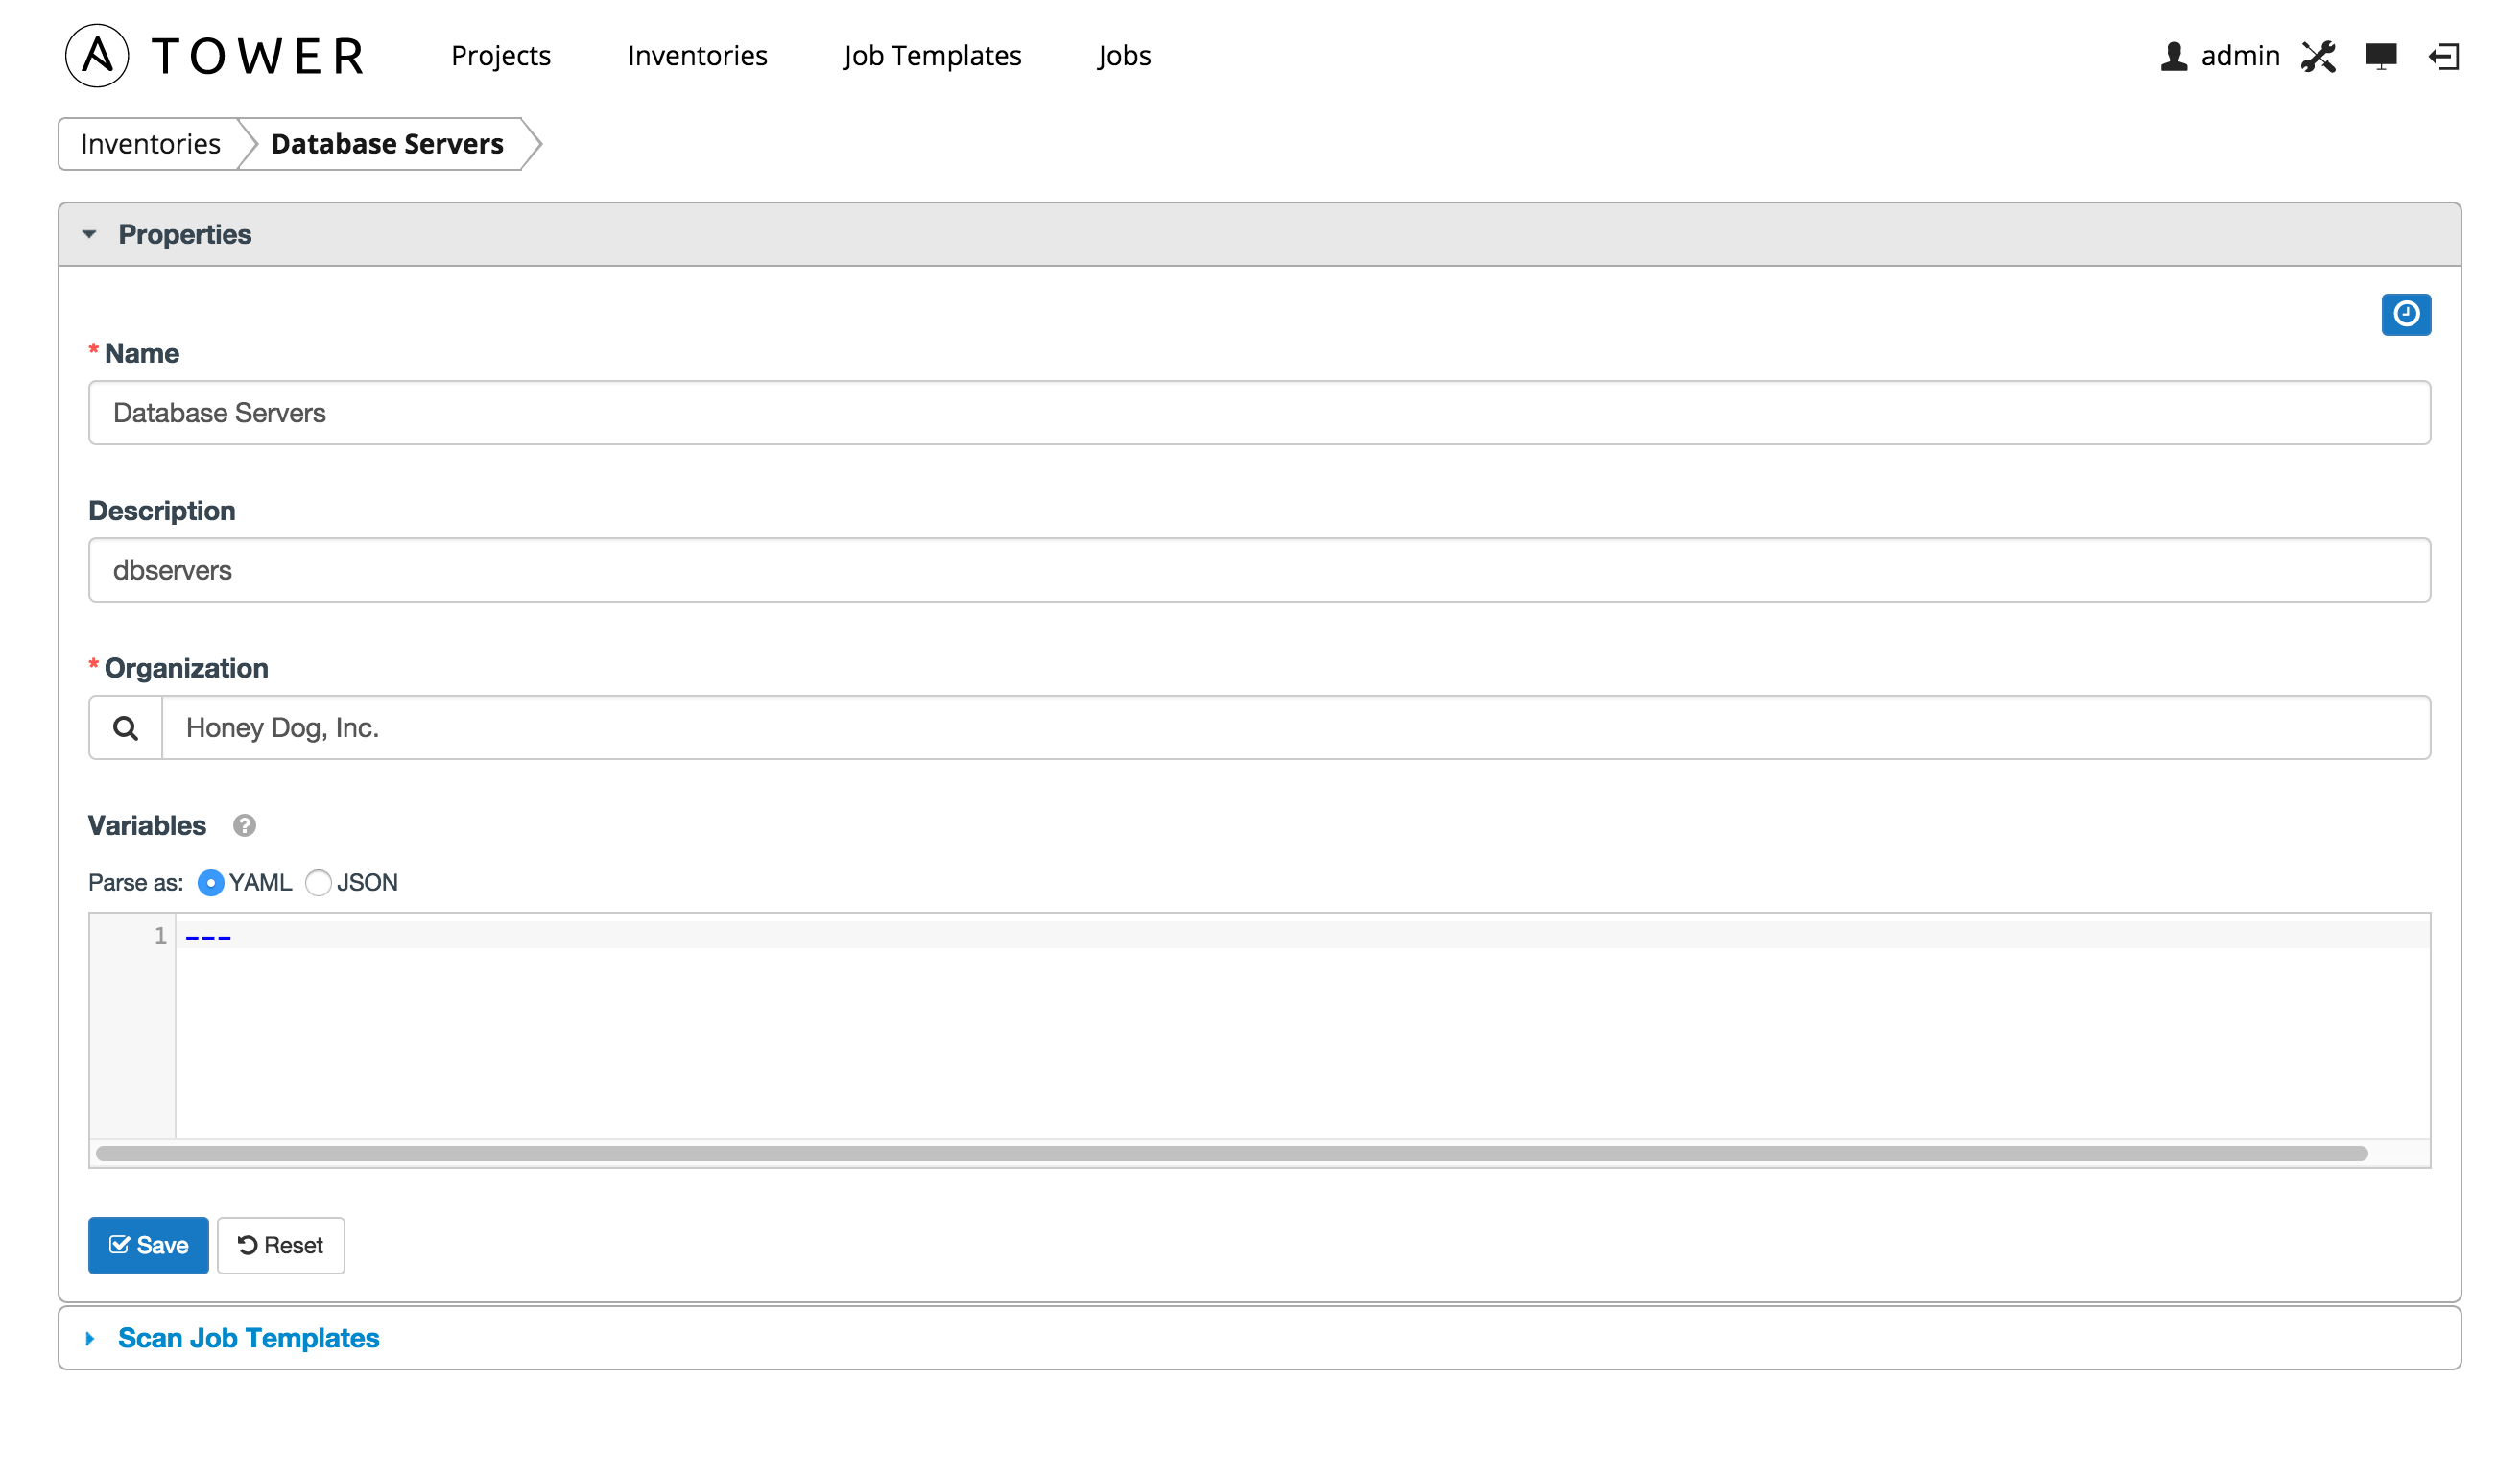
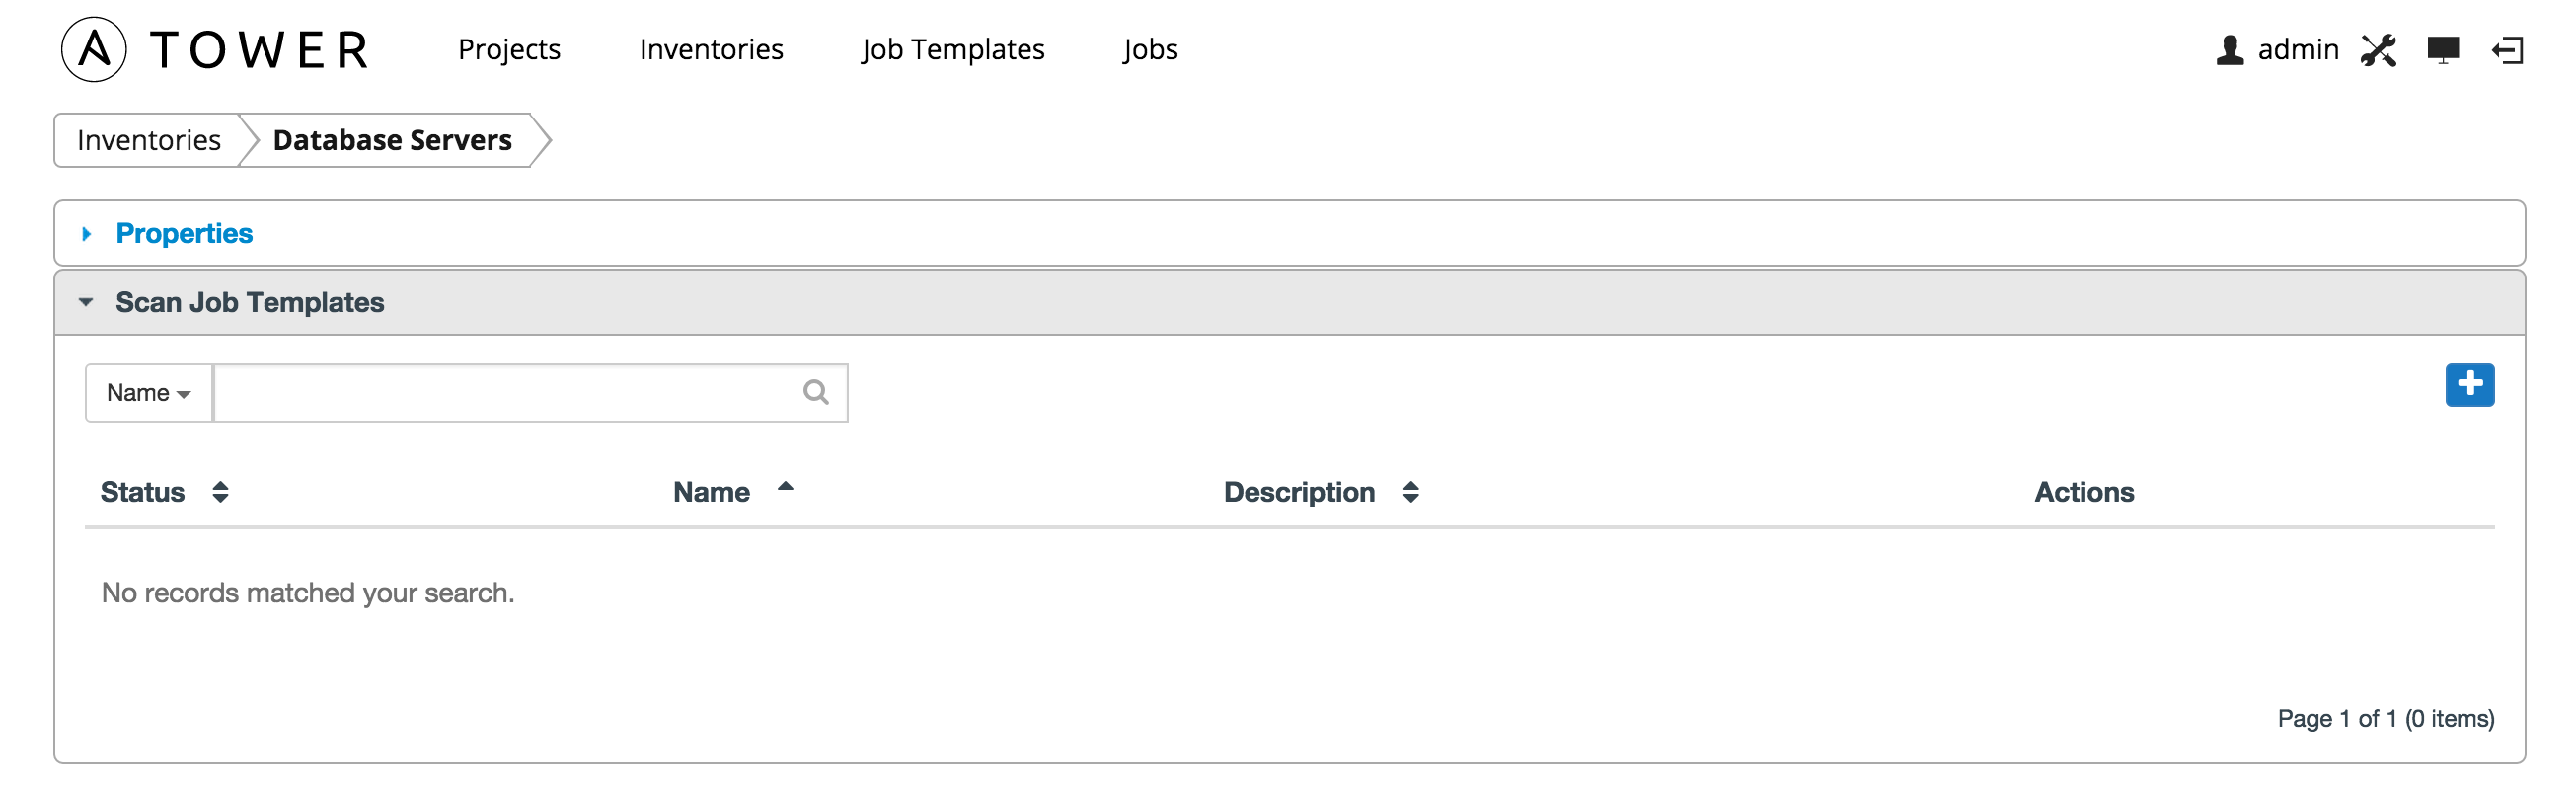
After clicking save, an accordion-style menu appears for Scan Job Templates. Expand this menu to view current scan job templates.
10.2. Scan Job Templates
Scan jobs are special Job Templates that only collect information about the host on which the job is running.
To access scan job templates directly, click on the  button of a selected Inventory to edit the inventory’s properties (above the display of groups and hosts). An accordion-style menu appears for Scan Job Templates under the inventory’s Properties window. Expand this menu to view current scan job templates.
To create a new job template click the button, which opens the Create Job Templates window.
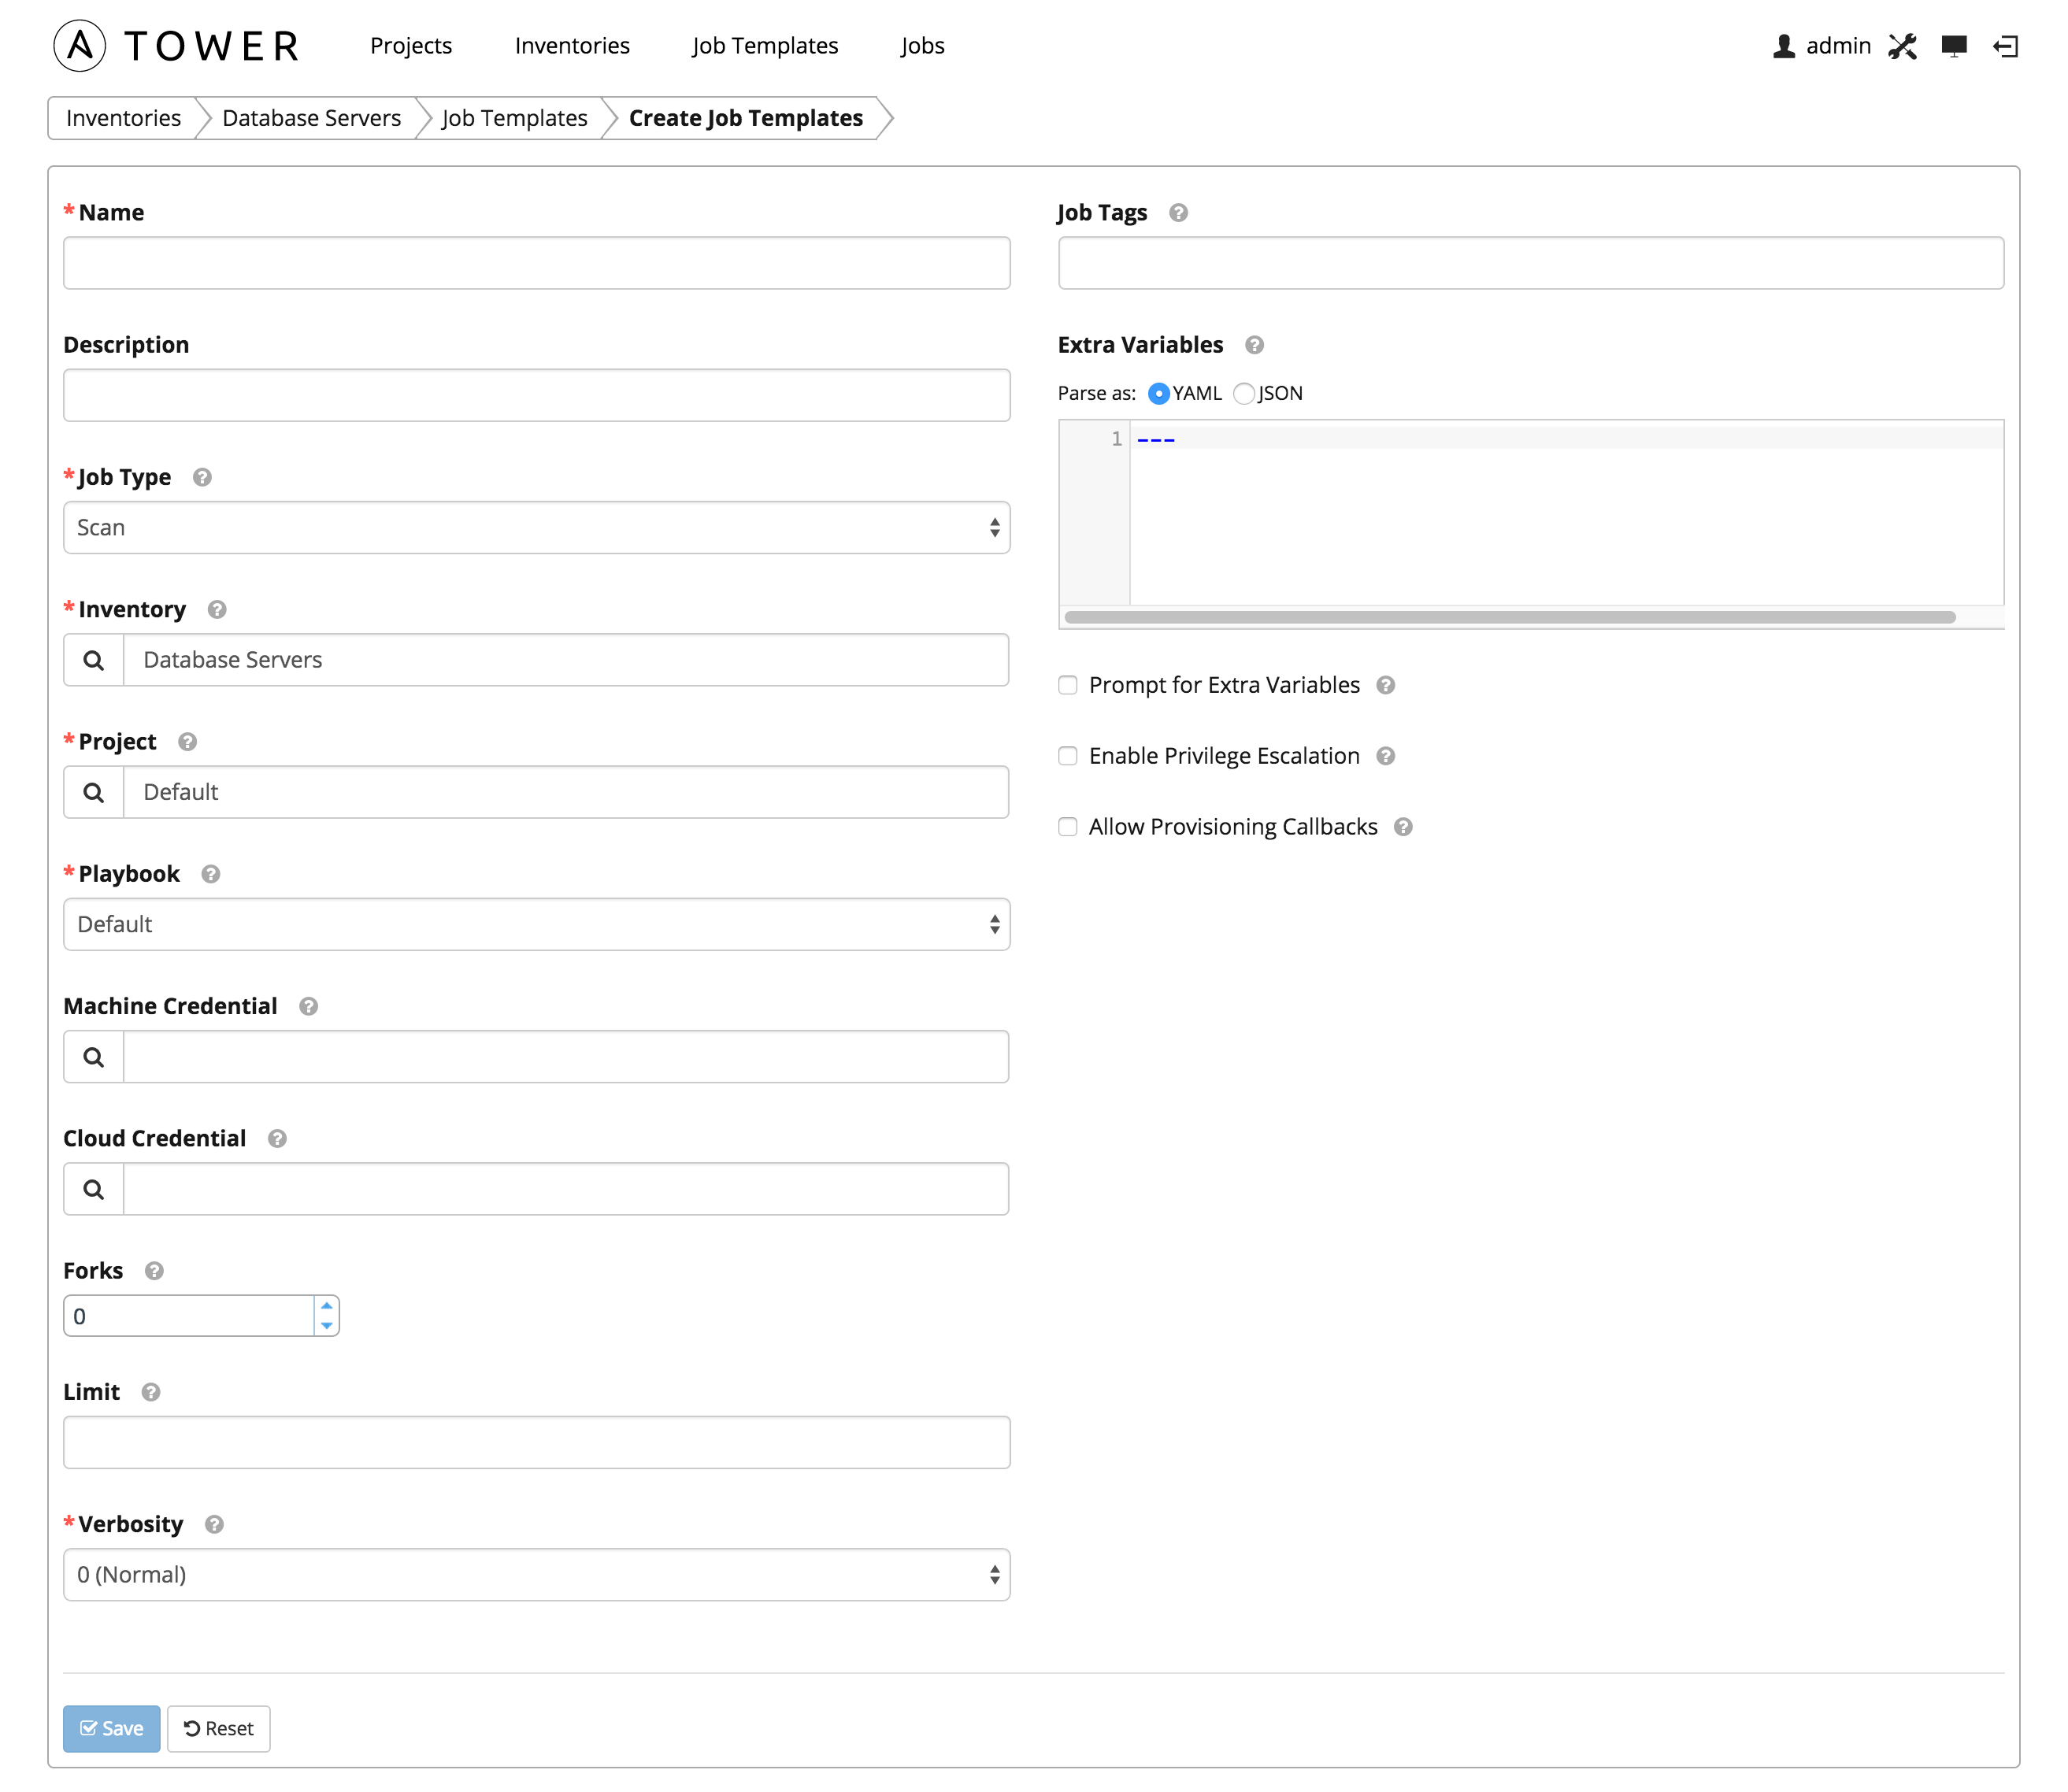
Enter values for the following fields and select Save.
- Name: Enter a name appropriate for this inventory. (Required.)
- Description: Enter an arbitrary description as appropriate.
- Job Type: Jobs can be of type Run, Check, or Scan. (Required.)
- Inventory: Select the inventory containing the hosts you want this job to manage. (Required.)
- Project: Select the project containing the playbook you want this job to execute. Use the default project included with Tower unless you have a specific project to scan. (Required.)
- Playbook: Select the playbook to be executed by this job. Use the default playbook included with Tower unless you have a specific playbook to scan. (Required.)
- Machine Credential: Select the credential you want the job to use when accessing the remote hosts. Choose the credential containing the username and SSH key or password that Ansible will need to log into the remote hosts.
- Cloud Credential: Selecting an optional cloud credential in the job template will pass along the access credentials to the running playbook, allowing provisioning into the cloud without manually passing parameters to the included modules.
- Forks: The number of parallel or simultaneous processes to use while executing the playbook.
- Limit: Provide a host pattern to further constrain the list of hosts that will be managed or affected by the playbook.
- Verbosity: Control the level of output ansible will produce as the playbook executes. (Required.)
- Job Tags: Provide a comma separated list of tags to run a specific part of a play or task.
- Extra Variables: Variable definitions and values to be applied to all hosts in this job template. Enter variables using either JSON or YAML syntax. Use the radio button to toggle between the two.
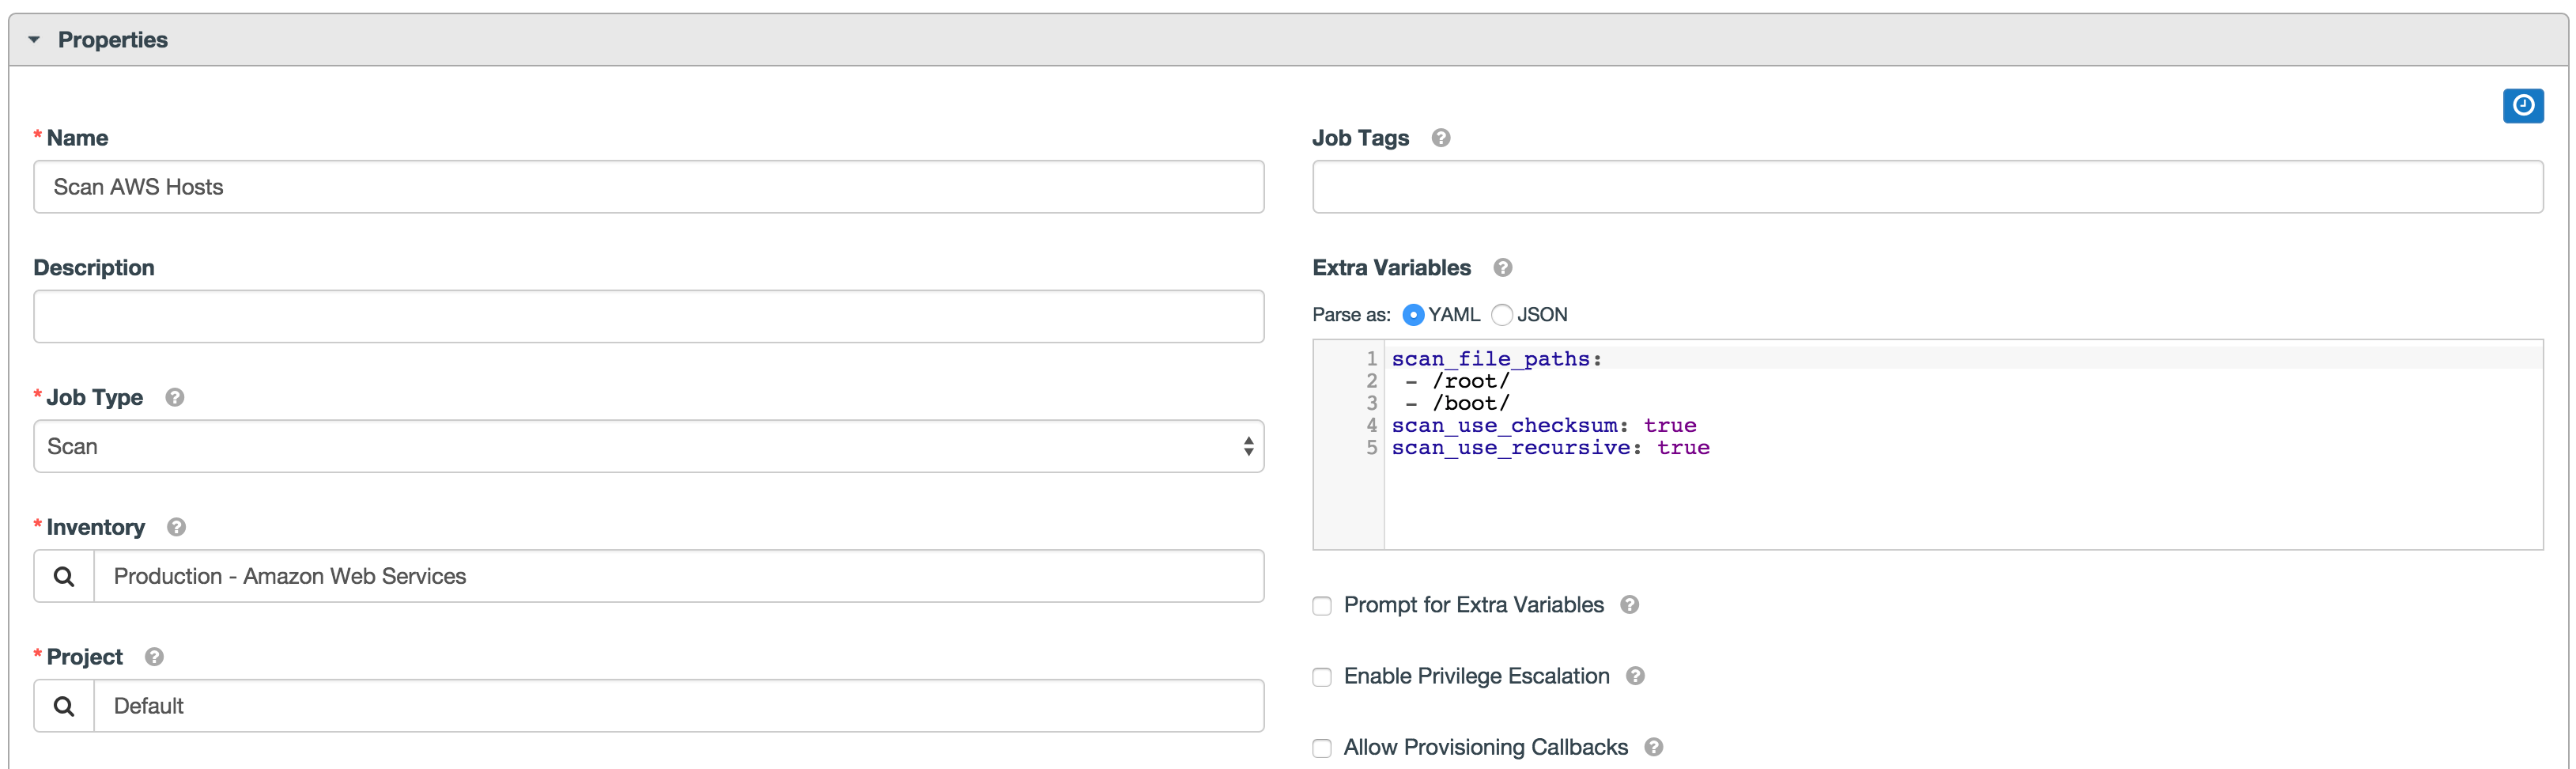
Extra variables can be passed as command line variables to the playbook. This is the “-e” or “–extra-vars” command line parameter for ansible-playbook that is documented in the Ansible documentation at Passing Variables on the Command Line. Example commands might include:
scan_file_paths:
 - /root/
 - /root/
scan_use_checksum: true
scan_use_recursive: true
Extra variables can also be provided by key/value pairs using either YAML or JSON. These variables have a maximum value of precedence and overrides other variables specified elsewhere.
10.2.1. Launching a Scan Job Template

You can Launch, Schedule, Edit, Delete, or Copy the scan job template using the buttons to the right.
Click on the  button. Enter any necessary credentials, passwords, passphrases, etc. that were setup for this job template.
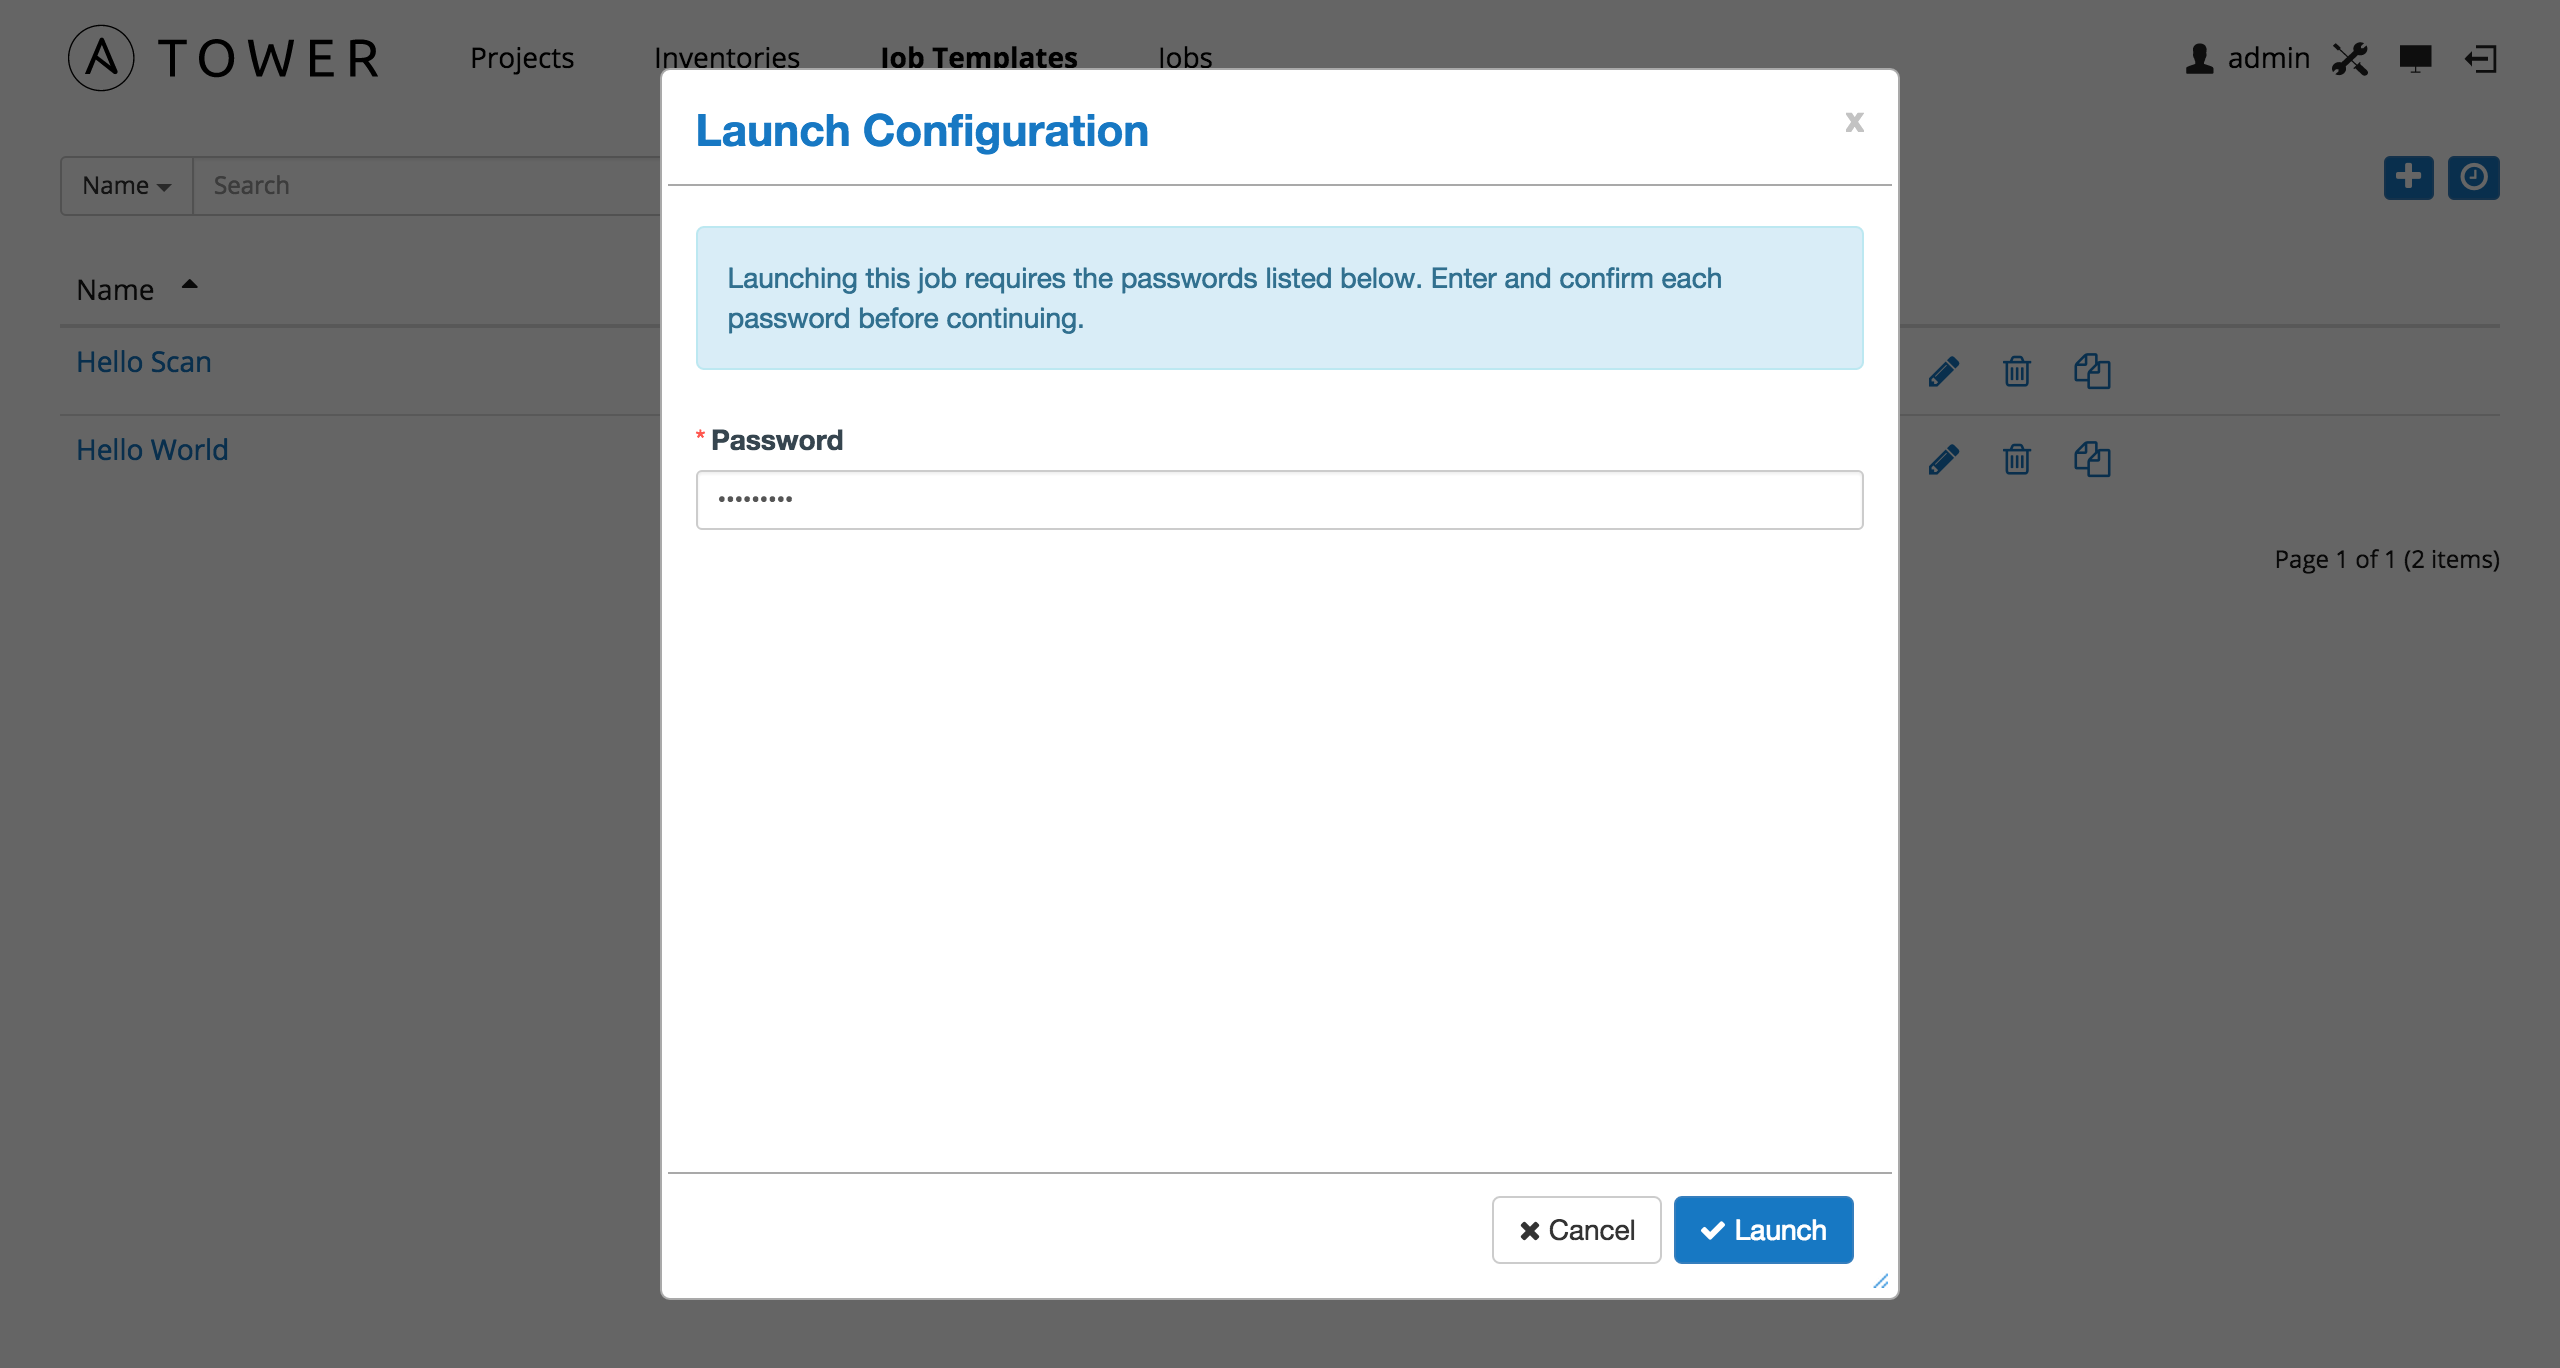
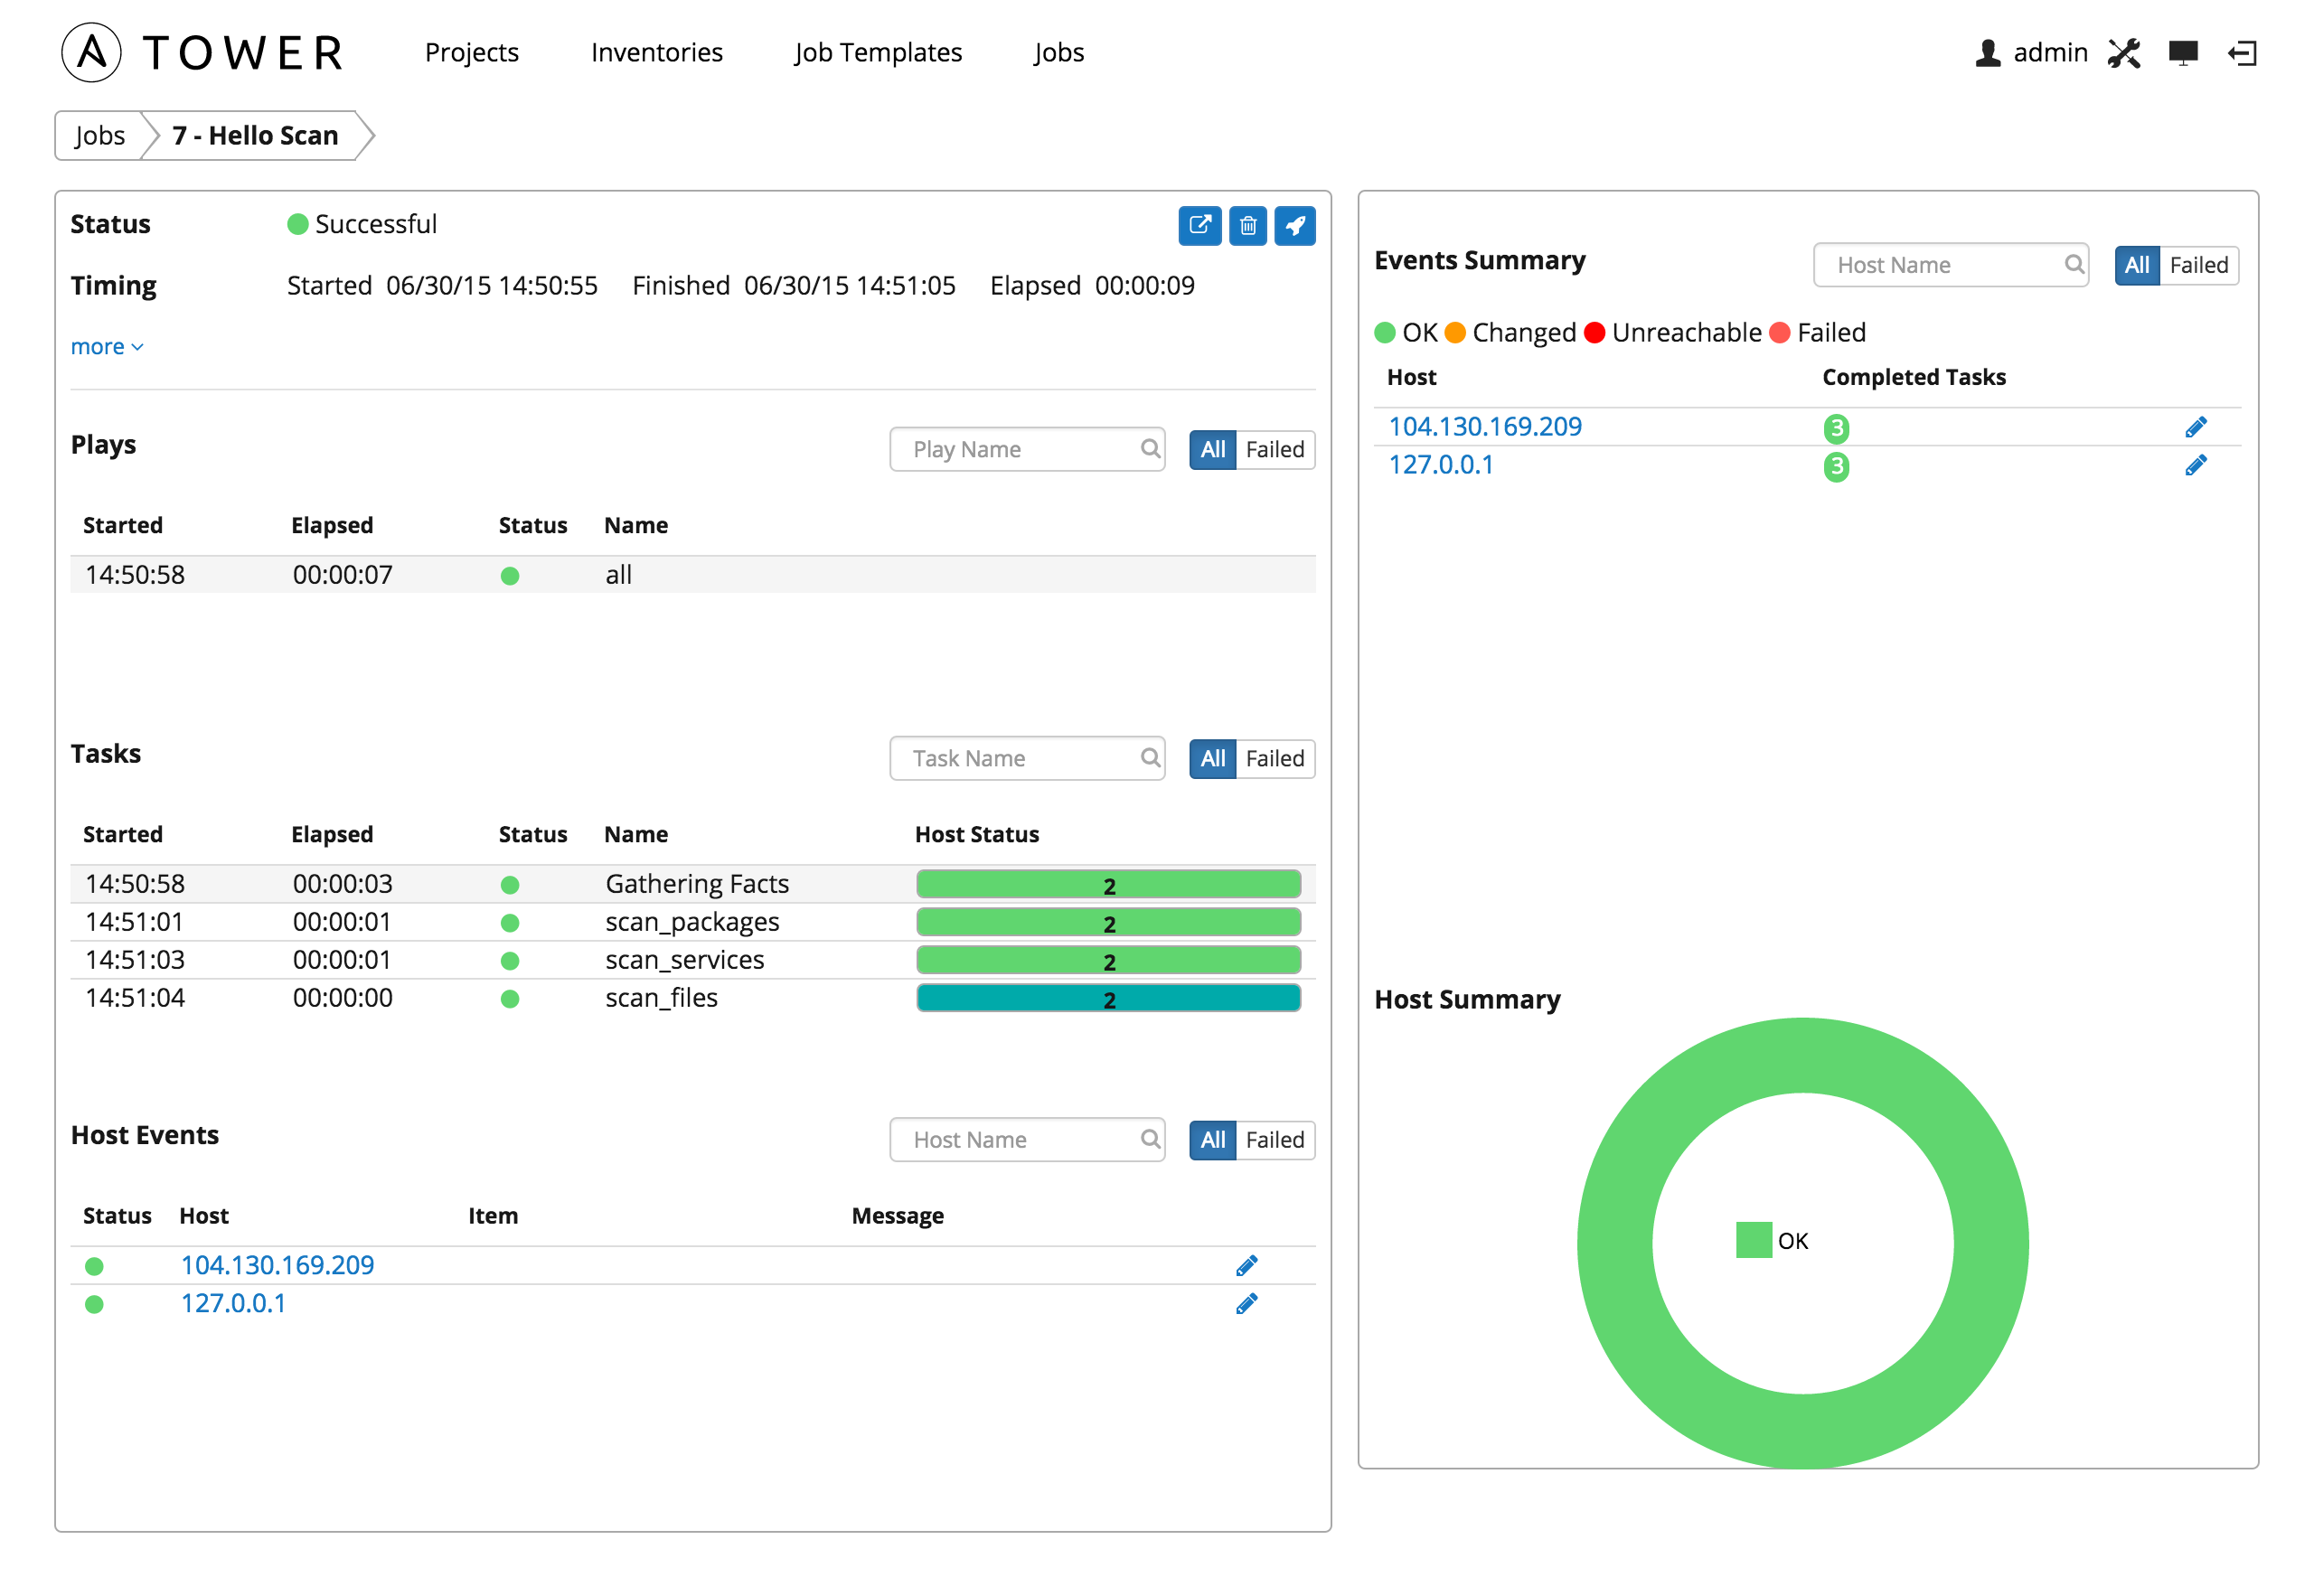
The Jobs page shows details of all the tasks and events for that playbook run.
10.2.2. Scheduling a Scan Job Template
To access scheduling for your scan job, click the  button (most easily accessible from the Job Templates navigational link).
Click the button to add a schedule.
Enter the appropriate details into the following fields and select Save:
- Name (required)
- Start Date (required)
- Start Time (required)
- Local Time Zone (the entered Start Time should be in this timezone)
- UTC Start Time (calculated from Start Time + Local Time Zone)
- Repeat Frequency (the appropriate options displays as the update frequency is modified.)

There are several actions available for schedules, under the Actions column:
- Stop an active schedule or activate a stopped schedule
- Edit Schedule
- Delete schedule
10.2.3. Custom Scan Job Templates
Custom scan jobs are normal projects which use a custom scan playbook with customized fact modules. Ansible fact modules can be included easily via custom scan playbooks.
10.2.3.1. Fact Scan Playbook
The scan_facts.yml playbook contains invocations of, potentially, multiple file fact scan modules. The default playbook bundled with Tower invokes four (4) fact scan modules–ansible, packages, services, and files. The scan_facts.yml playbook file looks like the following:
- hosts: all
  vars:
    scan_use_checksum: false
    scan_use_recursive: false
  tasks:
    - scan_packages:
    - scan_services:
    - scan_files:
        paths: '{{ scan_file_paths }}'
        get_checksum: '{{ scan_use_checksum }}'
        recursive: '{{ scan_use_recursive }}'
      when: scan_file_paths is defined
The fact file scan module is the only module that accepts parameters:
scan_file_paths: '/tmp/'
scan_use_checksum: true
scan_use_recursive: true
- The
scan_file_pathsparameter may have multiple settings (such as/tmp/or/var/log). - The
scan_use_checksumandscan_use_recursiveparameters may also be set to false or omitted. An omission is the same as a false setting.
10.2.3.2. Custom Fact Scans
The playbook for custom fact scans is similar to the example of the Fact Scan Playbook above. It differs in that it only invokes the custom fact scan module, scan_foo.
scan_custom.yml:
- hosts: all
  gather_facts: false
  tasks:
    - scan_foo:
scan_foo.py:
def main():
    module = AnsibleModule(
        argument_spec = dict())

    foo = [
      {
        "hello": "world"
      },
      {
        "foo": "bar"
      }
    ]
    results = dict(ansible_facts=dict(foo=foo))
    module.exit_json(**results)

main()
The custom fact scan module lives in the /library/ subdirectory of the Ansible project. The fact scan module is very simple, returning a hard-coded set of facts:
[
   {
     "hello": "world"
   },
   {
     "foo": "bar"
   }
 ]
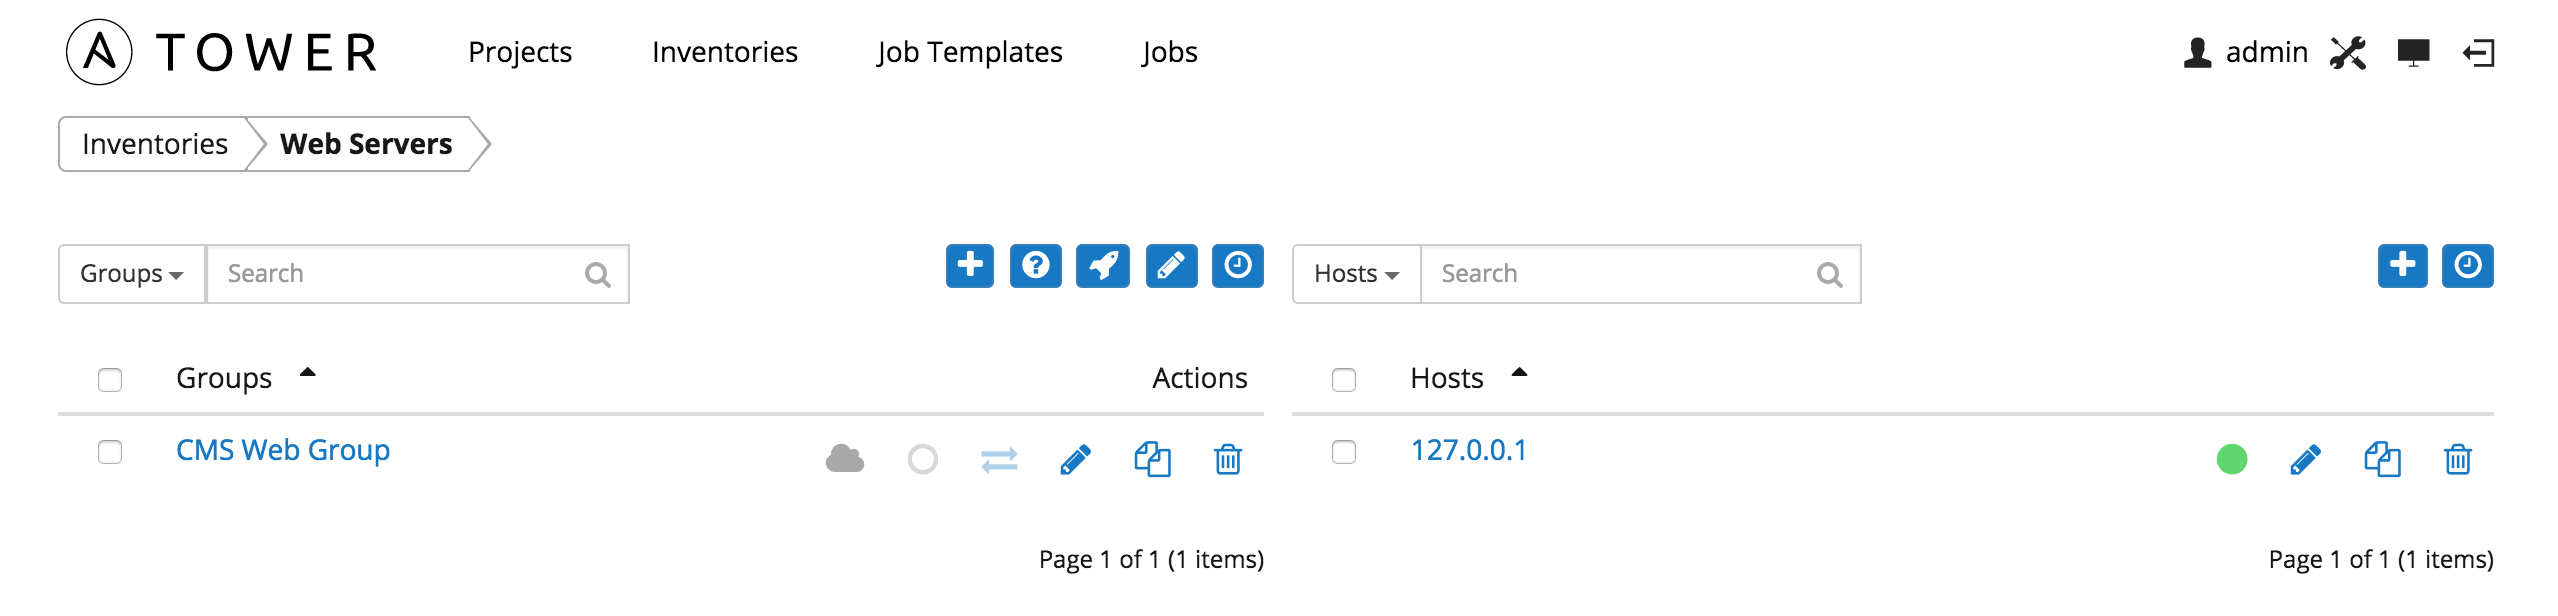
10.3. Groups and Hosts
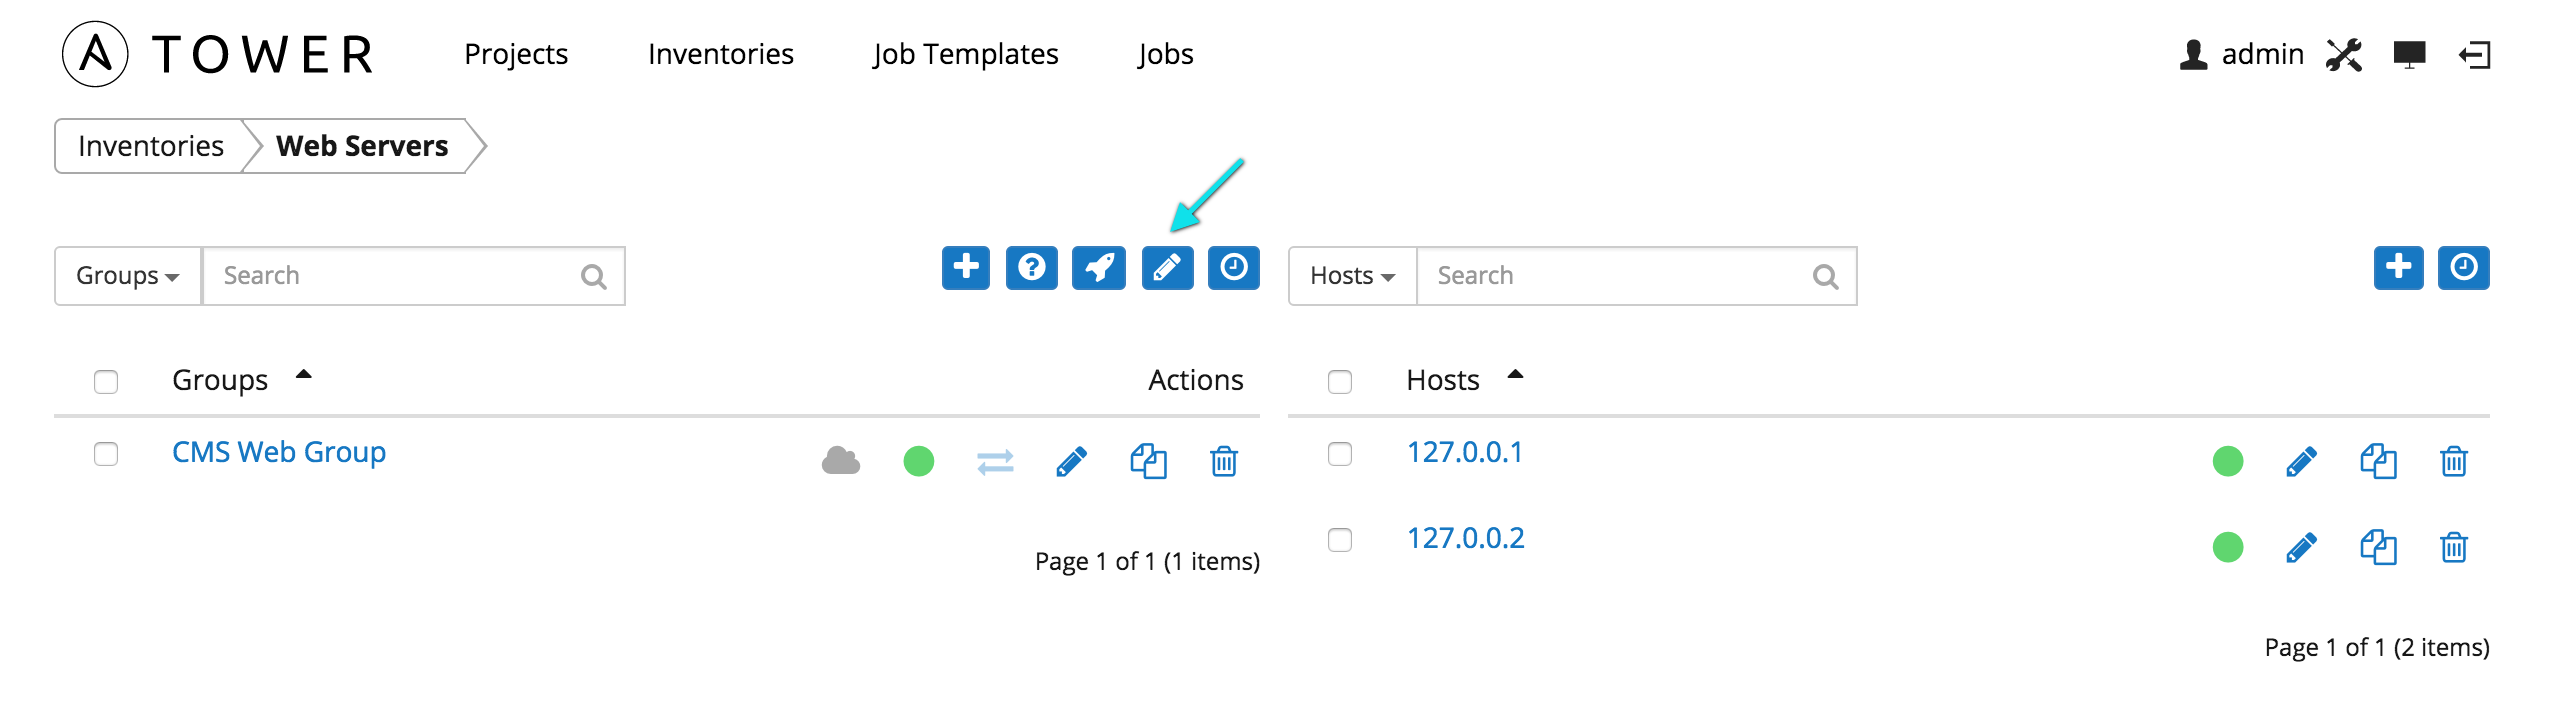
Inventories are divided into groups, which may contain hosts and other groups, and hosts. To add a group or host to an inventory or to manage an existing group or host, click on the inventory name.
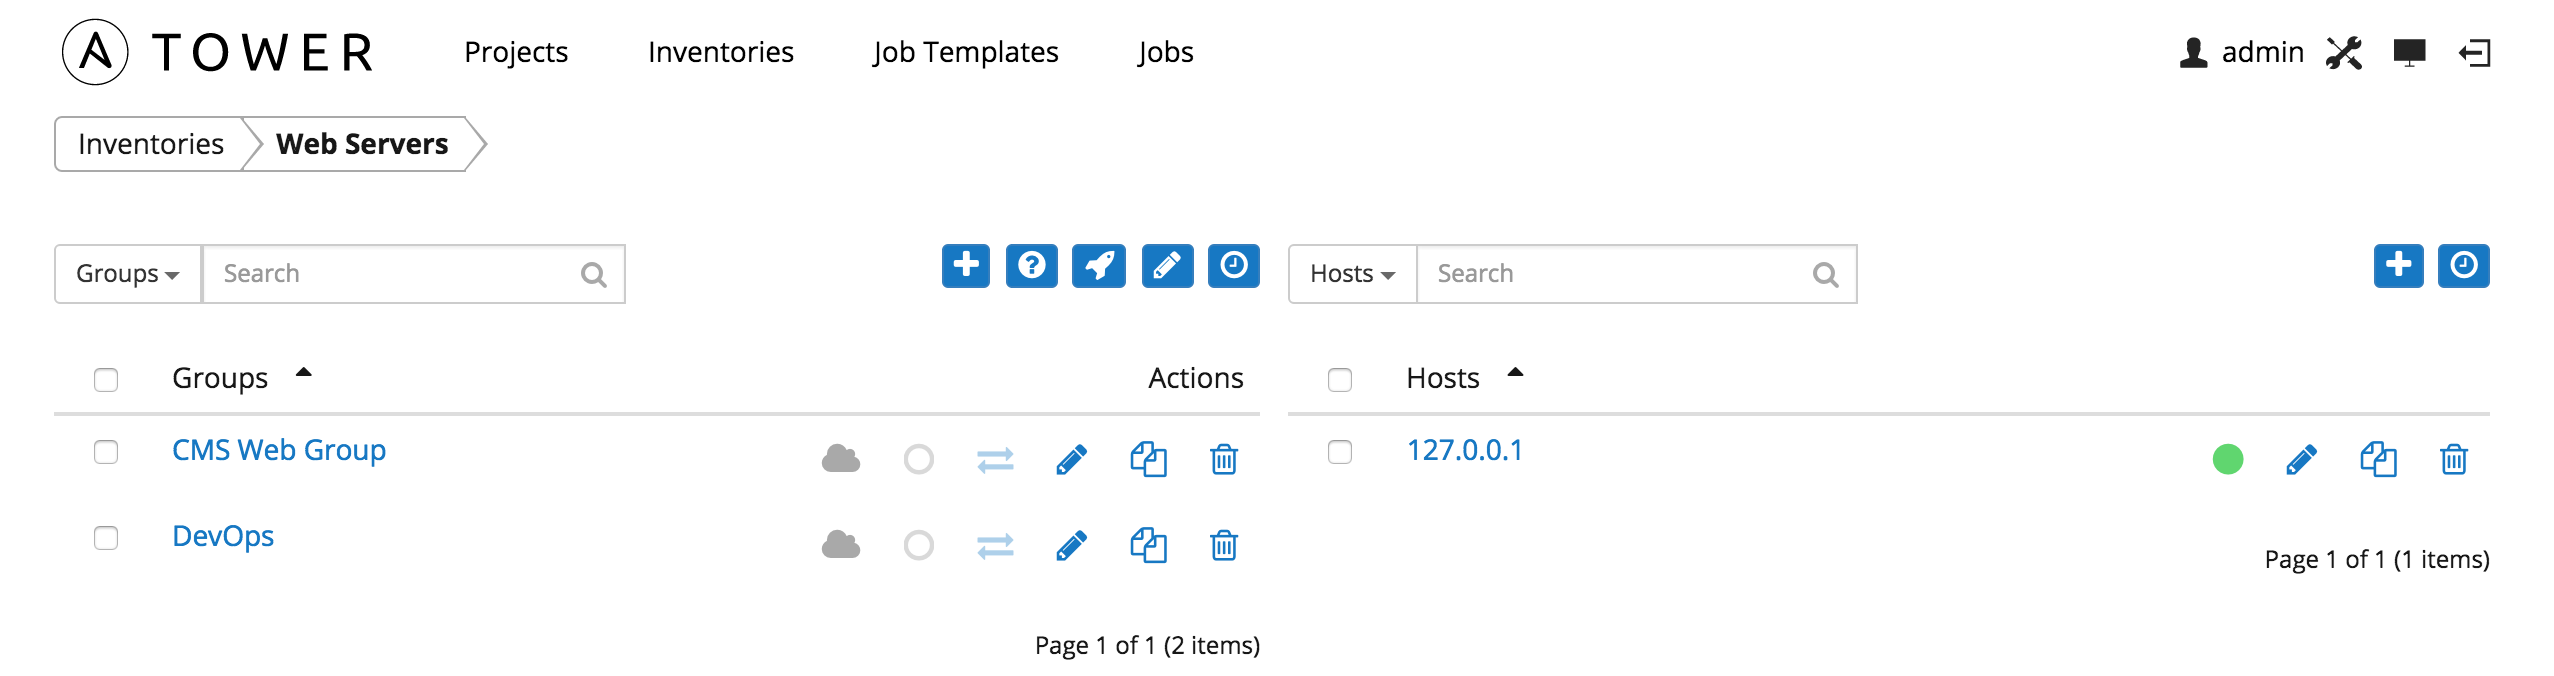
This screen displays groups and hosts that belong to the selected Inventory.

There are several actions available for inventories.
- Create a new Group
- Create a new Host
- Run a command on the selected Inventory
- Edit Inventory properties
- View activity streams for Groups and Hosts
- Obtain help building your Inventory
10.3.1. Groups
Under Groups, you can view which groups belong to this inventory, easily filtered or searched by group name.
Additional actions may be performed on the group by selecting the buttons to the right of the group name:
- Sync status: Show the status of inventory synchronization for groups configured with cloud sources. If synchronization is configured, clicking this button shows the synchronization log for the selected group.
- Host status: Show the status of successful and failed jobs for the selected group. Clicking this button shows the list of hosts that are members of the selected group.
- Start sync process: Initiate a synchronization of the group with the configured cloud source. (A synchronization process that is in progress may be canceled by clicking the cancel button that appears here during synchronization.)
- Edit Group: Edit the properties for the selected group
- Copy Group: Groups can be nested. This allows you to copy or move the group to a different group.
- Delete: Delete the selected group. This operation cannot be reversed!
10.3.1.1. Add a new group
Create a new group for an inventory by clicking the button, which opens the Create Group window.
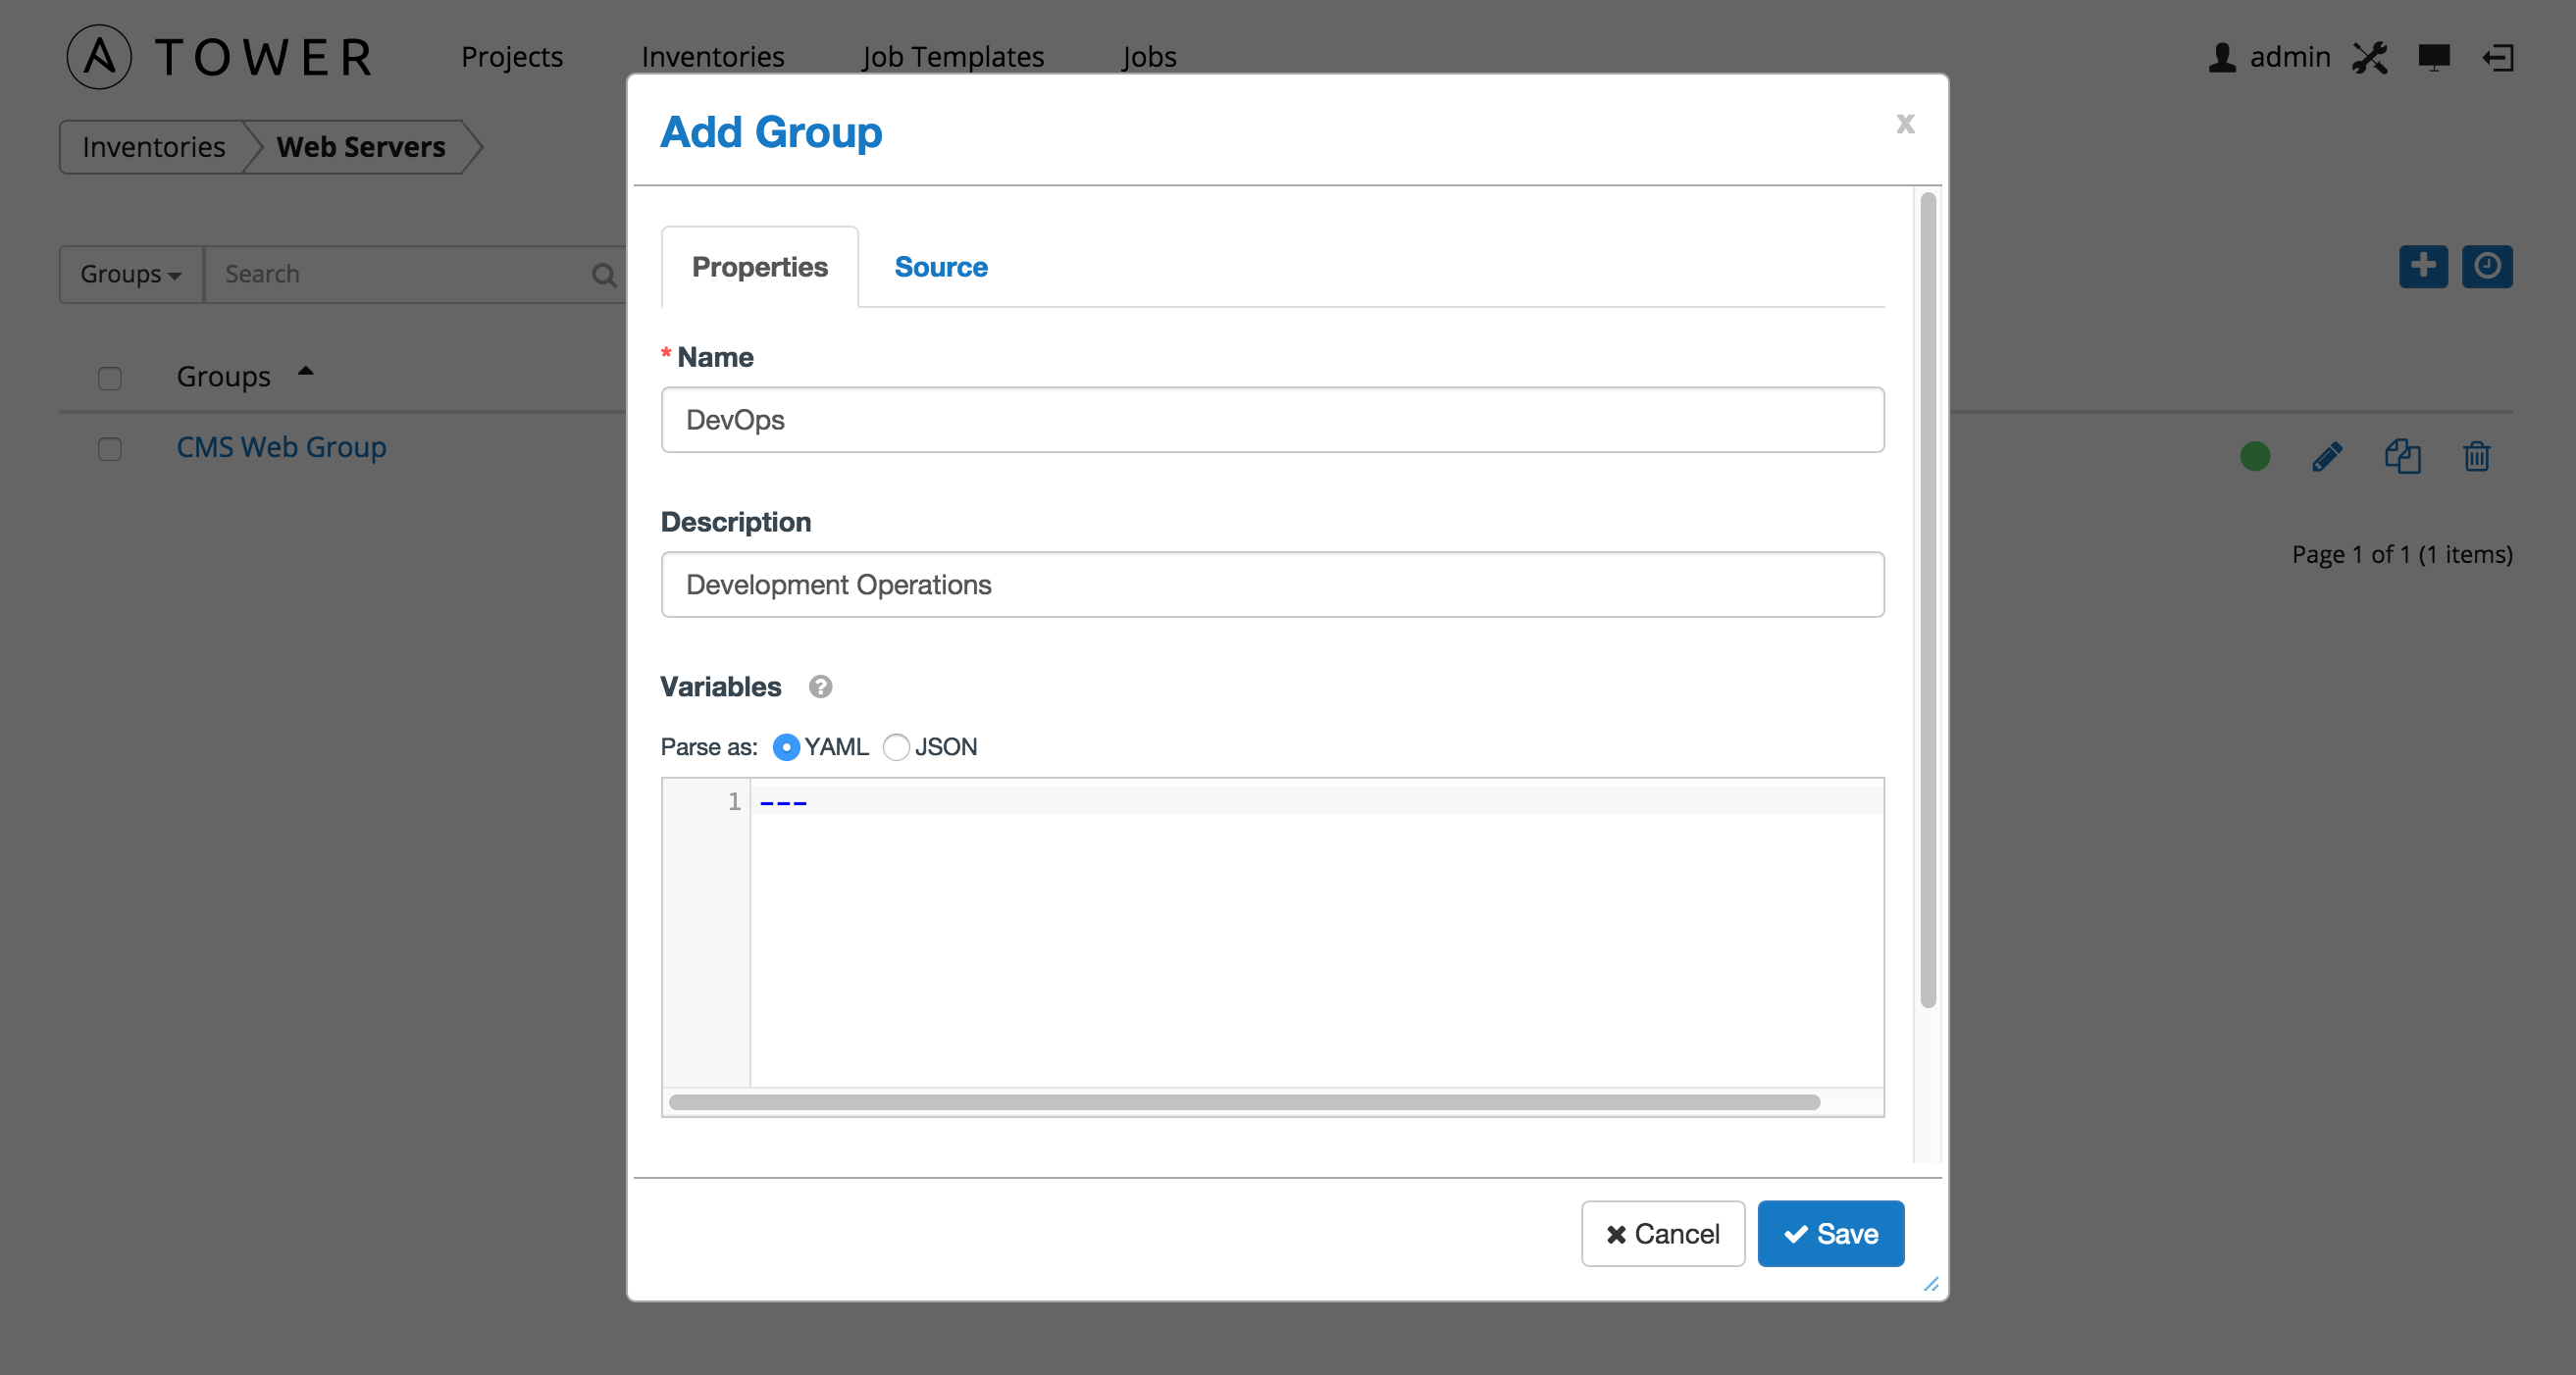
Enter the appropriate details into the following fields and click Save.
- Name: Required
- Description: Enter an arbitray description as appropriate
- Variables: Enter definitions and values to be applied to all hosts in this group. Enter variables using either JSON or YAML syntax. Use the radio button to toggle between the two.
By default, the group Source is manual, meaning that the hosts must be entered into Tower manually. (Refer to Add a new host for more information on managing hosts individually.)
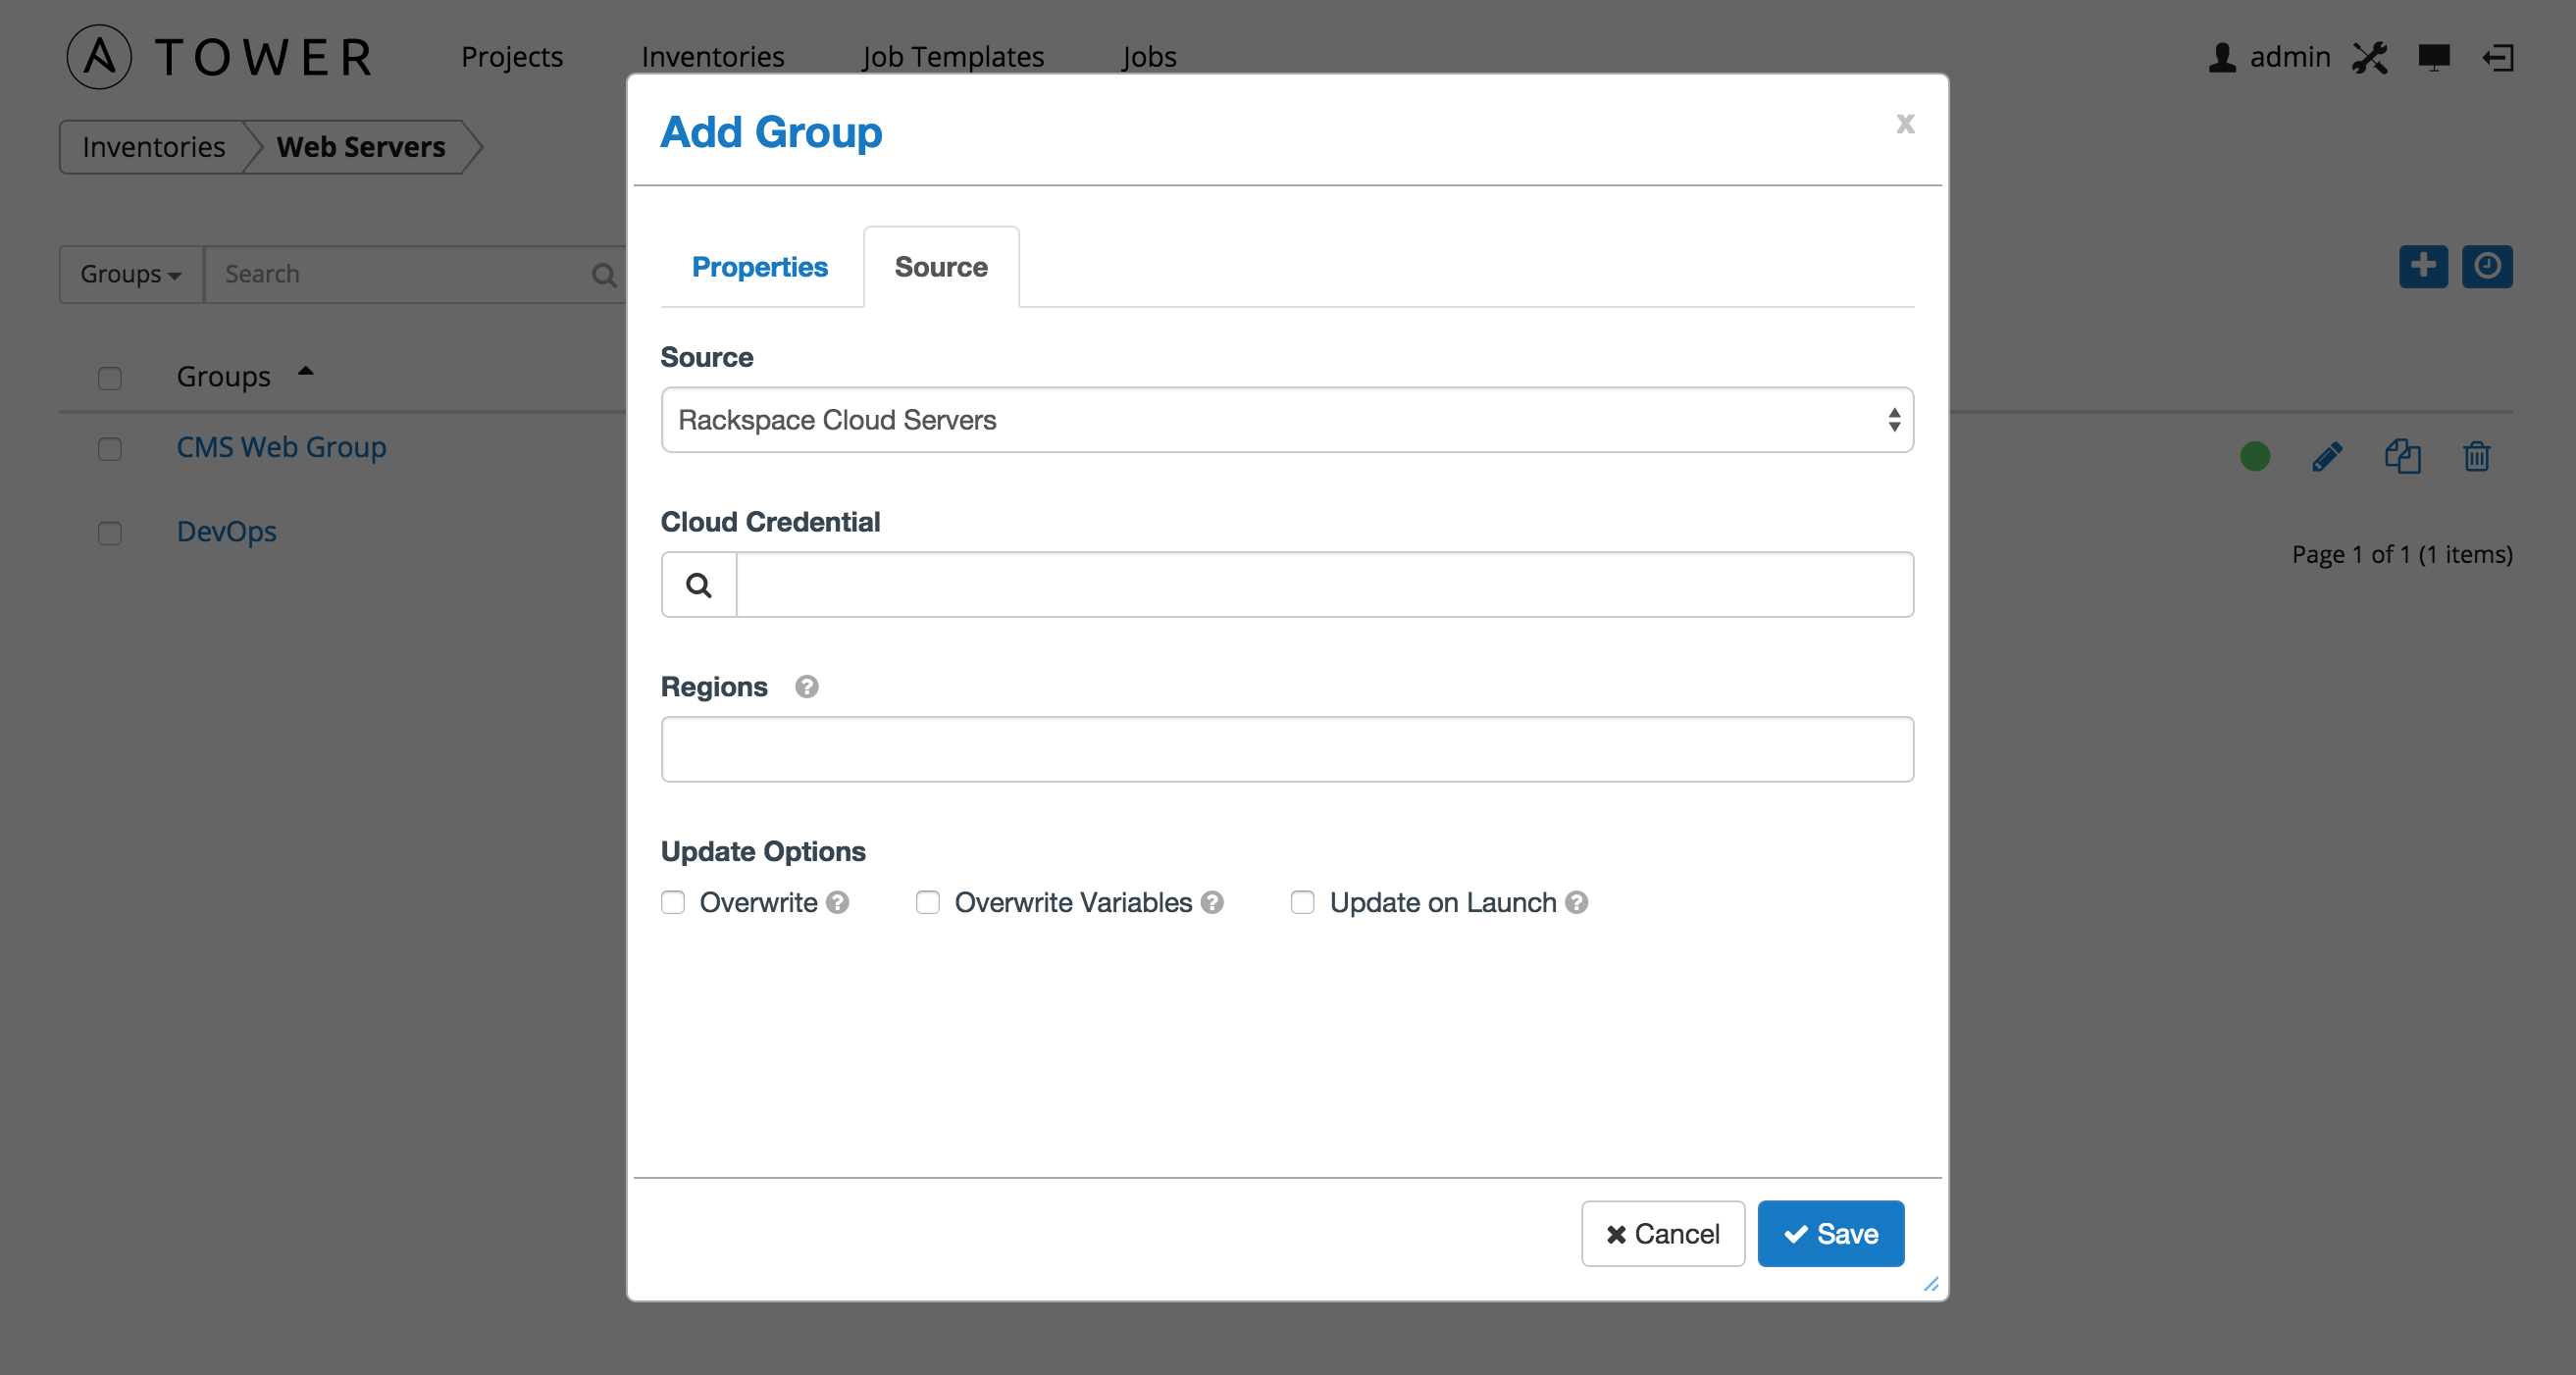
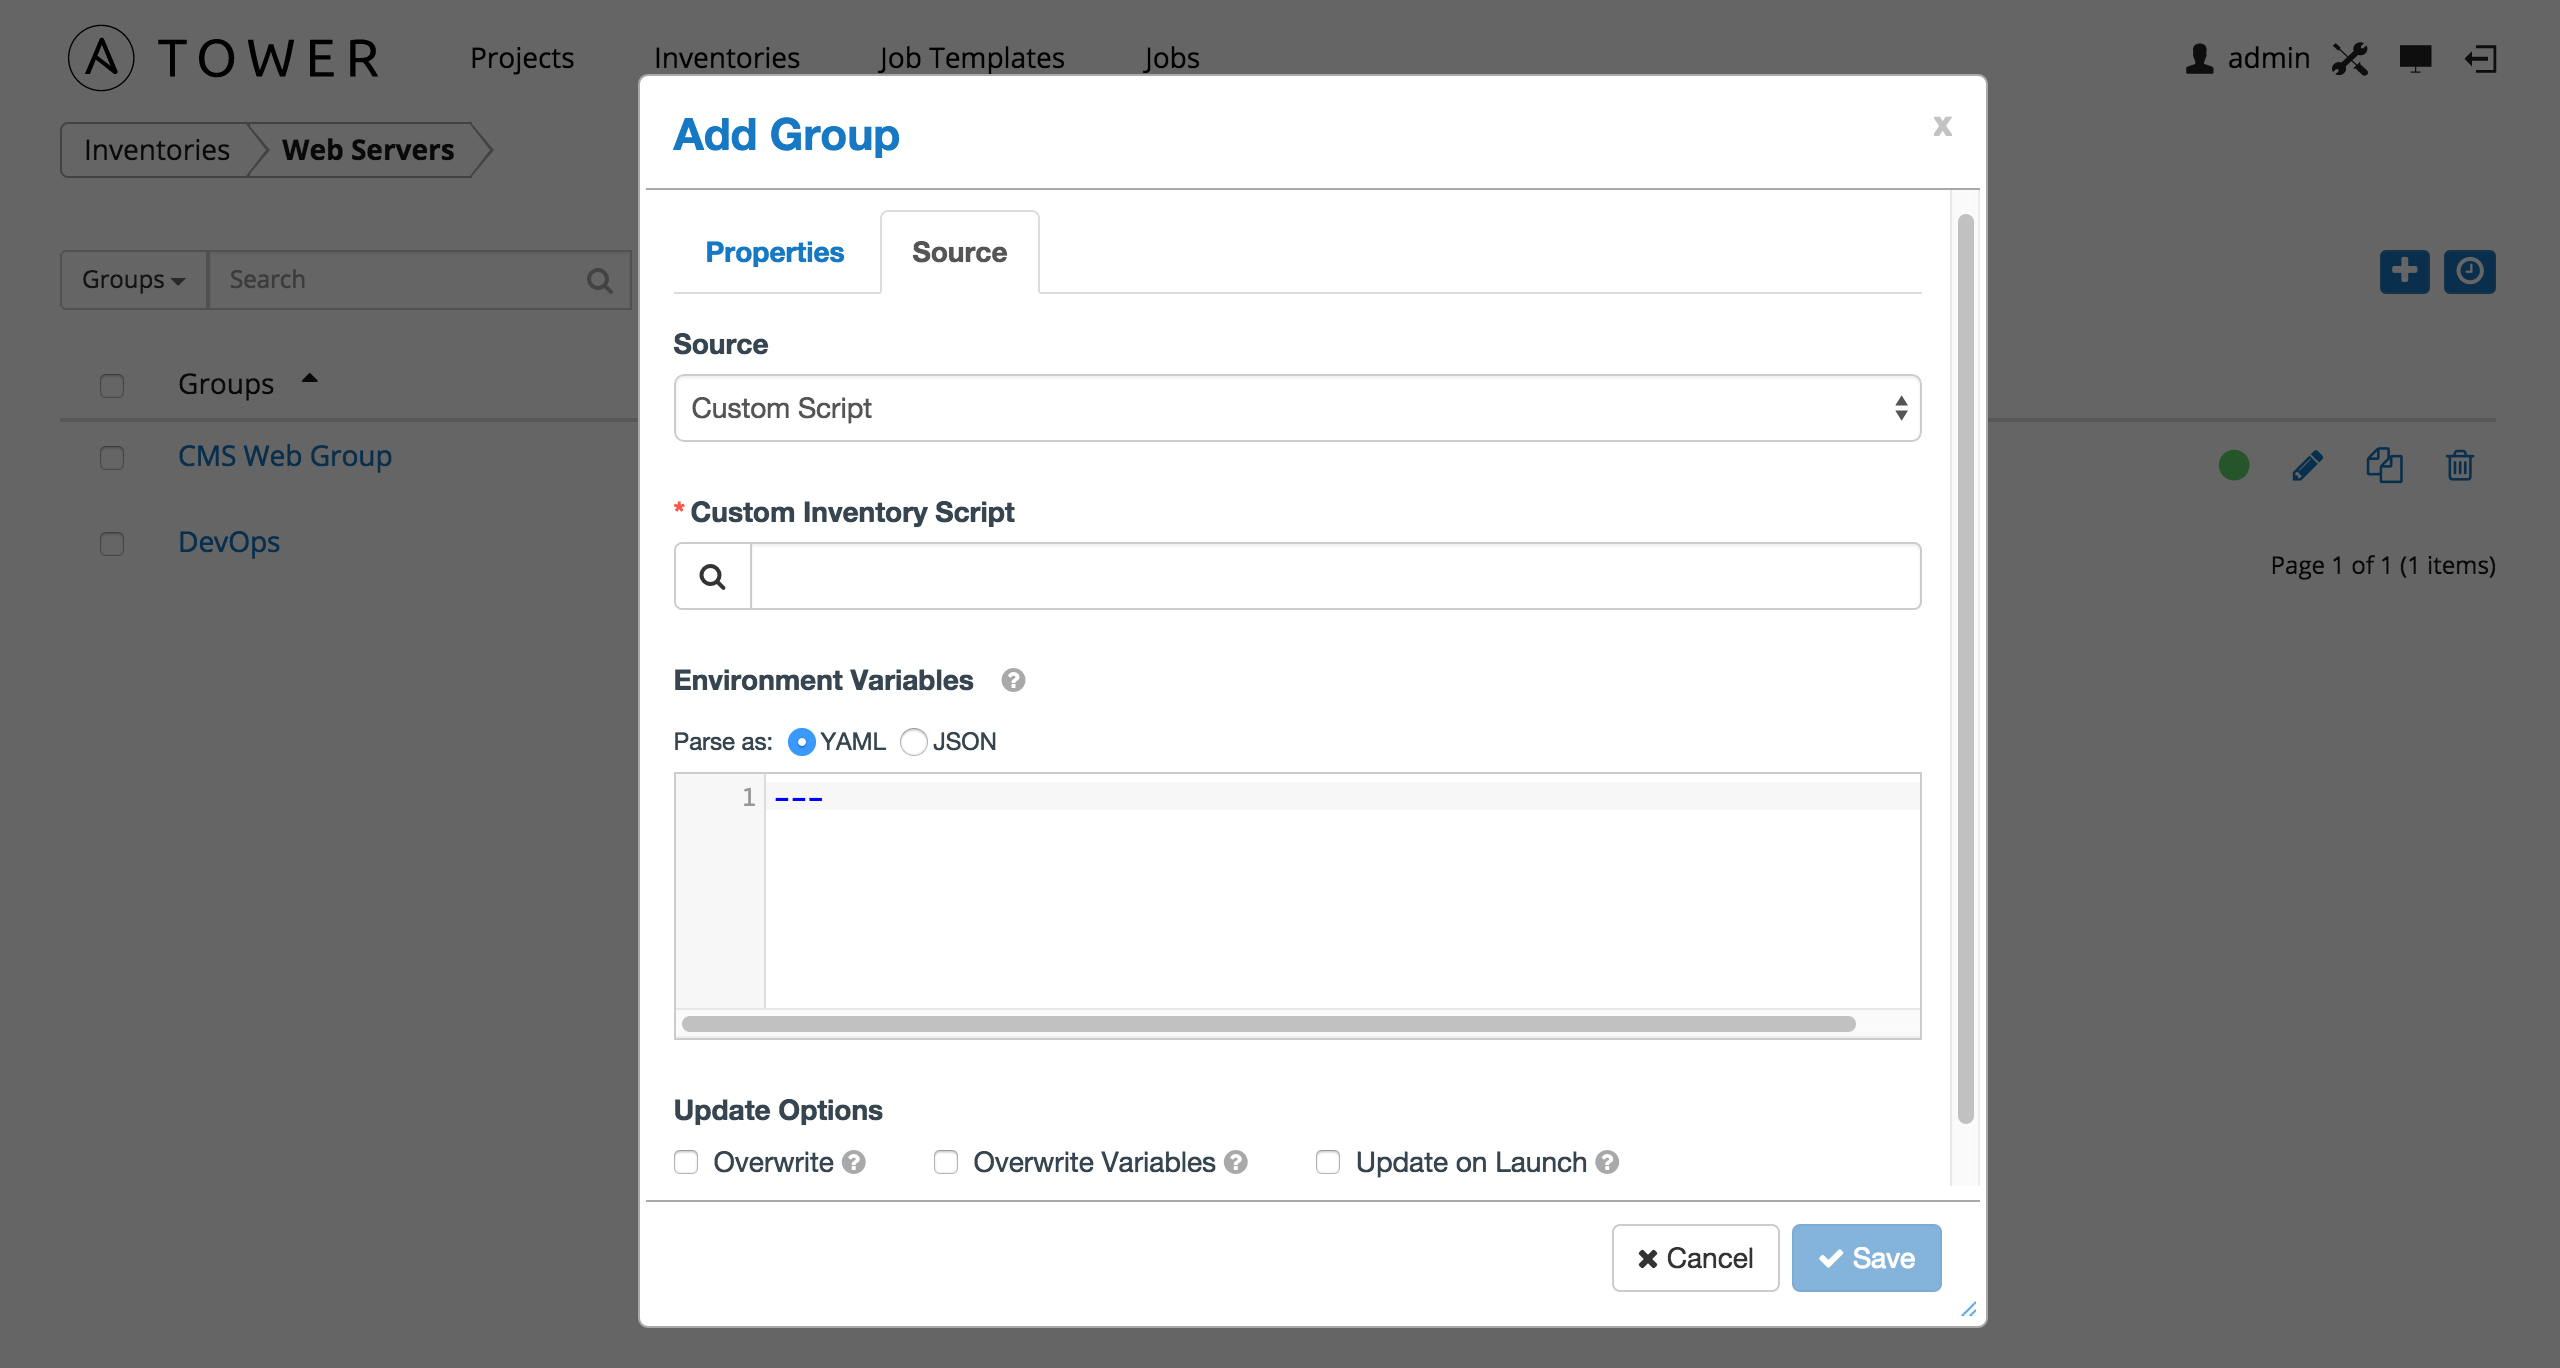
To synchronize the inventory group from a cloud source, select the Source tab and choose the appropriate source from the Source menu. Tower 2.2 supports Amazon Web Services EC2, Rackspace Cloud Servers, Google Compute Engine, VMware vCenter, Microsoft Azure, OpenStack, and custom scripts added by the administrator.
All cloud inventory sources have the following update options:
- Overwrite: When checked all child groups and hosts not found on the remote source is deleted from the local inventory. When not checked any local child hosts and groups not found on the external source remains untouched by the inventory update process.
- Overwrite Variables: If checked, all variables for child groups and hosts will be removed and replaced by those found on the external source. When not checked a merge is performed, combining local variables with those found on the external source.
- Update on Launch: Each time a job runs using this inventory, refresh the inventory from the selected source before executing job tasks. To avoid job overflows if jobs are spawned faster than the inventory can sync, selecting this allows you to configure a Cache Timeout to cache prior inventory syncs for a certain number of seconds.
The “Update on Launch” setting refers to a dependency system for projects and inventory, and it will not specifically exclude two jobs from running at the same time. If a cache timeout is specified, then the dependencies for the second job is created and it uses the project and inventory update that the first job spawned. Both jobs then wait for that project and/or inventory update to finish before proceeding. If they are different job templates, they can then both start and run at the same time, if the system has the capacity to do so.
Note
If you intend to use Tower’s provisioning callback feature with a dynamic inventory source, “Update on Launch” should be set for the inventory group.
10.3.1.2. Rackspace Cloud Servers
To configure a group for Rackspace, select Rackspace Cloud Servers and enter the following details:
- Cloud Credential: Choose from an existing Credential. For more information, refer to Credentials.
- Regions: Click on the regions field to see a list of regions for your cloud provider. You can select multiple regions, or choose “All” to include all regions. Tower will only be updated with Hosts associated with the selected regions.
You can also configure Update Options.
- Overwrite: If checked, all child groups and hosts not found on the external source are deleted from the local inventory. When not checked, local child hosts and groups not found on the external source remain untouched by the inventory update process.
- Overwrite Variables: If checked, all variables for child groups and hosts are removed and replaced by those found on the external source. When not checked, a merge is performed, combining local variables with those found on the external source.
- Update on Launch: Each time a job runs using this inventory, refresh the inventory from the selected source before executing job tasks.
10.3.1.3. Amazon Web Services EC2
To configure a group for AWS, select Amazon EC2 and enter the following details:
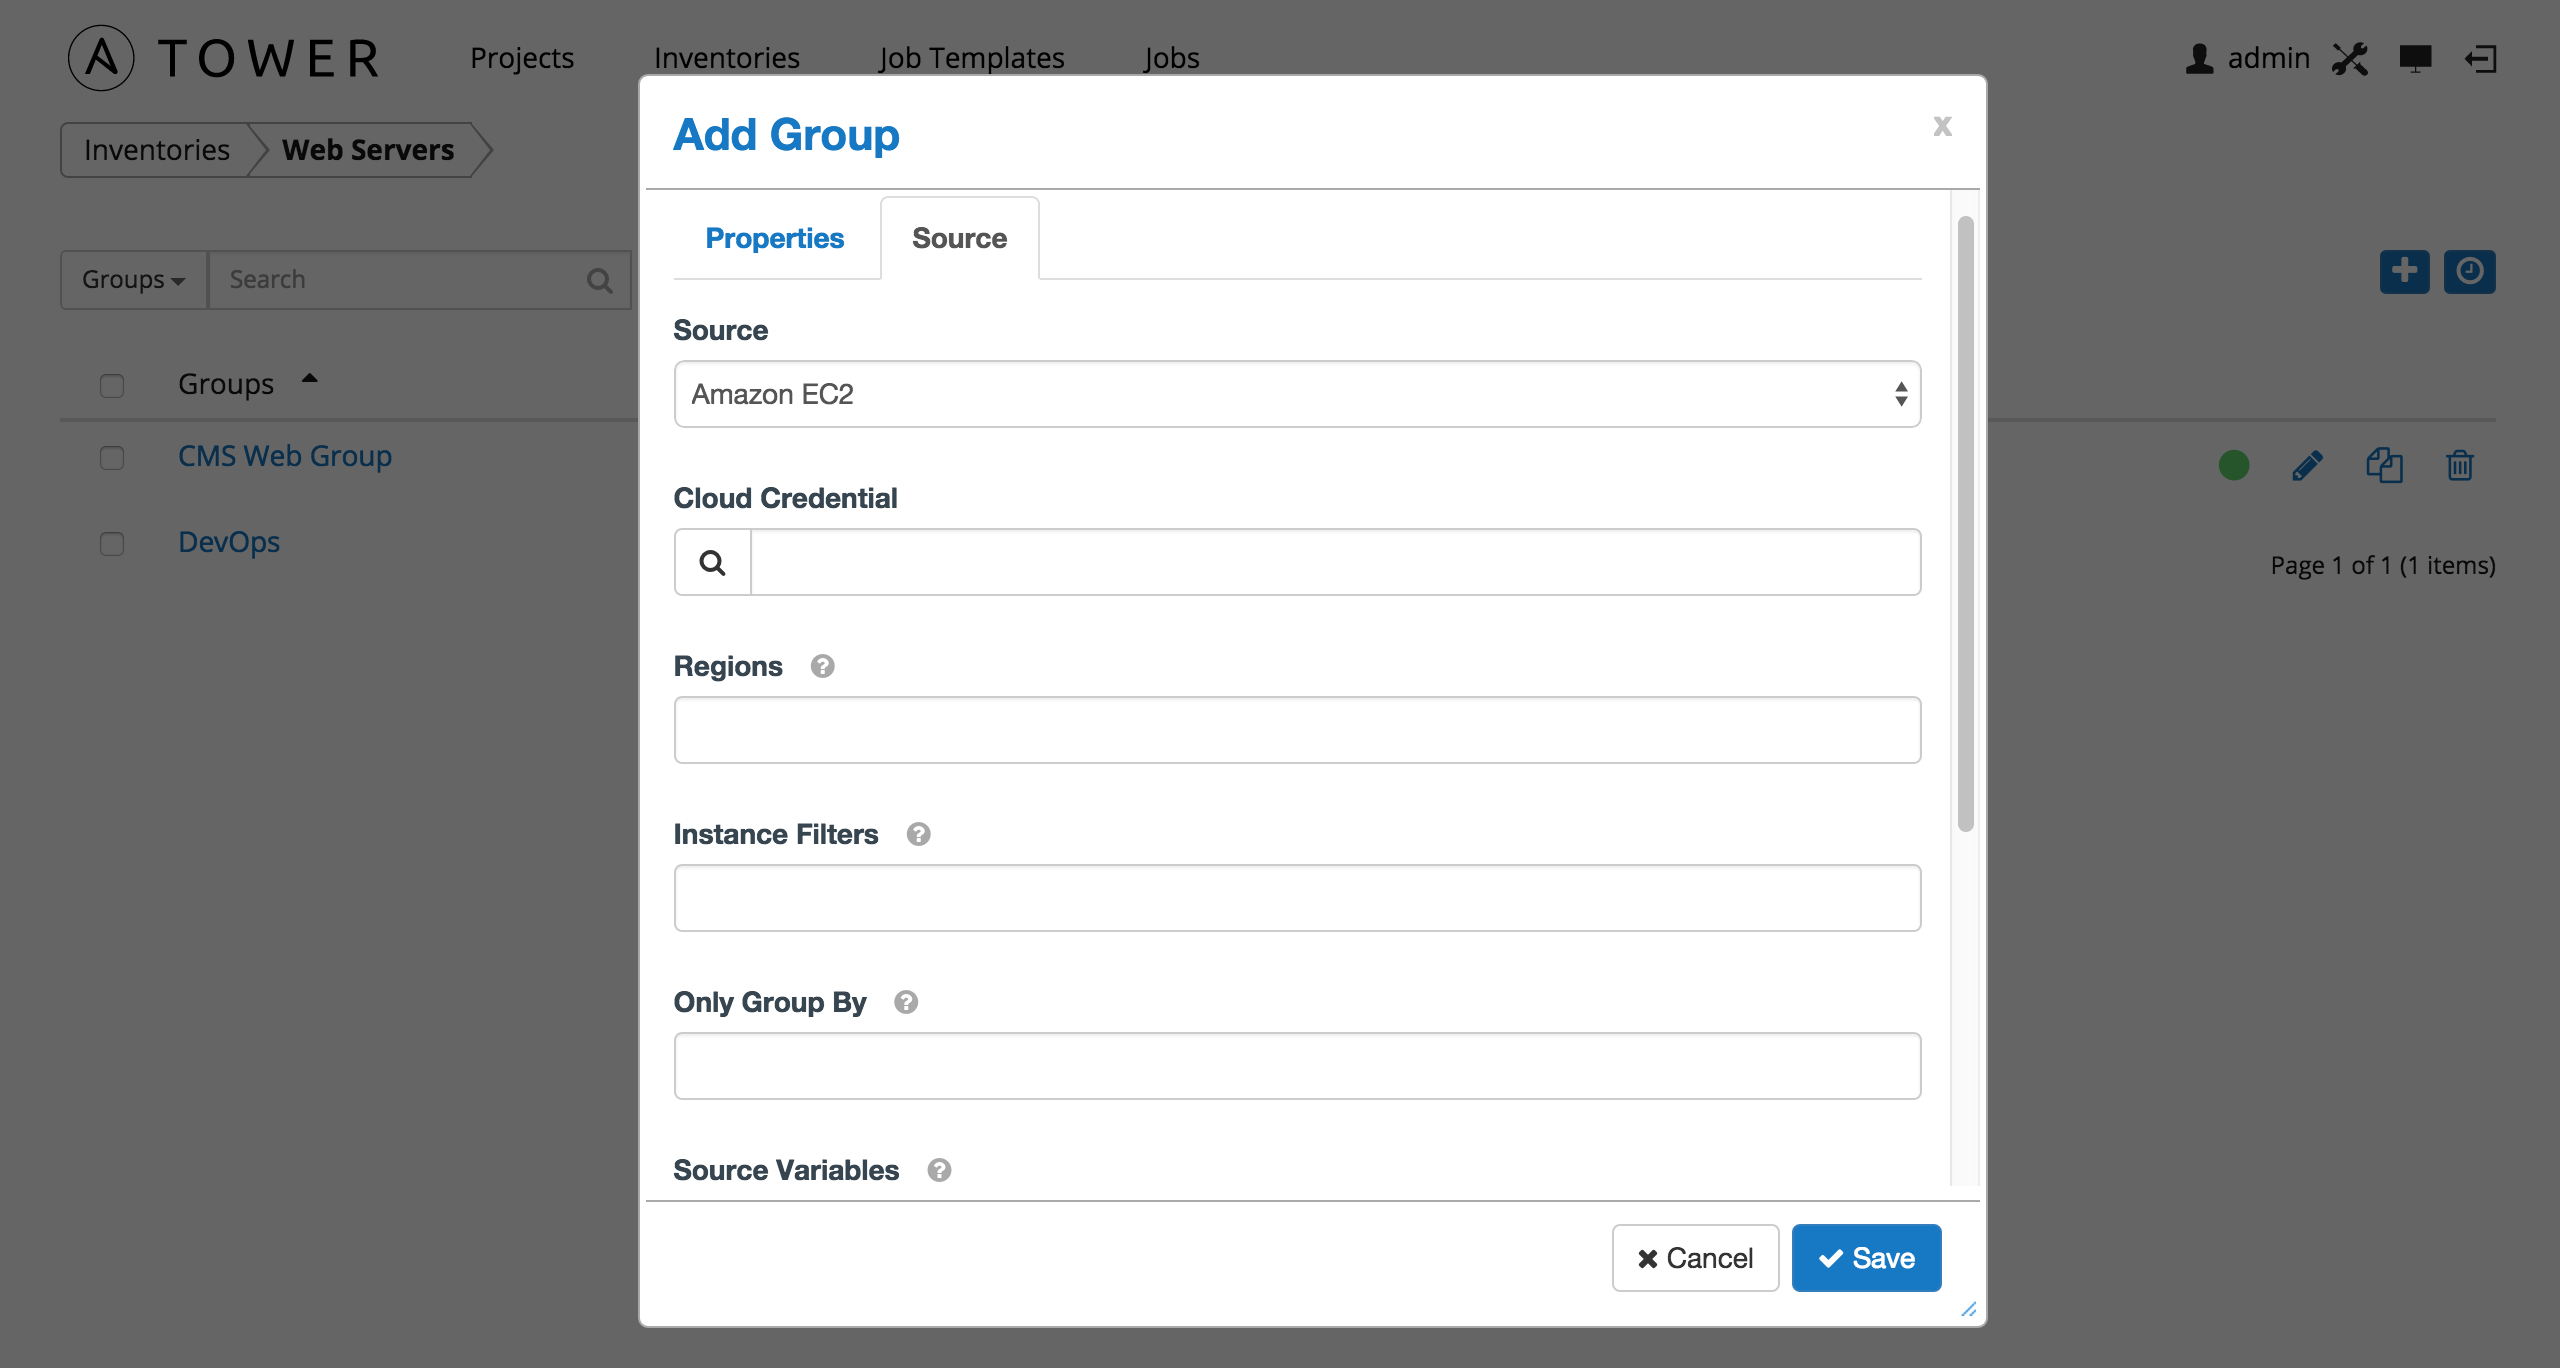
Cloud Credential: Choose from an existing credential (for more information, refer to Credentials).
If Tower is running on an EC2 instance with an assigned IAM Role, the credential may be omitted, and the security credentials from the instance metadata will be used instead. For more information on using IAM Roles, refer to the IAM_Roles_for_Amazon_EC2_documentation_at_Amazon.
Regions: Click on the regions field to see a list of regions for your cloud provider. You can select multiple regions, or choose “All” to include all regions. Tower will only be updated with Hosts associated with the selected regions.
Instance Filters: Rather than importing your entire Amazon EC2 inventory, filter the instances returned by the inventory script based on a variety of metadata. Hosts are imported if they match any of the filters entered here.
Examples:
- To limit to hosts having the tag
TowerManaged: Entertag-key=TowerManaged - To limit to hosts using either the key-name
stagingorproduction: Enterkey-name=staging, key-name=production - To limit to hosts where the
Nametag begins withtest: Entertag:Name=test*
For more information on the filters that can be used here, refer to the DescribeInstances documentation at Amazon.
Only Group By
By default, Tower creates groups based on the following Amazon EC2 parameters:
- Availability Zones
- Image ID
- Instance Type
- Key Name
- Region
- Security Group
- Tags (by name)
- VPC ID
If you do not want all these groups created, select from the dropdown the list of groups that you would like created by default. You can also select Instance ID to create groups based on the Instance ID of your instances.
Source Variables
Override variables found in ec2.ini and used by the inventory update script. For a detailed description of these variables view ec2.ini in the Ansible GitHub repo.
Enter variables using either JSON or YAML syntax. Use the radio button to toggle between the two.
You can also configure Update Options.
- Overwrite: If checked, all child groups and hosts not found on the external source are deleted from the local inventory. When not checked, local child hosts and groups not found on the external source remain untouched by the inventory update process.
- Overwrite Variables: If checked, all variables for child groups and hosts are removed and replaced by those found on the external source. When not checked, a merge is performed, combining local variables with those found on the external source.
- Update on Launch: Each time a job runs using this inventory, refresh the inventory from the selected source before executing job tasks.
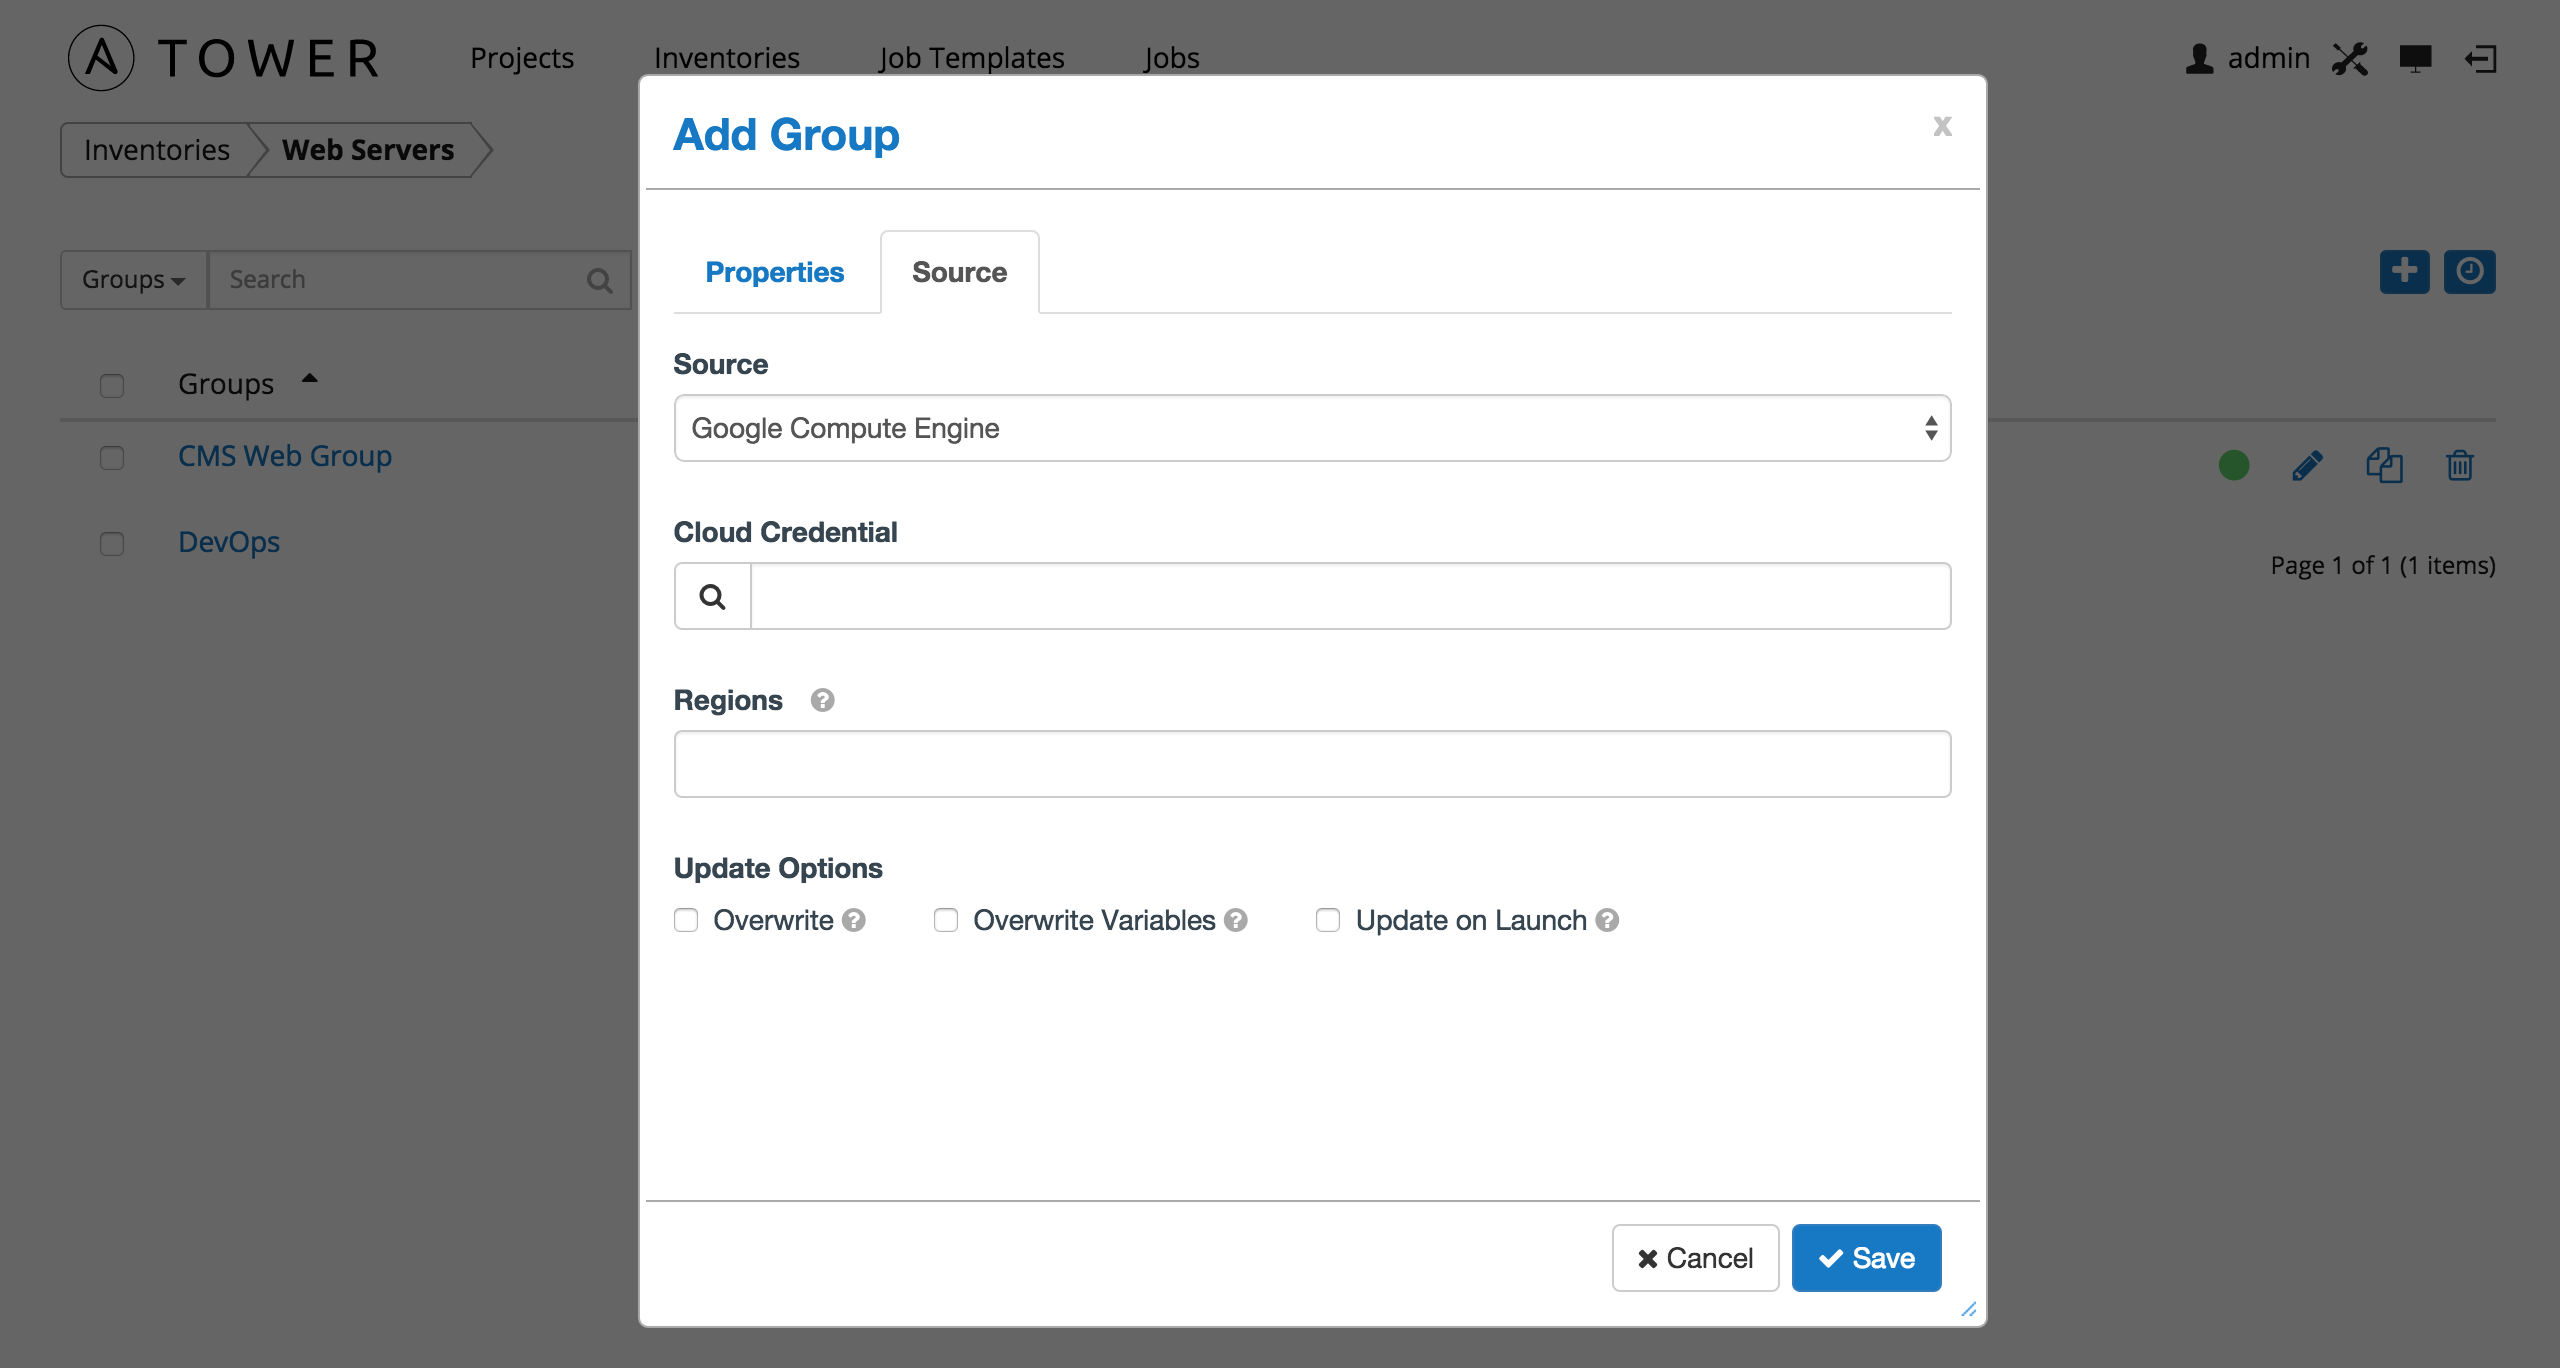
10.3.1.4. Google Compute Engine
To configure a group for Google Compute Engine, select Google Compute Engine and enter the following details:
- Cloud Credential: Choose from an existing Credential. For more information, refer to Credentials.
- Regions: Click on the regions field to see a list of regions for your cloud provider. You can select multiple regions, or choose “All” to include all regions. Tower will only be updated with Hosts associated with the selected regions.
You can also configure Update Options.
- Overwrite: If checked, all child groups and hosts not found on the external source are deleted from the local inventory. When not checked, local child hosts and groups not found on the external source remain untouched by the inventory update process.
- Overwrite Variables: If checked, all variables for child groups and hosts are removed and replaced by those found on the external source. When not checked, a merge is performed, combining local variables with those found on the external source.
- Update on Launch: Each time a job runs using this inventory, refresh the inventory from the selected source before executing job tasks.
10.3.1.5. Microsoft Azure
To configure a group for Microsoft Azure, select Microsoft Azure and enter the following details:
- Cloud Credential: Choose from an existing Credential. For more information, refer to Credentials.
- Regions: Click on the regions field to see a list of regions for your cloud provider. You can select multiple regions, or choose “All” to include all regions. Tower will only be updated with Hosts associated with the selected regions.
You can also configure Update Options.
- Overwrite: If checked, all child groups and hosts not found on the external source are deleted from the local inventory. When not checked, local child hosts and groups not found on the external source remain untouched by the inventory update process.
- Overwrite Variables: If checked, all variables for child groups and hosts are removed and replaced by those found on the external source. When not checked, a merge is performed, combining local variables with those found on the external source.
- Update on Launch: Each time a job runs using this inventory, refresh the inventory from the selected source before executing job tasks.

10.3.1.6. VMware vCenter
To configure a group for VMware vCenter, select VMware and enter the following details:
- Cloud Credential: Choose from an existing Credential. For more information, refer to Credentials.
- Source Variables: Override variables found in
vmware.iniand used by the inventory update script. For a detailed description of these variables view vmware.ini in the Ansible GitHub repo. Enter variables using either JSON or YAML syntax. Use the radio button to toggle between the two.
You can also configure Update Options.
- Overwrite: If checked, all child groups and hosts not found on the external source are deleted from the local inventory. When not checked, local child hosts and groups not found on the external source remain untouched by the inventory update process.
- Overwrite Variables: If checked, all variables for child groups and hosts are removed and replaced by those found on the external source. When not checked, a merge is performed, combining local variables with those found on the external source.
- Update on Launch: Each time a job runs using this inventory, refresh the inventory from the selected source before executing job tasks.

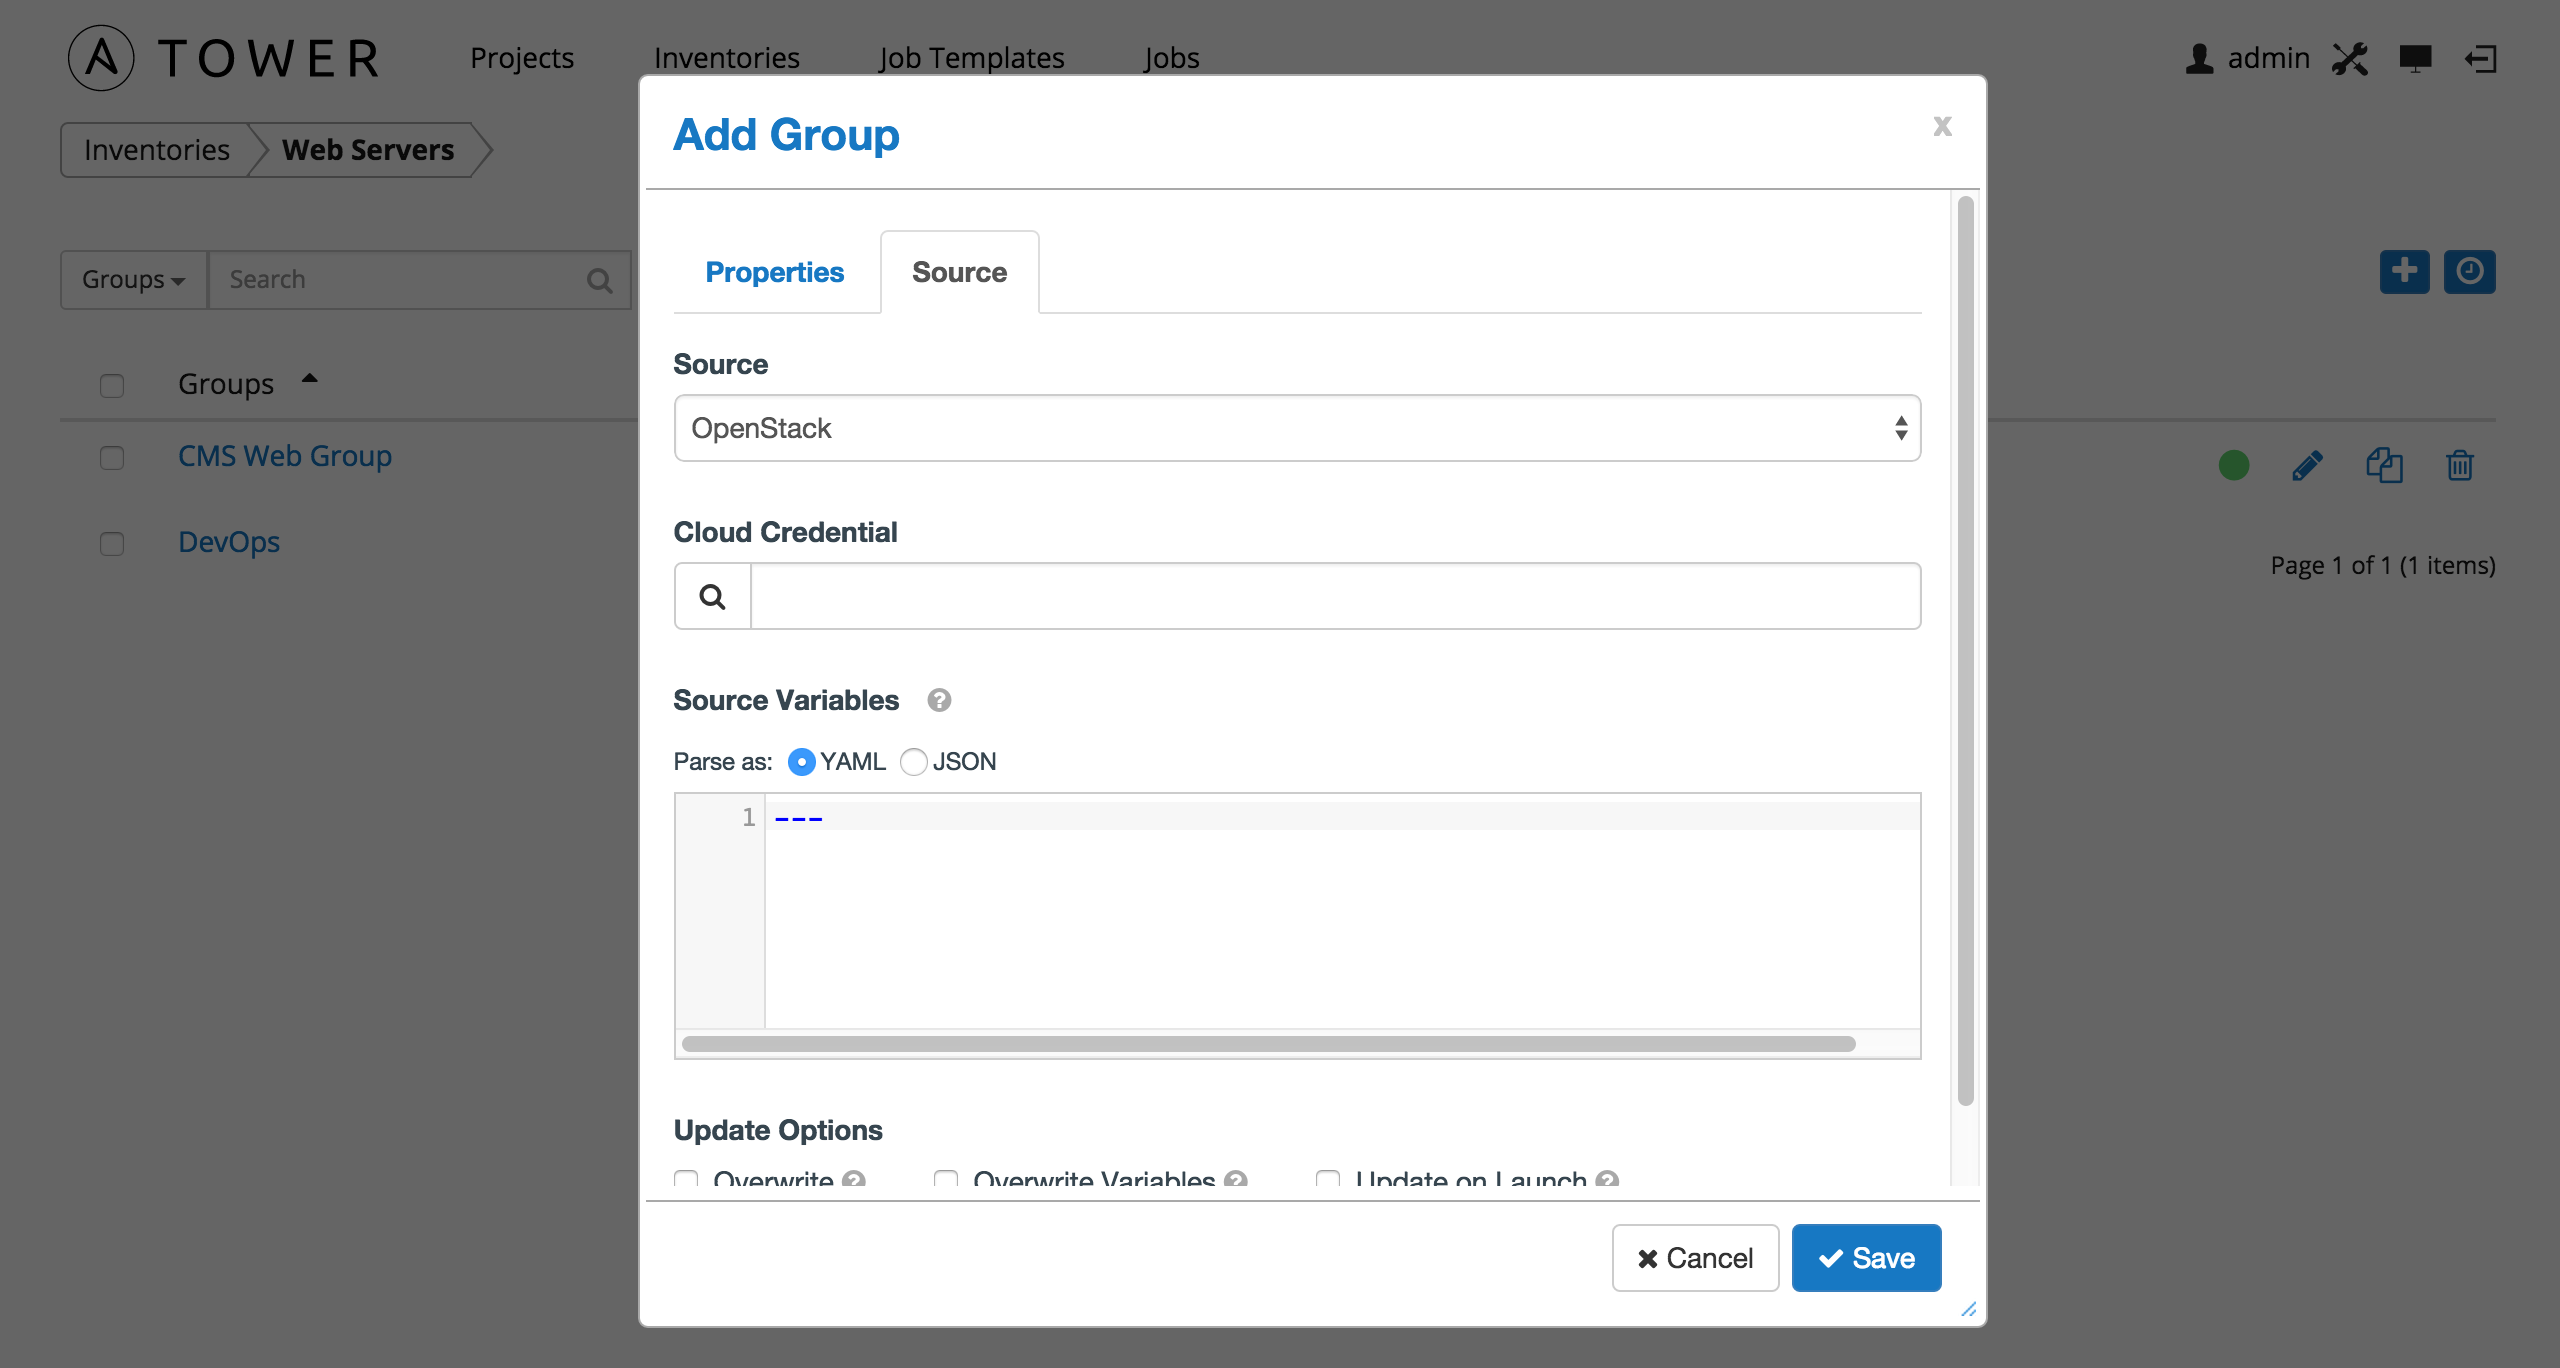
10.3.1.7. OpenStack
To configure a group for OpenStack, select OpenStack and enter the following details:
- Cloud Credential: Choose from an existing Credential. For more information, refer to Credentials.
- Source Variables: Override variables found in
openstack.ymland used by the inventory update script. For a detailed description of these variables view openstack.yml in the Ansible GitHub repo. Enter variables using either JSON or YAML syntax. Use the radio button to toggle between the two.
You can also configure Update Options.
- Overwrite: If checked, all child groups and hosts not found on the external source are deleted from the local inventory. When not checked, local child hosts and groups not found on the external source remain untouched by the inventory update process.
- Overwrite Variables: If checked, all variables for child groups and hosts are removed and replaced by those found on the external source. When not checked, a merge is performed, combining local variables with those found on the external source.
- Update on Launch: Each time a job runs using this inventory, refresh the inventory from the selected source before executing job tasks.
10.3.1.8. Custom Script
Tower allows you to use a custom dynamic inventory script, if your administrator has added one.
To configure a group to use a Custom Inventory Script, select Custom Script and enter the following details:
Custom Inventory Script: Choose from an existing Inventory Script. For information on how to add custom inventory scripts to Tower, refer to Custom Inventory Scripts.
Environment Variables: Set variables in the environment to be used by the inventory update script. The variables would be specific to the script that you have written.
Enter variables using either JSON or YAML syntax. Use the radio button to toggle between the two.
You can also configure Update Options.
- Overwrite: If checked, all child groups and hosts not found on the external source are deleted from the local inventory. When not checked, local child hosts and groups not found on the external source remain untouched by the inventory update process.
- Overwrite Variables: If checked, all variables for child groups and hosts are removed and replaced by those found on the external source. When not checked, a merge is performed, combining local variables with those found on the external source.
- Update on Launch: Each time a job runs using this inventory, refresh the inventory from the selected source before executing job tasks.
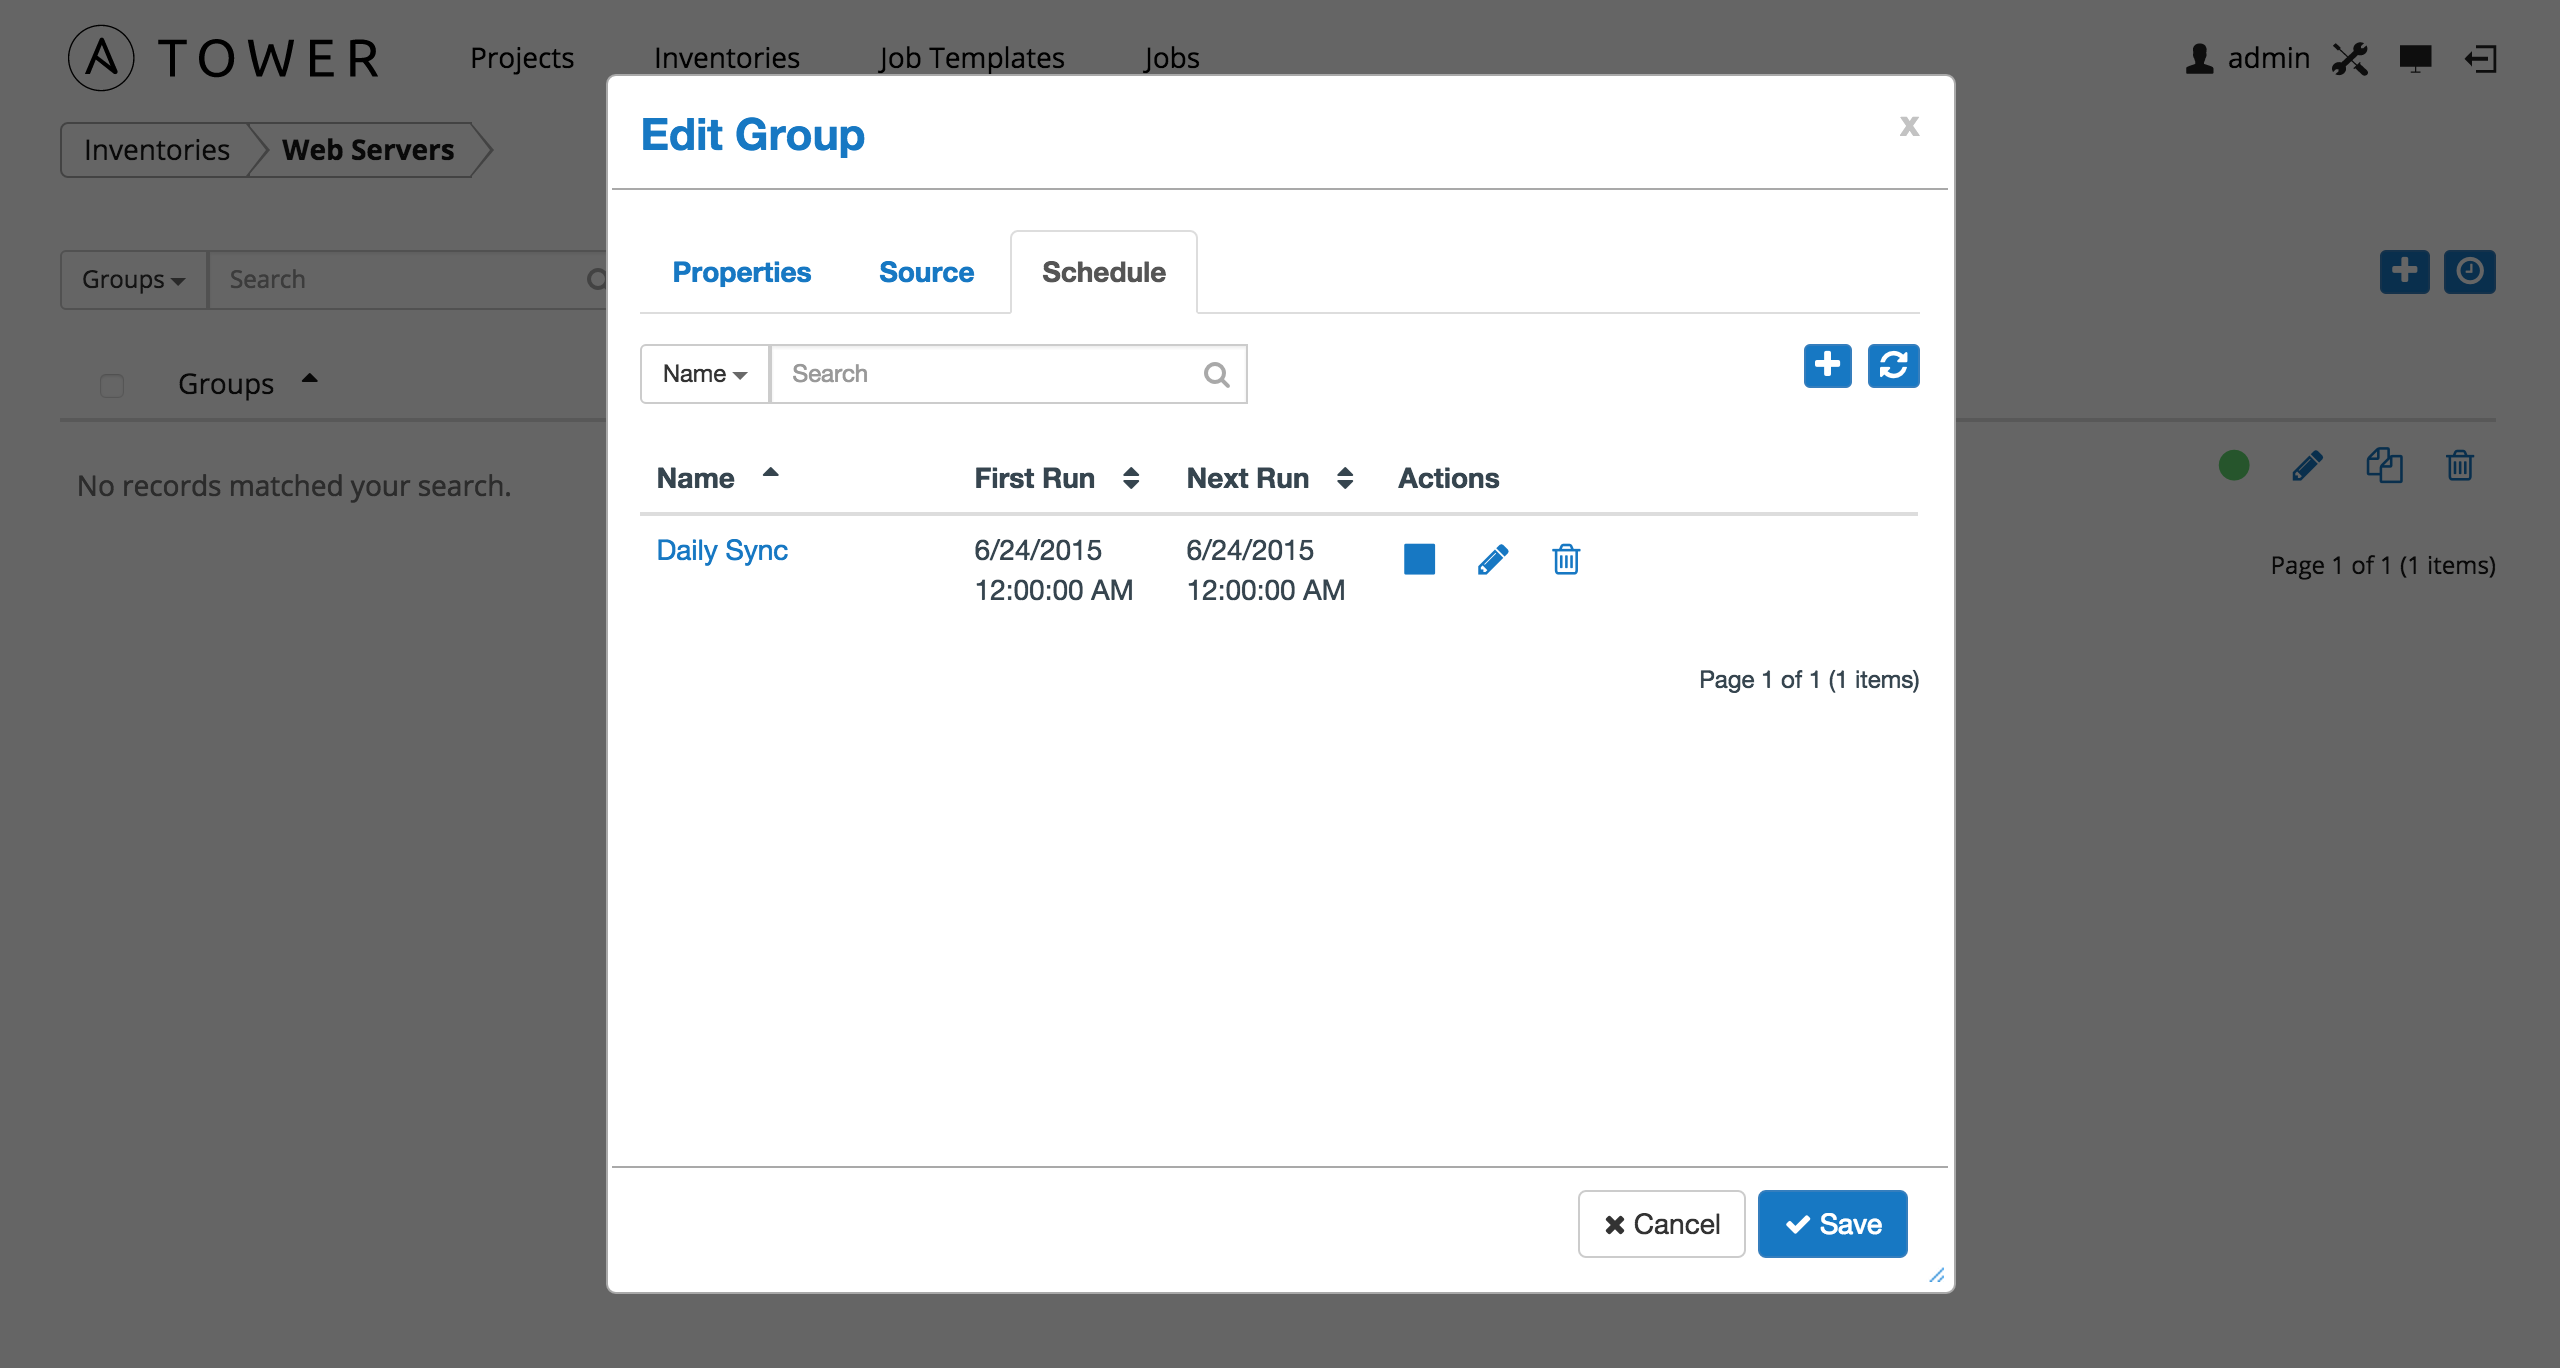
10.3.1.9. Scheduling
For groups sourced from a cloud service, the inventory update process may be scheduled via the Schedule tab. To access the Schedule tab, click the button beside the Inventory Group name to open the Edit Group dialog.
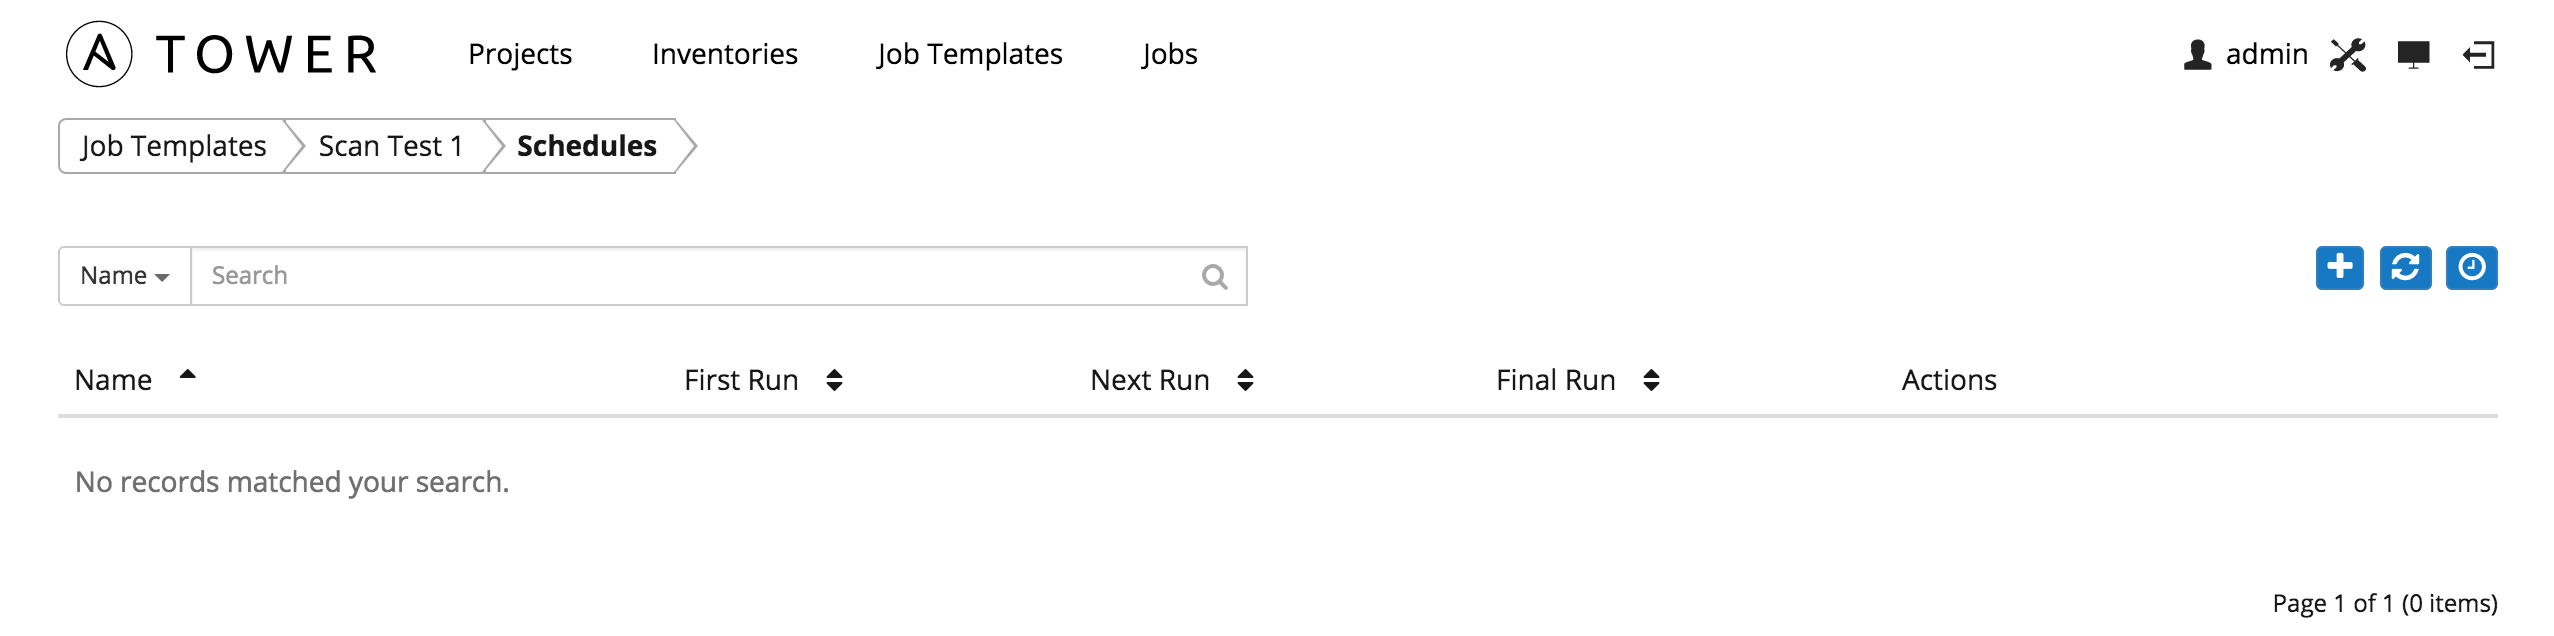
This screen displays a list of the schedules that are currently available for the selected Group. The schedule list may be sorted and searched by Name.
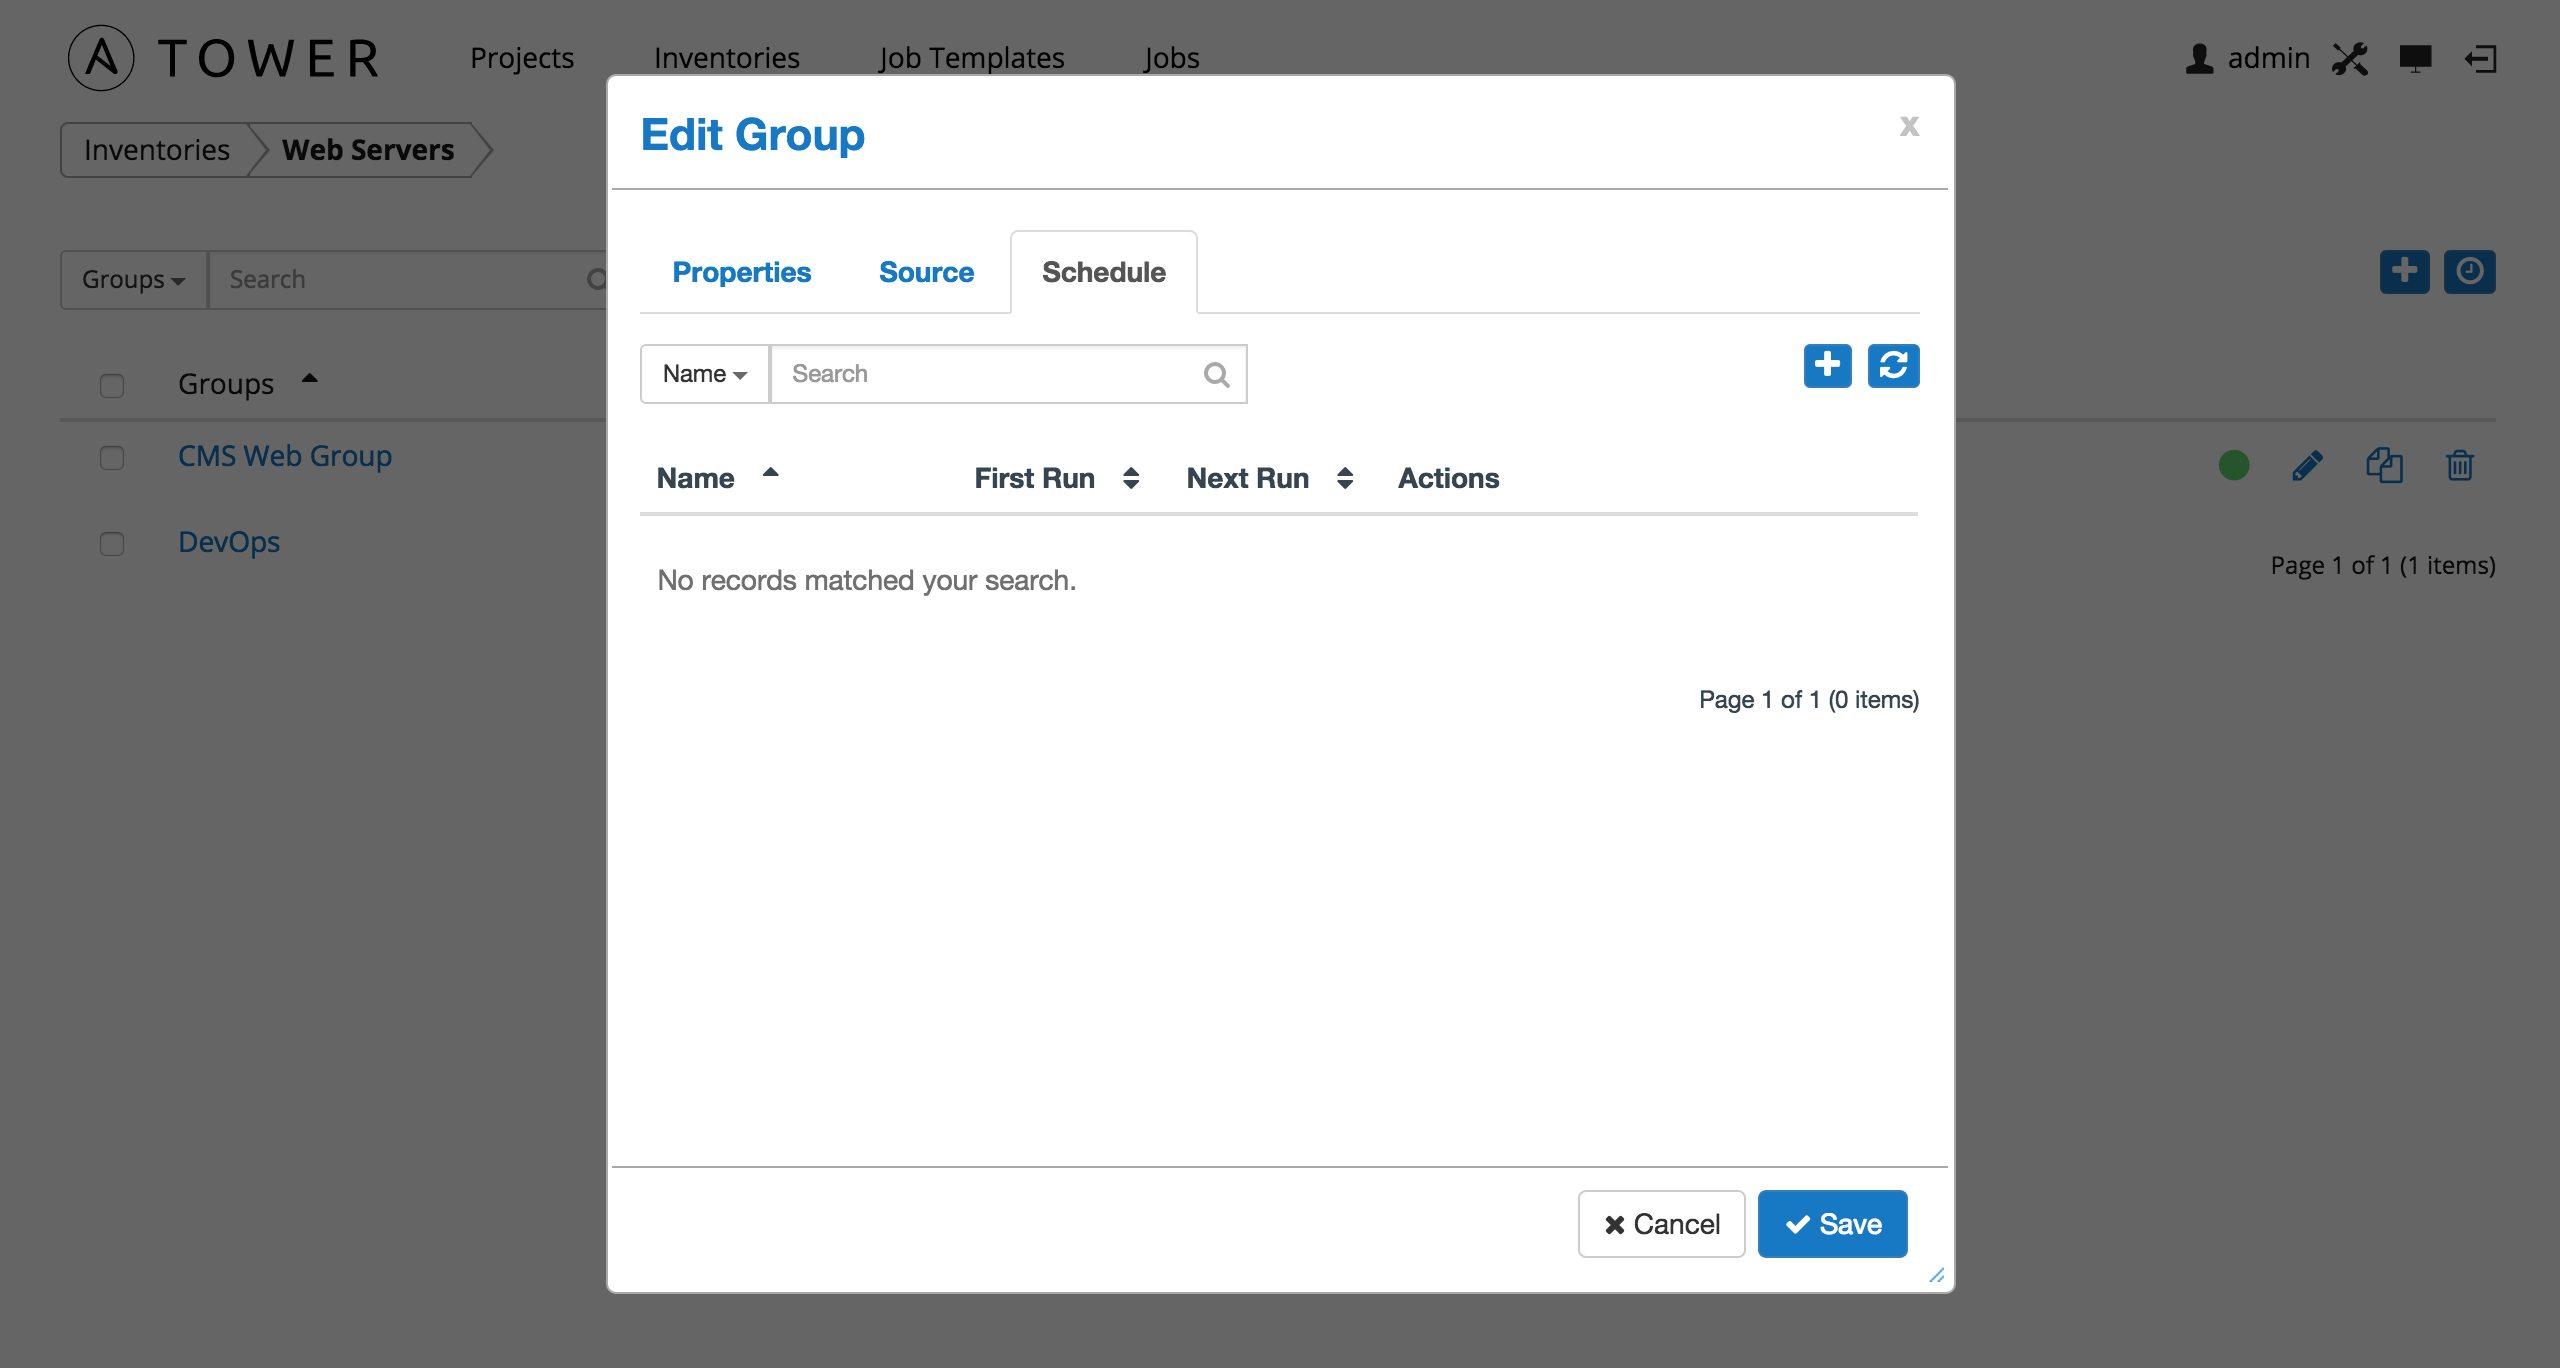
The list of schedules includes:
- Name (Clicking the schedule name opens the Edit Schedule dialog)
- First Run
- Next Run
Buttons located in the upper right corner of the Schedules screen provide the following actions:
- Create a new schedule
- Refresh this view
10.3.1.9.1. Add a new schedule
To create a new schedule click the button.
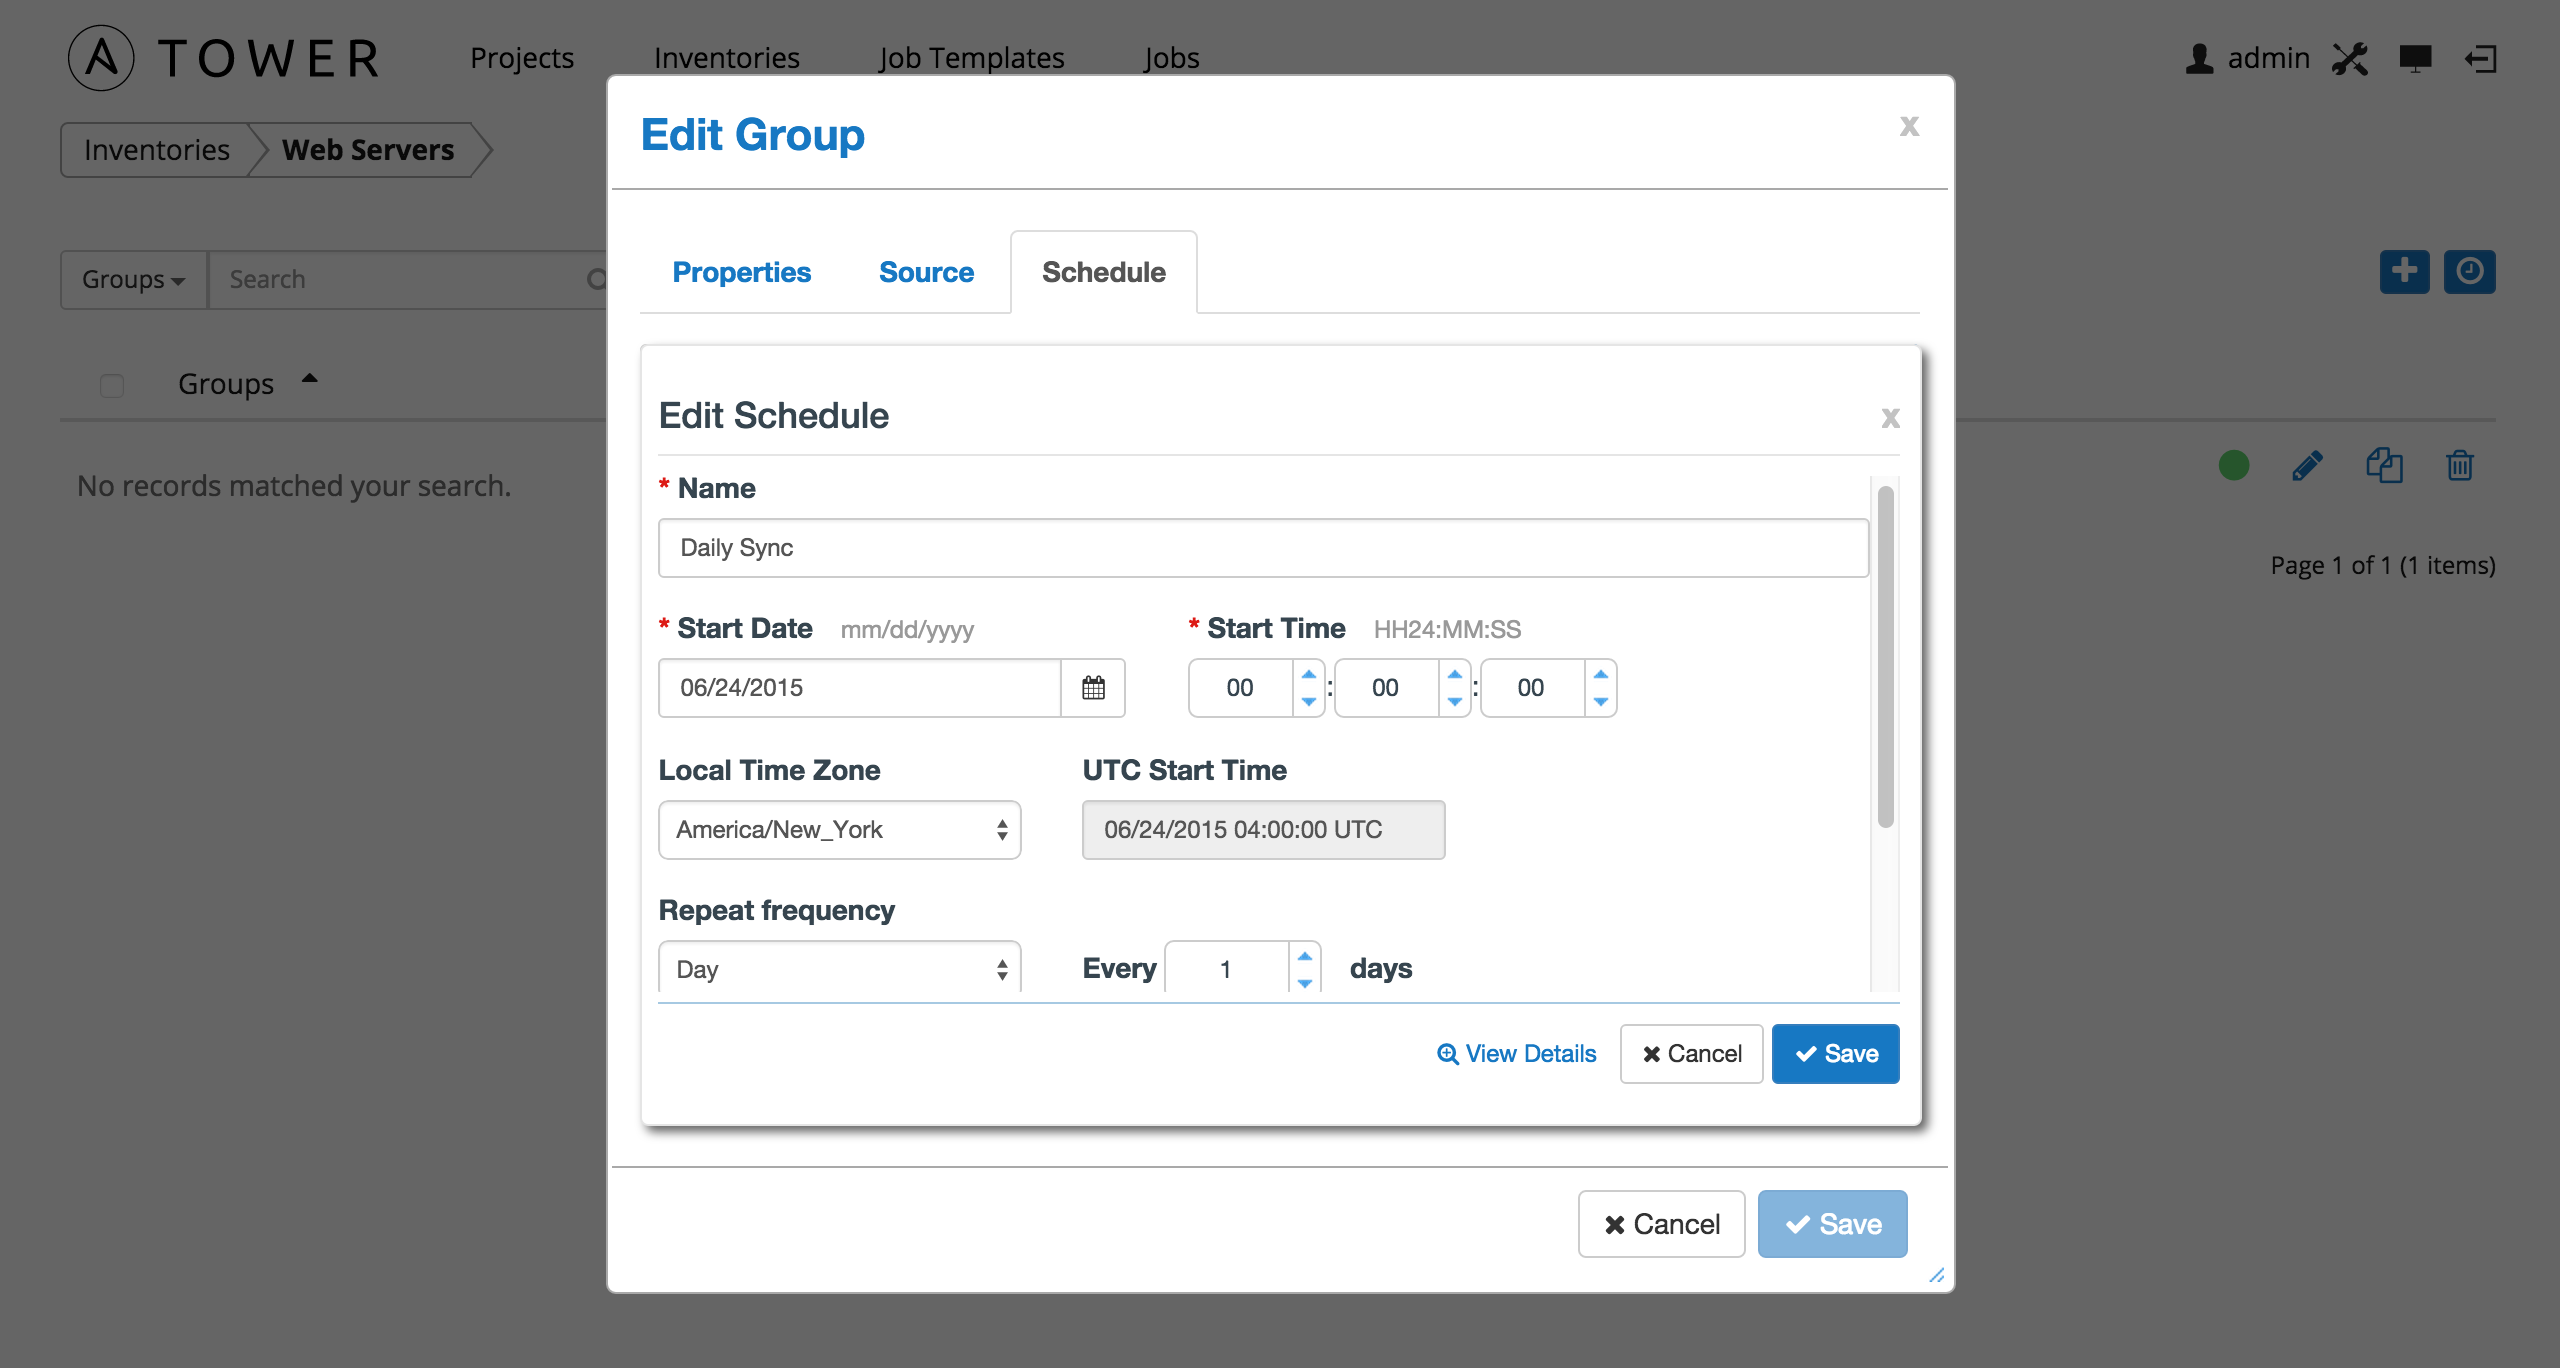
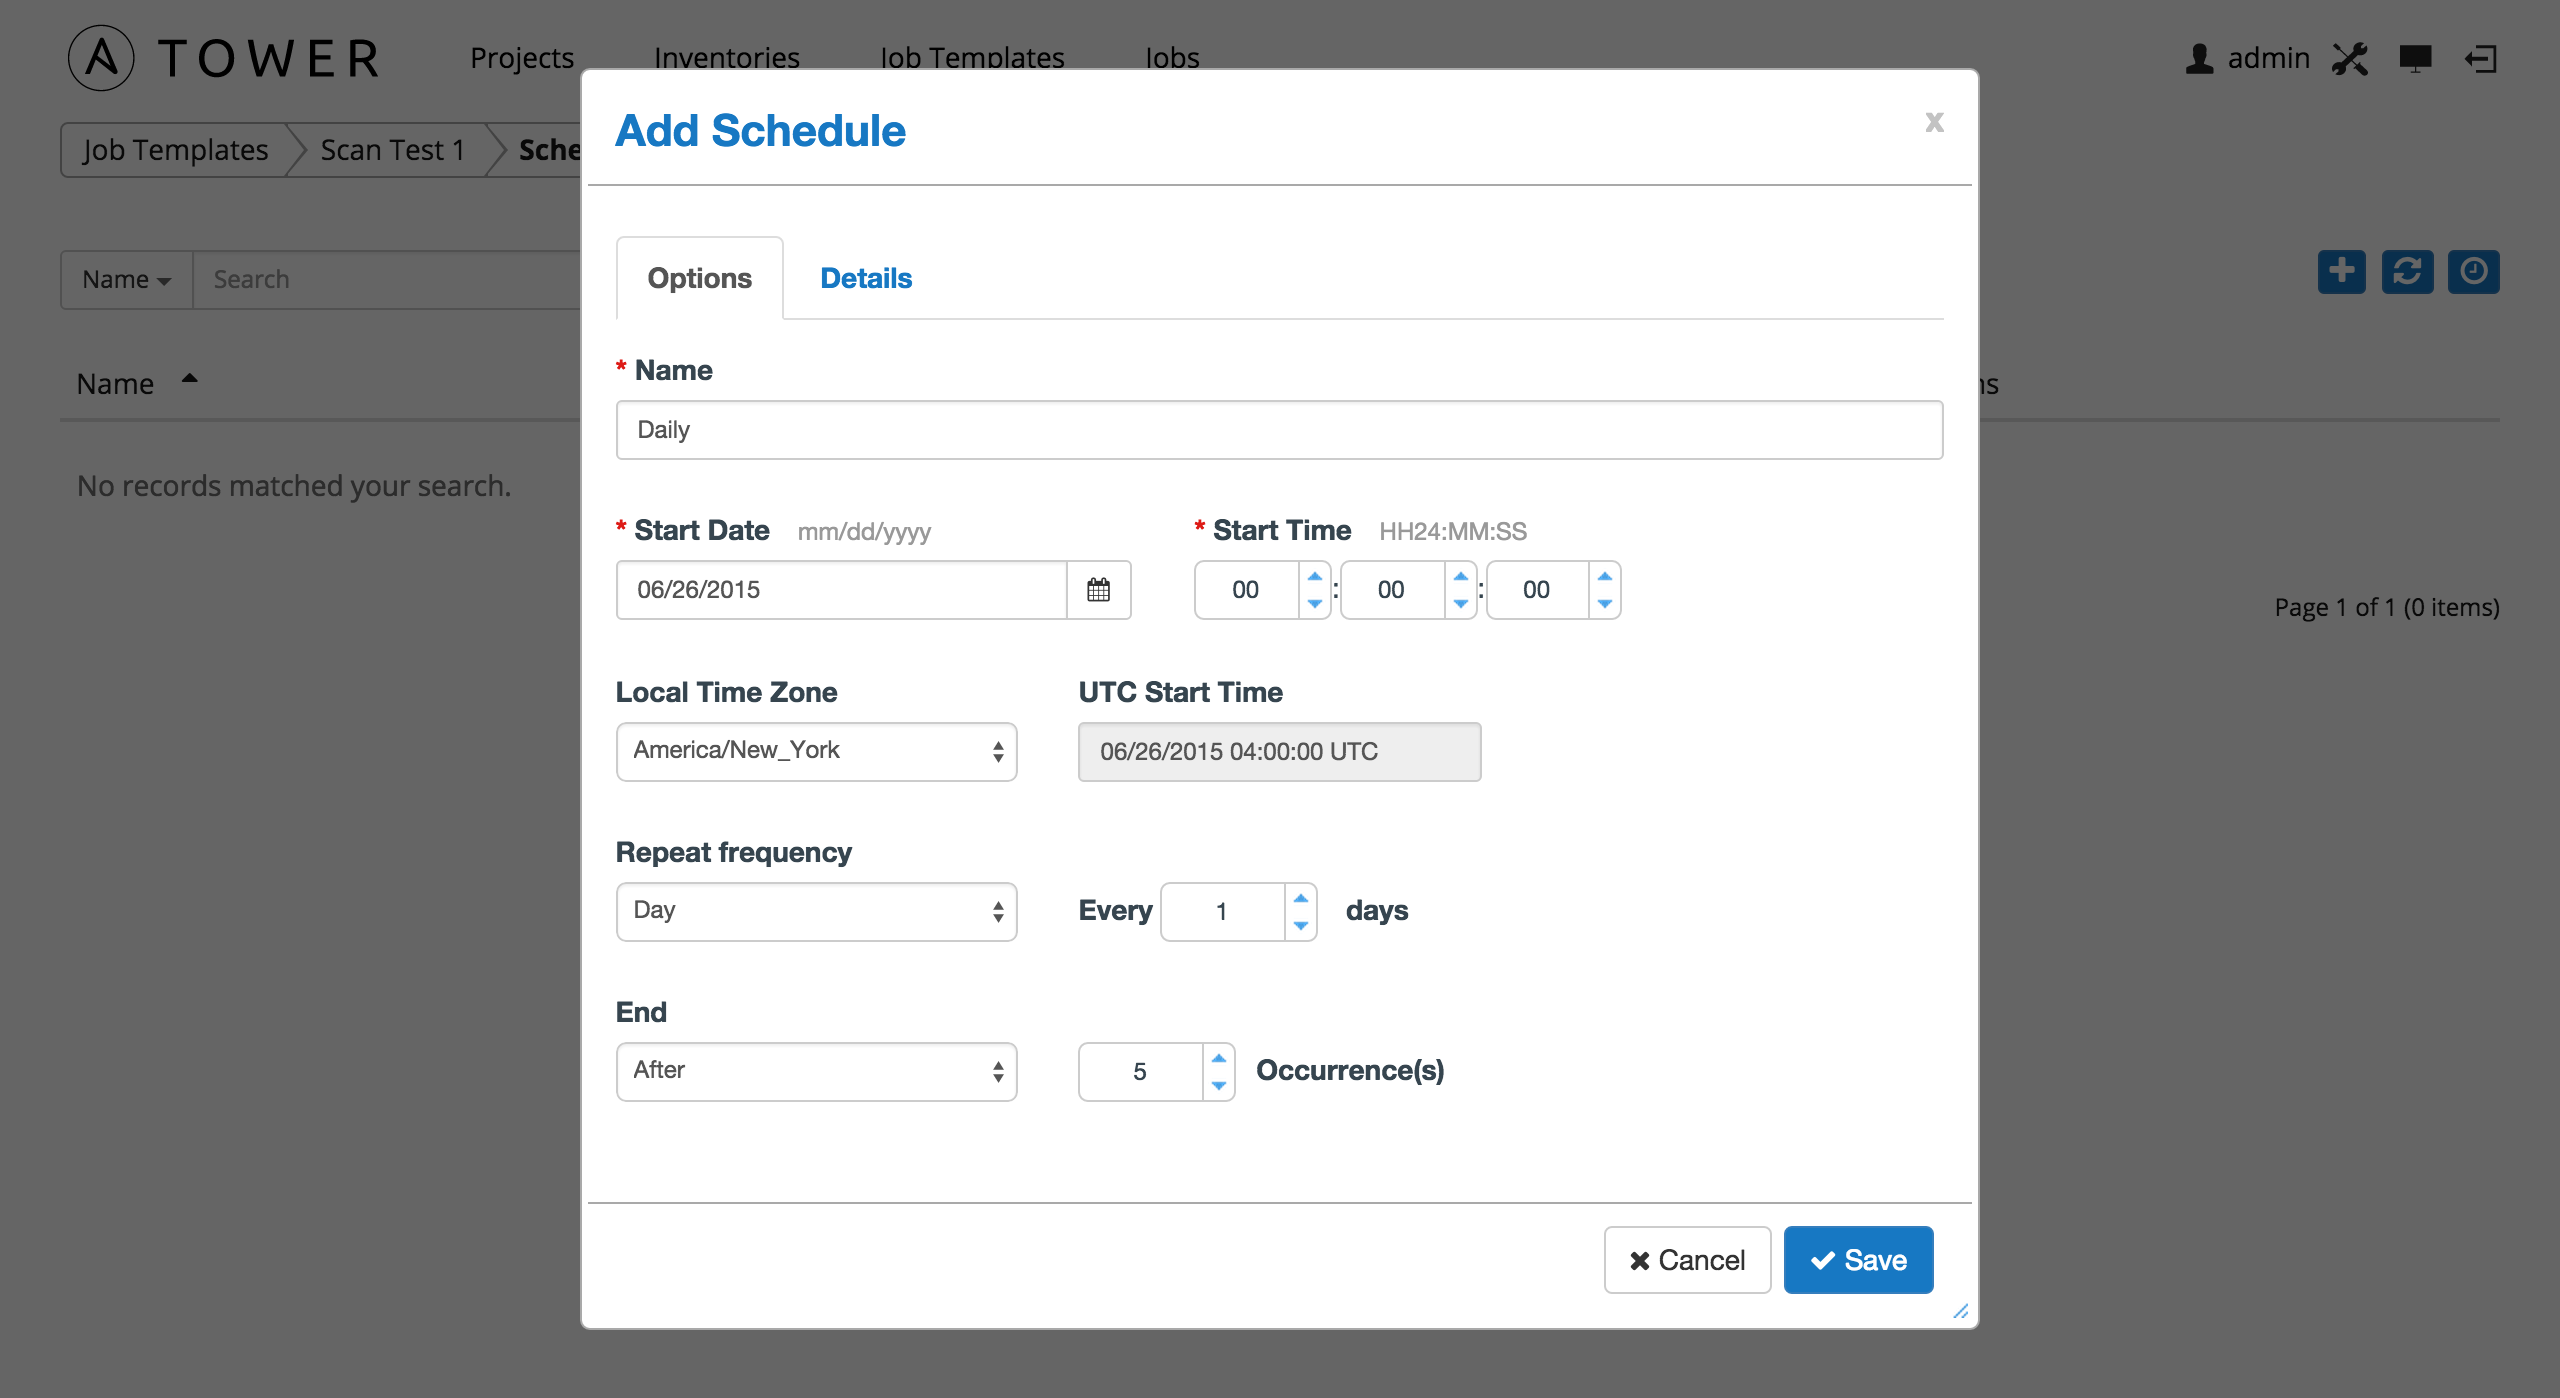
Enter the appropriate details into the following fields and select Save:
- Name (required)
- Start Date (required)
- Start Time (required)
- Local Time Zone (the entered Start Time should be in this timezone)
- UTC Start Time (calculated from Start Time + Local Time Zone)
- Repeat Frequency (the appropriate options are displayed as the update frequency is modified.
The View Details link at the bottom displays a description of the schedule and a list of the scheduled occurrences in the selected Local Time Zone.
Note
Jobs are scheduled in UTC. Repeating jobs that runs at a specific time of day may move relative to a local timezone when Daylight Saving Time shifts occur.
Once you have saved the schedule, it can be viewed on the Schedule tab.
There are server actions available for schedules:
- Stop an active schedule or activate a stopped schedule
- Edit schedule
- Delete schedule
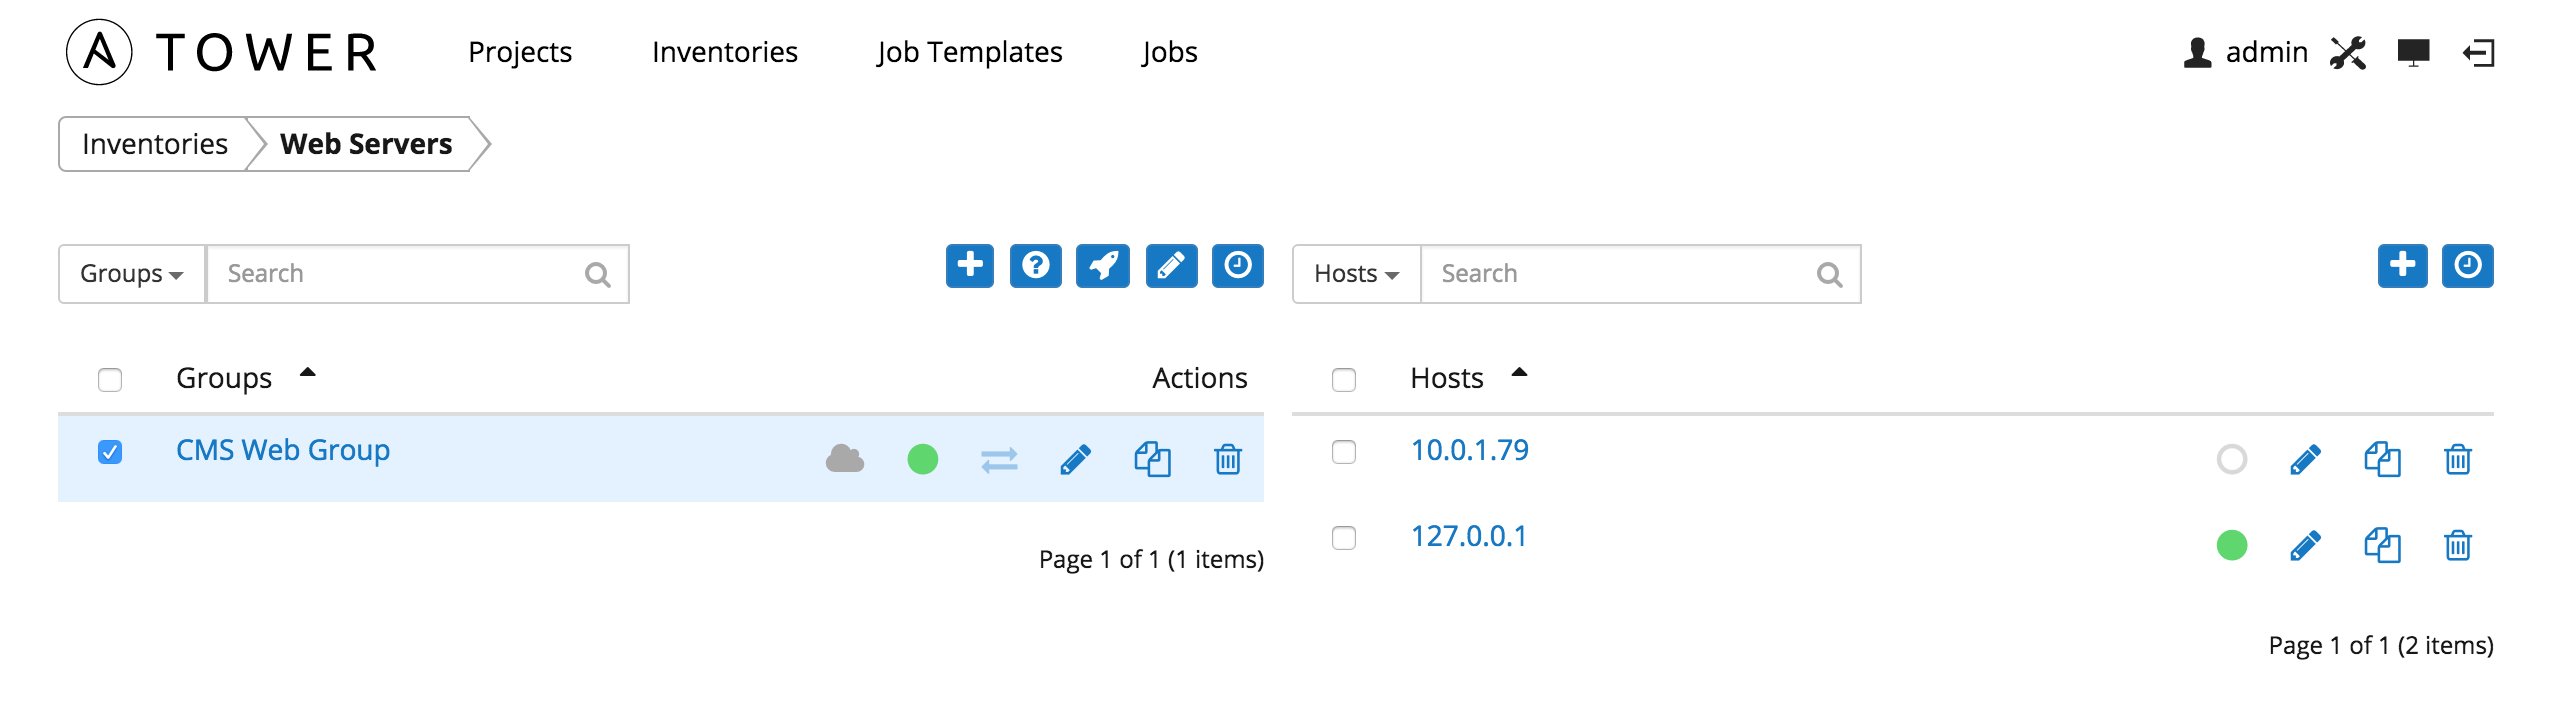
10.3.2. Hosts
Hosts are listed on the right side of the Inventory display screen.
The host list may be sorted and searched by Name or Groups, and filtered by hosts that are disabled, by hosts with failed jobs, and by hosts synchronized with an external source.
This list displays information about each host and provides for several actions:
- Name: Opens the Host Properties dialog
- Available: A toggle indicating whether the host is enabled to receive jobs from Tower. Click to toggle this setting.
- Jobs: Shows the most recent Jobs run against this Host. Clicking this button displays a window showing the most recent jobs and their status.
- Edit host: Opens the Host Properties dialog
- Copy host: Copies or moves the host to a different group
- Delete: Removes the host from Tower. This operation is not reversible!
10.3.2.1. Add a new host
To create a new host and add it to an existing group, click the button.
This opens the Create New Host dialog.
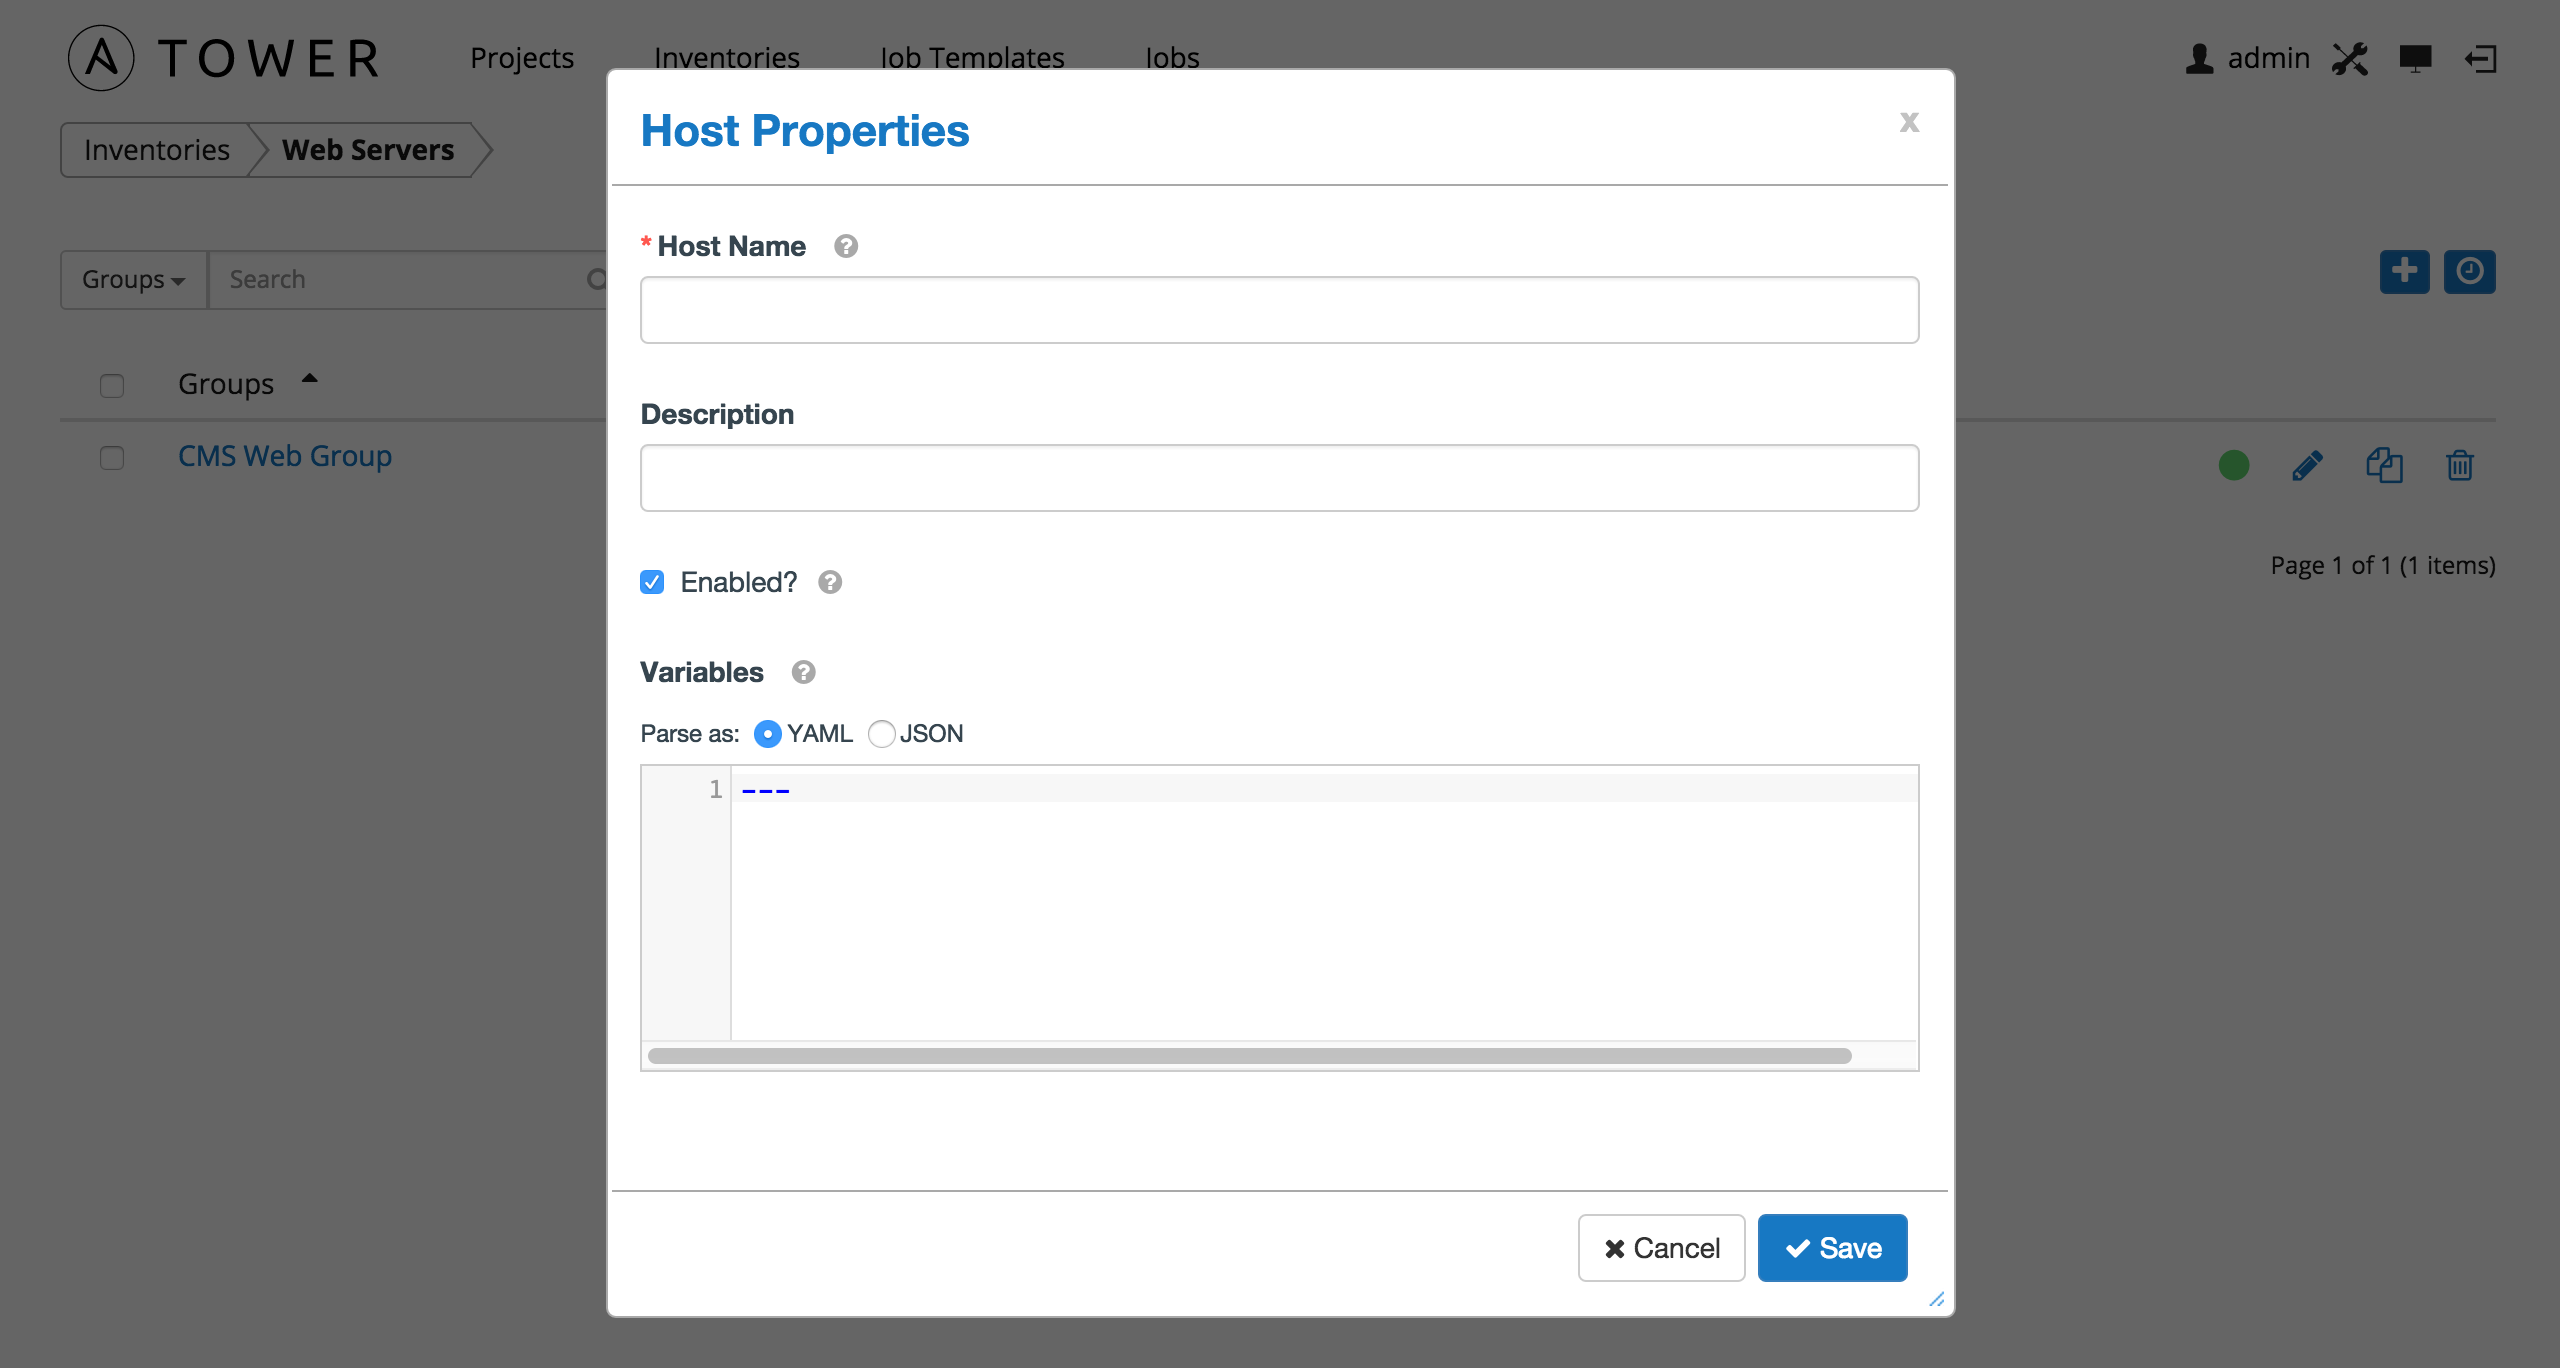
Enter the appropriate details into the following fields and click Save:
- Host Name: The hostname or IP address of the host
- Description: Enter an arbitrary description as appropriate
- Enabled?: Indicates if a host is available and should be included in running jobs. For hosts that are part of an external inventory, this flag cannot be changed. It is set by the inventory sync process.
- Variables: Variable definitions and values to be applied to the selected host. Enter variables using either JSON or YAML syntax, using the radio button to toggle between JSON or YAML.
10.4. Running Ad Hoc Commands
To run an ad hoc command, select an inventory source and click the button. The inventory source can be a single group or host, a selection of multple hosts, or a selection of multiple groups.

Enter the details for the following fields:
Module: Select one of the modules that Tower supports running commands against.
command apt_repository mount win_service shell apt_rpm ping win_updates yum service selinux win_group apt group setup win_user apt_key user win_ping Arguments: Provide arguments to be used with the module you selected.
Host Pattern: Enter the pattern used to target hosts in the inventory. To target all hosts in the inventory enter
allor*, or leave the field blank. This is automatically populated with whatever was selected in the previous view prior to clicking the launch button.Machine Credential: Select the credential to use when accessing the remote hosts to run the command. Choose the credential containing the username and SSH key or password that Ansbile needs to log into the remote hosts.
Enable Privilege Escalation: If enabled, the playbook is run with administrator privileges. This is the equivalent of passing the
--becomeoption to theansiblecommand.Verbosity: Select a verbosity level for the standard output.
Forks: If needed, select the number of parallel or simultaneous processes to use while executing the command.
Click the Launch button to run this ad hoc command.
10.5. System Tracking
Note
System Tracking, introduced as a new feature in Ansible Tower 2.2, is only available to those with Enterprise-level licenses.
System Tracking offers the ability to compare the results of two scan runs from different dates on one host or the same date on two hosts.
Data is grouped by fact modules:
- Packages
- Services
- Files
- Ansible
- Custom
Tower is designed to make every attempt to find your data. If you select a date without any scan runs, Tower gathers the previous year’s worth of scan runs to verify possible data to include. Successful comparisons display results from the available dates instead of the specified dates. Unsuccessful comparisons display a message indicating why they did not work.
Note
Service scan jobs should not run against an inventory with hosts that point to the same physical machine.
10.5.1. Single Host Workflow
Select a single host in an inventory to compare against two dates and click the  button.
![]()
Select two dates on which you have scan data for the host, with the earliest date to compare on the left and the latest date to compare on the right.
![]()
Select the module for which you want to compare differences. To change modules, click on the module button with the button navigation to filter by different types of facts. Note that differences among the “ansible” and “files” modules changes are highlighted, while only changes for “packages” and “services” are shown.
![]()
You may also choose the same date in both date selectors if you want to compare multiple scan runs against a single date. If two (2) or more scan jobs runs are discovered on a particular day, Tower compares the most recent and the second-most recent. If there is only one (1) run for the selected date, Tower may display a message saying it could not find any scan job runs in one of the columns. (Also noted in Known Issues in the Tower Installation and Reference Guide.)
![]()
Please note that if the scans found for the selected date are identical, Tower displays a single result of all facts scanned.
As an example, say that a user selects “7/7/2015” for both dates and selects the “packages” module. And say that two runs occurred on this date, but there were no changes to packages on the selected host. The user sees a message indicating the scans were identical as well as a single column containing all package versions, instead of a two-column listing of differences.
10.5.2. Host to Host Workflow
To compare two hosts, select the hosts and click the button.
![]()
You can currently only select from a single page of hosts. This is a known issue.
Select a single date on which to compare the two (2) hosts. Next, select the module for which you want to view differences.
![]()
Although Tower only supports picking a single date for both hosts, you may notice different dates in the results. Remember that Tower is designed to make every attempt to find your data. If a date is selected without any scan runs, Tower gathers the previous year’s worth of scan runs to verify possible data to include. Note that differences among the “ansible” and “files” modules changes are highlighted, while only changes for “packages” and “services” are shown.
![]()