13. Job Templates
A job template is a definition and set of parameters for running an Ansible job. Job templates are useful to execute the same job many times. Job templates also encourage the reuse of Ansible playbook content and collaboration between teams. While the REST API allows for the execution of jobs directly, Tower requires that you first create a job template.
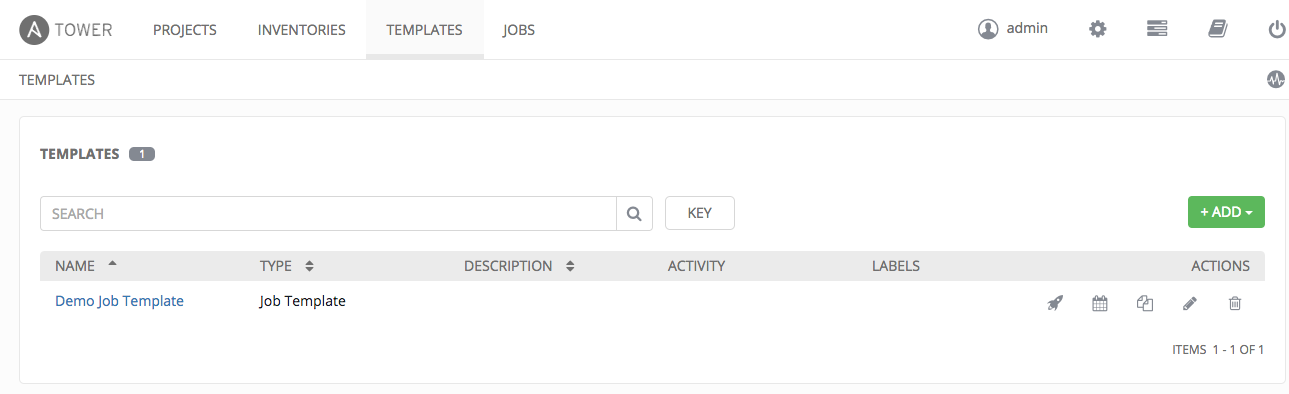
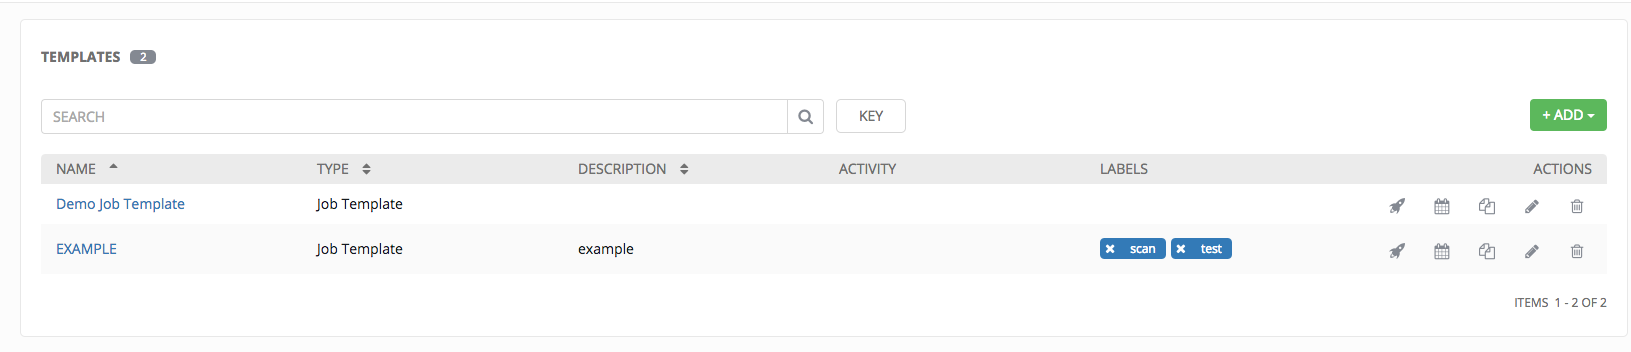
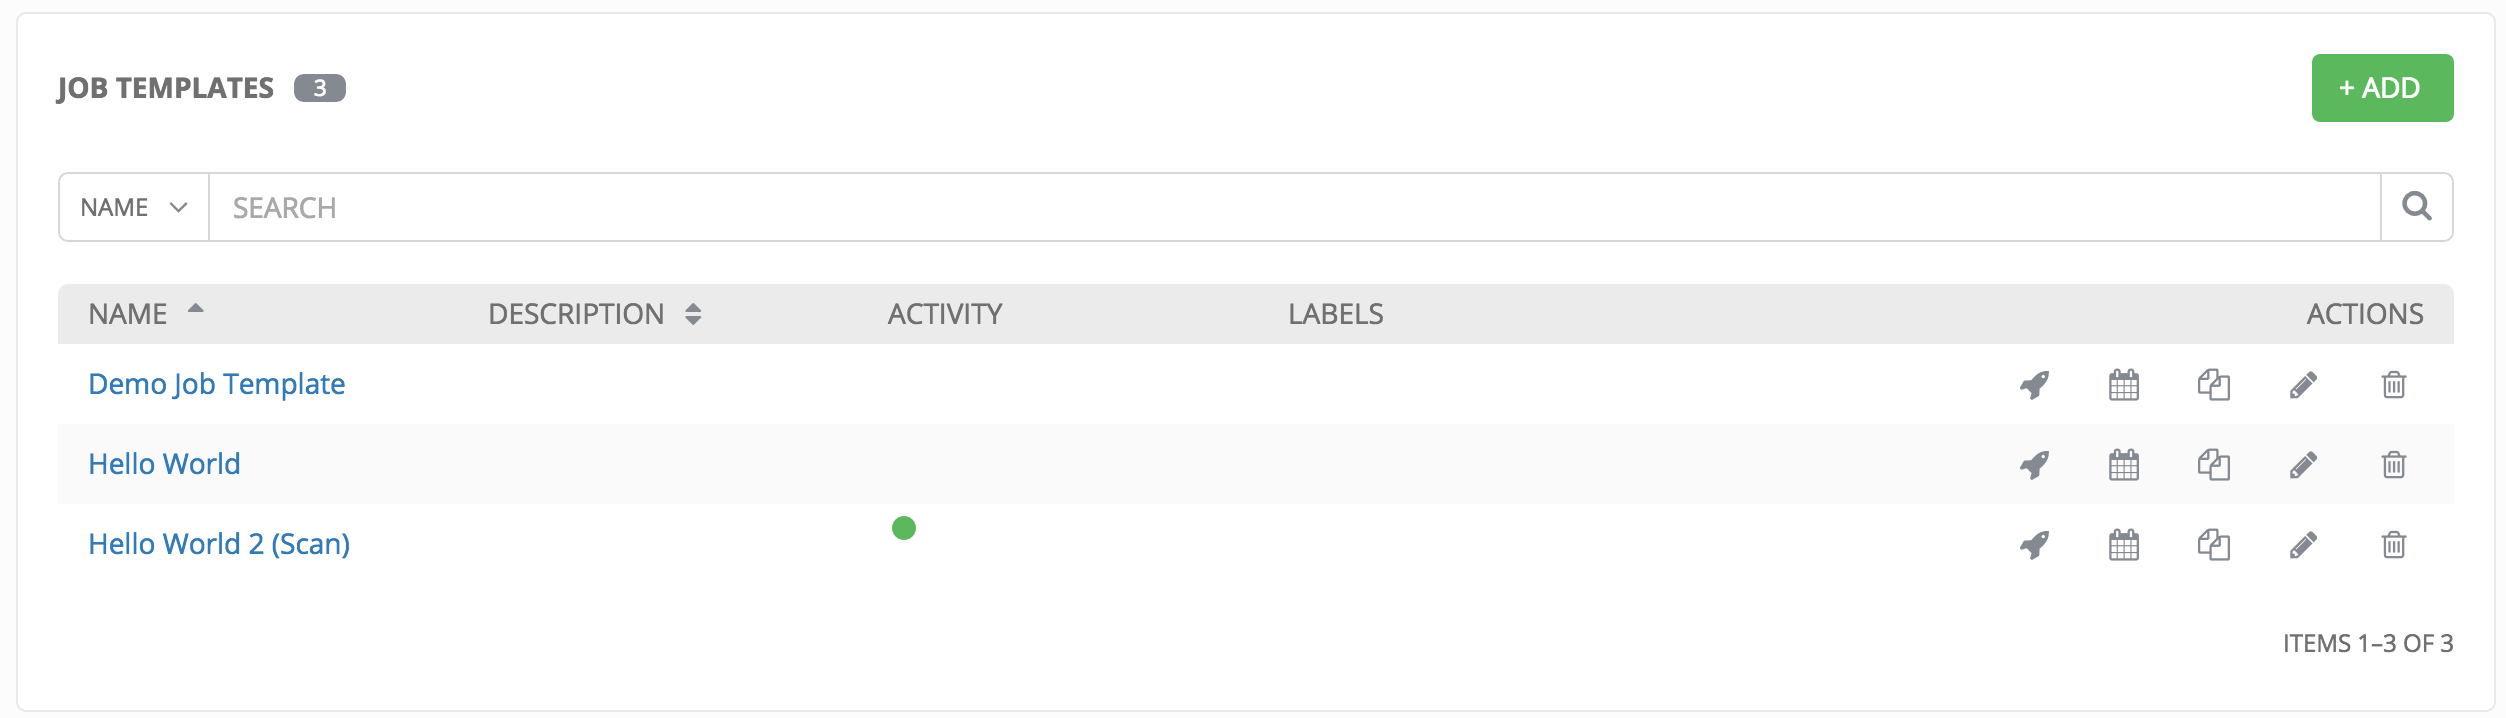
This menu opens a list of the job templates that are currently available. The job template list may be sorted and searched by Name or Description. The Templates tab also enables the user to launch, schedule, modify, and remove a job template.
13.1. Create a Job Template
To create a new job template:
- Click the
 button then select Job Template from the menu list.
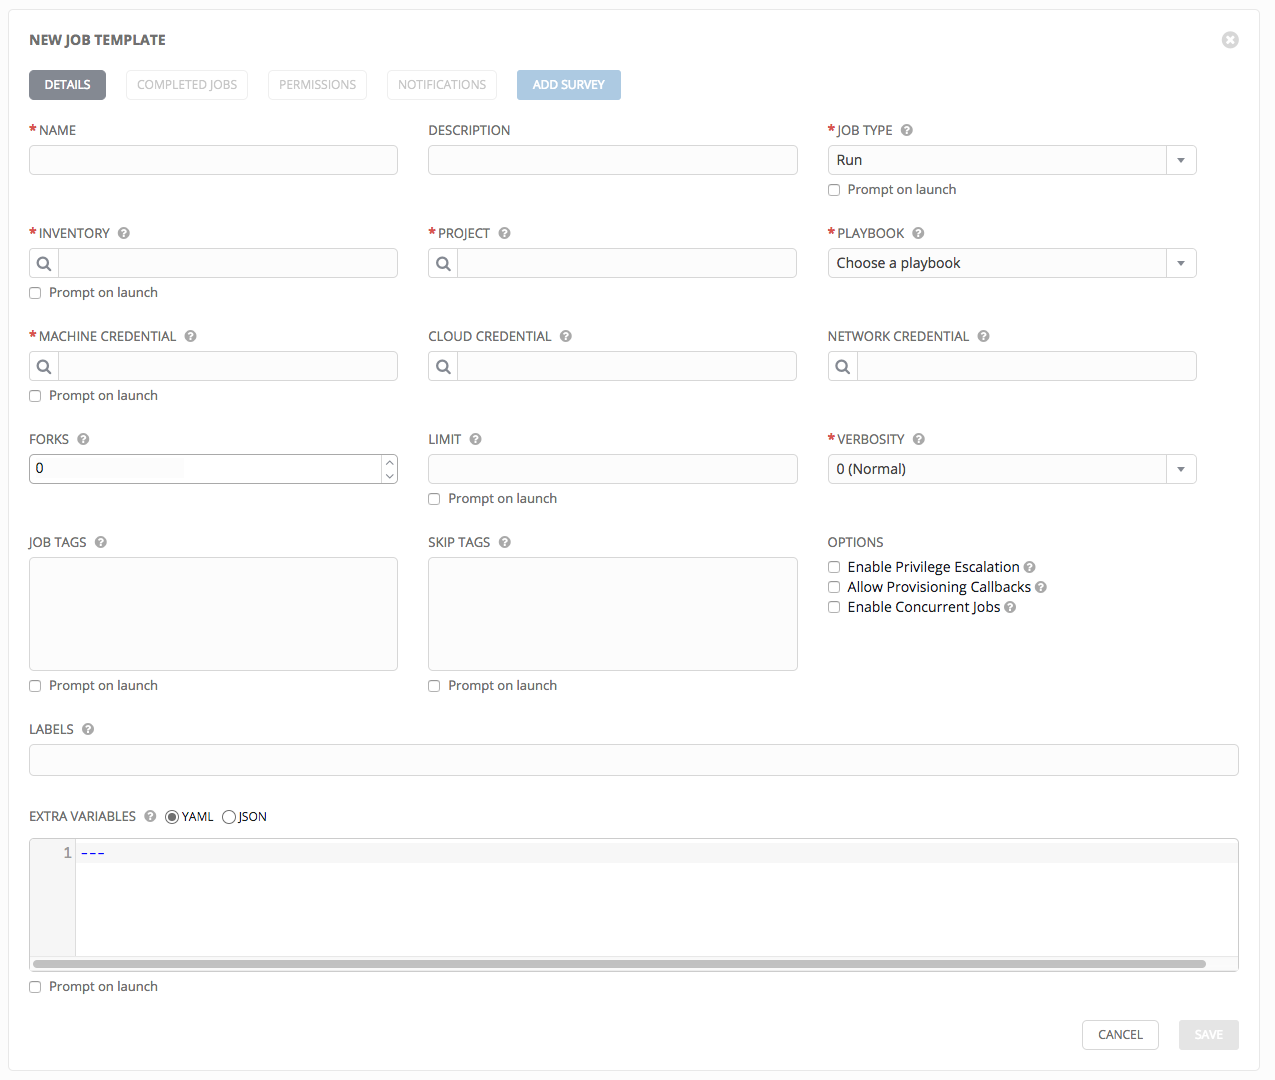
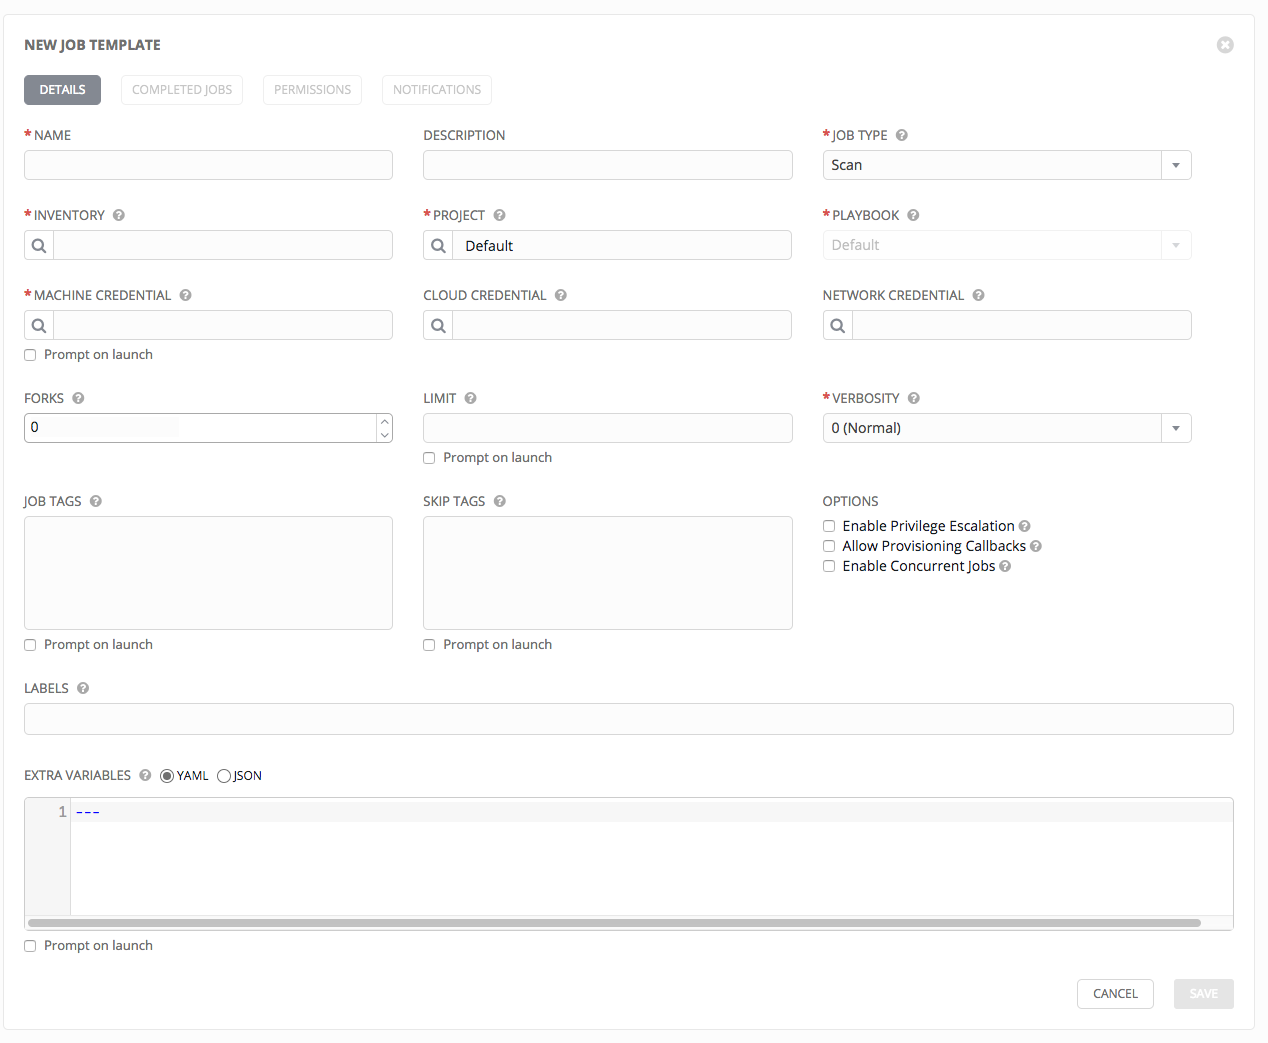
- Enter the appropriate details into the following fields:
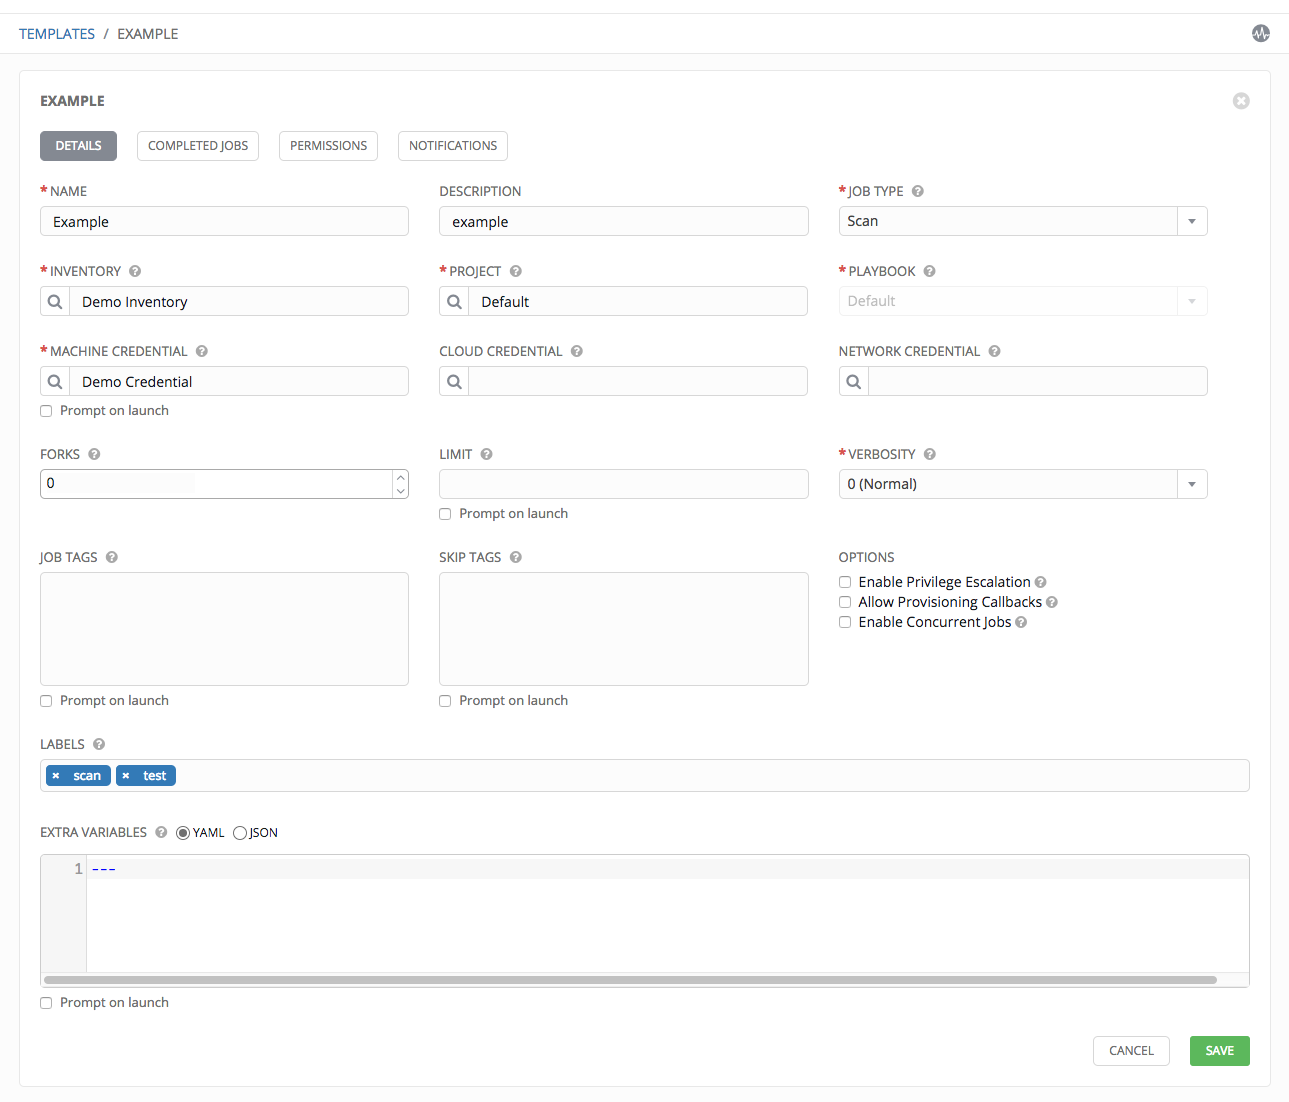
Name: Enter a name for the job.
Description: Enter an arbitrary description as appropriate (optional).
Job Type:
- Run: Execute the playbook when launched, running Ansible tasks on the selected hosts.
- Check: Perform a “dry run” of the playbook and report changes that would be made without actually making them. Tasks that do not support check mode will be skipped and will not report potential changes.
- Scan: Gather system tracking information. Users who have ‘Use’ permissions on a particular inventory have permission to create scan jobs. A default playbook has been created for your use. Custom written scan playbooks can use scan modules. For more information about creating a scan job, refer to Scan Job Templates.
- Prompt on Launch – If selected, even if a default value is supplied, you will be prompted upon launch to choose a job type of run or check (scan job types cannot be changed at the time of launch).
Note
More information on job types can be found in the Playbooks: Special Topics section of the Ansible documentation.
Inventory: Choose the inventory to be used with this job template from the inventories available to the currently logged in Tower user.
Prompt on Launch – If selected, even if a default value is supplied, you will be prompted upon launch to choose an inventory to run this job template against.
Project: Choose the project to be used with this job template from the projects available to the currently logged in Tower user.
Playbook: Choose the playbook to be launched with this job template from the available playbooks. This menu is automatically populated with the names of the playbooks found in the project base path for the selected project. For example, a playbook named “jboss.yml” in the project path appears in the menu as “jboss”.
Machine Credential: Choose the machine credential to be used with this job template from the credentials available to the currently logged in Tower user.
Cloud Credential: Choose the credential to be used with this job template from the credentials available to the currently logged in Tower user. For more information, refer to Utilizing Cloud Credentials.
Network Credential Choose the network credential to be used with this job template from the credentials available to the currently logged in Tower user.
Forks: The number of parallel or simultaneous processes to use while executing the playbook. A value of zero uses the Ansible default setting, which is 5 parallel processes unless overridden in
/etc/ansible/ansible.cfg.Limit:
- A host pattern to further constrain the list of hosts managed or affected by the playbook. Multiple patterns can be separated by colons (”:”). As with core Ansible, “a:b” means “in group a or b”, “a:b:&c” means “in a or b but must be in c”, and “a:!b” means “in a, and definitely not in b”.
- Prompt on Launch: If selected, even if a default value is supplied, you will be prompted upon launch to choose a limit.
Note
For more information and examples refer to Patterns in the Ansible documentation.
Verbosity: Control the level of output Ansible produces as the playbook executes. Set the verbosity to any of Default, Verbose, or Debug. This only appears in the “details” report view. Verbose logging includes the output of all commands. Debug logging is exceedingly verbose and includes information on SSH operations that can be useful in certain support instances. Most users do not need to see debug mode output.
Warning
Verbosity 5 causes Tower to block heavily when jobs are running, which could delay reporting that the job has finished (even though it has) and can cause the browser tab to lock up.
Job Tags:
- Provide a comma-separated list of playbook tags to specify what parts of the playbooks should be executed.
- For more information and examples refer to Tags in the Ansible documentation.
- Prompt on Launch – If selected, even if a default value is supplied, you will be prompted upon launch to choose a job tag.
Skip Tags:
- Provide a comma-separated list of playbook tags to skip certain tasks or parts of the playbooks to be executed.
- For more information and examples refer to Tags in the Ansible documentation.
- Prompt on Launch – If selected, even if a default value is supplied, you will be prompted upon launch to choose a job tag.
Options
- Enable Privilege Escalation: If enabled, run this playbook as an administrator. This is the equivalent of passing the
--becomeoption to theansible-playbookcommand. - Allow Provisioning Callbacks: Enable a host to call back to Tower via the Tower API and invoke the launch of a job from this job template. Refer to Provisioning Callbacks for additional information.
- Enable Concurrent Jobs: Allow jobs in the queue to run simultaneously if not dependent on one another. Refer to Job Concurrency for additional information.
- Enable Privilege Escalation: If enabled, run this playbook as an administrator. This is the equivalent of passing the
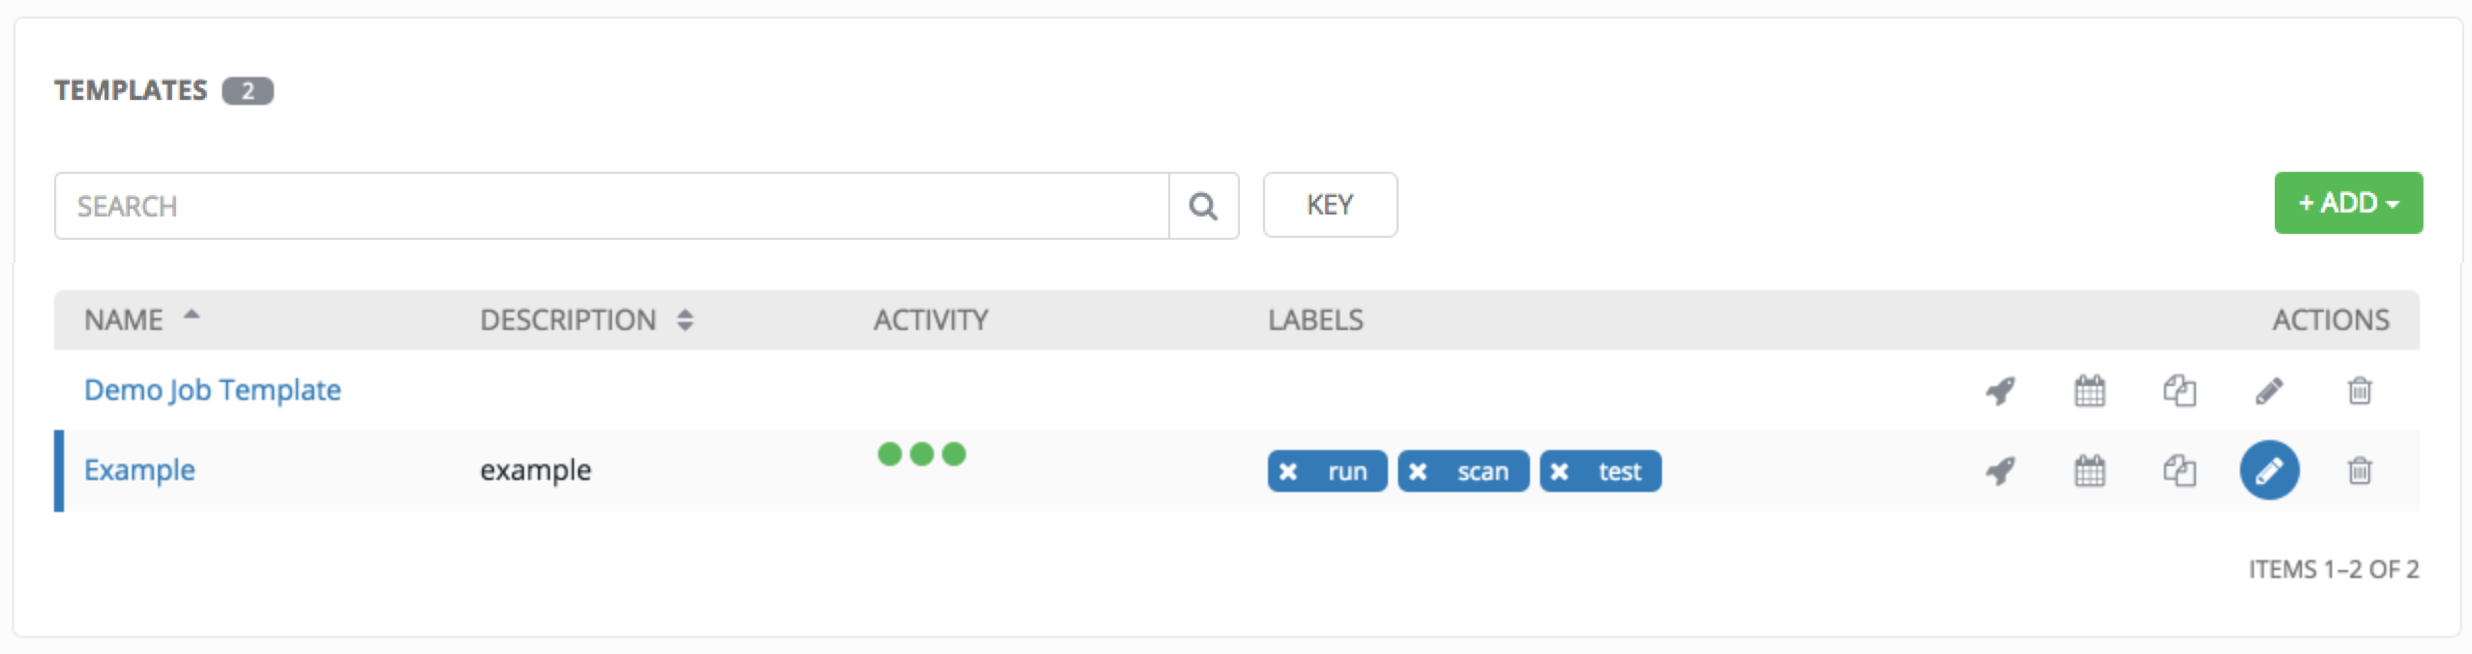
Labels: Supply optional labels that describe this job template, such as “dev” or “test”. Labels can be used to group and filter job templates and completed jobs in the Tower display.
- Labels are created when they are added to the Job Template. Labels are associated to a single Organization using the Project that is provided in the Job Template. Members of the Organization can create labels on a Job Template if they have edit permissions (such as an admin role).
- Once the Job Template is saved, the labels appear in the Job Templates overview.
- Click on the “x” beside a label to remove it. When a label is removed, and is no longer associated with a Job or Job Template, the label is permanently deleted from the list of Organization labels.
- Jobs inherit labels from the Job Template at the time of launch. If a label is deleted from a Job Template, it is also deleted from the Job.

Extra Variables:
Pass extra command line variables to the playbook. This is the “-e” or “–extra-vars” command line parameter for ansible-playbook that is documented in the Ansible documentation at Passing Variables on the Command Line.
Provide key/value pairs using either YAML or JSON. These variables have a maximum value of precedence and overrides other variables specified elsewhere. An example value might be:
git_branch: production
release_version: 1.5
Prompt on Launch – If selected, even if a default value is supplied, you will be prompted upon launch to choose command line variables.
For more information about extra variables, refer to Extra Variables.
- When you have completed configuring the details of the job template, select Save.
Saving the template does not exit the job template page but remains on the Job Template Details view for further editing, if necessary. The Details tab of a saved job allows you to review, edit, and add a survey (if the job type is not a scan).
You can verify the template is saved when the newly created template appears on the list of templates at the bottom of the screen.
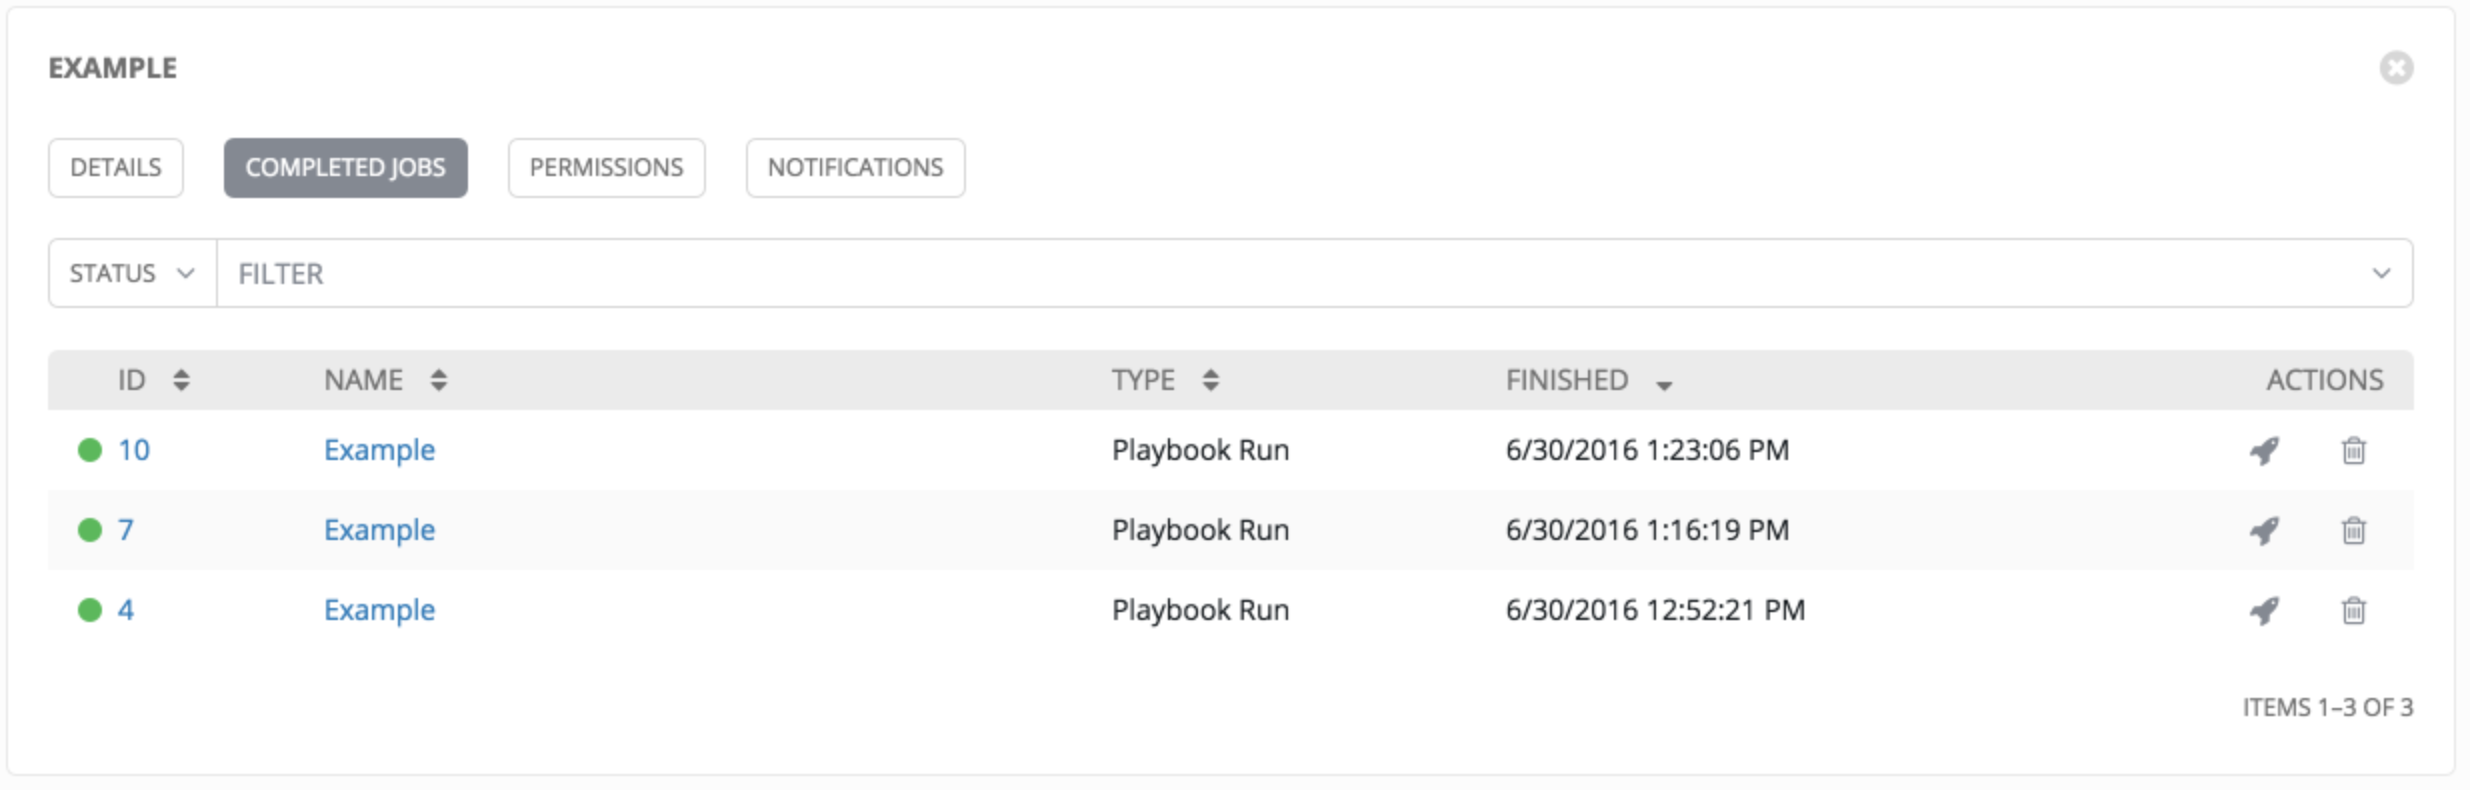
13.2. View Completed Jobs
The Completed Jobs tab provides details of how this job template has been run. It provides you with the ID, Name, Job Type, when it completed, and allows you to relaunch or delete the job. You can filter the list of completed jobs using the job ID, Name, Type, or if the Job Failed.
13.3. Work with Permissions
Clicking on Permissions allows you to review, grant, edit, and remove associated permissions for users as well as team members.
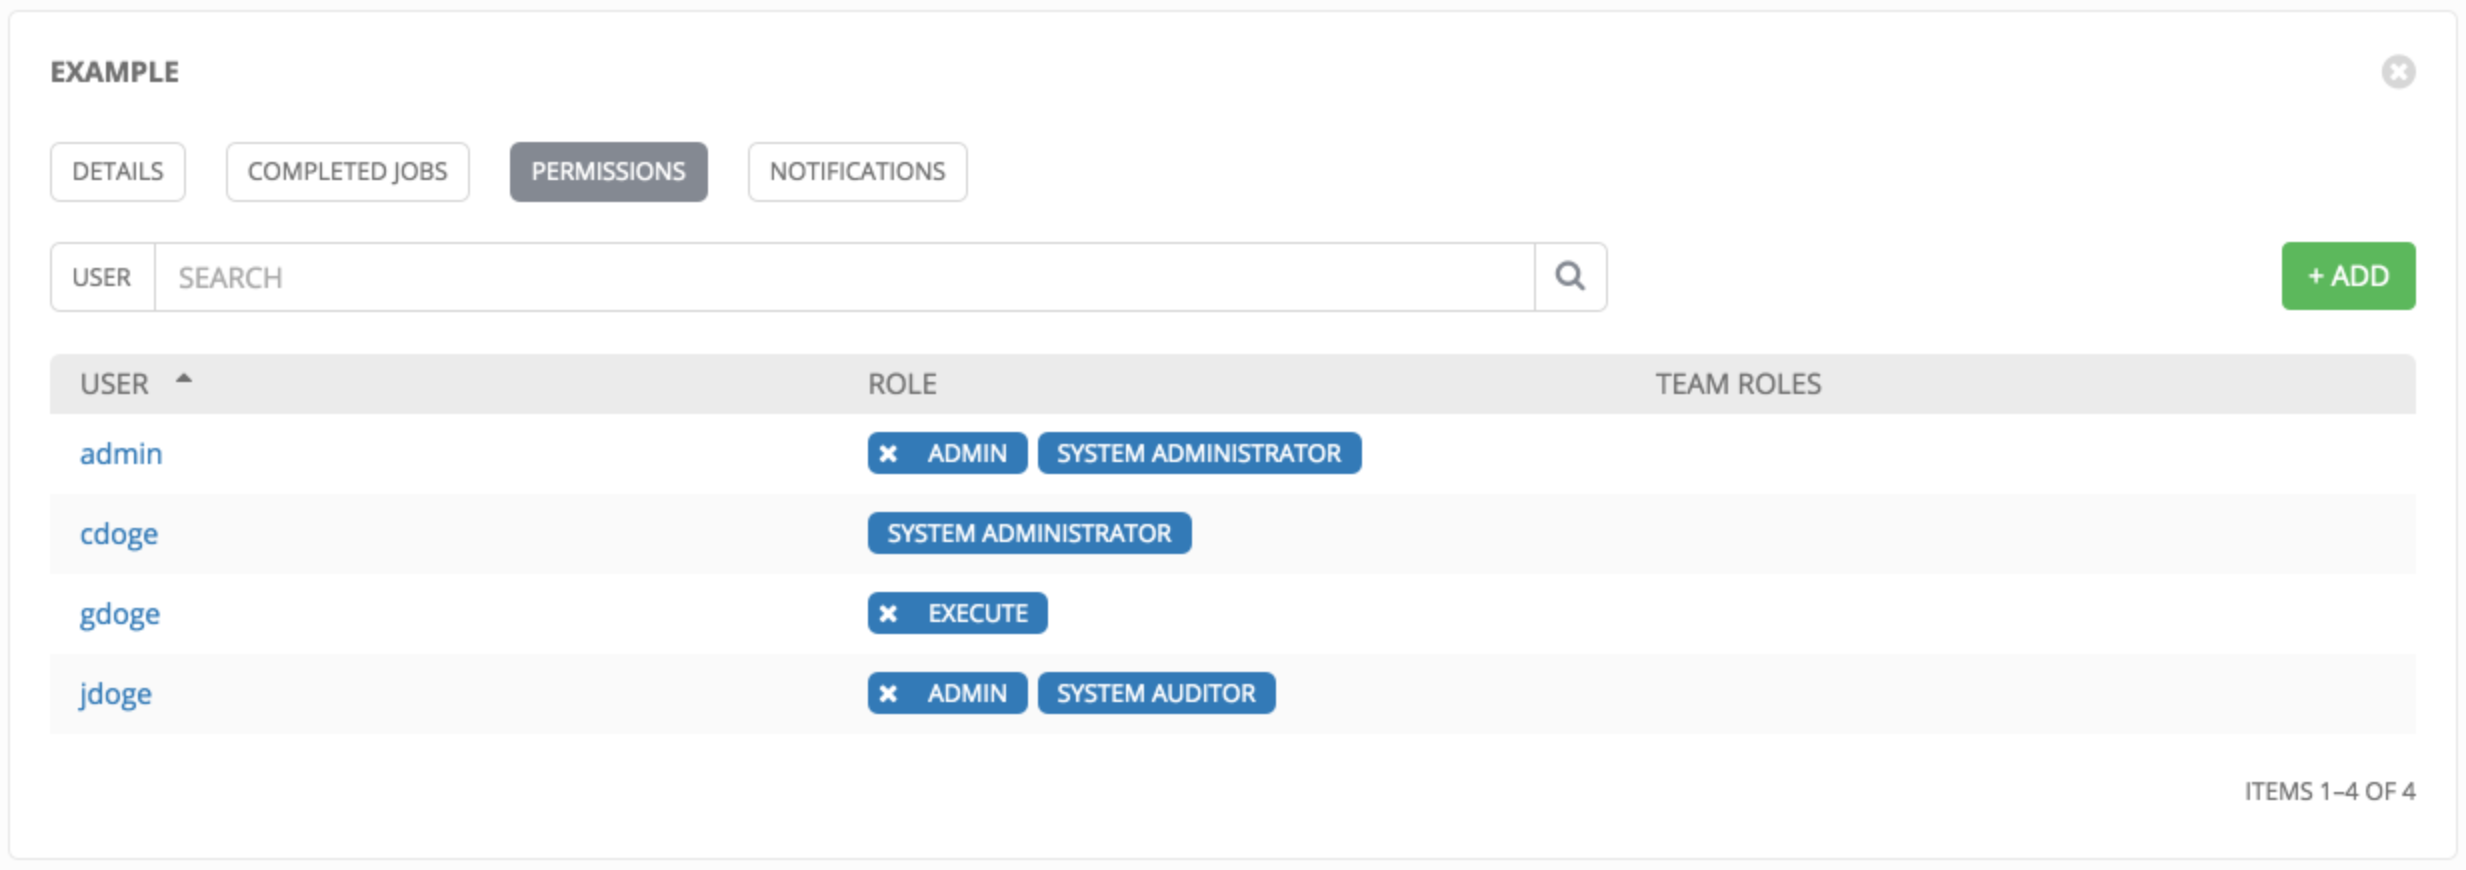
Click the button to create new permissions for this Job Template.
In this example, two users and one team have been selected and each have been granted permissions for this Job Template.
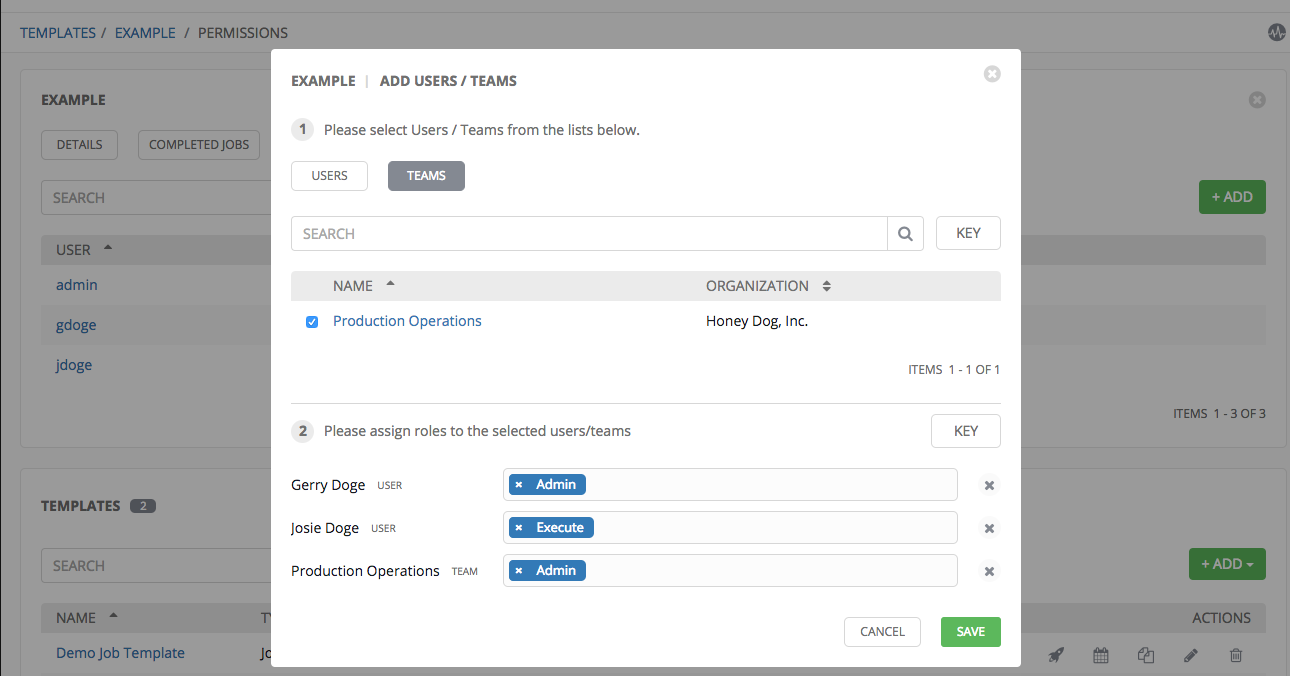
Note that you do not have to choose between teams or users, and that you can assign permissions to both at the same time.
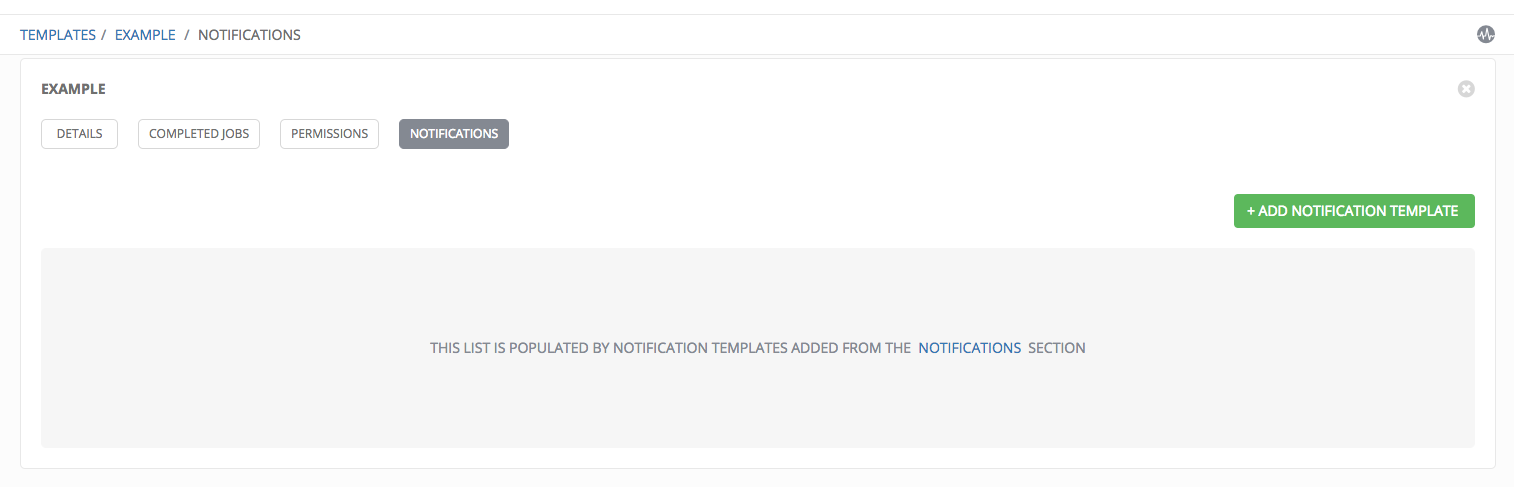
13.4. Work with Notifications
Clicking on Notifications allows you to review any notification integrations you have setup.
Click on the  button to create a notification.
Refer to Notifications for more information.
13.5. Surveys
Job types of Run or Check will provide a way to set up surveys in the Job Template creation or editing screens. Surveys set extra variables for the playbook similar to ‘Prompt for Extra Variables’ does, but in a user-friendly question and answer way. Surveys also allow for validation of user input. Click the  button to create a survey.
Use cases for surveys are numerous. An example might be if operations wanted to give developers a “push to stage” button they could run without advanced Ansible knowledge. When launched, this task could prompt for answers to questions such as, “What tag should we release?”
Many types of questions can be asked, including multiple-choice questions.
Note
Surveys are only available to those with Enterprise-level licenses.
13.5.1. Create a Survey
To create a survey:
- Click on the button to bring up the Add Survey window.
Use the ON/OFF toggle button at the top of the screen to quickly activate or deactivate this survey prompt.
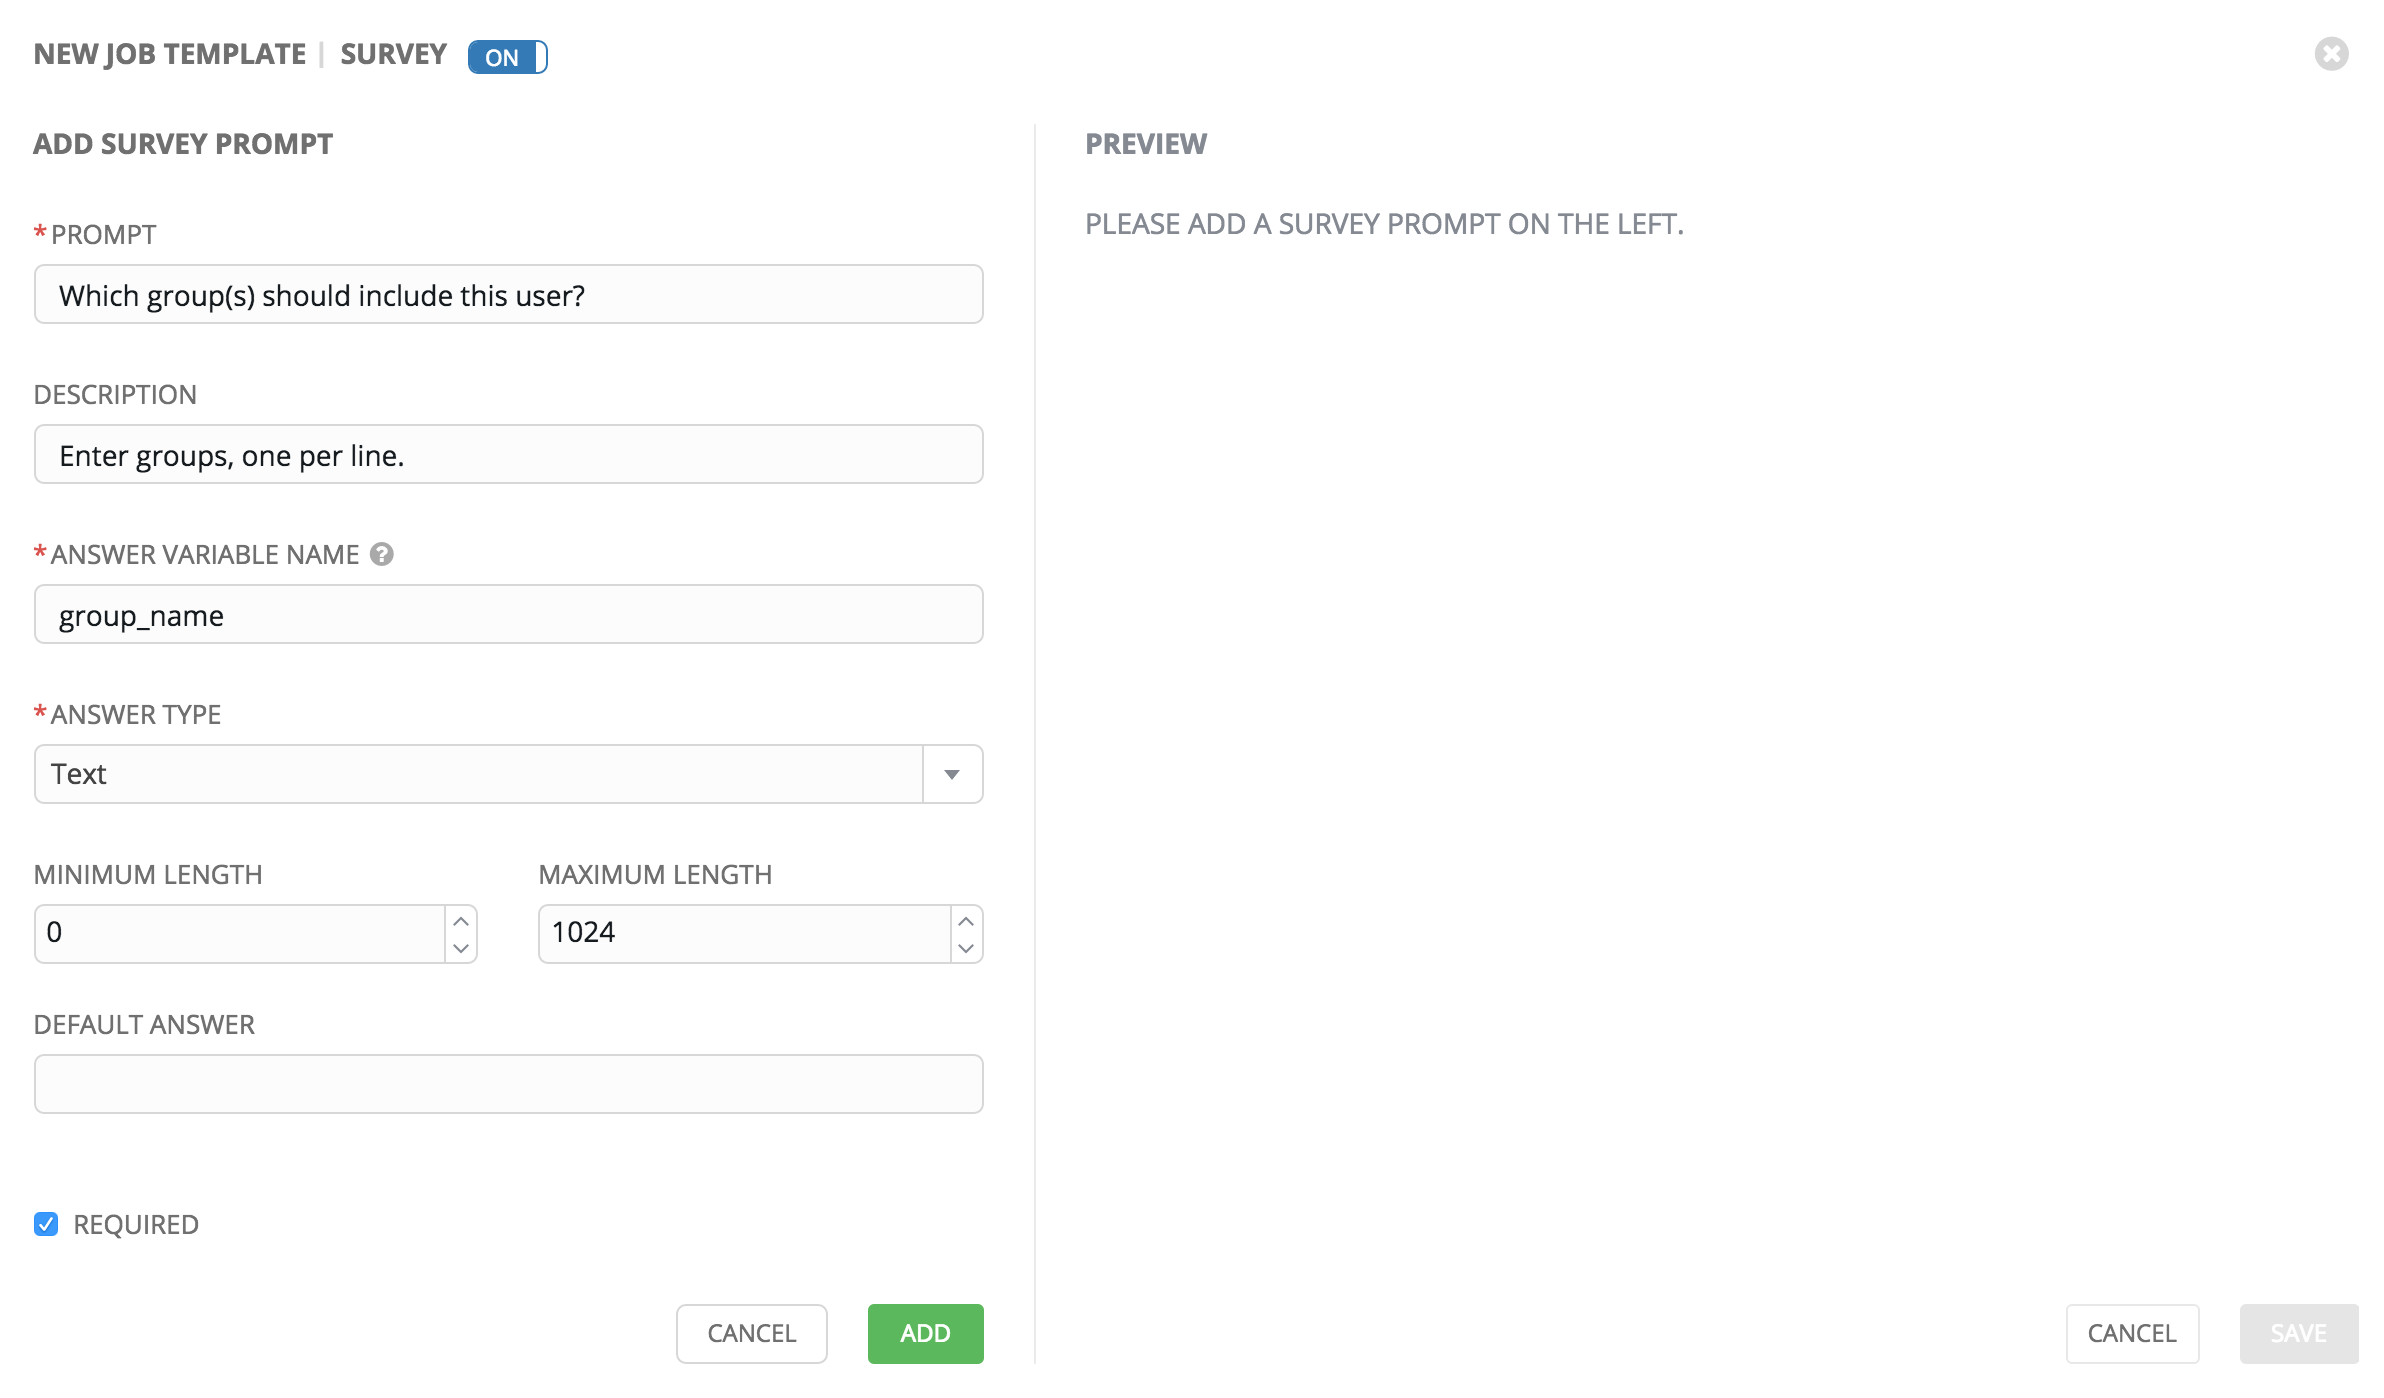
- A survey can consist of any number of questions. For each question, enter the following information:
- Name: The question to ask the user
- Description: (optional) A description of what’s being asked of the user.
- Answer Variable Name: The Ansible variable name to store the user’s response in. This is the variable to be used by the playbook. Variable names cannot contain spaces.
- Answer Type: Choose from the following question types.
- Text: A single line of text. You can set the minimum and maximum length (in characters) for this answer.
- Textarea: A multi-line text field. You can set the minimum and maximum length (in characters) for this answer.
- Password: Responses are treated as sensitive information, much like an actual password is treated. You can set the minimum and maximum length (in characters) for this answer.
- Multiple Choice (single select): A list of options, of which only one can be selected at a time. Enter the options, one per line, in the Multiple Choice Options box.
- Multiple Choice (multiple select): A list of options, any number of which can be selected at a time. Enter the options, one per line, in the Multiple Choice Options box.
- Integer: An integer number. You can set the minimum and maximum length (in characters) for this answer.
- Float: A decimal number. You can set the minimum and maximum length (in characters) for this answer.
- Default Answer: The default answer to the question. This value is pre-filled in the interface and is used if the answer is not provided by the user.
- Required: Whether or not an answer to this question is required from the user.
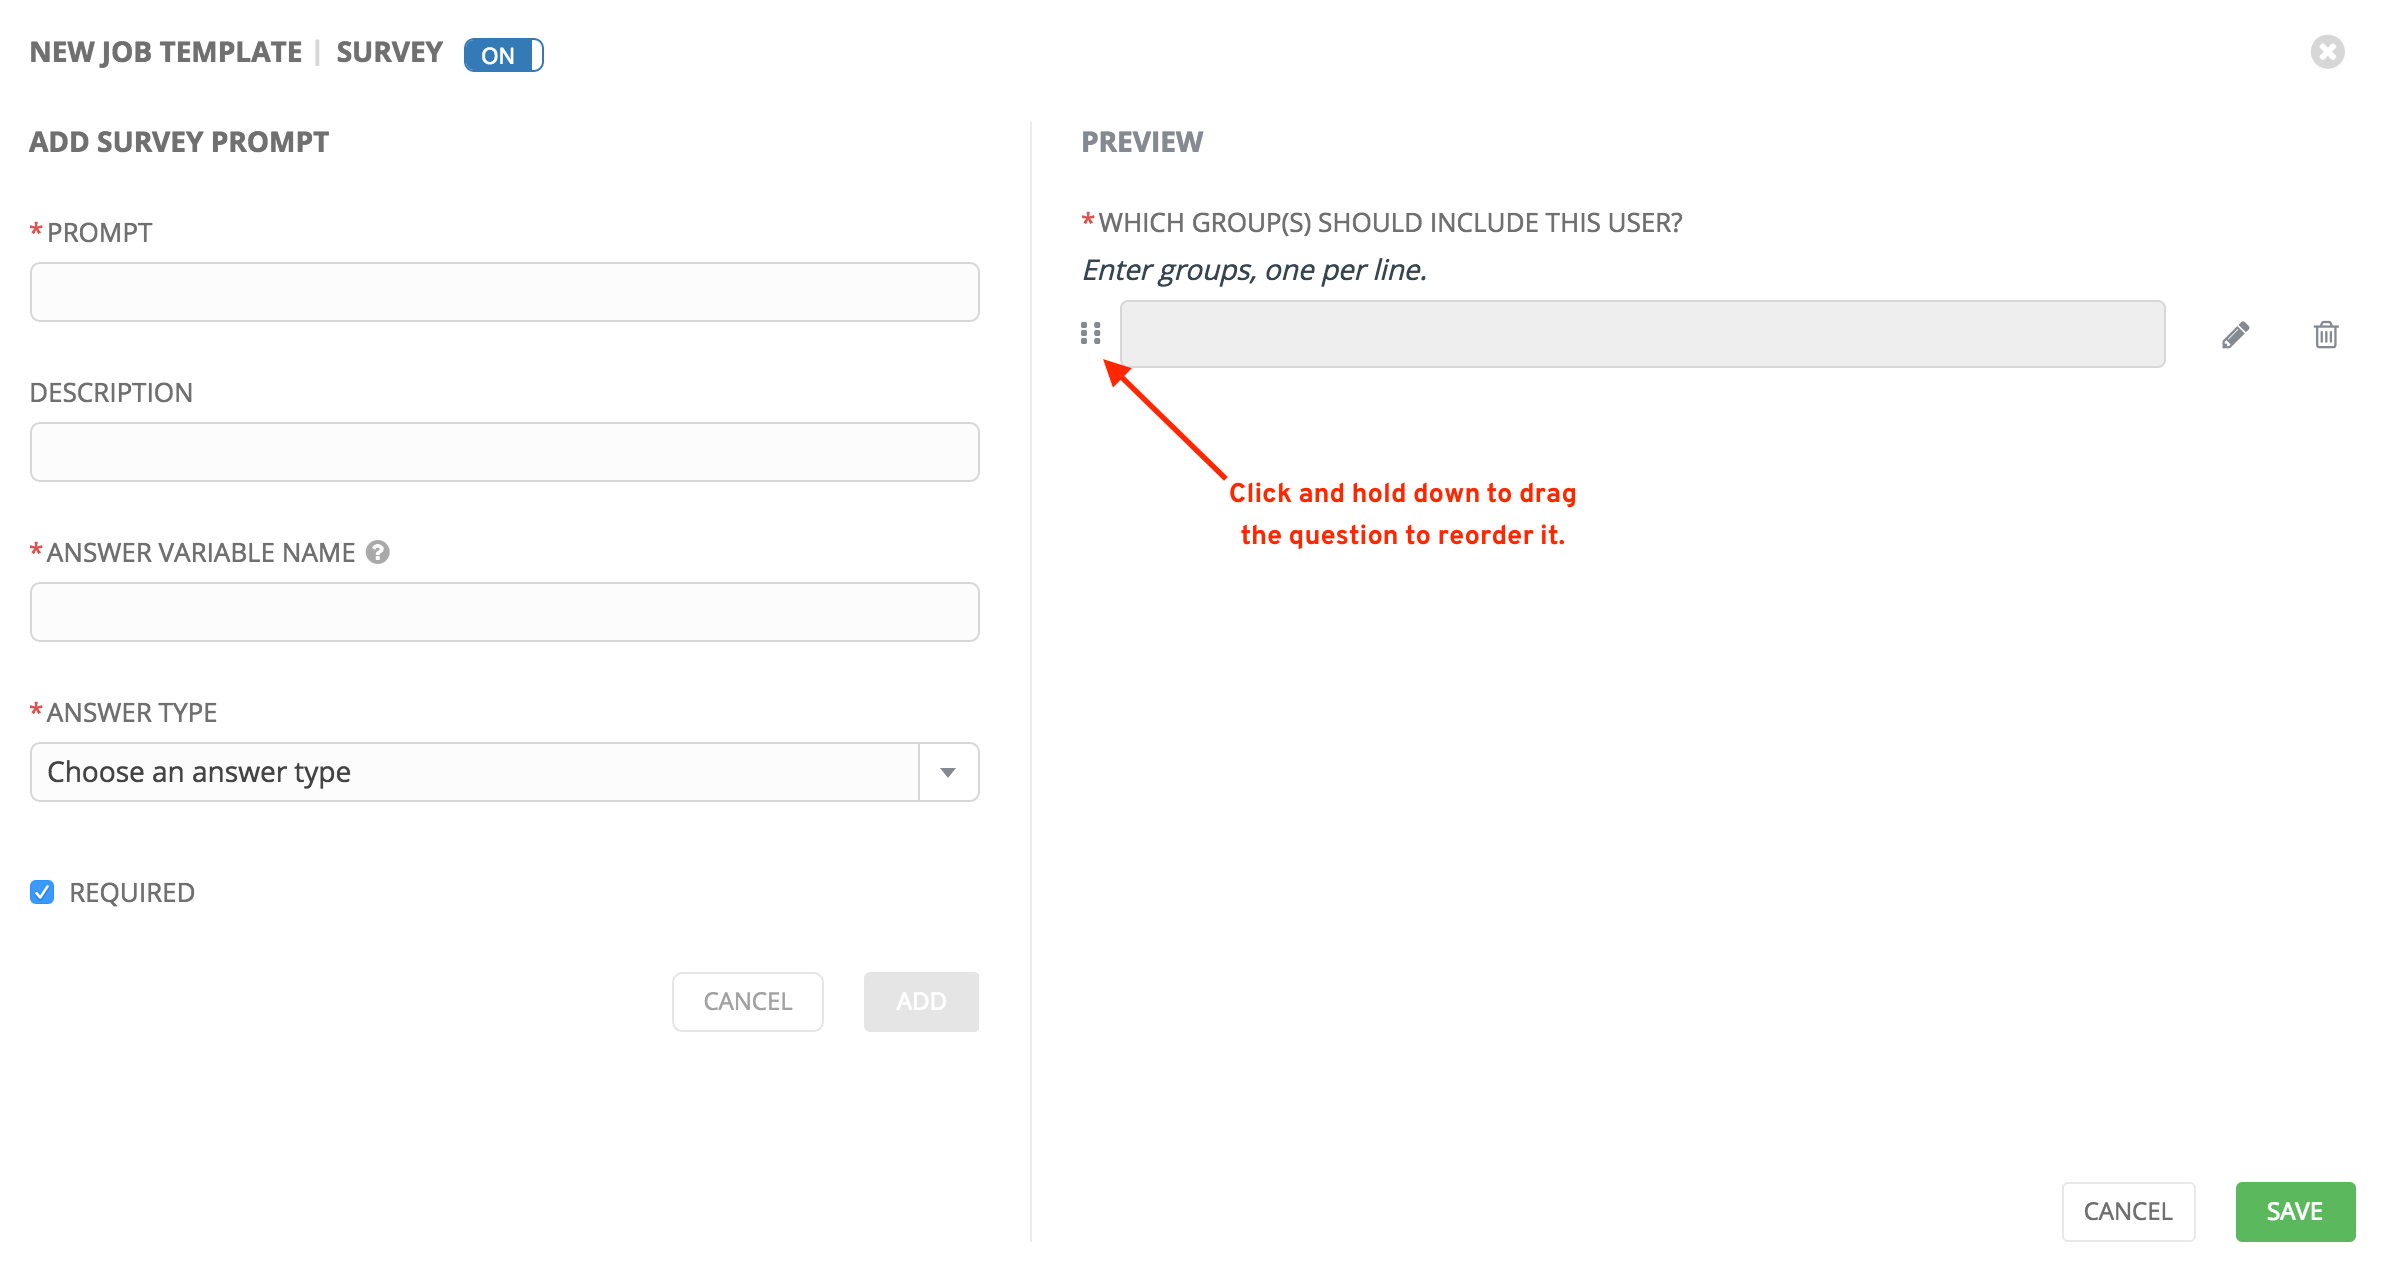
- Once you have entered the question information, click the button to add the question.
A stylized version of the survey is presented in the Preview pane. For any question, you can click on the Edit button to edit the question, the Delete button to delete the question, and click anad drag on the grid icon to rearrange the order of the questions.
- Return to the left pane to add additional questions.
- When done, click Save to save the survey.
13.5.2. Optional Survey Questions
The Required setting on a survey question determines whether the answer is optional or not for the user interacting with it.
Behind the scenes, optional survey variables can be passed to the playbook in extra_vars, even when they aren’t filled in.
- If a non-text variable (input type) is marked as optional, and is not filled in, no survey
extra_varis passed to the playbook. - If a text input or text area input is marked as optional, is not filled in, and has a minimum
length > 0, no surveyextra_varis passed to the playbook. - If a text input or text area input is marked as optional, is not filled in, and has a minimum
length === 0, that surveyextra_varis passed to the playbook, with the value set to an empty string ( “” ).
13.6. Launch a Job Template
A major benefit of Ansible Tower is the push-button deployment of Ansible playbooks. You can easily configure a template within Tower to store all parameters you would normally pass to the ansible-playbook on the command line–not just the playbooks, but the inventory, credentials, extra variables, and all options and settings you can specify on the command line.
Easier deployments drive consistency, by running your playbooks the same way each time, and allow you to delegate responsibilities–even users who aren’t Ansible experts can run Tower playbooks written by others.
To launch a job template:
- Access the job template from the Templates navigational link or while in the Job Template Details view, scroll to the bottom to access it from a list of templates.
- Click the
 button.
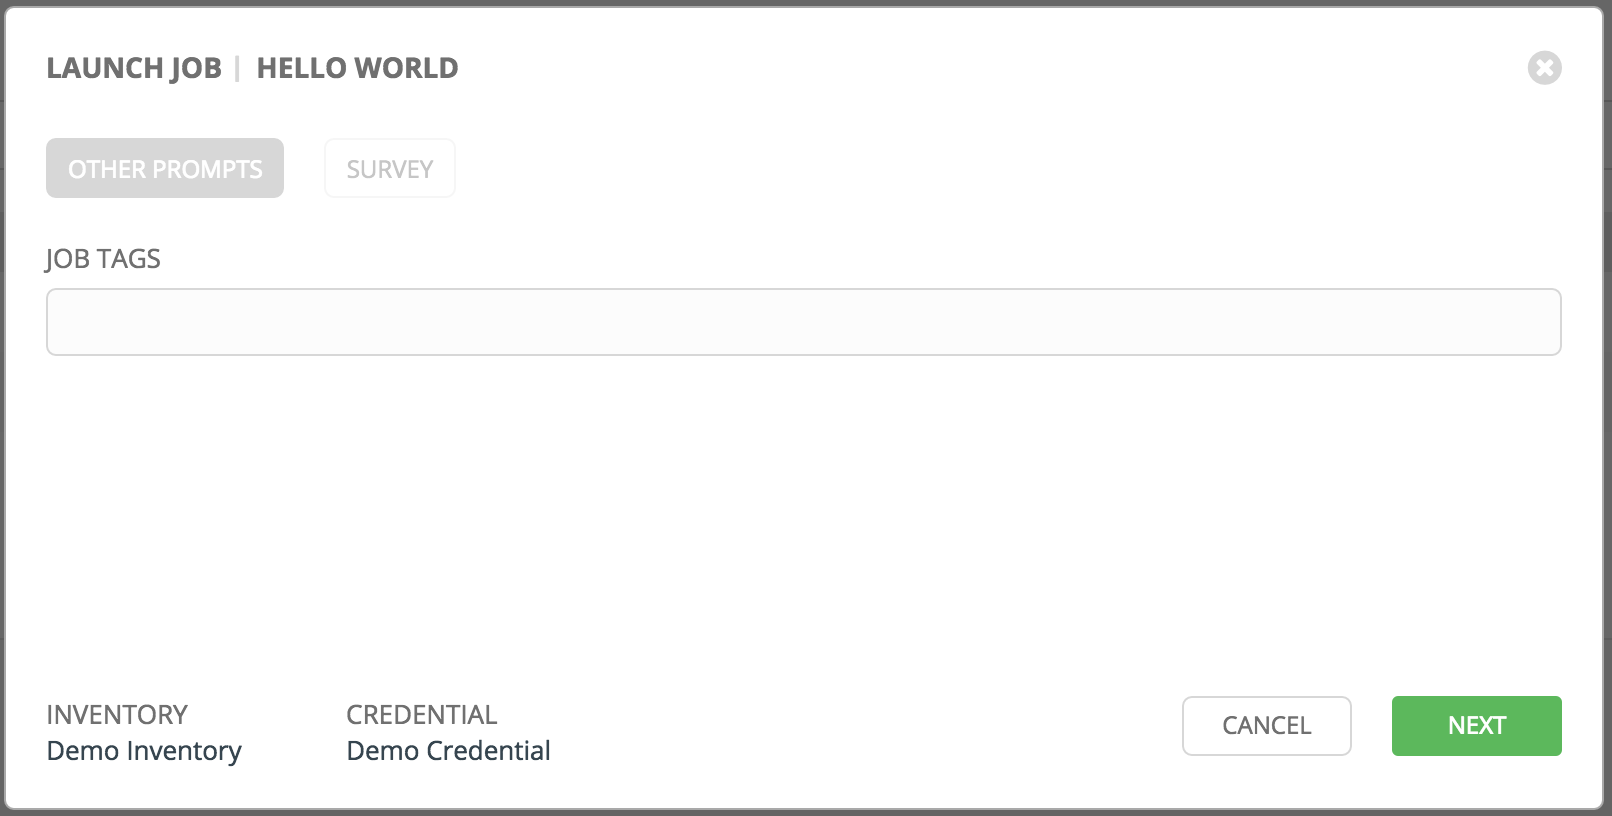
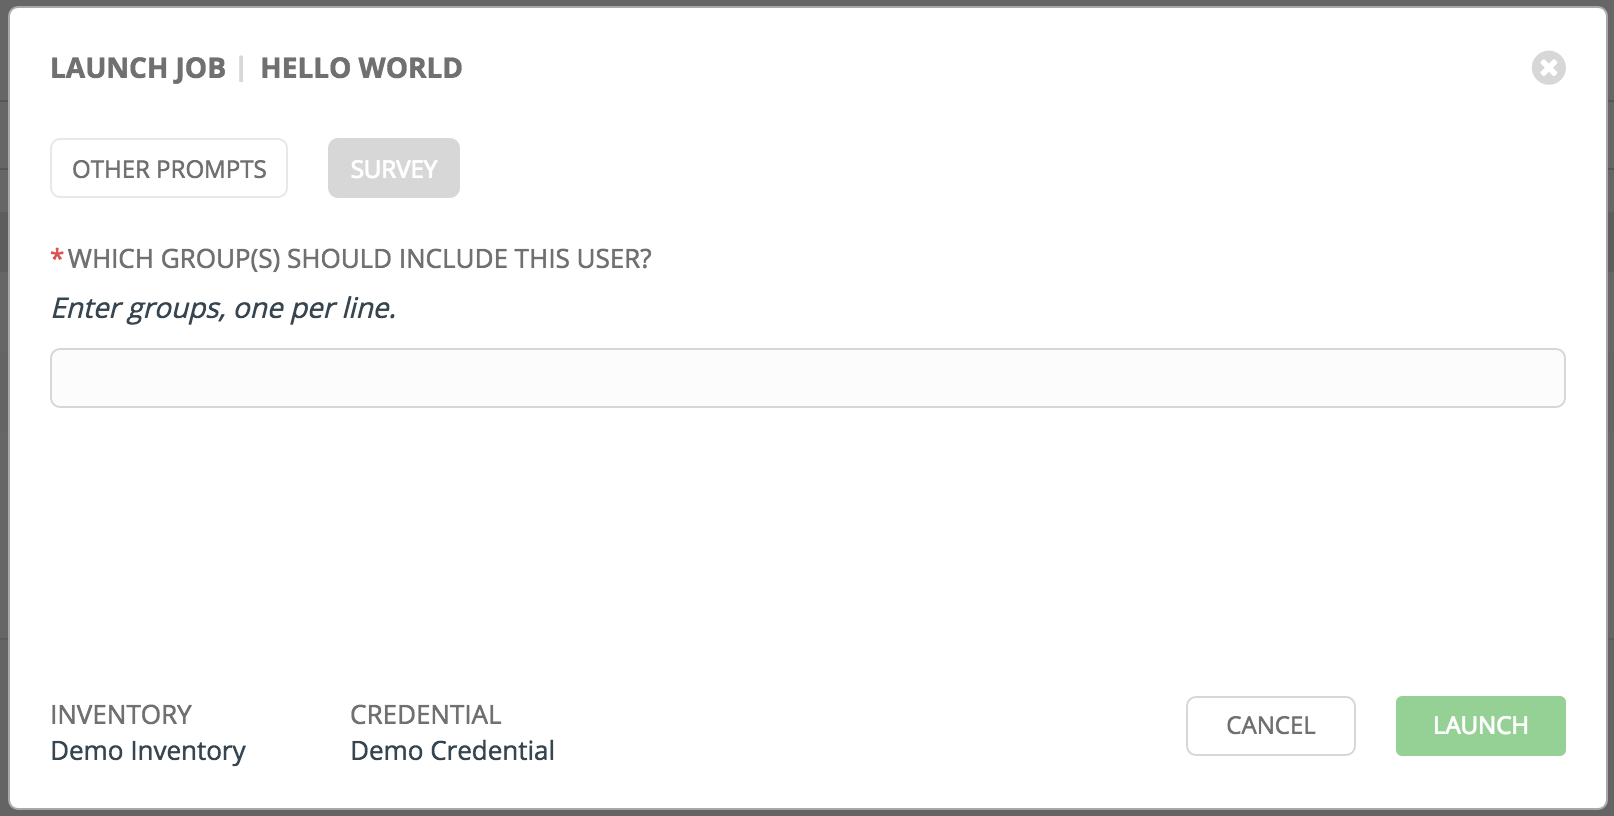
A job may require additional information to run. The following data may be requested at launch:
- Credentials that were setup
- Passwords or passphrases that have been set to Ask
- A survey, if one has been configured for the job templates
- Extra variables, if requested by the job template
Below is an example job launch that prompts for Job Tags, and runs the example survey created in Surveys.
Along with any extra variables set in the job template and survey, Tower automatically adds the following variables to the job environment:
tower_job_id: The Job ID for this job runtower_job_launch_type: One of manual, callback, or scheduled to indicate how the job was startedtower_job_template_id: The Job Template ID that this job run usestower_job_template_name: The Job Template name that this job usestower_user_id: The user ID of the Tower user that started this job. This is not available for callback or scheduled jobs.tower_user_name: The user name of the Tower user that started this job. This is not available for callback or scheduled jobs.
Upon launch, Tower automatically redirects the web browser to the Job Status page for this job under the Jobs tab.
13.7. Scheduling
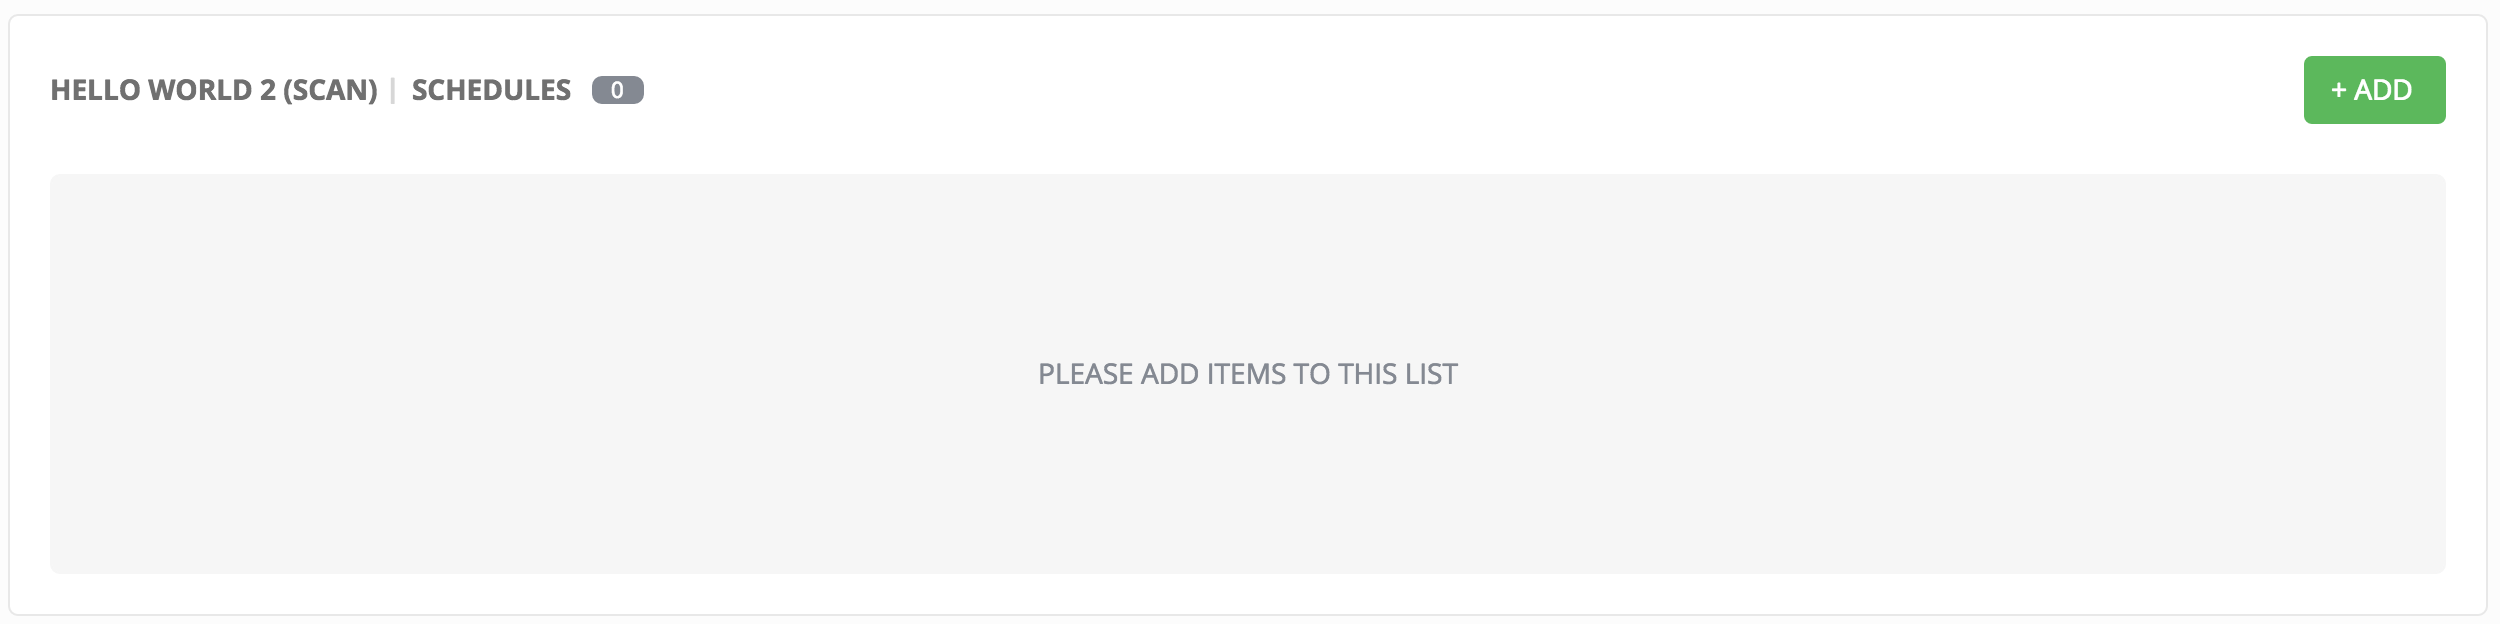
Launching job templates may also be scheduled via the  button. Clicking this button opens the Schedules page.
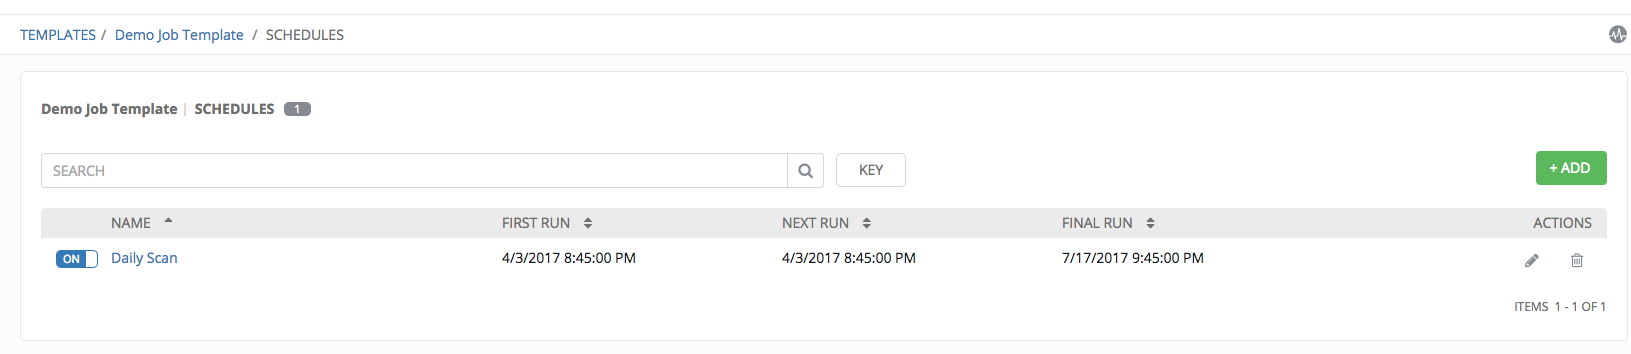
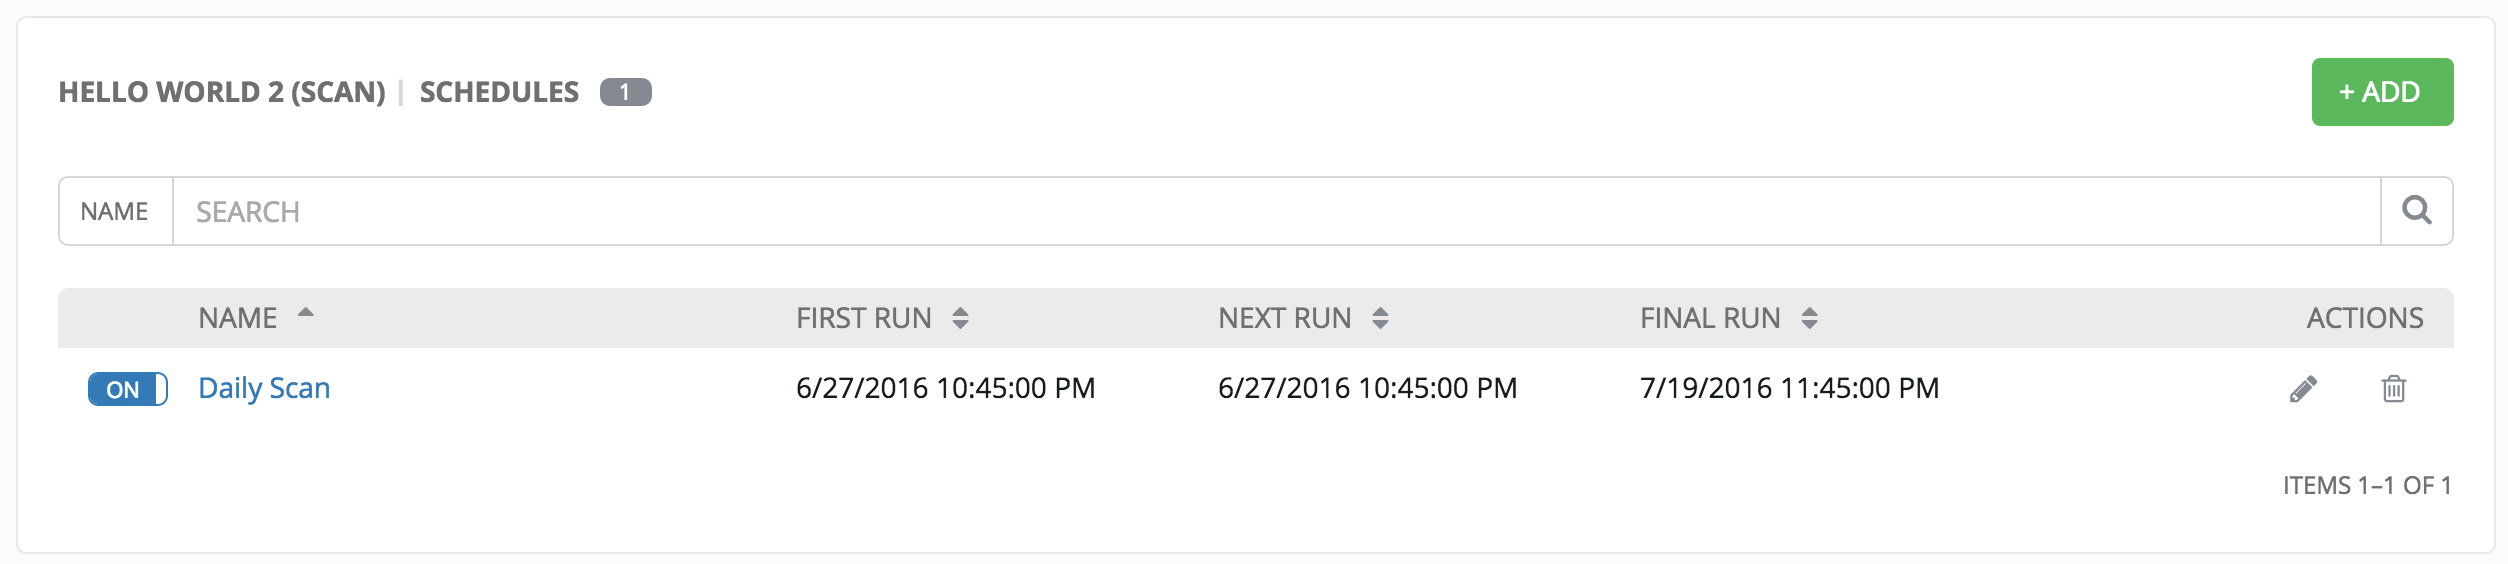
This page displays a list of the schedules that are currently available for the selected Job Template. The schedule list may be sorted and searched by any of the following:
- Name: Clicking the schedule name opens the Edit Schedule dialog
- First Run: The first scheduled run of this task
- Next Run: The next scheduled run of this task
- Final Run: If the task has an end date, this is the last run of the task
Buttons located in the upper right corner of the Schedules screen provide the following actions:
- View Activity Stream
- Add a new schedule
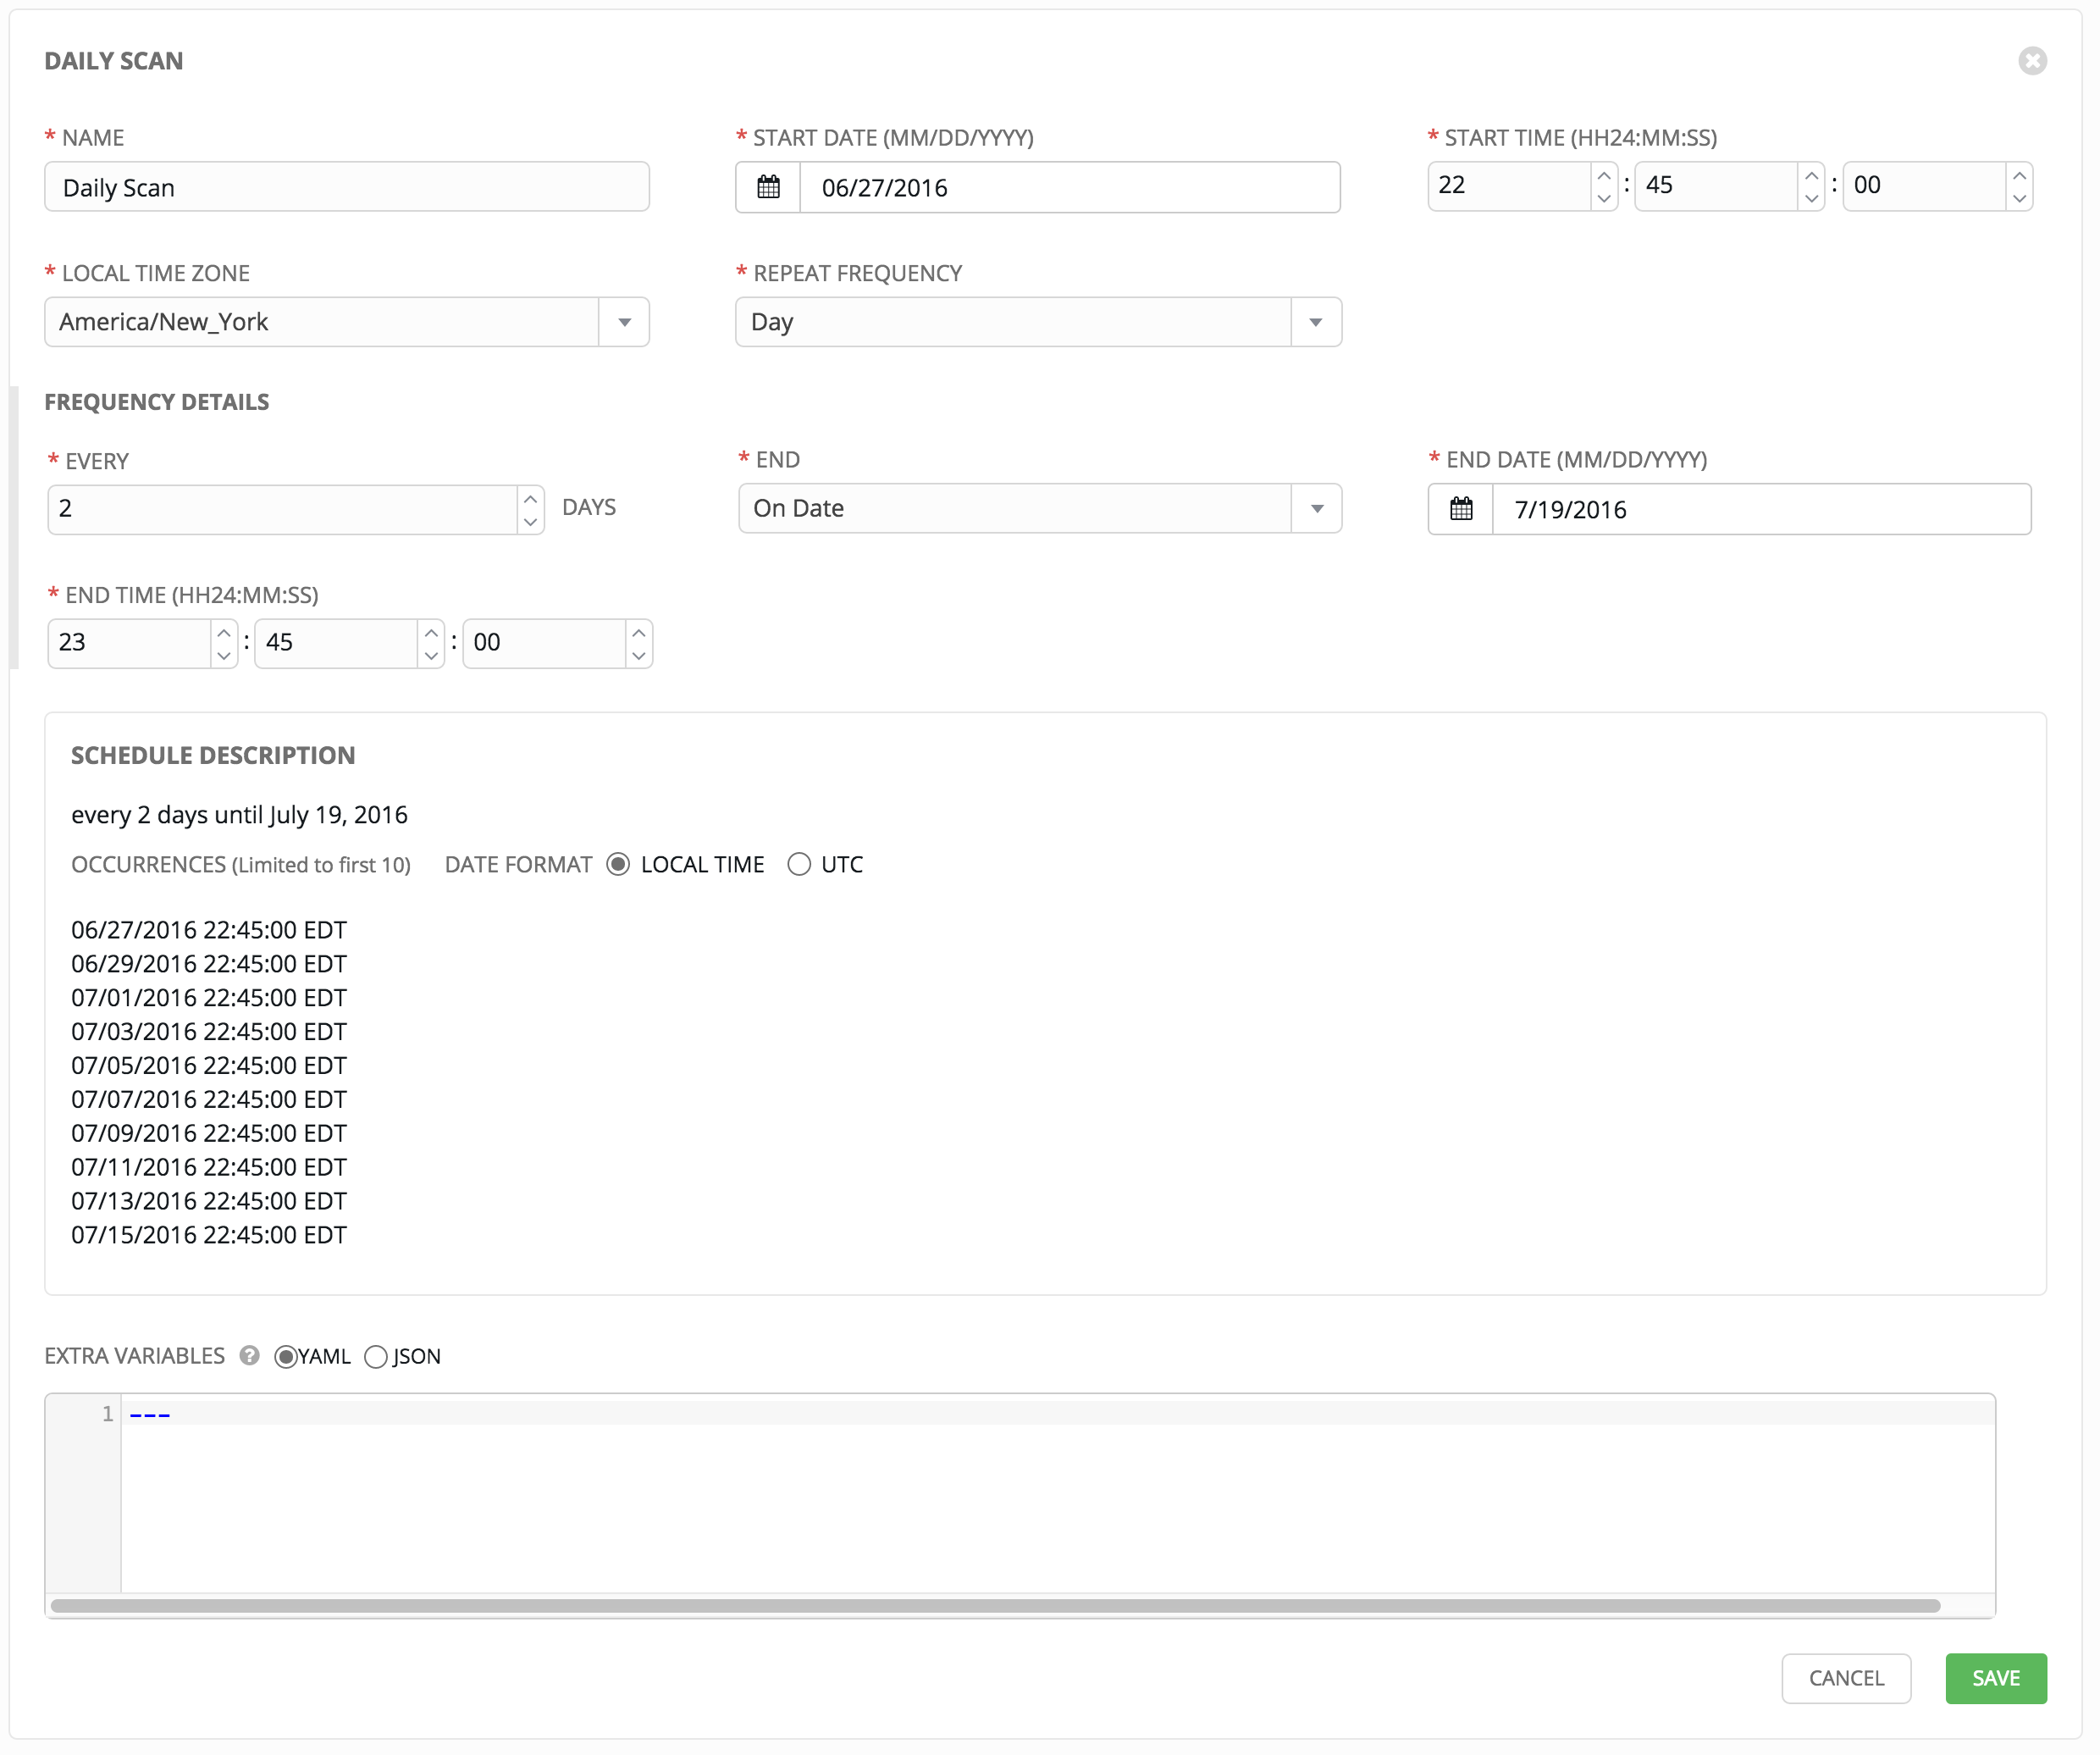
13.7.1. Schedule a Job Template
To create a new schedule:
- From the Schedules screen, click the button.
- Enter the appropriate details into the following fields:
- Name
- Start Date
- Start Time
- Local Time Zone: the entered Start Time should be in this timezone
- Repeat Frequency: the appropriate options display as the update frequency is modified
Note
Jobs are scheduled in UTC. Repeating jobs that runs at a specific time of day may move relative to a local timezone when Daylight Saving Time shifts occur.
The Schedule Description below displays the specifics of the schedule and a list of the scheduled occurrences in the selected Local Time Zone.
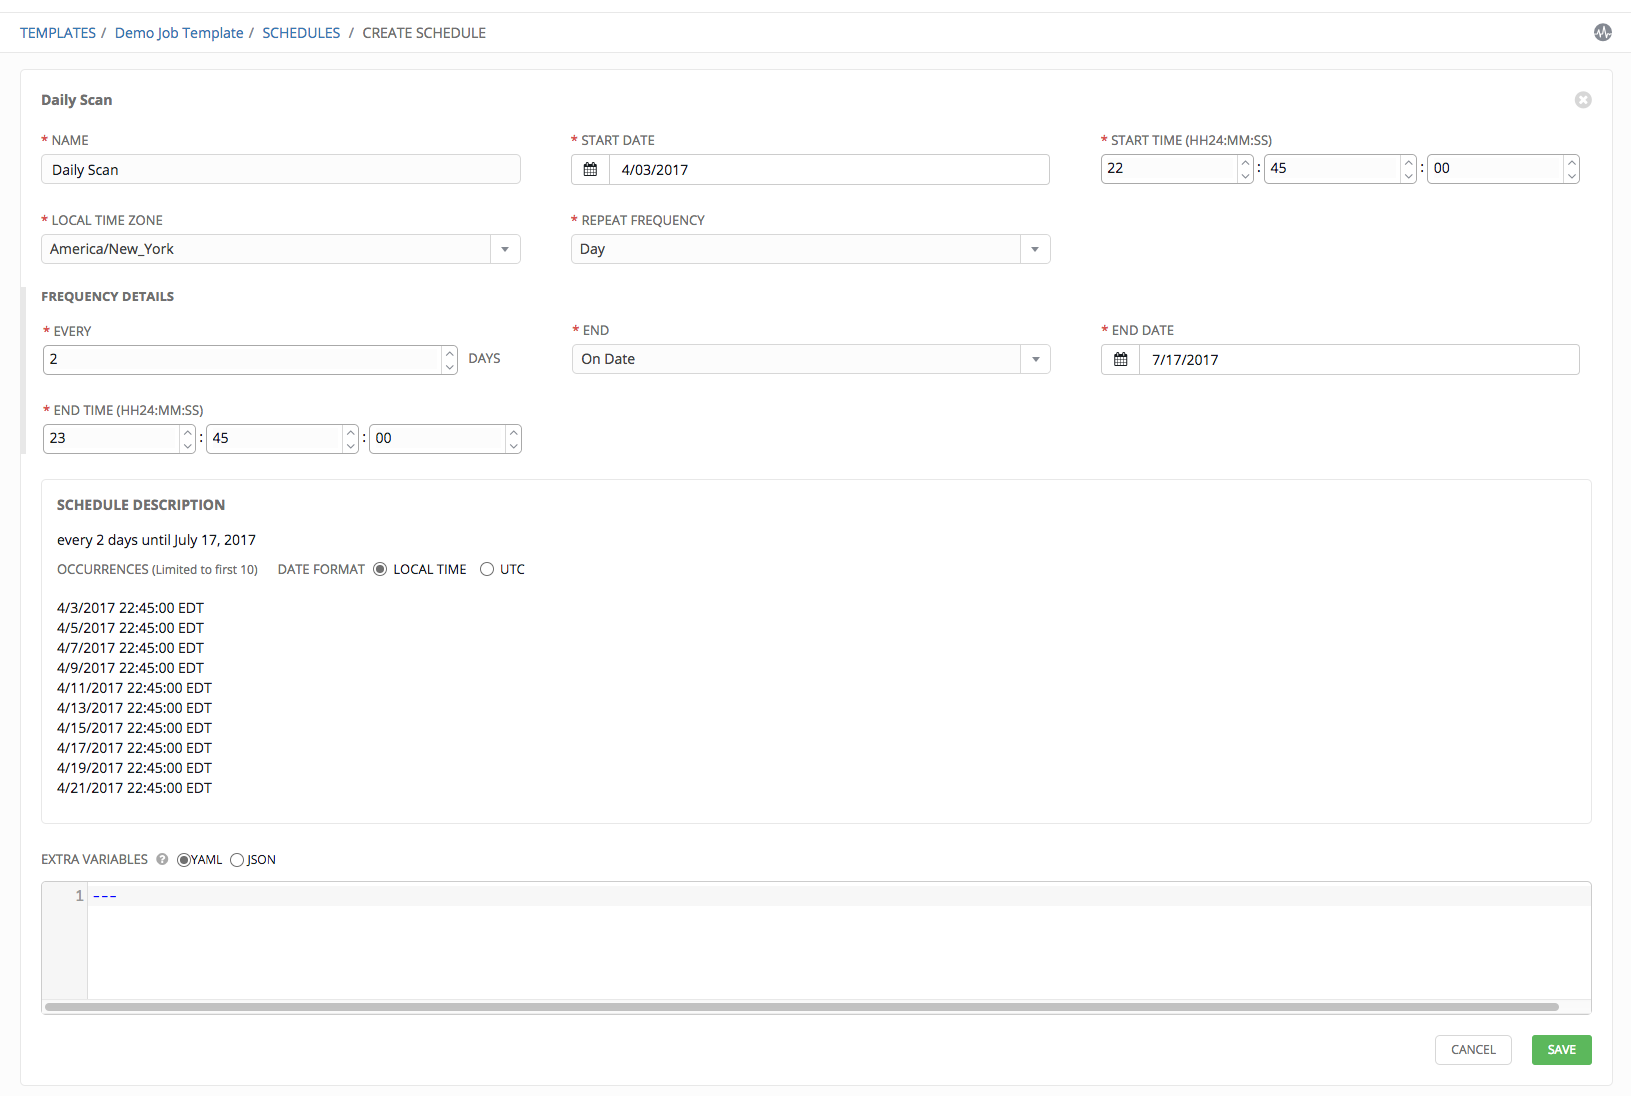
- When satisfied with the schedule specifics, click Save.
Once the schedule is saved, the list of schedules display for the associated job template.
Use the ON/OFF toggle button to quickly activate or deactivate this schedule.
Other actions for schedules are available under the Actions column:
- Edit Schedule
- Delete schedule
13.8. Copy a Job Template
Ansible Tower 3.0 introduced the ability to copy a Job Template. If you choose to copy Job Template, it does not copy any associated schedule, notifications, or permissions. Schedules and notifications must be recreated by the user or admin creating the copy of the Job Template. The user copying the Job Template will be granted the admin permission, but no permissions are assigned (copied) to the Job Template.
- Access the job template that you want to copy from the Templates navigational link or while in the Job Template Details view, scroll to the bottom to access it from a list of templates.
- Click the
 button.
A new template opens with the name of the template from which you copied and a timestamp.
- Replace the contents of the Name field with a new name, and provide or modify the entries in the other fields to complete this page.
- Click Save when done.
13.9. Scan Job Templates
Scan jobs are special Job Templates that only collect information about the host on which the job is running.
To create this special type of job template:
- Click on Templates.
2. Click the button then select Job Template from the menu list, which launches the Create Job Template window.
- Enter values for the following fields (required fields are marked with a red asterisk):
- Name: Enter a name appropriate for this inventory.
- Description: Enter an arbitrary description as appropriate.
- Job Type: Select Scan.
Note
You cannot change the Job Type at the time of launch to or from the type of “scan”. The ask_job_type_on_launch option only enables you to toggle “run” versus “check” at launch time.
- Inventory: Select the inventory containing the hosts you want this job to manage.
Note
You cannot assign a new inventory at the time of launch to a scan job. Scan jobs must be tied to a fixed inventory.
Project: Select the project containing the playbook you want this job to execute. Use the default project included with Tower unless you have a specific project to scan.
Playbook: Select the playbook to be executed by this job. Use the default playbook included with Tower unless you have a specific playbook to scan.
Machine Credential: Select the credential you want the job to use when accessing the remote hosts. Choose the credential containing the username and SSH key or password that Ansible will need to log into the remote hosts.
Cloud Credential: Selecting an optional cloud credential in the job template will pass along the access credentials to the running playbook, allowing provisioning into the cloud without manually passing parameters to the included modules. For more information, refer to Utilizing Cloud Credentials.
Network Credential Choose the network credential to be used with this job template from the credentials availale to the currently logged in Tower user.
Forks: The number of parallel or simultaneous processes to use while executing the playbook.
Limit: Provide a host pattern to further constrain the list of hosts that will be managed or affected by the playbook.
- Prompt on Launch: If selected, even if a default value is supplied, you will be prompted upon launch to choose a limit.
Verbosity: Control the level of output Ansible produces as the playbook executes.
Job Tags: Provide a comma separated list of tags to run a specific part of a play or task.
- Prompt on Launch – If selected, even if a default value is supplied, you will be prompted upon launch to choose a job tag.
Skip Tags:
- Provide a comma-separated list of playbook tags to skip certain tasks or parts of the playbooks to be executed.
- For more information and examples refer to Tags in the Ansible documentation.
- Prompt on Launch – If selected, even if a default value is supplied, you will be prompted upon launch to choose a job tag.
Options:
- Enable Privilege Escalation: If enabled, run this playbook as an administrator. This is the equivalent of passing the
--becomeoption to theansible-playbookcommand. - Allow Provisioning Callbacks: Enable a host to call back to Tower via the Tower API and invoke the launch of a job from this job template. Refer to Provisioning Callbacks for additional information.
- Enable Concurrent Jobs: Allow jobs in the queue to run simulataneously if not dependent on one another. Refer to Job Concurrency for additional information.
- Enable Privilege Escalation: If enabled, run this playbook as an administrator. This is the equivalent of passing the
Labels: Supply optional labels that describe this job template, such as “dev” or “test”. Labels can be used to group and filter job templates and completed jobs in the Tower display.
- Labels are created when they are added to the Job Template. Labels are associated to a single Organization using the Project that is provided in the Job Template. Members of the Organization can create labels on a Job Template if they have edit permissions (such as an admin role).
- Once the Job Template is saved, the labels appear in the Job Templates overview.
- Click on the “x” beside a label to remove it. When a label is removed, and is no longer associated with a Job or Job Template, the label is permanently deleted from the list of Organization labels.
- Jobs inherit labels from the Job Template at the time of launch. If a label is deleted from a Job Template, it is also deleted from the Job.
Extra Variables:
- Pass extra command line variables to the playbook. This is the “-e” or “–extra-vars” command line parameter for ansible-playbook that is documented in the Ansible documentation at Passing Variables on the Command Line.
- Provide key/value pairs using either YAML or JSON. These variables have a maximum value of precedence and overrides other variables specified elsewhere.
- Prompt on Launch – If selected, even if a default value is supplied, you will be prompted upon launch to choose command line variables.
For more information about extra variables, refer to Extra Variables.
- When you have completed configuring the job template, click Save.
13.9.1. Supported OSes for Scan Job Templates
The following operating systems are supported for Scan Jobs:
- Red Hat Enterprise Linux 5, 6, & 7
- CentOS 5, 6, & 7
- Ubuntu 12.04, 14.04, 16.04
- OEL 6 & 7
- SLES 11 & 12
- Debian 6 & 7
- Fedora 22, 23, 24
- Amazon Linux 2016.03
- Windows Server 2008 and later
Note that some of these operating systems may require initial configuration in order to be able to run python and/or have access to the python packages that the scan modules depend on.
13.9.1.1. Pre-scan Setup
The following are examples of playbooks that configure certain distributions so that scan jobs can be run against them.
Bootstrap Ubuntu (16.04)
---

- name: Get Ubuntu 15, 16, and on ready
 hosts: all
 sudo: yes
 gather_facts: no

 tasks:

 - name: install python-simplejson
   raw: sudo apt-get -y update
   raw: sudo apt-get -y install python-simplejson
   raw: sudo apt-get install python-apt
Bootstrap Fedora (23, 24)
---

- name: Get Fedora ready
 hosts: all
 sudo: yes
 gather_facts: no

 tasks:

 - name: install python-simplejson
   raw: sudo dnf -y update
   raw: sudo dnf -y install python-simplejson
   raw: sudo dnf -y install rpm-python
CentOS 5 or Red Hat Enterprise Linux 5 may also need the simplejson package installed.
13.9.2. Launching a Scan Job Template
You can Launch, Schedule, Edit, Delete, or Copy the scan job template using the buttons to the right.
Click on the button. Enter any necessary credentials, passwords, passphrases, etc. that were setup for this job template.
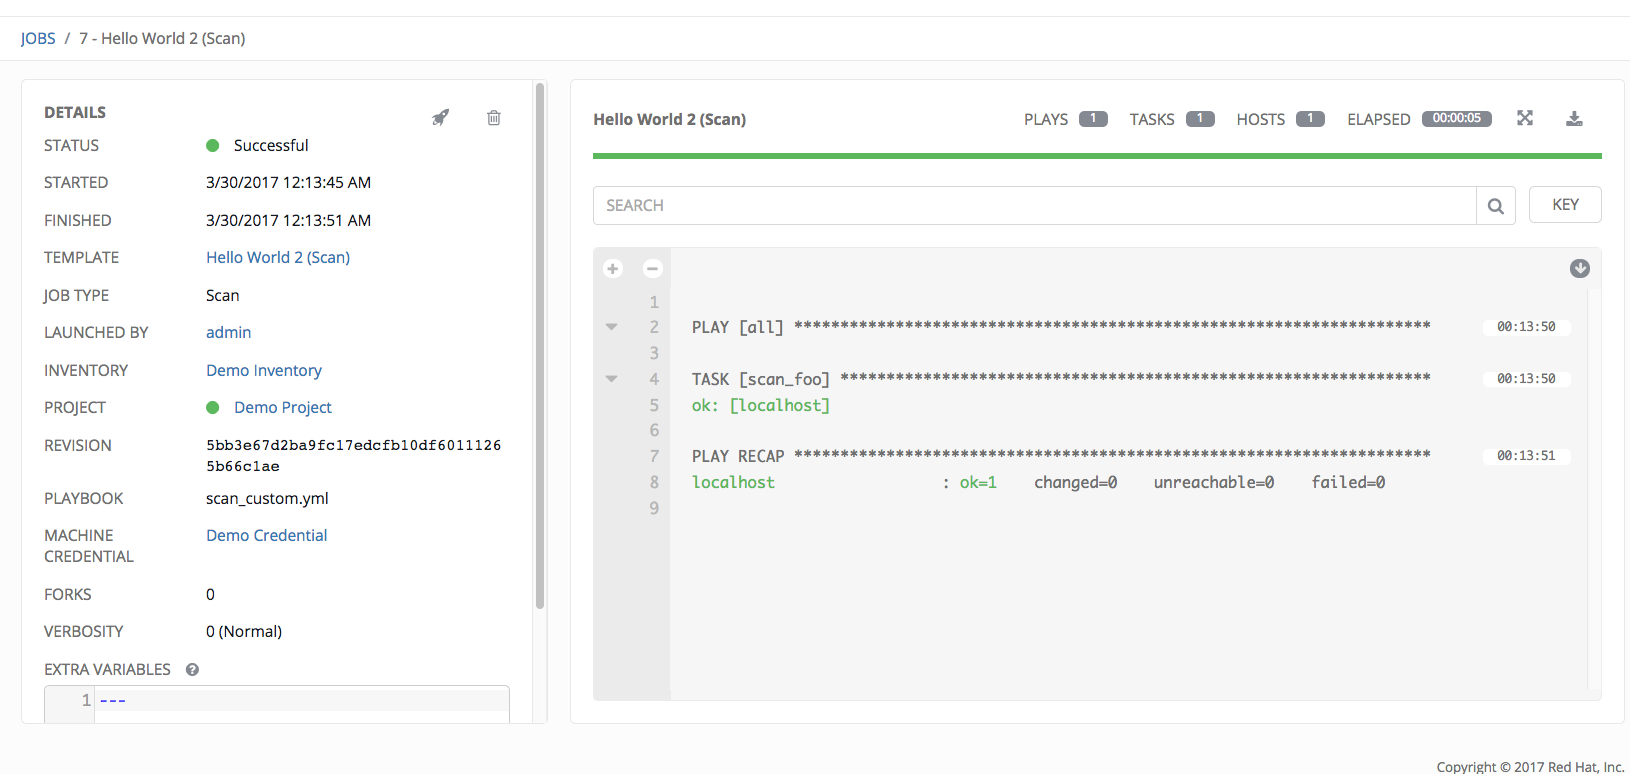
The Jobs page shows details of all the tasks and events for that playbook run.
13.9.3. Scheduling a Scan Job Template
To schedule a scan job:
- To access scheduling for your scan job, click the button (most easily accessible from the Templates navigational link).
- Click the button to add a schedule.
- Enter the appropriate details into the following fields:
- Name
- Start Date
- Start Time
- Local Time Zone: the entered Start Time should be in this timezone
- Repeat Frequency: the appropriate options display as the update frequency is modified
Note
Jobs are scheduled in UTC. Repeating jobs that runs at a specific time of day may move relative to a local timezone when Daylight Saving Time shifts occur.
The Schedule Description below displays the specifics of the schedule and a list of the scheduled occurrences in the selected Local Time Zone.
- When satisfied with the schedule specifics, click Save.
Once the schedule is saved, the list of schedules display for the associated job template.
Use the ON/OFF toggle button to quickly activate or deactivate this schedule.
Other actions for schedules are available under the Actions column:
- Edit Schedule
- Delete schedule
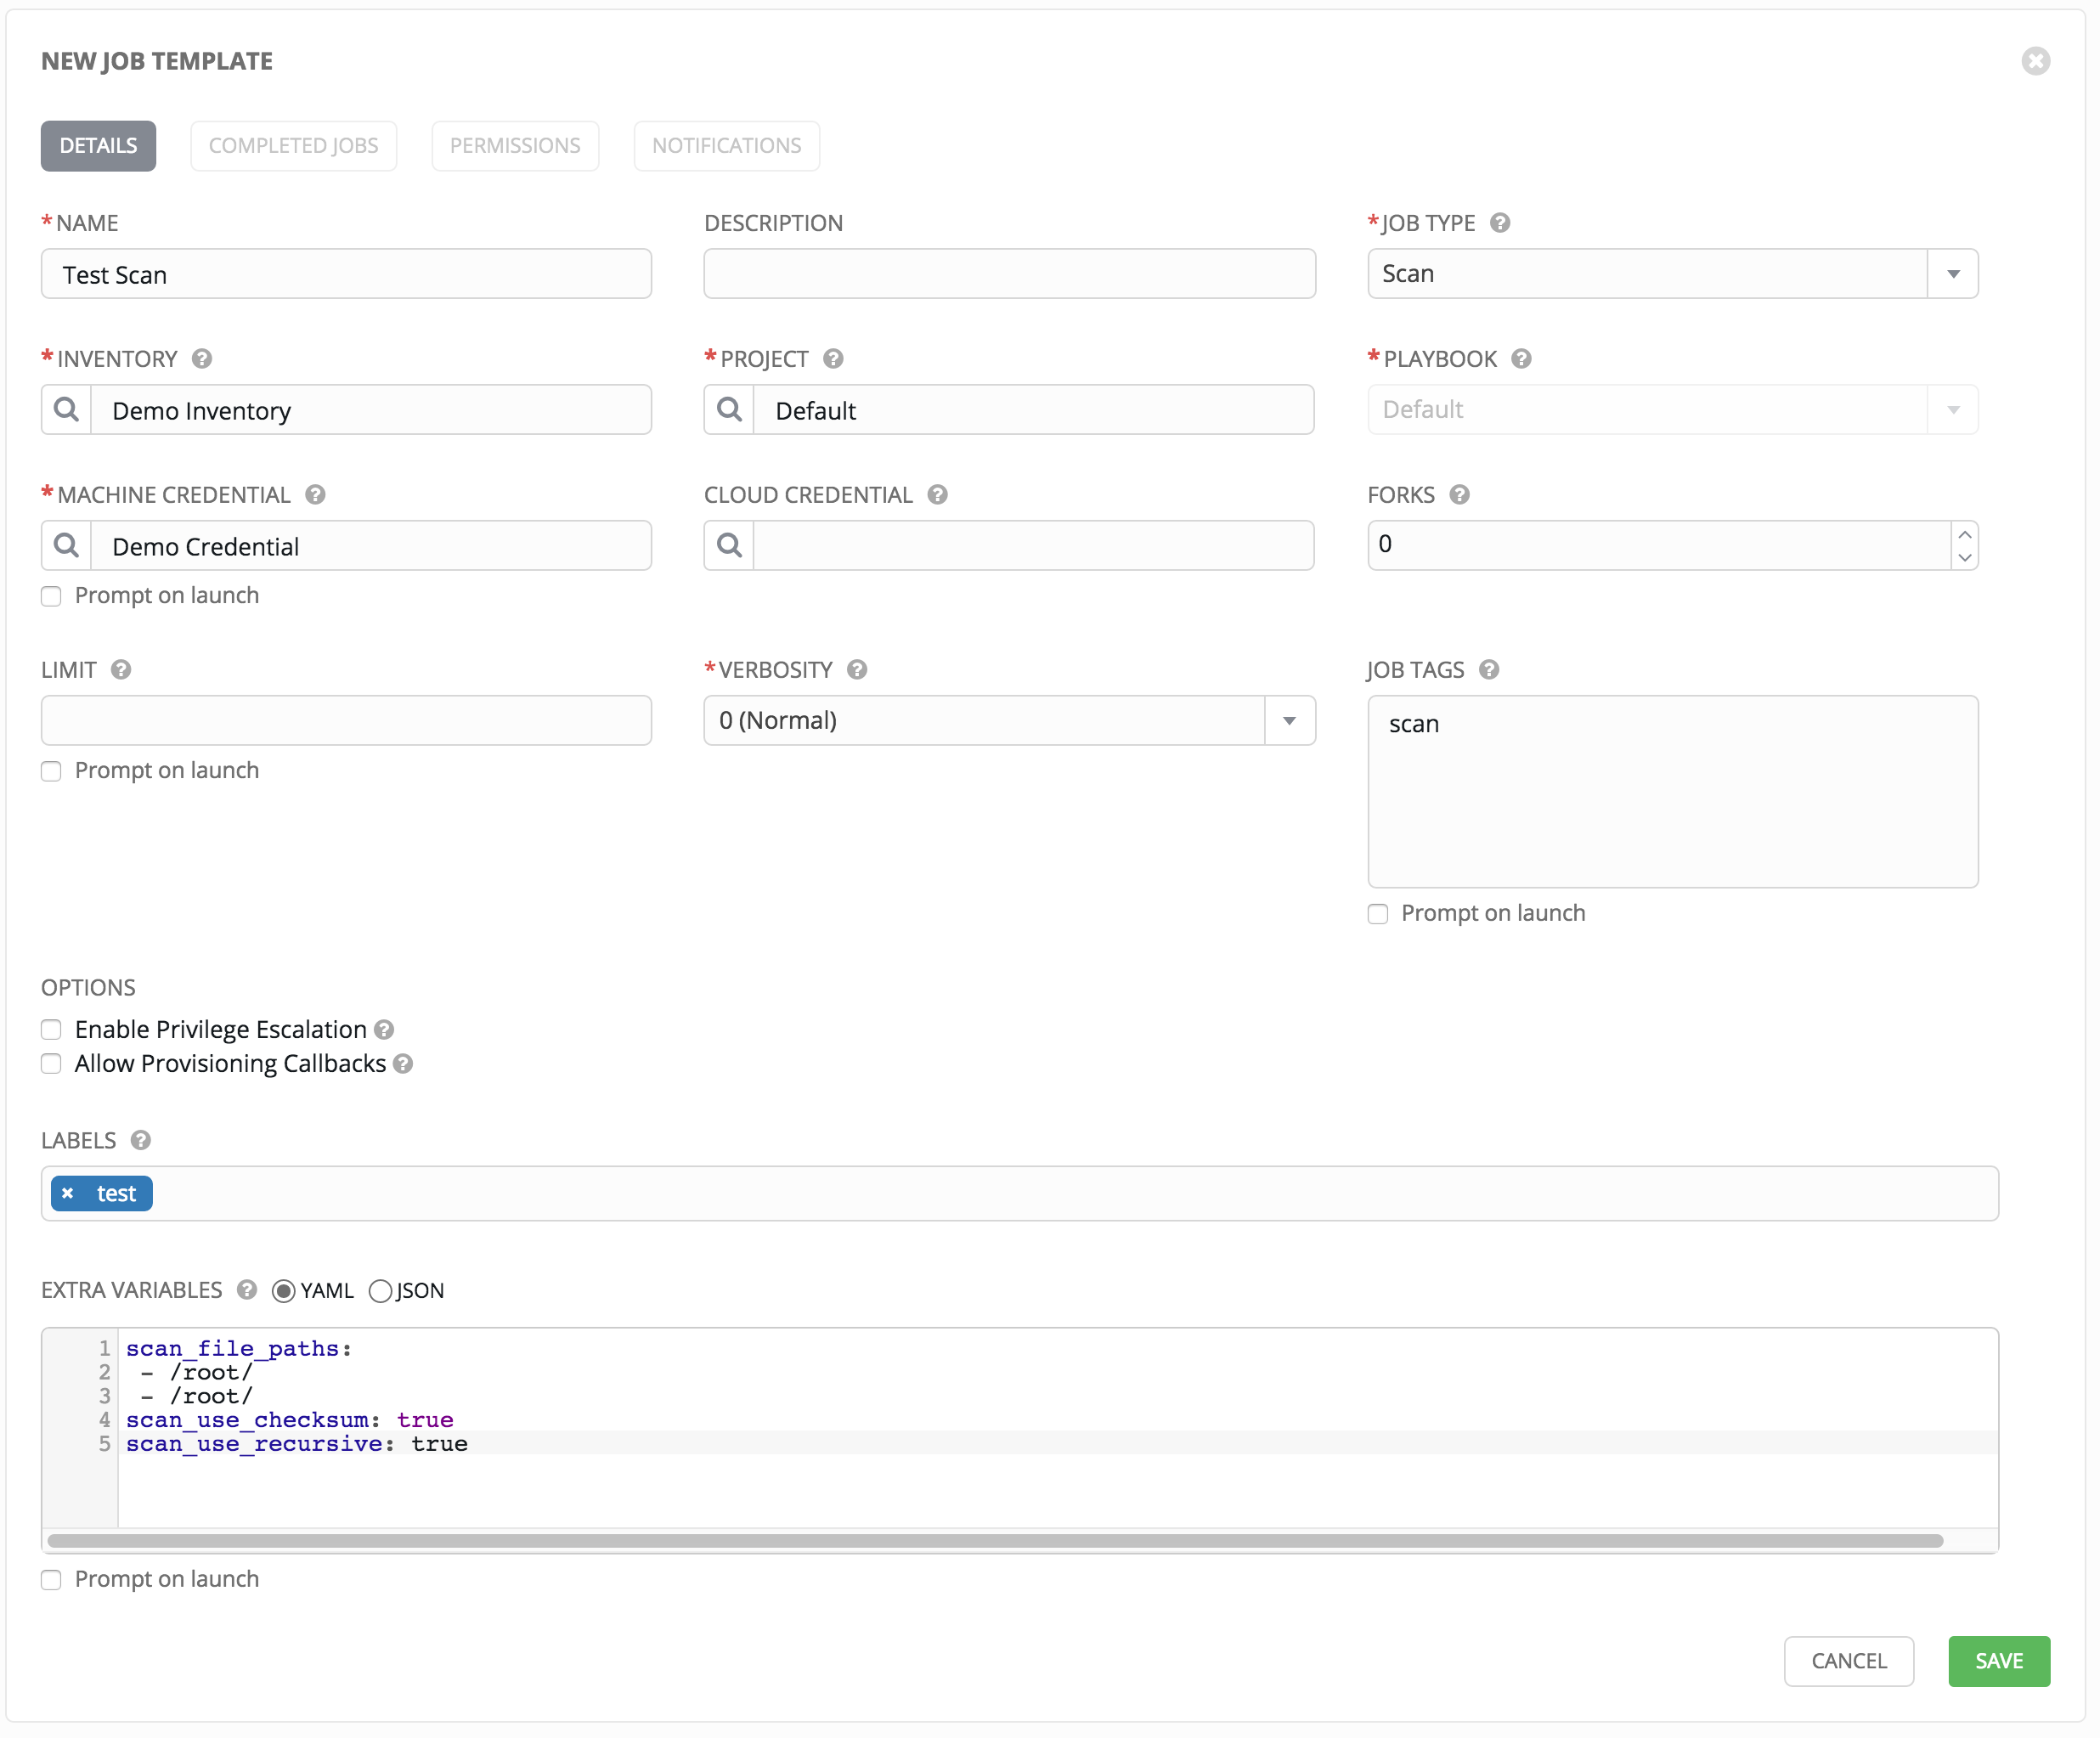
13.9.4. Custom Scan Job Templates
Custom scan jobs are normal scan job templates which use a custom scan playbook with customized fact modules. Additional Ansible fact modules can be included easily via custom scan playbooks.
13.9.4.1. Fact Scan Playbooks
The default scan job playbook bundled with Tower, scan_facts.yml, contains invocations of three fact scan modules - packages, services, and files, along with Ansible’s standard fact gathering. The scan_facts.yml playbook file looks like the following:
- hosts: all
  vars:
    scan_use_checksum: false
    scan_use_recursive: false
  tasks:
    - scan_packages:
    - scan_services:
    - scan_files:
        paths: '{{ scan_file_paths }}'
        get_checksum: '{{ scan_use_checksum }}'
        recursive: '{{ scan_use_recursive }}'
      when: scan_file_paths is defined
The scan_files fact module is the only module that accepts parameters, passed via extra_vars on the scan job template.
scan_file_paths: '/tmp/'
scan_use_checksum: true
scan_use_recursive: true
- The
scan_file_pathsparameter may have multiple settings (such as/tmp/or/var/log). - The
scan_use_checksumandscan_use_recursiveparameters may also be set to false or omitted. An omission is the same as a false setting.
13.9.4.2. Custom Fact Scans
A playbook for a custom fact scan is similar to the example of the Fact Scan Playbook above. As an example, a playbook that only uses a custom scan_foo Ansible fact module would look like this:
scan_custom.yml:
- hosts: all
  gather_facts: false
  tasks:
    - scan_foo:
scan_foo.py:
def main():
    module = AnsibleModule(
        argument_spec = dict())

    foo = [
      {
        "hello": "world"
      },
      {
        "foo": "bar"
      }
    ]
    results = dict(ansible_facts=dict(foo=foo))
    module.exit_json(**results)

main()
To use a custom fact module, ensure that it lives in the /library/ subdirectory of the Ansible project used in the scan job template. This fact scan module is very simple, returning a hard-coded set of facts:
[
   {
     "hello": "world"
   },
   {
     "foo": "bar"
   }
 ]
13.10. Utilizing Cloud Credentials
Cloud Credentials can be used when syncing a respective cloud inventory. Cloud Credentials may also be associated with a Job Template and included in the runtime environment for use by a playbook. The use of Cloud Credentials was introduced in Ansible Tower version 2.4.0.
13.10.1. OpenStack
The sample playbook below invokes the nova_compute Ansible OpenStack cloud module and requires credentials to do anything meaningful, and specifically requires the following information: auth_url, username, password, and project_name. These fields are made available to the playbook via the environmental variable OS_CLIENT_CONFIG_FILE, which points to a YAML file written by Tower based on the contents of the cloud credential. This sample playbook loads the YAML file into the Ansible variable space.
OS_CLIENT_CONFIG_FILE example:
clouds:
  devstack:
    auth:
      auth_url: http://devstack.yoursite.com:5000/v2.0/
      username: admin
      password: your_password_here
      project_name: demo
Playbook example:
- hosts: all
  gather_facts: false
  vars:
    config_file: "{{ lookup('env', 'OS_CLIENT_CONFIG_FILE') }}"
    nova_tenant_name: demo
    nova_image_name: "cirros-0.3.2-x86_64-uec"
    nova_instance_name: autobot
    nova_instance_state: 'present'
    nova_flavor_name: m1.nano

    nova_group:
      group_name: antarctica
      instance_name: deceptacon
      instance_count: 3
  tasks:
    - debug: msg="{{ config_file }}"
    - stat: path="{{ config_file }}"
      register: st
    - include_vars: "{{ config_file }}"
      when: st.stat.exists and st.stat.isreg

    - name: "Print out clouds variable"
      debug: msg="{{ clouds|default('No clouds found') }}"

    - name: "Setting nova instance state to: {{ nova_instance_state }}"
      local_action:
        module: nova_compute
        login_username: "{{ clouds.devstack.auth.username }}"
        login_password: "{{ clouds.devstack.auth.password }}"
13.10.2. Amazon Web Services
Amazon Web Services cloud credentials are exposed as the following environment variables during playbook execution (in the job template, choose the cloud credential needed for your setup):
AWS_ACCESS_KEYAWS_SECRET_KEY
All of the AWS modules will implicitly use these credentials when run via Tower without having to set the aws_access_key or aws_secret_key module options.
13.10.3. Rackspace
Rackspace cloud credentials are exposed as the following environment variables during playbook execution (in the job template, choose the cloud credential needed for your setup):
RAX_USERNAMERAX_API_KEY
All of the Rackspace modules will implicitly use these credentials when run via Tower without having to set the username or api_key module options.
13.10.4. Google
Google cloud credentials are exposed as the following environment variables during playbook execution (in the job template, choose the cloud credential needed for your setup):
GCE_EMAILGCE_PROJECTGCE_PEM_FILE_PATH
All of the Google modules will implicitly use these credentials when run via Tower without having to set the service_account_email, project_id, or pem_file module options.
13.10.5. Azure
Azure cloud credentials are exposed as the following environment variables during playbook execution (in the job template, choose the cloud credential needed for your setup):
AZURE_SUBSCRIPTION_IDAZURE_CERT_PATH
All of the Azure modules implicitly use these credentials when run via Tower without having to set the subscription_id or management_cert_path module options.
13.10.6. VMware
VMware cloud credentials are exposed as the following environment variables during playbook execution (in the job template, choose the cloud credential needed for your setup):
VMWARE_USERVMWARE_PASSWORDVMWARE_HOST
The sample playbook below demonstrates usage of these credentials:
- vsphere_guest:
    vcenter_hostname: "{{ lookup('env', 'VMWARE_HOST') }}"
    username: "{{ lookup('env', 'VMWARE_USER') }}"
    password: "{{ lookup('env', 'VMWARE_PASSWORD') }}"
    guest: newvm001
    from_template: yes
    template_src: centosTemplate
    cluster: MainCluster
    resource_pool: "/Resources"
    vm_extra_config:
      folder: MyFolder
13.11. Provisioning Callbacks
Provisioning callbacks are a feature of Tower that allow a host to initiate a playbook run against itself, rather than waiting for a user to launch a job to manage the host from the tower console. Please note that provisioning callbacks are only used to run playbooks on the calling host. Provisioning callbacks are meant for cloud bursting, ie: new instances with a need for client to server communication for configuration (such as transmitting an authorization key), not to run a job against another host. This provides for automatically configuring a system after it has been provisioned by another system (such as AWS auto-scaling, or a OS provisioning system like kickstart or preseed) or for launching a job programmatically without invoking the Tower API directly. The Job Template launched only runs against the host requesting the provisioning.
Frequently this would be accessed via a firstboot type script, or from cron.
To enable callbacks, check the Allow Provisioning Callbacks checkbox in the Job Template. This displays the Provisioning Callback URL for this job template.
Note
If you intend to use Tower’s provisioning callback feature with a dynamic inventory, Update on Launch should be set for the inventory group used in the Job Template.

Callbacks also require a Host Config Key, to ensure that foreign hosts with the URL cannot request configuration. Click the  button to create a unique host key for this callback, or enter your own key. The host key may be reused across multiple hosts to apply this job template against multiple hosts. Should you wish to control what hosts are able to request configuration, the key may be changed at any time.
To callback manually via REST, look at the callback URL in the UI, which is of the form:
http://<Tower server name>/api/v1/job_templates/1/callback/
The ‘1’ in this sample URL is the job template ID in Tower.
The request from the host must be a POST. Here is an example using curl (all on a single line):
root@localhost:~$ curl --data "host_config_key=5a8ec154832b780b9bdef1061764ae5a" \
                    http://<Tower server name>/api/v1/job_templates/1/callback/
The requesting host must be defined in your inventory for the callback to succeed. If Tower fails to locate the host either by name or IP address in one of your defined inventories, the request is denied. When running a Job Template in this way, the host initiating the playbook run against itself must be in the inventory. If the host is missing from the inventory, the Job Template will fail with a “No Hosts Matched” type error message.
Note
If your host is not in inventory and Update on Launch is set for the inventory group, Tower attempts to update cloud based inventory source before running the callback.
Successful requests result in an entry on the Jobs tab, where the results and history can be viewed.
While the callback can be accessed via REST, the suggested method of using the callback is to use one of the example scripts that ships with Tower - /usr/share/awx/request_tower_configuration.sh (Linux/UNIX) or /usr/share/awx/request_tower_configuration.ps1 (Windows). Usage is described in the source code of the file by passing the -h flag, as shown below:
./request_tower_configuration.sh -h
Usage: ./request_tower_configuration.sh <options>

Request server configuration from Ansible Tower.

OPTIONS:
   -h      Show this message
   -s      Tower server (e.g. https://tower.example.com) (required)
   -k      Allow insecure SSL connections and transfers
   -c      Host config key (required)
   -t      Job template ID (required)
   -e      Extra variables
   -s      Number of seconds between retries (default: 60)
This script is intelligent in that it knows how to retry commands and is therefore a more robust way to use callbacks than a simple curl request. As written, the script retries once per minute for up to ten minutes.
Note
Please note that this is an example script. You should edit this script if you need more dynamic behavior when detecting failure scenarios, as any non-200 error code may not be a transient error requiring retry.
Most likely you will use callbacks with dynamic inventory in Tower, such as pulling cloud inventory from one of the supported cloud providers. In these cases, along with setting Update On Launch, be sure to configure an inventory cache timeout for the inventory source, to avoid hammering of your Cloud’s API endpoints. Since the request_tower_configuration.sh script polls once per minute for up to ten minutes, a suggested cache invalidation time for inventory (configured on the inventory source itself) would be one or two minutes.
While we recommend against running the request_tower_configuration.sh script from a cron job, a suggested cron interval would be perhaps every 30 minutes. Repeated configuration can be easily handled by scheduling in Tower, so the primary use of callbacks by most users is to enable a base image that is bootstrapped into the latest configuration upon coming online. To do so, running at first boot is a better practice. First boot scripts are just simple init scripts that typically self-delete, so you would set up an init script that called a copy of the request_tower_configuration.sh script and make that into an autoscaling image.
13.11.1. Passing Extra Variables to Provisioning Callbacks
Just as you can pass extra_vars in a regular Job Template, you can also pass them to provisioning callbacks. To pass extra_vars, the data sent must be part of the body of the POST request as application/json (as the content type). Use the following JSON format as an example when adding your own extra_vars to be passed:
'{"extra_vars": {"variable1":"value1","variable2":"value2",...}}'
(Added in Ansible Tower version 2.2.0.)
You can also pass extra variables to the Job Template call using curl, such as is shown in the following example:
root@localhost:~$ curl -f -H 'Content-Type: application/json' -XPOST \
                 -d '{"host_config_key": "5a8ec154832b780b9bdef1061764ae5a", "extra_vars": "{\"foo\": \"bar\"}"}' \
                 http://<Tower server name>/api/v1/job_templates/1/callback
For more information, refer to Launching Jobs with Curl.
13.12. Extra Variables
Note
Additional strict extra_vars validation was added in Ansible Tower 3.0.0. extra_vars passed to the job launch API are only honored if one of the following is true:
- They correspond to variables in an enabled survey
ask_variables_on_launchis set to True
When you pass survey variables, they are passed as extra variables (extra_vars) within Tower. This can be tricky, as passing extra variables to a job template (as you would do with a survey) can override other variables being passed from the inventory and project.
For example, say that you have a defined variable for an inventory for debug = true. It is entirely possible that this variable, debug = true, can be overridden in a job template survey.
To ensure that the variables you need to pass are not overridden, ensure they are included by redefining them in the survey. Keep in mind that extra variables can be defined at the inventory, group, and host levels.
Note
Beginning with Ansible Tower version 2.4, the behavior for Job Template extra variables and Survey variables has changed. Previously, variables set using a Survey overrode any extra variables specified in the Job Template. In 2.4 and later, the Job Template extra variables dictionary is merged with the Survey variables. This may result in a change of behavior upon upgrading to 2.4.
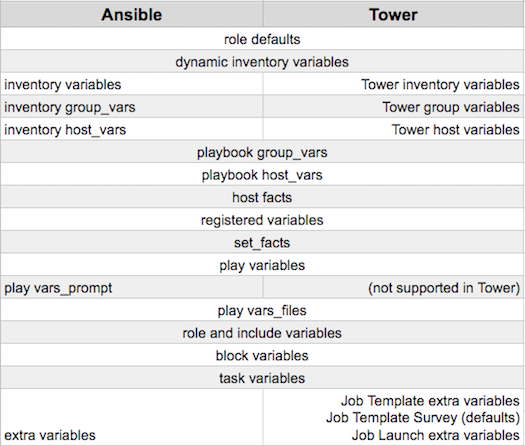
The following table notes the behavior (hierarchy) of variable precedence in Ansible Tower as it compares to variable precedence in Ansible.
Ansible Tower Variable Precedence Hierarchy (last listed wins)
13.12.1. Relaunching Job Templates
Another change for Ansible Tower version 2.4 introduced a launch_type setting for your jobs. Instead of manually relaunching a job, a relaunch is denoted by setting launch_type to relaunch. The relaunch behavior deviates from the launch behavior in that it does not inherit extra_vars.
Job relaunching does not go through the inherit logic. It uses the same extra_vars that were calculated for the job being relaunched.
For example, say that you launch a Job Template with no extra_vars which results in the creation of a Job called j1. Next, say that you edit the Job Template and add in some extra_vars (such as adding "{ "hello": "world" }").
Relaunching j1 results in the creation of j2, but because there is no inherit logic and j1 had no extra_vars, j2 will not have any extra_vars.
To continue upon this example, if you launched the Job Template with the extra_vars you added after the creation of j1, the relaunch job created (j3) will include the extra_vars. And relaunching j3 results in the creation of j4, which would also include extra_vars.