15. Workflow Job Templates
A workflow job template links together a sequence of disparate job templates that accomplishes the task of tracking the full set of jobs that were part of the release process as a single unit.
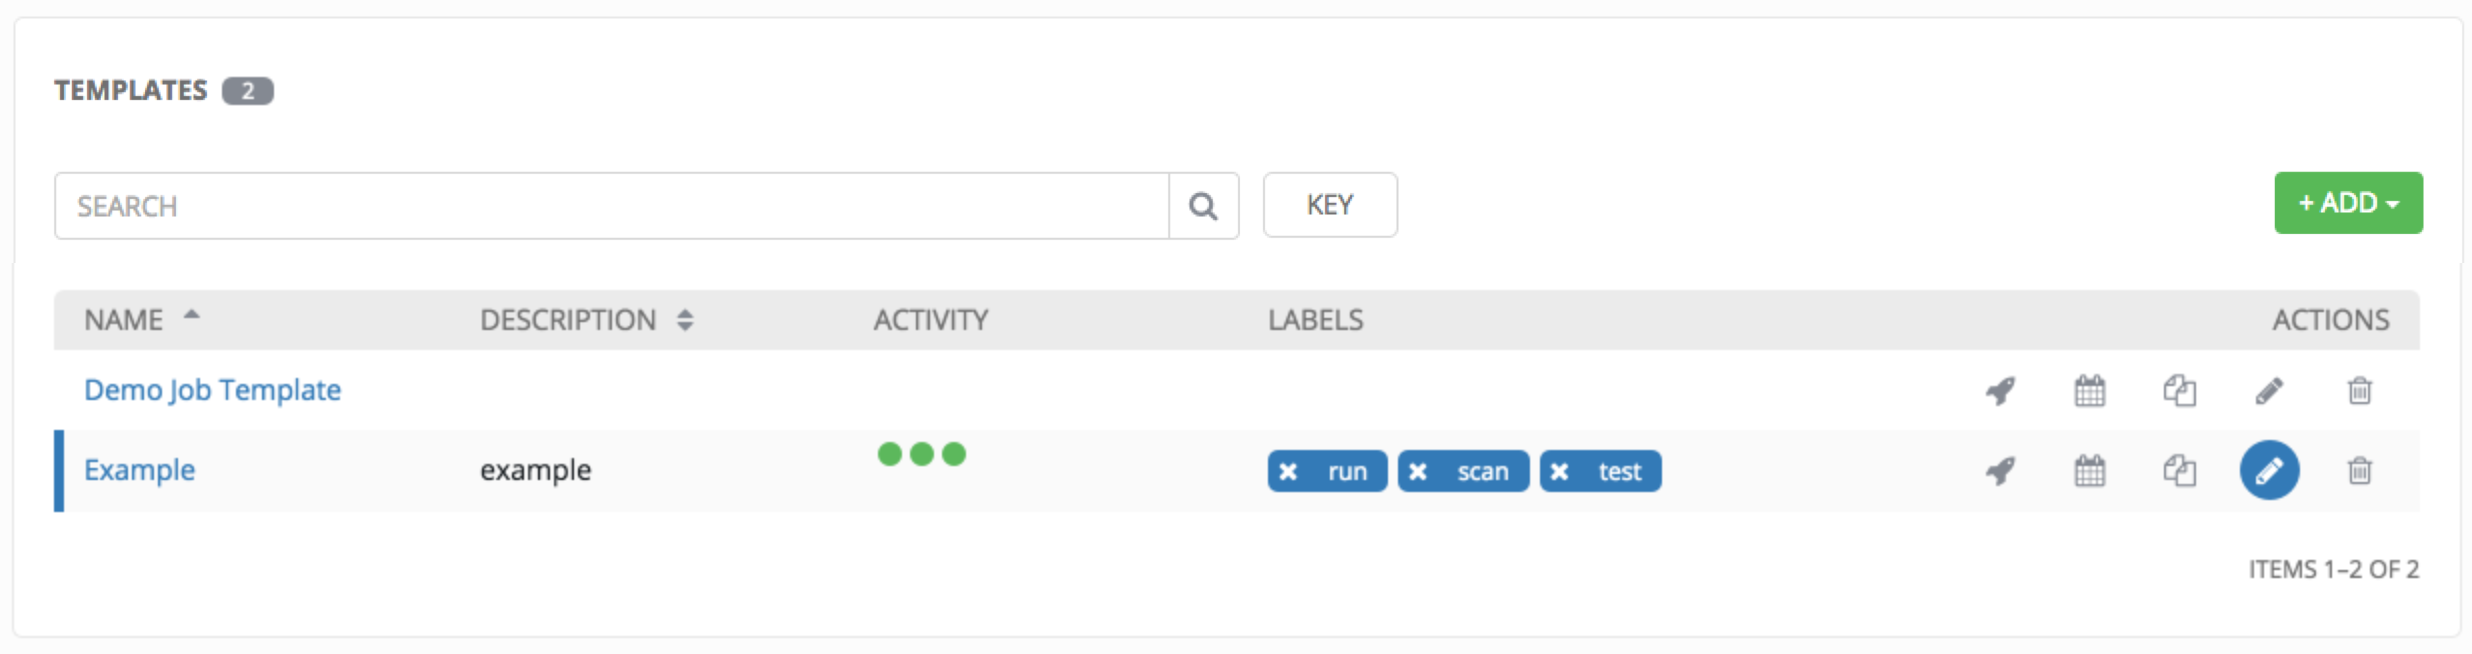
This menu opens a list of the workflow and job templates that are currently available. The templates list may be sorted and searched by Name or Description. The Job Templates tab also enables the user to launch, schedule, modify, and remove a workflow or job template.

15.1. Create a Workflow Template
To create a new workflow job template:
- Click the
 button then select Workflow Job Template from the menu list.
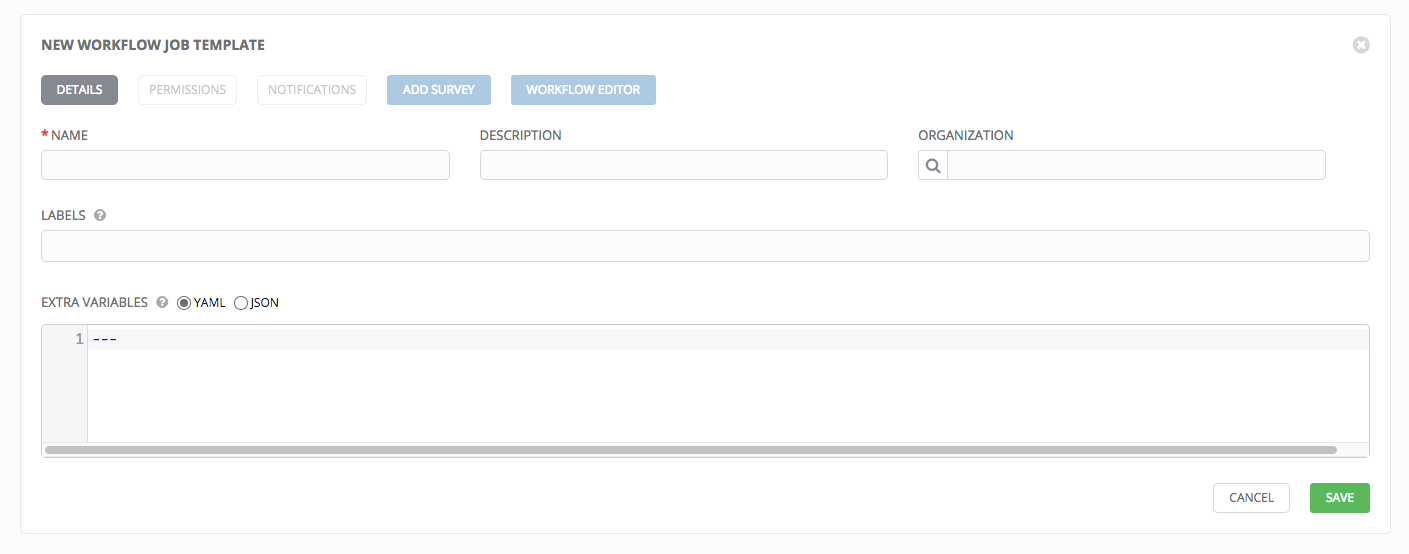
- Enter the appropriate details into the following fields:
- Name: Enter a name for the workflow template.
- Description: Enter an arbitrary description as appropriate (optional).
- Organization: Enter or search for an organization to associate the workflow.
- Labels: Supply optional labels that describe this workflow template, such as “dev” or “test”. Labels can be used to group and filter workflow templates and completed jobs in the Tower display.
- Labels are created when they are added to the Workflow Template. Labels are associated to a single Organization using the Project that is provided in the Workflow Template. Members of the Organization can create labels on a Workflow Template if they have edit permissions (such as an admin role).
- Once the Workflow Template is saved, the labels appear in the Templates overview.
- Click on the “x” beside a label to remove it. When a label is removed, and is no longer associated with a Workflow or Workflow Template, the label is permanently deleted from the list of Organization labels.
- Jobs inherit labels from the Workflow Template at the time of launch. If a label is deleted from a Workflow Template, it is also deleted from the Job.

Extra Variables:
Pass extra command line variables to the playbook. This is the “-e” or “–extra-vars” command line parameter for ansible-playbook that is documented in the Ansible documentation at Passing Variables on the Command Line.
Provide key/value pairs using either YAML or JSON. These variables have a maximum value of precedence and overrides other variables specified elsewhere. An example value might be:
git_branch: production
release_version: 1.5
For more information about extra variables, refer to Extra Variables.
- When you have completed configuring the workflow job template, select Save.
Saving the template does not exit the Workflow Job Template page but remains on the Workflow Job Template Details view for further editing, if necessary. The Details tab of a saved template allows you to review, edit, and add permissions, notifications, surveys, or build a workflow job template using an editor.
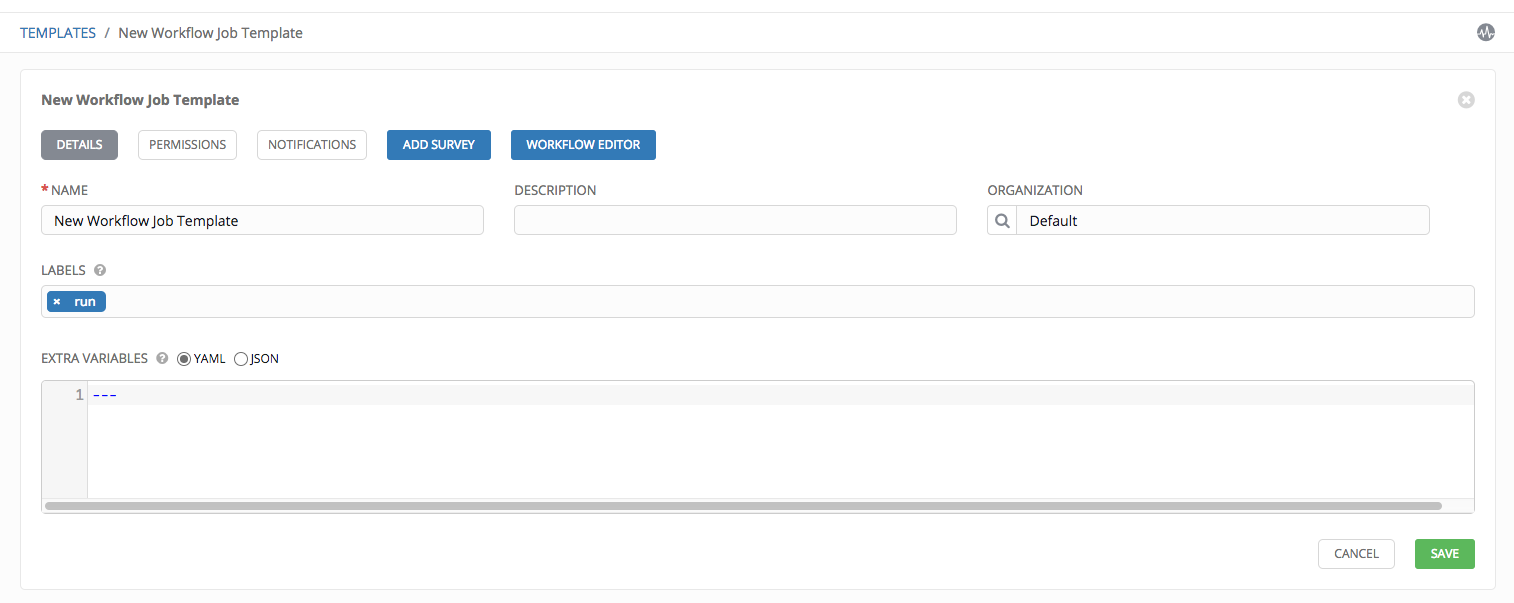
You can verify the template is saved when the newly created workflow job template appears on the list of templates at the bottom of the screen.
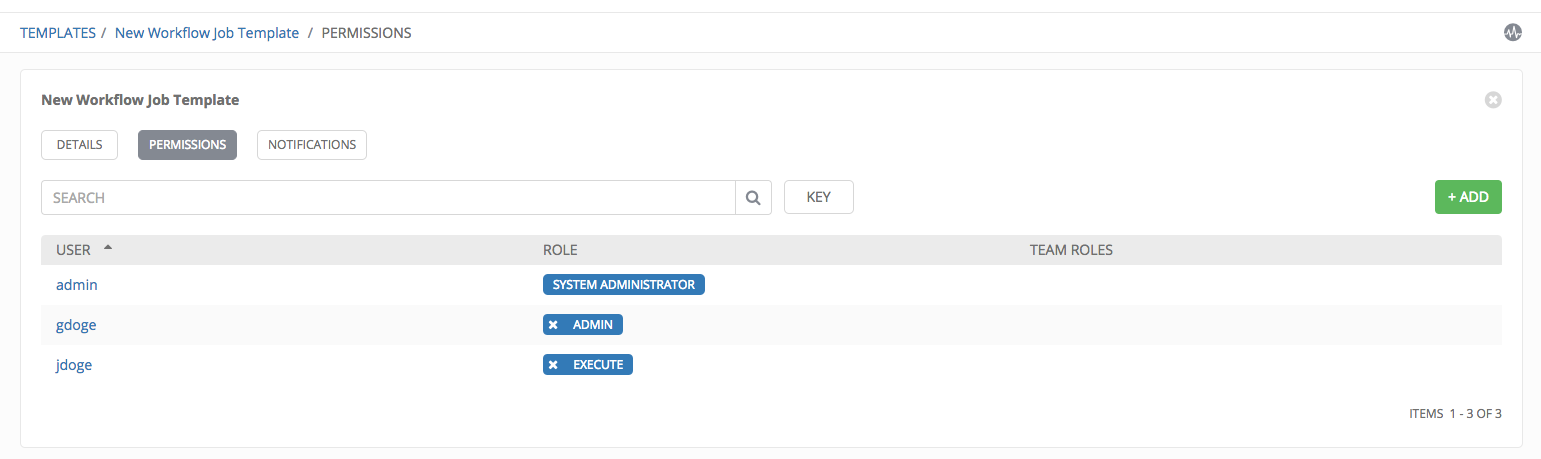
15.2. Work with Permissions
Clicking on Permissions allows you to review, grant, edit, and remove associated permissions for users as well as team members.
Click the button to create new permissions for this workflow job template.
In this example, two users and one team have been selected and each have been granted permissions for this Workflow Template.
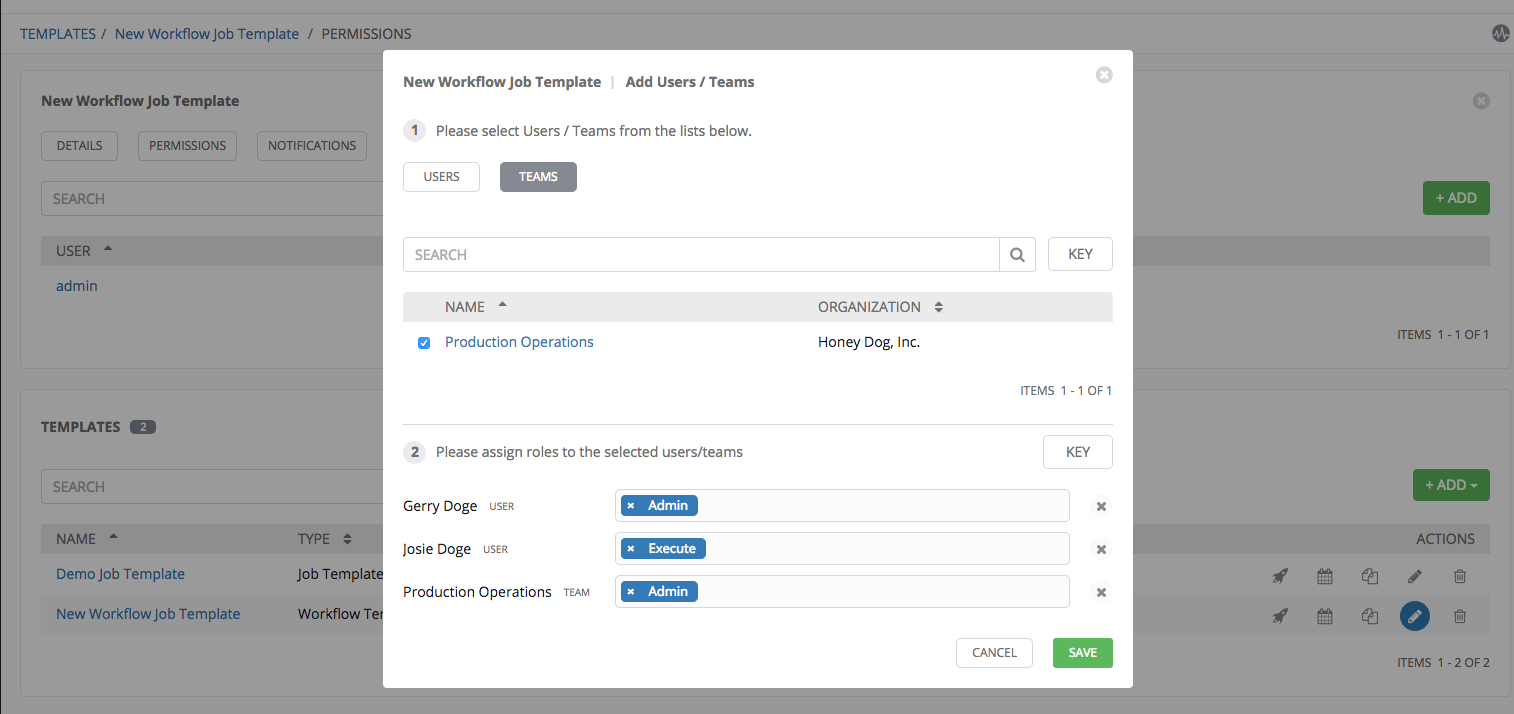
Note that you do not have to choose between teams or users, and that you can assign permissions to both at the same time.
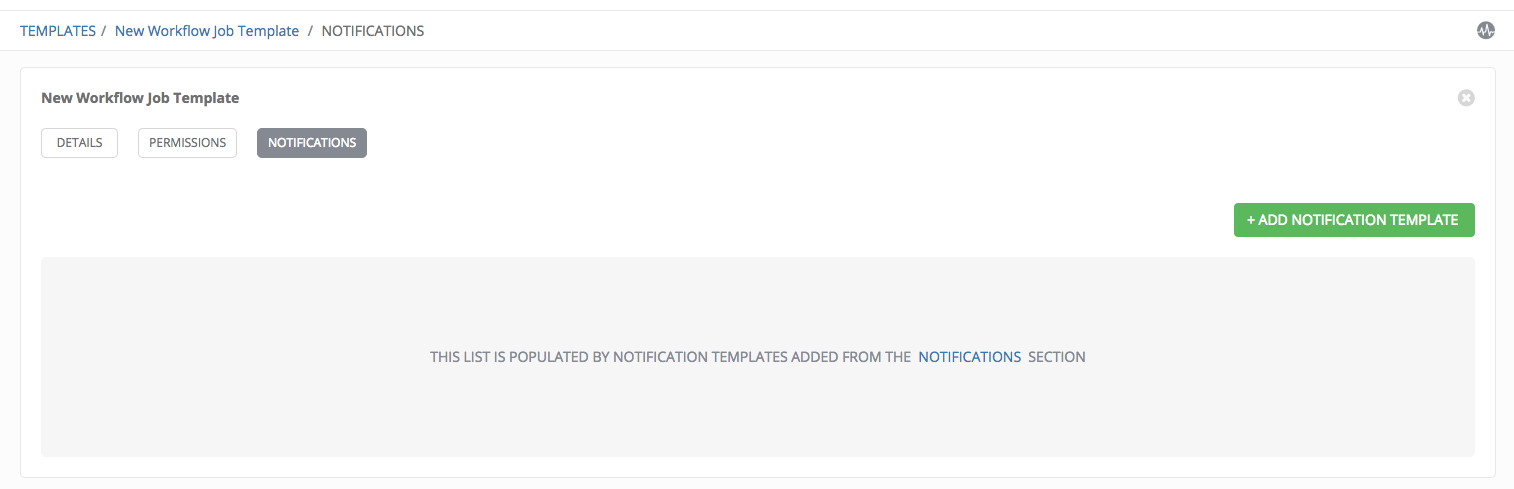
15.3. Work with Notifications
Clicking on Notifications allows you to review any notification integrations you have setup.
Click on the  button to create a notification.
Refer to Notifications for more information.
15.4. Surveys
Workflows containing job types of Run or Check provide a way to set up surveys in the Workflow Job Template creation or editing screens. Surveys set extra variables for the playbook similar to ‘Prompt for Extra Variables’ does, but in a user-friendly question and answer way. Surveys also allow for validation of user input. Click the  button to create a survey.
Use cases for surveys are numerous. An example might be if operations wanted to give developers a “push to stage” button they could run without advanced Ansible knowledge. When launched, this task could prompt for answers to questions such as, “What tag should we release?”
Many types of questions can be asked, including multiple-choice questions.
Note
Surveys are only available to those with Enterprise-level licenses.
15.4.1. Create a Survey
To create a survey:
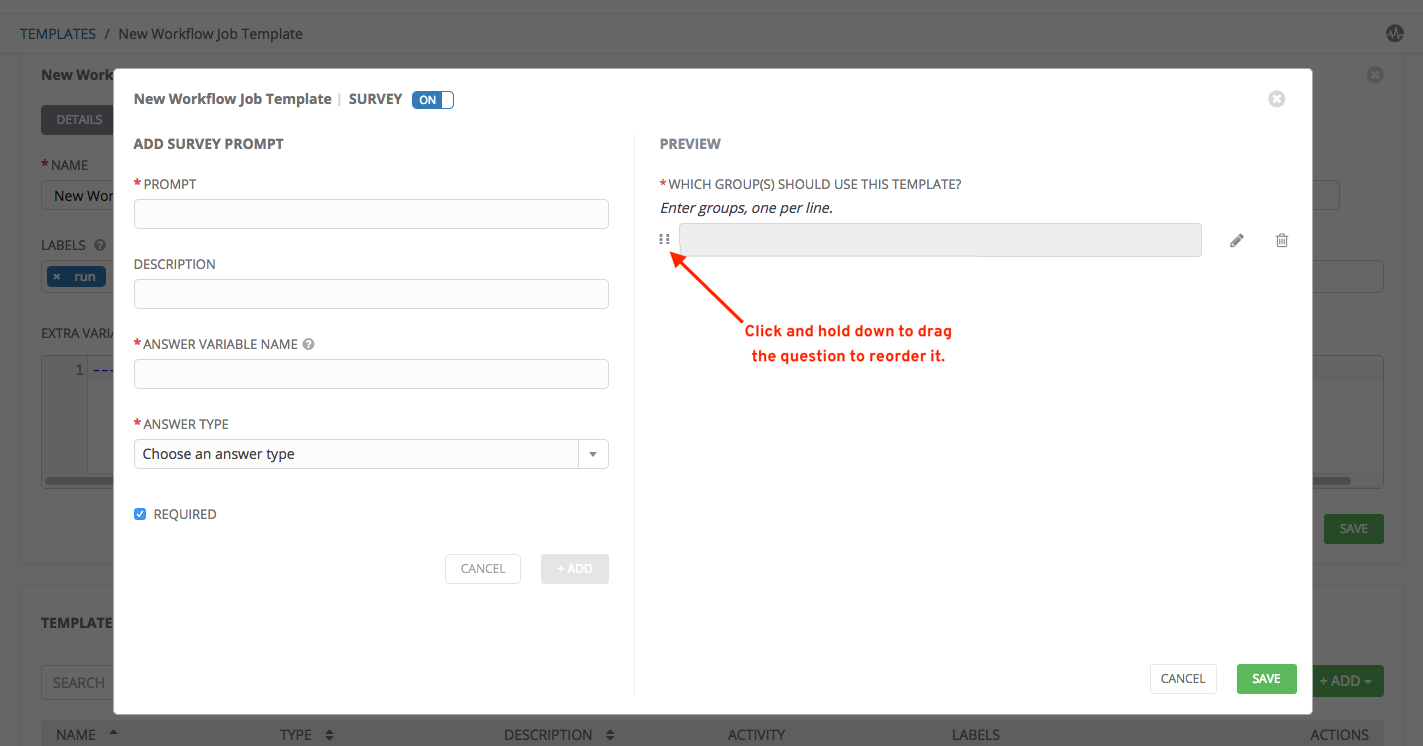
- Click on the button to bring up the Add Survey window.

Use the ON/OFF toggle button at the top of the screen to quickly activate or deactivate this survey prompt.
- A survey can consist of any number of questions. For each question, enter the following information:
- Name: The question to ask the user.
- Description: (optional) A description of what’s being asked of the user.
- Answer Variable Name: The Ansible variable name to store the user’s response in. This is the variable to be used by the playbook. Variable names cannot contain spaces.
- Answer Type: Choose from the following question types.
- Text: A single line of text. You can set the minimum and maximum length (in characters) for this answer.
- Textarea: A multi-line text field. You can set the minimum and maximum length (in characters) for this answer.
- Password: Responses are treated as sensitive information, much like an actual password is treated. You can set the minimum and maximum length (in characters) for this answer.
- Multiple Choice (single select): A list of options, of which only one can be selected at a time. Enter the options, one per line, in the Multiple Choice Options box.
- Multiple Choice (multiple select): A list of options, any number of which can be selected at a time. Enter the options, one per line, in the Multiple Choice Options box.
- Integer: An integer number. You can set the minimum and maximum length (in characters) for this answer.
- Float: A decimal number. You can set the minimum and maximum length (in characters) for this answer.
- Default Answer: The default answer to the question. This value is pre-filled in the interface and is used if the answer is not provided by the user.
- Required: Whether or not an answer to this question is required from the user.
- Once you have entered the question information, click the button to add the question.
A stylized version of the survey is presented in the Preview pane. For any question, you can click on the Edit button to edit the question, the Delete button to delete the question, and click and drag on the grid icon to rearrange the order of the questions.
- Return to the left pane to add additional questions.
- When done, click Save to save the survey.
15.4.2. Optional Survey Questions
The Required setting on a survey question determines whether the answer is optional or not for the user interacting with it.
Behind the scenes, optional survey variables can be passed to the playbook in extra_vars, even when they aren’t filled in.
- If a non-text variable (input type) is marked as optional, and is not filled in, no survey
extra_varis passed to the playbook. - If a text input or text area input is marked as optional, is not filled in, and has a minimum
length > 0, no surveyextra_varis passed to the playbook. - If a text input or text area input is marked as optional, is not filled in, and has a minimum
length === 0, that surveyextra_varis passed to the playbook, with the value set to an empty string ( “” ).
15.5. Workflow Editor
Starting with Ansible Tower 3.1, the Workflow Editor provides a graphical way of linking together job templates, project syncs, and inventory syncs to build a workflow job template.
15.5.1. Build a Workflow
Make sure you have any combination of two of the following templates to build a workflow: jobs, project sync, or inventory sync.
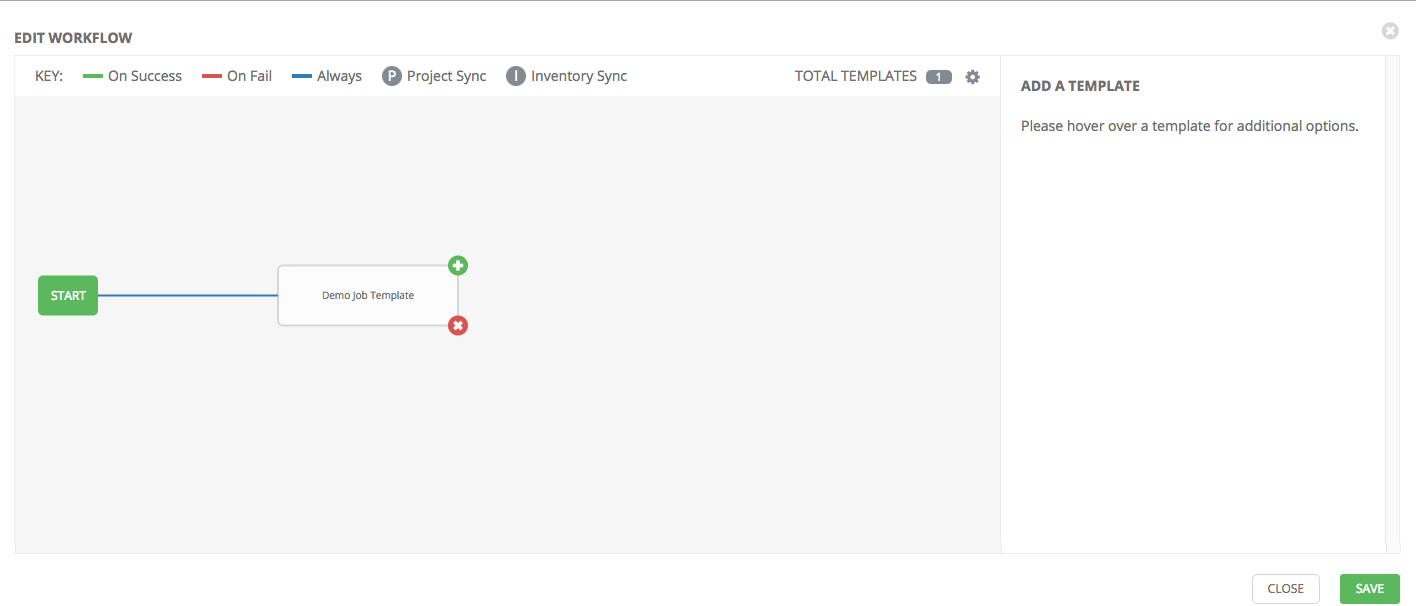
- In the details/edit view of a workflow job template, click the
 button to launch the Workflow Editor.
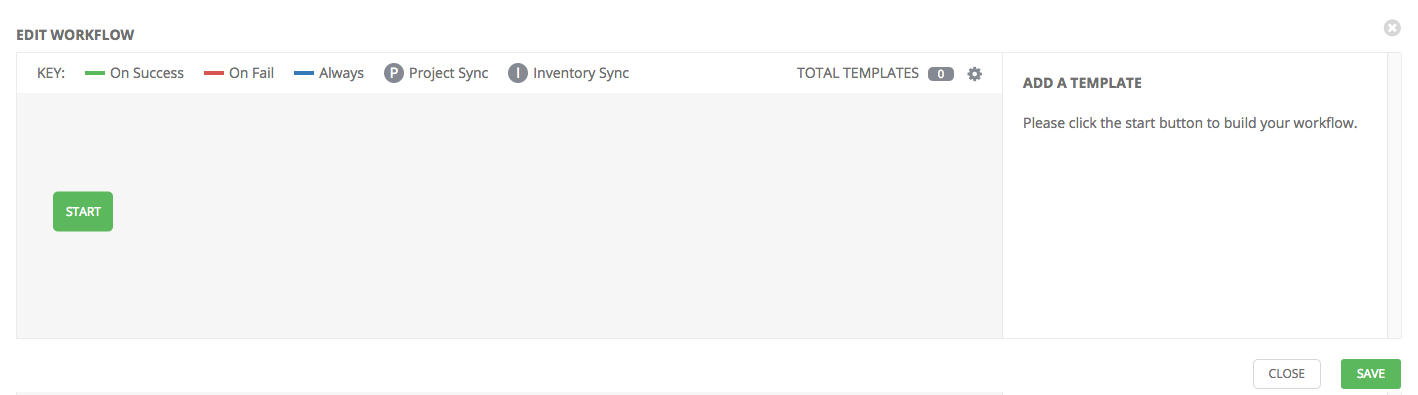
- Click the
 button to display a list of templates to add to your workflow.
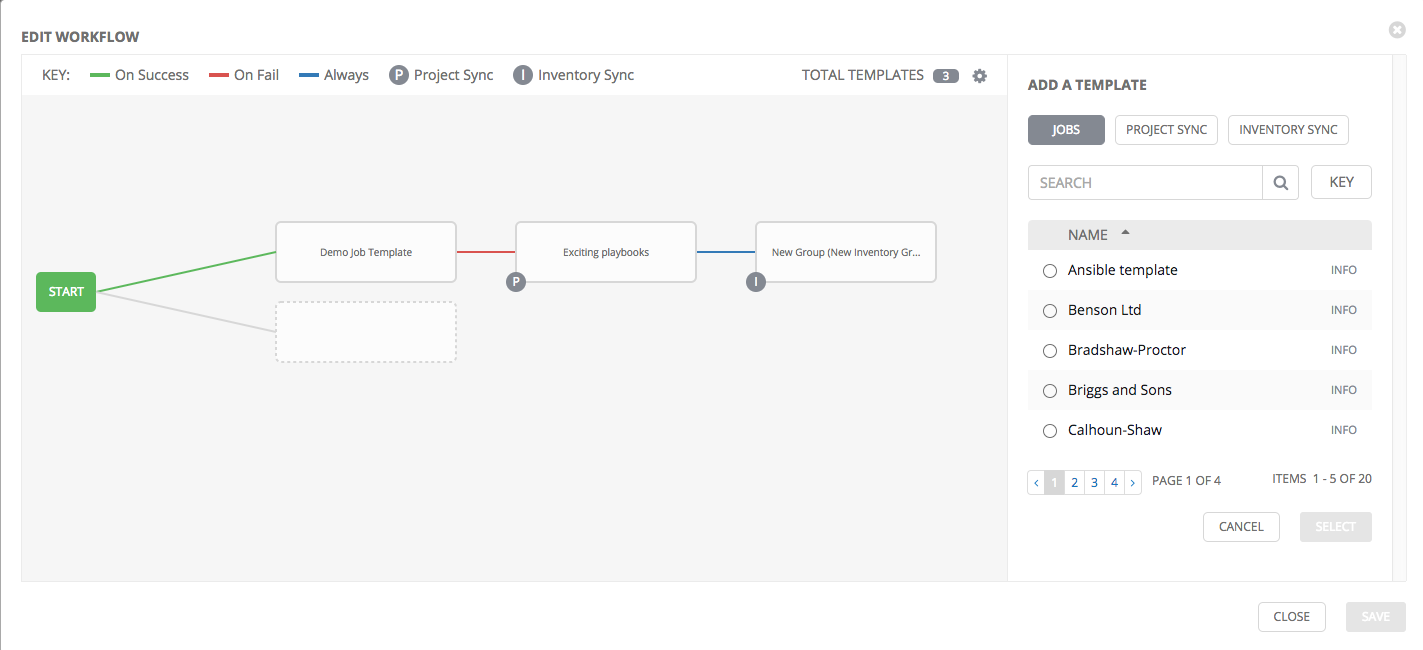
- On the right pane, select a template from the list of templates to add. To switch between jobs, project syncs, and inventory syncs, click the appropriate button above. Each template added represents a node.
Note
You will not be able to select job templates that don’t have a default inventory or credential when populating a workflow graph.
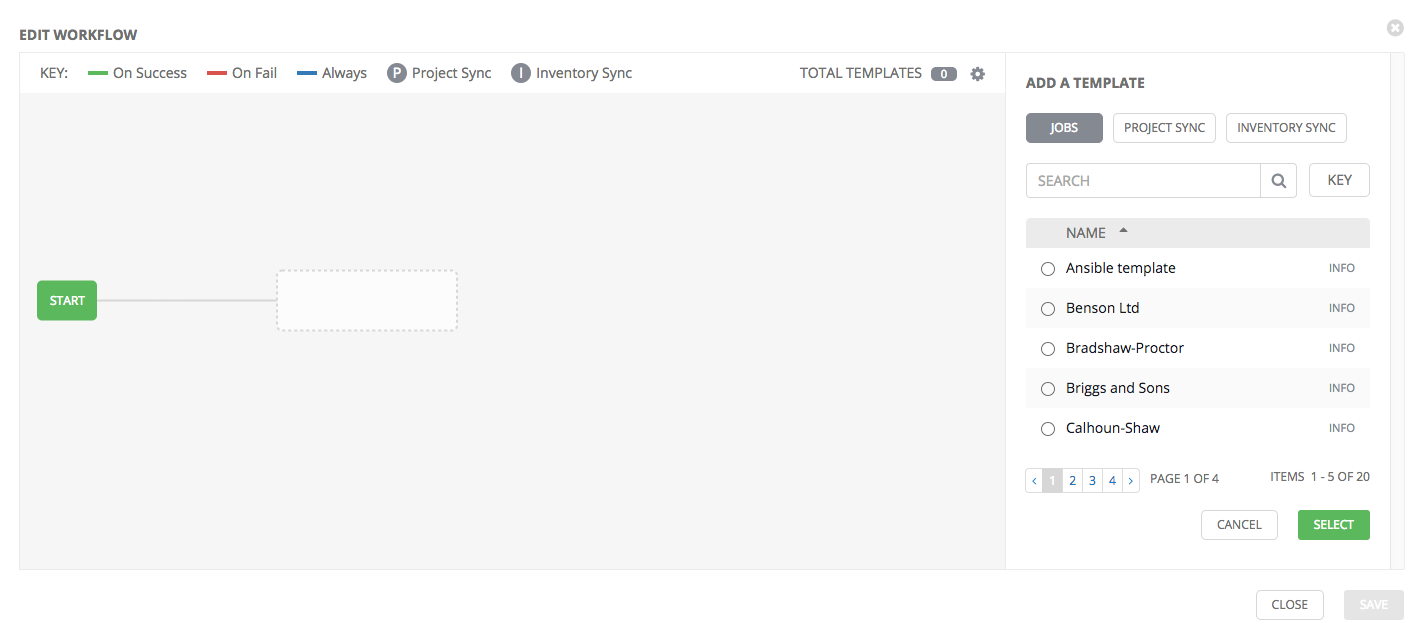
- Once a template is selected, the workflow begins to build, and a prompt appears, requesting for the type of action to be taken for the selected template:
A template that is associated with each workflow node will run based on the success or failure scenario as it proceeds.
- Select one of the following scenarios (edge type) to apply to this template:
- On Success: Upon successful completion, execute the next template.
- On Failure: Upon failure, execute a different template.
- Always: Continue to execute regardless of success or failure.
- When done adding a node, click Select to render it on the graphical view.
Hovering over the template allows you to delete the selected template  , or add another one
  .
.
Note
If you create a workflow job template with any number of strung-together job templates or job/inventory syncs, and one of those are deleted from your inventory of resources (the resource no longer exists), returning to the Workflow Editor for the affected workflow job template will show the missing resource as an incomplete node.

To fix the incomplete node, update it with a new job template or delete it from the workflow.
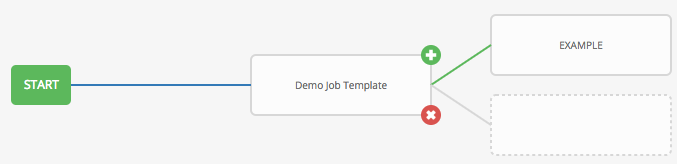
You can insert another node in between nodes and drag the diagram to depict a split scenario:
If you want to undo the last inserted node, when the right pane opens, click Cancel or proceed to click on another node without selecting from the right pane.
If you want to edit a node, click on the node you want to edit and the right pane displays the current selections. Make your changes and click Select to apply them to the graphical view.
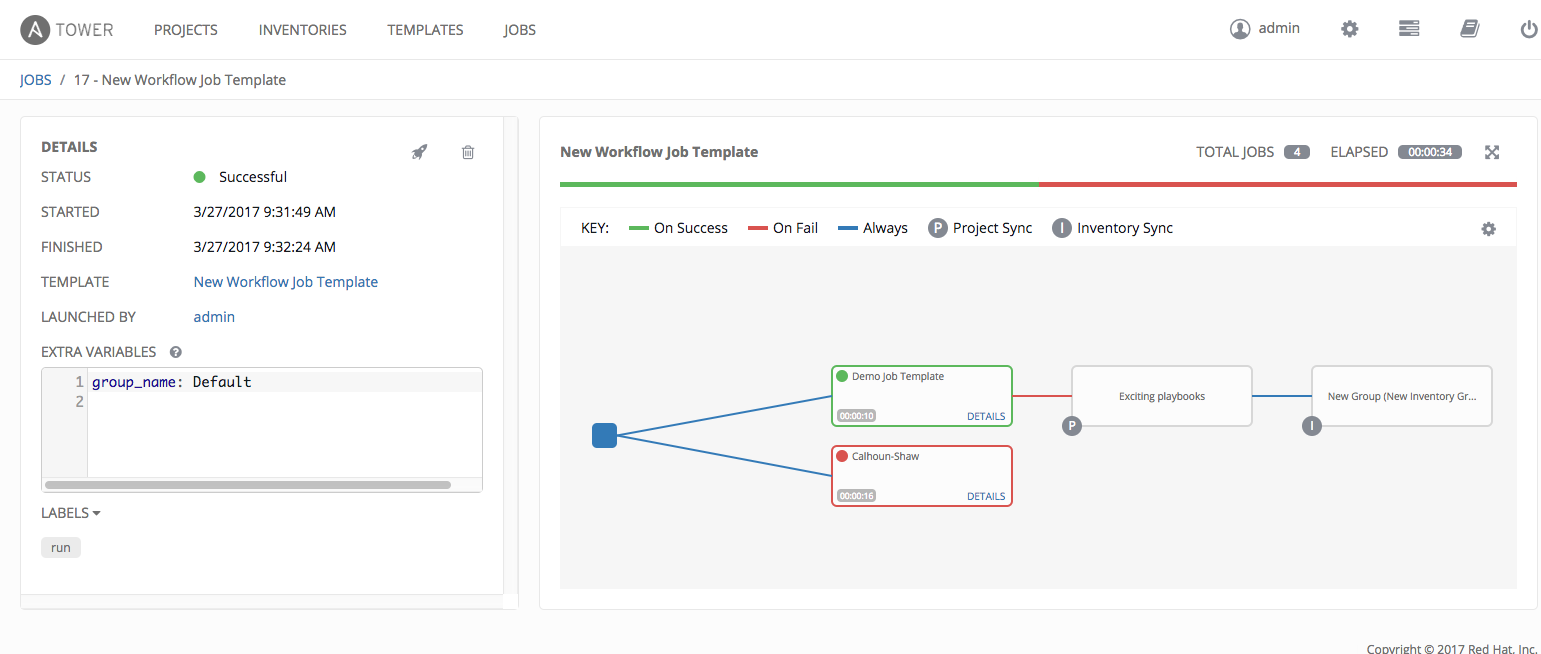
Below is an example of a workflow that contains all three types of jobs that is initiated by a job template that if it fails to run, proceed to the project sync job, and regardless of whether that fails or succeeds, proceed to the inventory sync job.
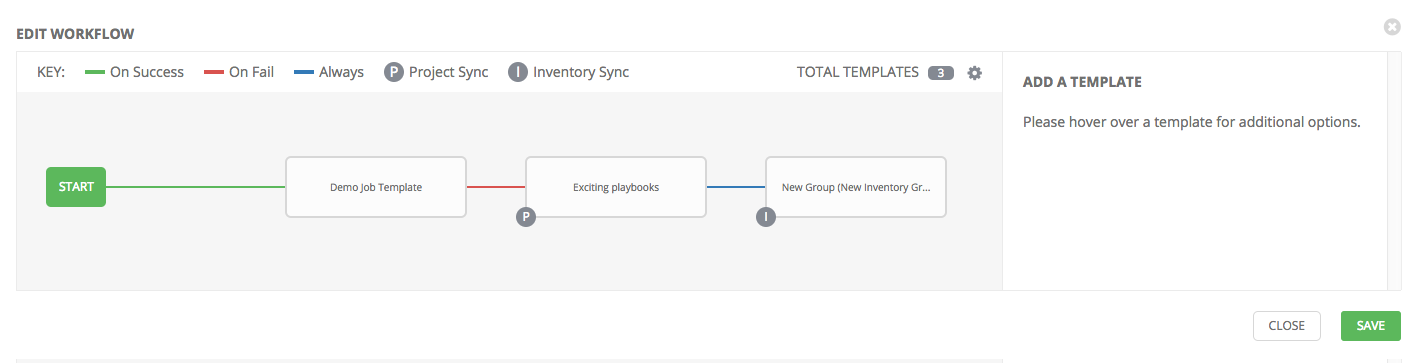
Use the Key at the top of the window to identify the meaning of the symbols and colors associated with the graphical depiction.
You may add multiple nodes from the same parent node, creating sibling nodes:
Note
In a workflow with a set of sibling steps having varying edge types, and one of those siblings has a follow-on step attached to it, gets removed from the workflow:
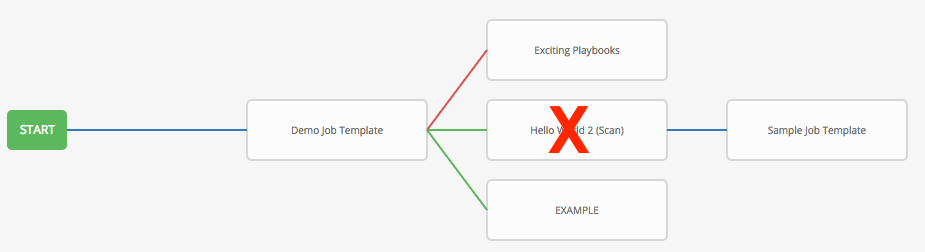
The follow-on step will automatically join the set of sibling steps. If there is more than one edge type among the now-siblings, an edge conflict occurs:
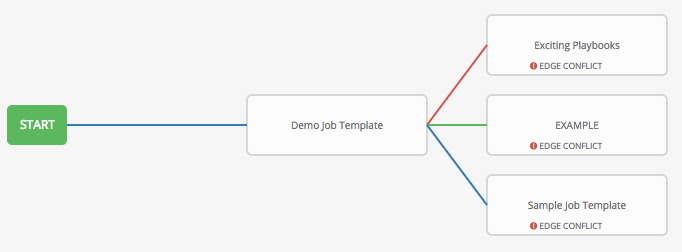
You must resolve this conflict before you can save the workflow job template. To resolve the conflict, make all the siblings have the same edge types.
Click the settings icon ( ) to zoom, pan, or reposition the view. Drag the workflow diagram to reposition it on the screen.
- When done with building your workflow job template, click Save to return to Create New Workflow Template details page.
Important
Clicking Close on this pane will not save your work, but instead, closes the entire Workflow Editor and you will have to start over.
- Click Save to save your entire workflow job template.
15.6. Launch a Workflow Job Template
To launch the workflow job template:
- Access the workflow job template from the Templates navigational link or while in the Workflow Job Template Details view, scroll to the bottom to access it from a list of templates.
- Click the
 icon next to the workflow you want to launch.
Along with any extra variables set in the job template and survey, Tower automatically adds the same variables as those added for a job template upon launch. Additionally, Tower automatically redirects the web browser to the Jobs Details page for this job, displaying the progress and the results.
15.7. Scheduling
Launching job templates may also be scheduled via the  button. Clicking this button opens the Schedules page.
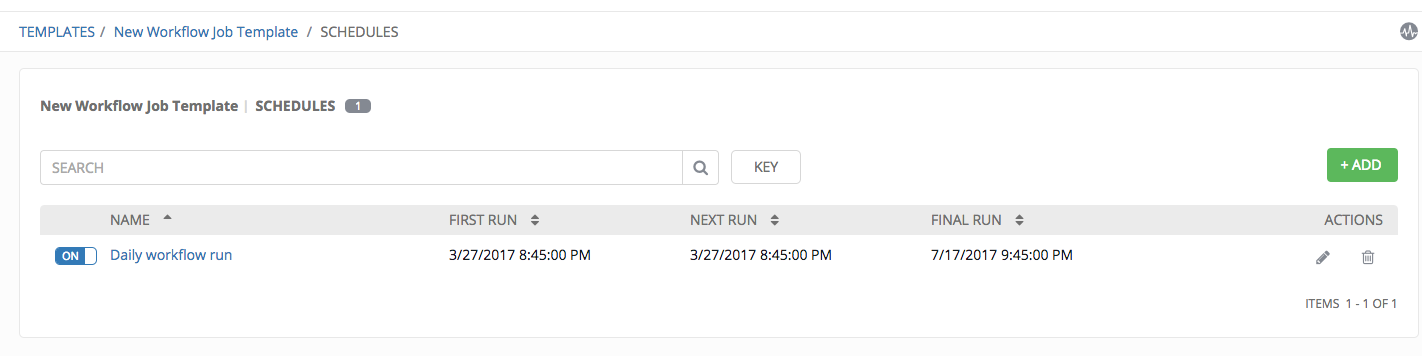
This page displays a list of the schedules that are currently available for the selected workflow job template. The schedule list may be sorted and searched by any of the following:
- Name: Clicking the schedule name opens the Edit Schedule dialog
- First Run: The first scheduled run of this task
- Next Run: The next scheduled run of this task
- Final Run: If the task has an end date, this is the last run of the task
Buttons located in the upper right corner of the Schedules screen provide the following actions:
- View Activity Stream
- Add a new schedule
15.7.1. Schedule a Workflow Job Template
To create a new schedule:
- From the Schedules screen, click the button.
- Enter the appropriate details into the following fields:
- Name
- Start Date
- Start Time
- Local Time Zone: the entered Start Time should be in this timezone
- Repeat Frequency: the appropriate options display as the update frequency is modified
Note
Jobs are scheduled in UTC. Repeating jobs that runs at a specific time of day may move relative to a local timezone when Daylight Saving Time shifts occur.
The Schedule Description below displays the specifics of the schedule and a list of the scheduled occurrences in the selected Local Time Zone.
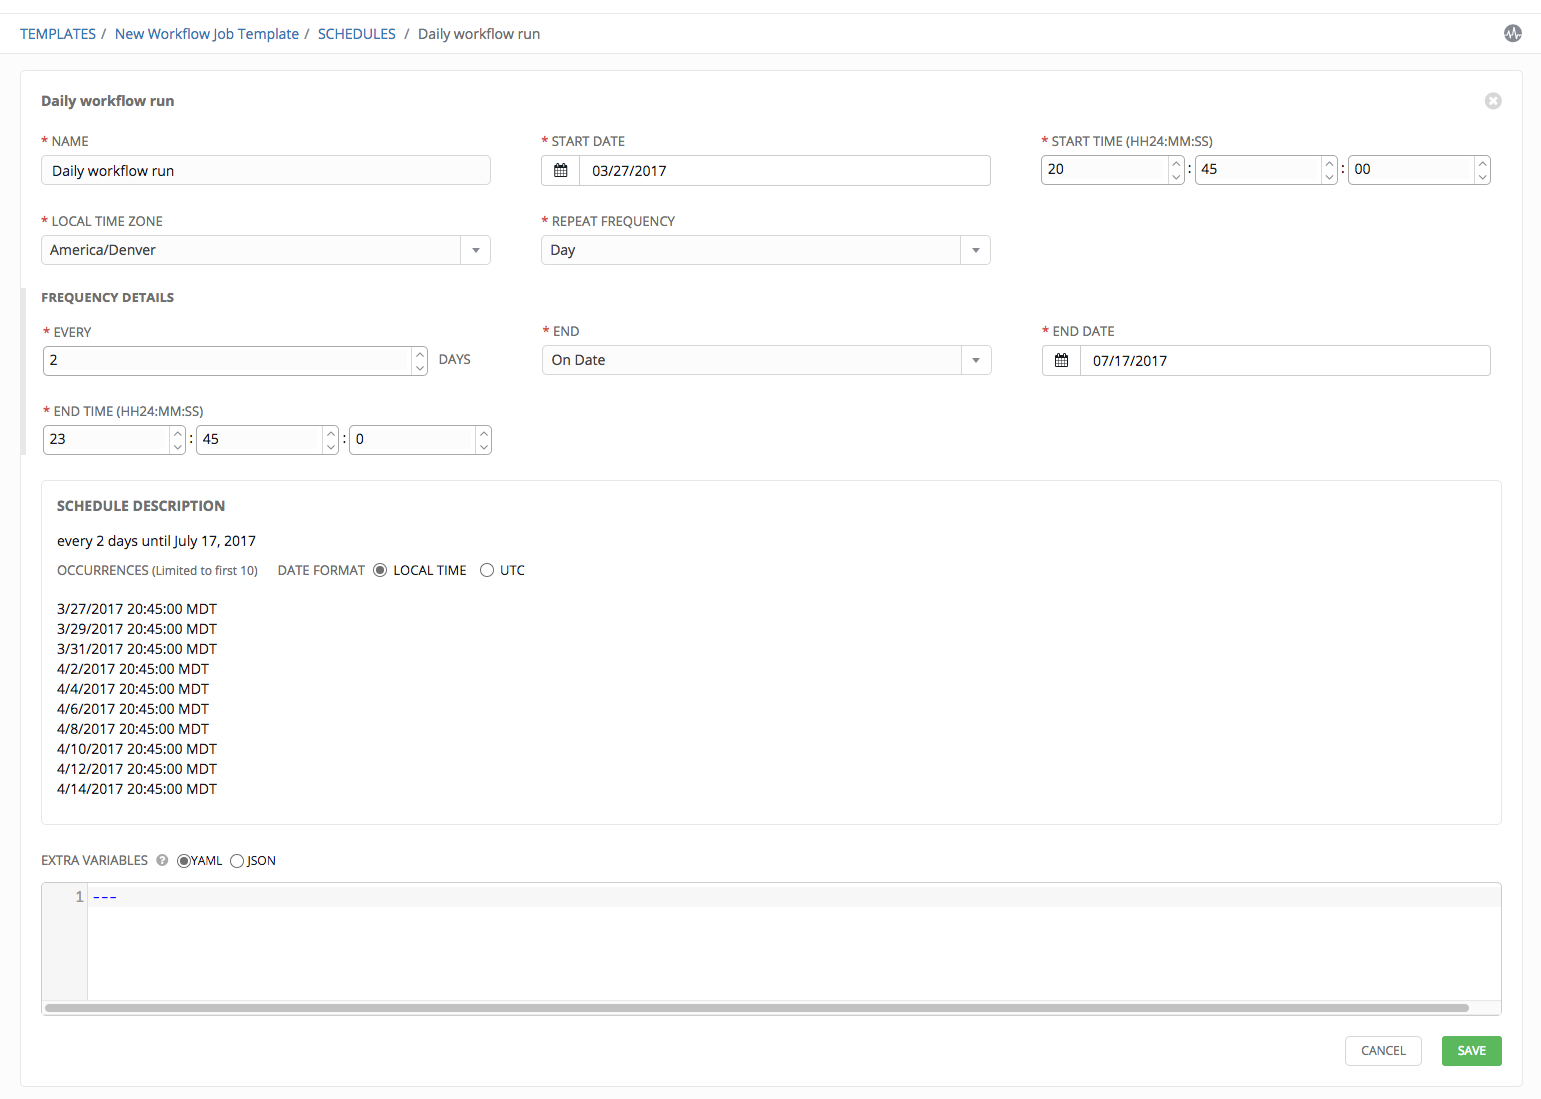
- When satisfied with the schedule specifics, click Save.
Once the schedule is saved, the list of schedules display for the associated workflow job template.
Use the ON/OFF toggle button to quickly activate or deactivate this schedule.
There are several actions available for schedules, under the Actions column:
- Edit Schedule
- Delete schedule
15.8. Copy a Workflow Job Template
Ansible Tower allows you the ability to copy a workflow job template. If you choose to copy a workflow job template, it does not copy any associated schedule, notifications, or permissions. Schedules and notifications must be recreated by the user or admin creating the copy of the workflow job template. The user copying the workflow job template will be granted the admin permission, but no permissions are assigned (copied) to the workflow job template.
- Access the workflow job template that you want to copy from the Templates navigational link or while in the Workflow Job Template Details view, scroll to the bottom to access it from a list of templates.
- Click the
 button.
A new template opens with the name of the template from which you copied and a timestamp.
Replace the contents of the Name field with a new name, and provide or modify the entries in the other fields to complete this page.
- Click Save when done.
15.9. Extra Variables
Note
Additional strict extra_vars validation was added in Ansible Tower 3.0.0. extra_vars passed to the job launch API are only honored if one of the following is true:
- They correspond to variables in an enabled survey
ask_variables_on_launchis set to True
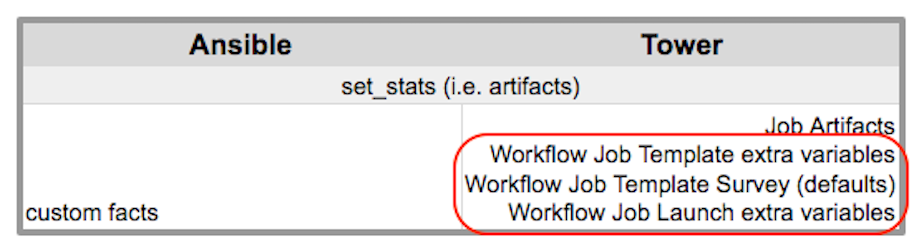
When you pass survey variables, they are passed as extra variables (extra_vars) within Tower. This can be tricky, as passing extra variables to a workflow template (as you would do with a survey) can override other variables being passed from the inventory and project.
For example, say that you have a defined variable for an inventory for debug = true. It is entirely possible that this variable, debug = true, can be overridden in a workflow template survey.
To ensure that the variables you need to pass are not overridden, ensure they are included by redefining them in the survey. Keep in mind that extra variables can be defined at the inventory, group, and host levels.
The following table notes the behavior (hierarchy) of variable precedence in Ansible Tower as it compares to variable precedence in Ansible.
Ansible Tower Variable Precedence Hierarchy (last listed wins)