4. Import a License
Tower requires a valid license to run. If you did not receive a license from Ansible directly or via email, or have issues with the license you received, refer to http://www.ansible.com/license for free and paid license options (including free trial licenses) or contact Ansible via the Red Hat Customer portal at https://access.redhat.com/.
Note
To successfully add your license, you must be logged on as the Superuser. Otherwise, the operation will fail.
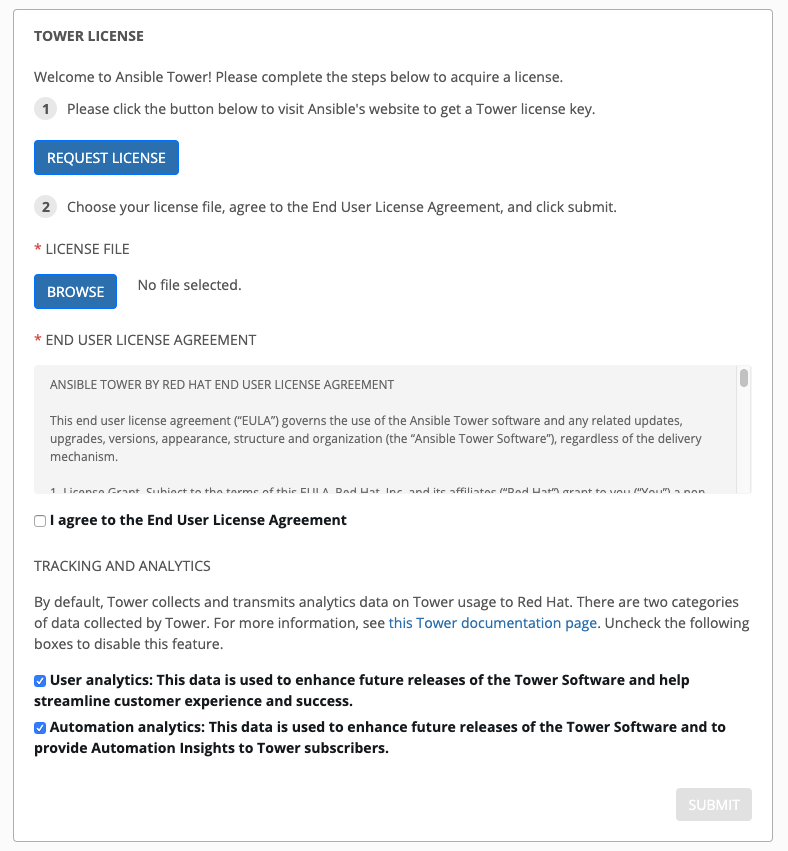
To add your license:
Save your license (or save the license contents to a text file locally, if needed).
Click the Settings (
 ) icon from the left navigation bar and select the License tab from the Settings screen.
Click the Browse button and navigate to the location where the license file is saved to upload it. The uploaded license may be a plain text file or a JSON file, and must include properly formatted JSON code.
Once uploaded, check to agree to the End User License Agreement.
Analytics data collection helps Red Hat improve the product by delivering you a much better user experience. For more information about data collection, refer to Usability Analytics and Data Collection. This option is checked by default, but you may opt out of any of the following:
User analytics, which collects data from the Tower User Interface.
Automation analytics provides a high level analysis of your automation with Ansible Tower, which is used to help you identify trends and anomalous use of Tower. For opt-in of Automation analytics to have any effect, your instance of Ansible Tower must be running on Red Hat Enterprise Linux. See instructions described in the Automation Insights section.
Note
At this time, Automation Insights is not supported when Ansible Tower is running in the OpenShift Container Platform. You may change your analytics data collection preferences at any time, as described in the Usability Analytics and Data Collection section.
After you have specified your tracking and analytics preferences, click Submit.
Once your license has been accepted, Tower briefly displays the license screen and navigates you to the Dashboard of the Ansible Tower interface (which you can access by clicking on the Ansible Tower logo at the top left of the screen as well).
For later reference, you can view this license from the License tab of the Settings screen, accessible through the Settings (![]() ) icon from the left navigation bar.
) icon from the left navigation bar.

4.1. Adding a Tower License Manually
If you are in a situation where uploading a file is not allowed due to a locked down environment, you can add the Ansible Tower license by hand using Tower’s API.
Note
To successfully add your license, you must be logged on as the Superuser. Otherwise, the operation will fail. Use only the procedure described here for applying a license via the API. Do not put the license in a file, and manually placing it in the license directory of your Ansible Tower install. The ability to do so has been deprecated in version 3.1.0.
To add the license file manually:
In Tower’s REST API, at the
/api/v2/config/endpoint, scroll down to the POST text entry box.Add your valid license, the one you received directly from Ansible, to the POST box using the following as an example:
{"eula_accepted" : "true",
   "subscription_name": "Enterprise Tower up to 100000 Nodes",
   "features": {},
   "instance_count": 100000,
   "trial": false,
   "contact_email": "[email protected]",
   "company_name": "Dr. Maddux Golden",
   "license_type": "enterprise",
   "contact_name": "Dr. Maddux Golden",
   "license_date": 0000000000,
   "license_key": "xxx111xx111xxx1x1x1x1x1x11x1xxxx1x1xx1x1xx1x1x1x1xxx111xx1x1xx1x"

}
When finished, click the POST button and review your license.