12. Secret Management System
Users and admins upload machine and cloud credentials to Tower so that it can access machines and external services on their behalf. By default, sensitive credential values (such as SSH passwords, SSH private keys, API tokens for cloud services) in Tower are stored in the database after being encrypted. With external credentials backed by credential plugins, you can map credential fields (like a password or an SSH Private key) to values stored in a secret management system instead of providing them to Tower directly. Ansible Tower provides a secret management system that include integrations for:
CyberArk Application Identity Manager (AIM)
CyberArk Conjur
HashiCorp Vault Key-Value Store (KV)
HashiCorp Vault SSH Secrets Engine
Microsoft Azure Key Management System (KMS)
These external secret values will be fetched prior to running a playbook that needs them. For more information on specifying these credentials in the Tower User Interface, see Credentials.
12.1. Configure and link secret lookups
When configuring Tower to pull a secret from a 3rd-party system, it is in essence linking credential fields to external systems. To link a credential field to a value stored in an external system, select the external credential corresponding to that system and provide metadata to look up the desired value. The metadata input fields are part of the external credential type definition of the source credential.
Tower provides a credential plugin interface for developers, integrators, admins, and power-users with the ability to add new external credential types to Tower so it can be extended to support other secret management systems. For more detail, see the development docs for credential plugins.
Use the Ansible Tower User Interface to configure and use each of the supported 3-party secret management systems.
First, create an external credential for authenticating with the secret management system. At minimum, provide a name for the external credential and select one of the following for the Credential Type:
Navigate to the credential form of the target credential and link one or more input fields to the external credential along with metadata for locating the secret in the external system. In this example, the Demo Credential is the target credential.
For any of the fields below the Type Details area that you want to link to the external credential, click the
 button of the input field. You are prompted to set the input source to use to retrieve your secret information.
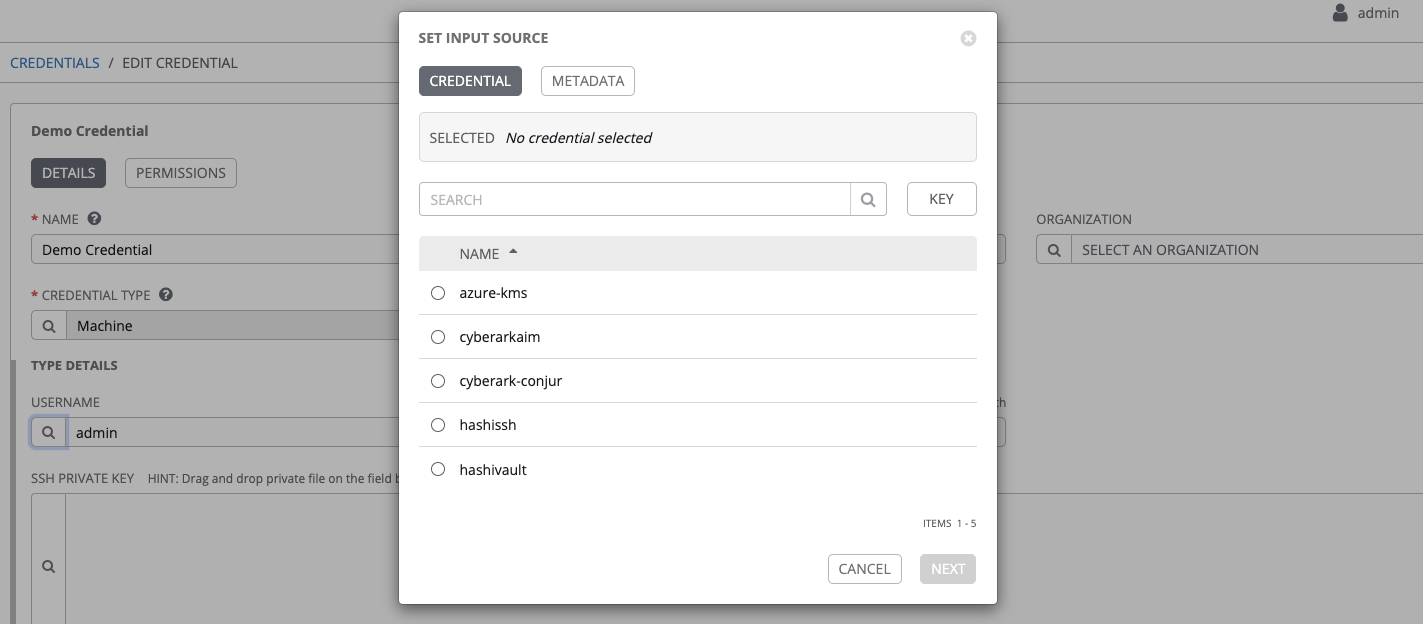
Select the credential you want to link to, and click Next. This takes you to the Metadata tab of the input source. This example shows the Metadata prompt for HashiVault Secret Lookup.
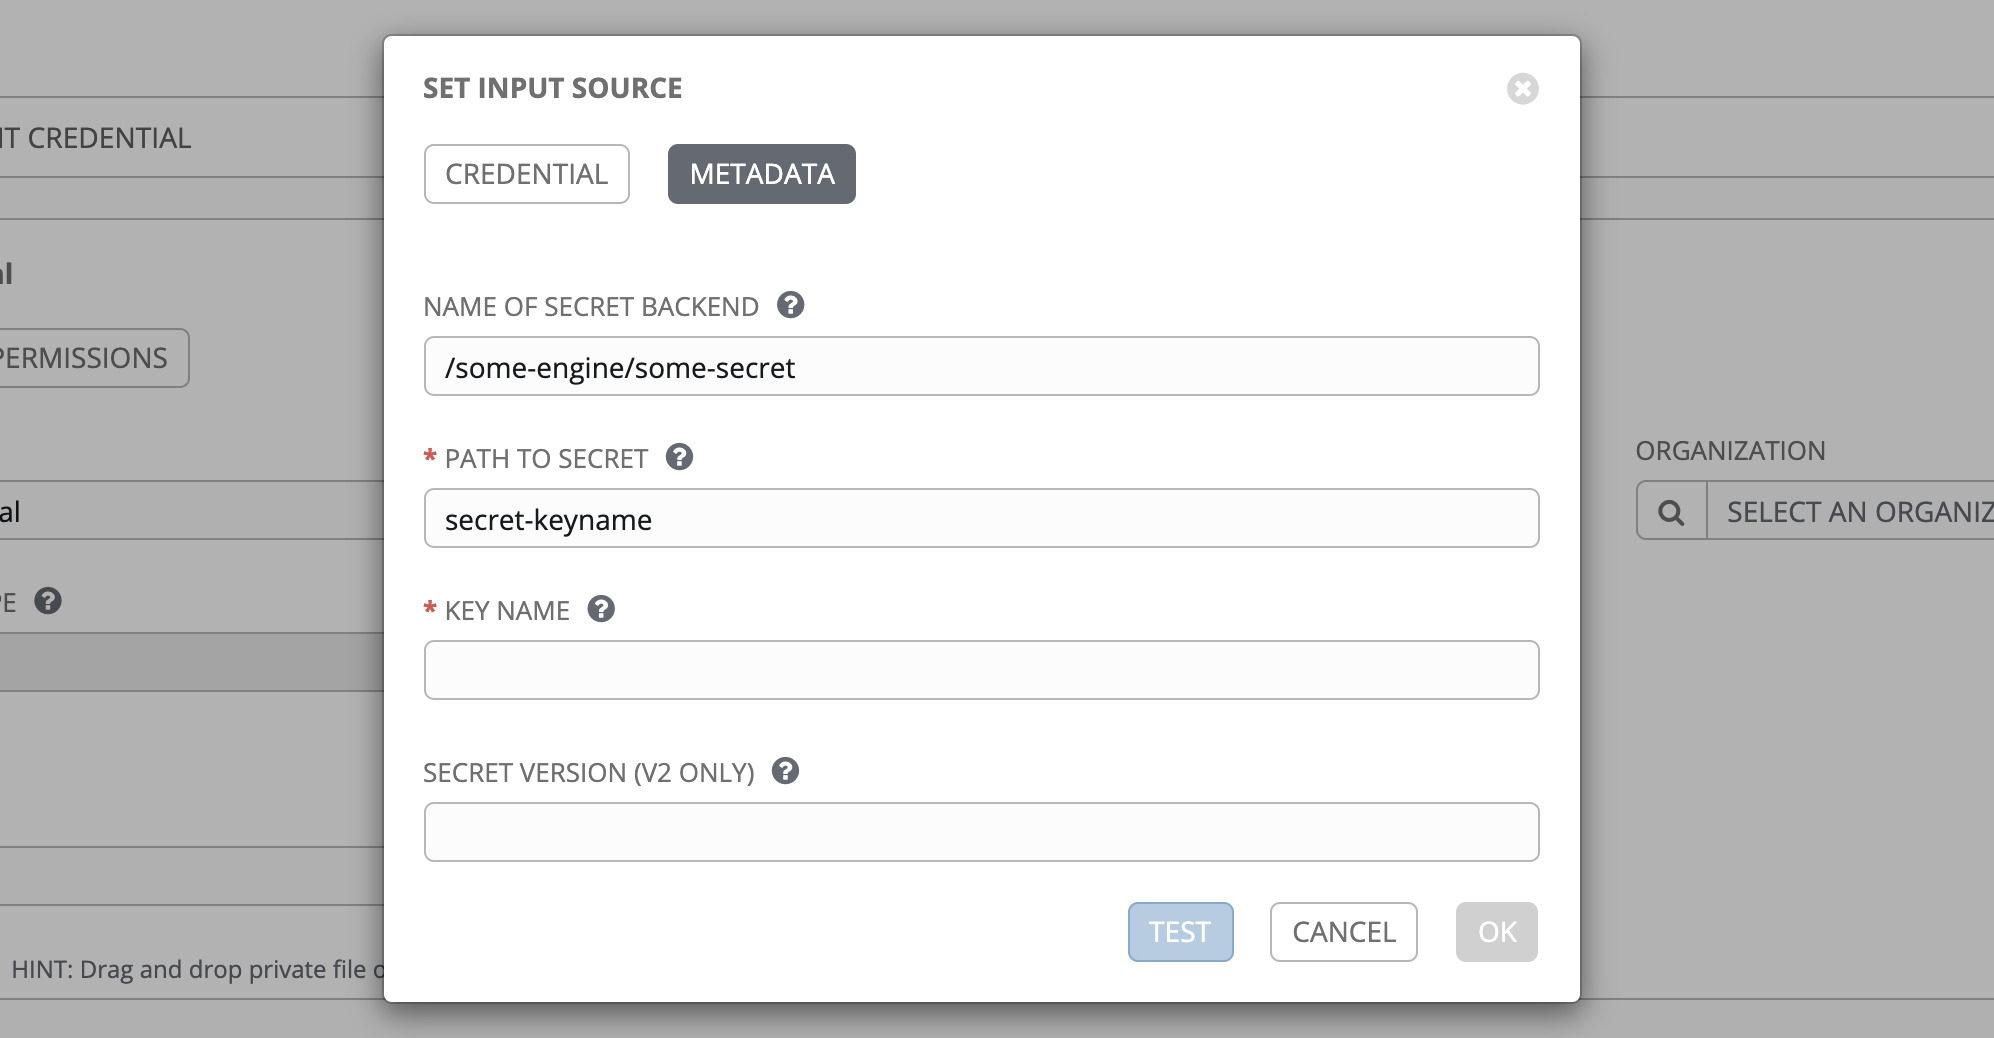
The metadata required depends on the input source selected:
Input Source |
Metadata |
Description |
|---|---|---|
CyberArk AIM |
Object Query (Required) |
Lookup query for the object. |
Object Query Format |
Select |
|
Reason |
If required per the object’s policy, supply a reason for checking out the secret, as CyberArk logs those. |
|
CyberArk Conjur |
Secret Identifier |
The identifier for the secret. |
Secret Version |
Specify a version of the secret, if necessary, otherwise, leave it empty to use the latest version. |
|
HashiVault Secret Lookup |
Name of Secret Backend |
Specify the name of the KV backend to use. Leave it blank to use the first path segment of the Path to Secret field instead. |
Path to Secret (required) |
Specify the path to where the secret information is stored (e.g., /path/username). |
|
Key Name (required) |
Specify the name of the key to look up the secret information. |
|
Secret Version (V2 Only) |
Specify a version if necessary, otherwise, leave it empty to use the latest version. |
|
HashiCorp Signed SSH |
Unsigned Public Key (required) |
Specify the public key of the cert you want to get signed. It needs to be present in the authorized keys file of the target host(s). |
Path to Secret (required) |
Specify the path to where the secret information is stored (e.g., /path/username). |
|
Role Name (required) |
A role is a collection of SSH settings and parameters that are stored in Hashi vault. Typically, you can specify a couple of them with different privileges, timeouts, etc. So you could have a role that is allowed to get a cert signed for root, and other less privileged ones, for example. |
|
Valid Principals |
Specify a user (or users) other than the default, that you are requesting vault to authorize the cert for the stored key. Hashi vault has a default user for whom it signs (e.g., ec2-user). |
|
Azure KMS |
Secret Name (required) |
The actual name of the secret as it is referenced in Azure’s Key vault app. |
Secret Version |
Specify a version of the secret, if necessary, otherwise, leave it empty to use the latest version. |
Click Test to verify connection to the secret management system. If the lookup is unsuccessful, an error message like this one displays:

When done, click OK. This closes the prompt window and returns you to the Details screen of your target credential. Repeat these steps, starting with step 3 above to complete the remaining input fields for the target credential. By linking the information in this manner, Tower retrieves sensitive information, such as username, password, keys, certificates, and tokens from the 3rd-party management systems and populates that data into the remaining fields of the target credential form.
If necessary, supply any information manually for those fields that do not use linking as a way of retrieving sensitive information. Refer to the appropriate Credential Types for more detail about each of the fields.
Click Save when done.
12.1.1. CyberArk AIM Credential Provider Lookup
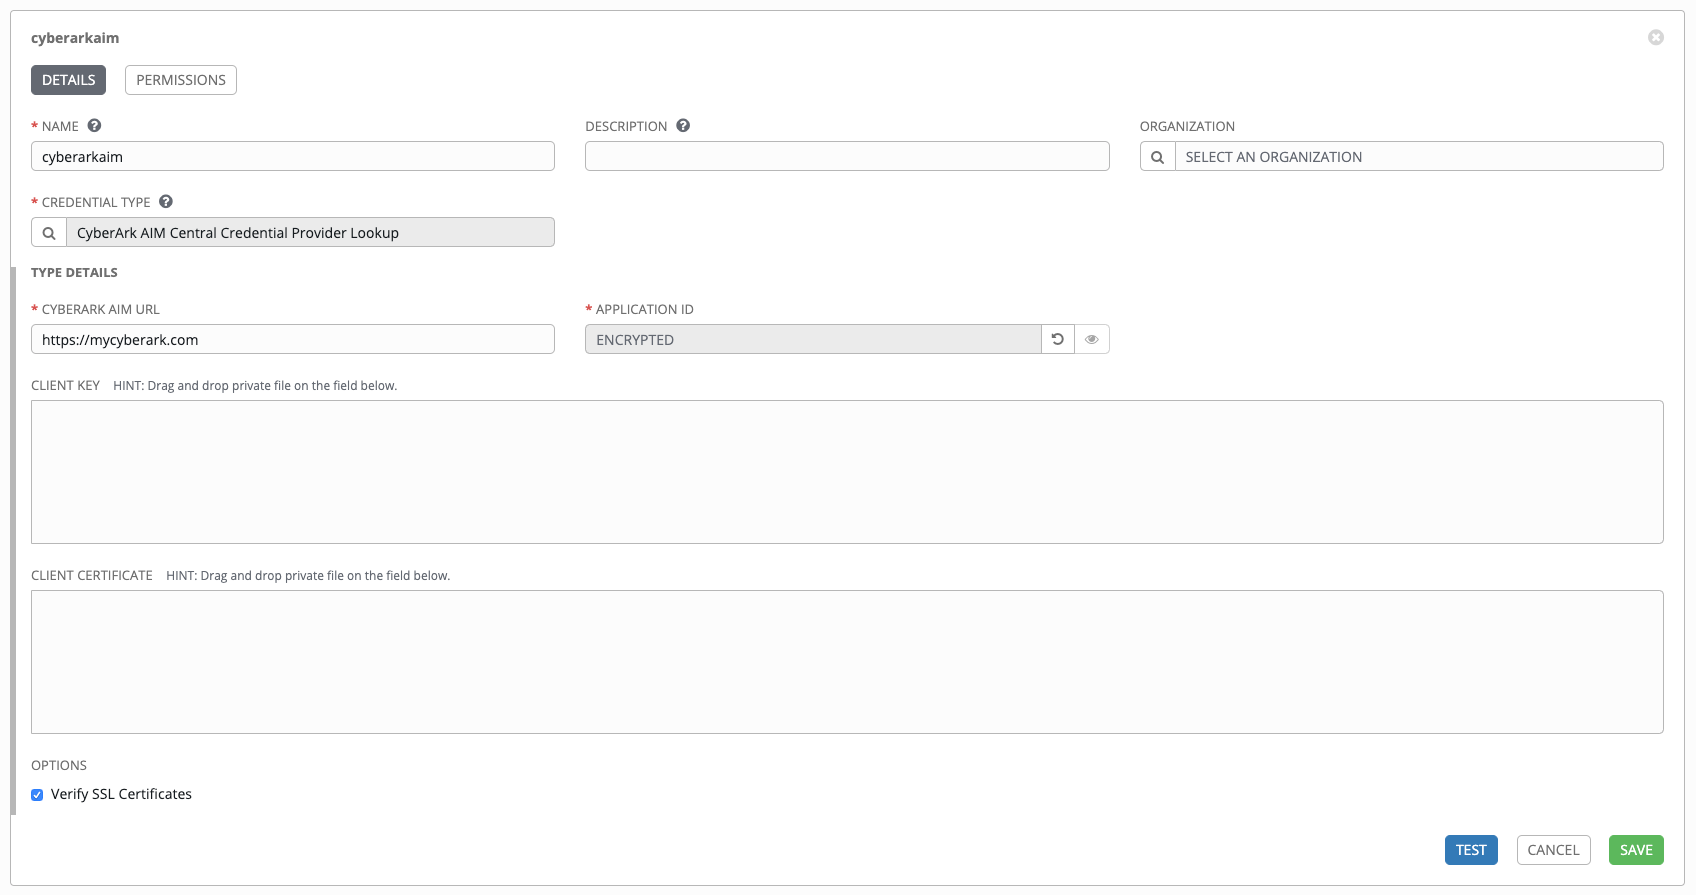
You need the CyberArk Central Credential Provider web service running to store secrets in order for this integration to work. When CyberArk AIM Credential Provider Lookup is selected for Credential Type, provide the following metadata to properly configure your lookup:
CyberArk AIM URL (required): provide the URL used for communicating with CyberArk AIM’s secret management system
Application ID (required): specify the identifier given by CyberArk AIM services
Client Key: paste the client key if provided by CyberArk
Client Certificate: include the
BEGIN CERTIFICATEandEND CERTIFICATElines when pasting the certificate, if provided by CyberArkVerify SSL Certificates: this option is only available when the URL uses HTTPS. Check this option to allow Tower to verify the server’s SSL certificate is valid and trusted. Environments that use internal or private CA’s should leave this option unchecked to disable verification.
Below shows an example of a configured CyberArk AIM credential.
12.1.2. CyberArk Conjur Secret Lookup
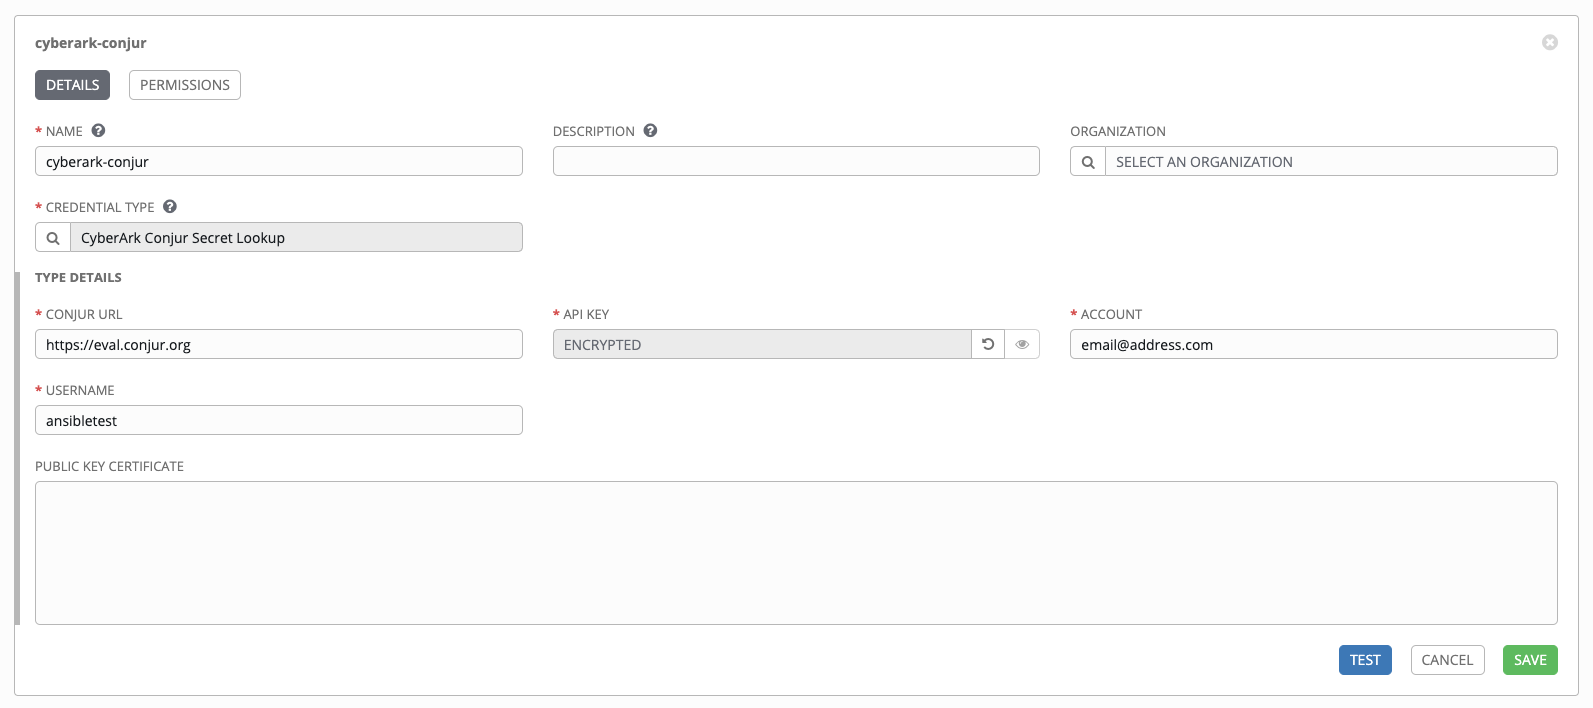
When CyberArk Conjur Secret Lookup is selected for Credential Type, provide the following metadata to properly configure your lookup:
Conjur URL (required): provide the URL used for communicating with CyberArk Conjur’s secret management system
API Key (required): provide the key given by your Conjur admin
Account (required): the organization’s account name
Username (required): the specific authenticated user for this service
Public Key Certificate: include the
BEGIN CERTIFICATEandEND CERTIFICATElines when pasting the public key, if provided by CyberArk
Below shows an example of a configured CyberArk Conjur credential.
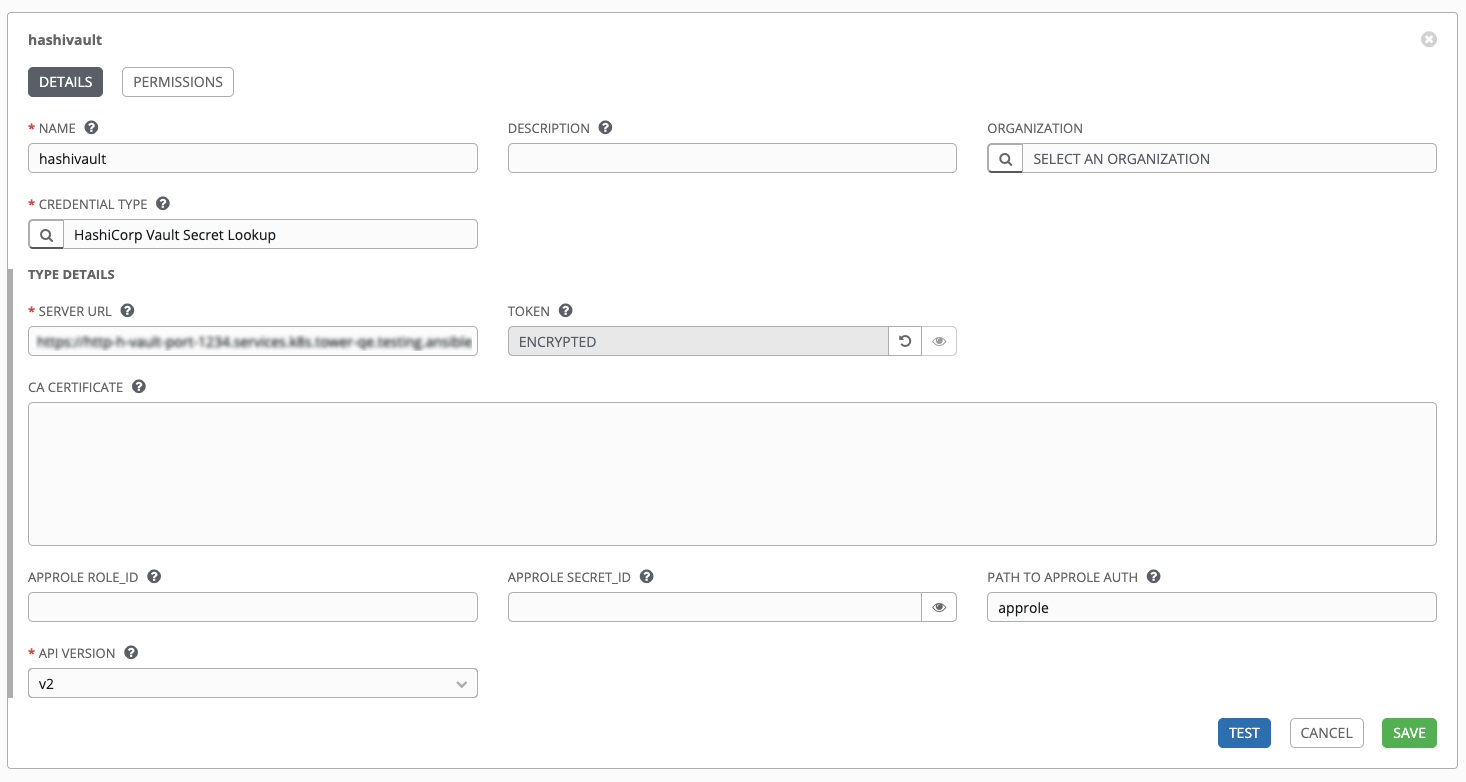
12.1.3. HashiCorp Vault Secret Lookup
When HashiCorp Vault Secret Lookup is selected for Credential Type, provide the following metadata to properly configure your lookup:
Server URL (required): provide the URL used for communicating with HashiCorp Vault’s secret management system
Token: specify the access token used to authenticate HashiCorp’s server
CA Certificate: specify the CA certificate used to verify HashiCorp’s server
Approle Role_ID: specify the ID for Approle authentication
Approle Secret_ID: specify the corresponding secret ID for Approle authentication
Path to Approle Auth: specify a path if other than the default path of
/approleAPI Version (required): select v1 for static lookups and v2 for versioned lookups
For more detail about Approle and its fields, refer to the Vault documentation for Approle Auth Method. Below shows an example of a configured HashiCorp Vault Secret Lookup credential.
12.1.4. HashiCorp Vault Signed SSH
When HashiCorp Vault Signed SSH is selected for Credential Type, provide the following metadata to properly configure your lookup:
Server URL (required): provide the URL used for communicating with HashiCorp Signed SSH’s secret management system
Token: specify the access token used to authenticate HashiCorp’s server
CA Certificate: specify the CA certificate used to verify HashiCorp’s server
Approle Role_ID: specify the ID for Approle authentication
Approle Secret_ID: specify the corresponding secret ID for Approle authentication
Path to Approle Auth: specify a path if other than the default path of
/approle
For more detail about Approle and its fields, refer to the Vault documentation for Approle Auth Method.
Below shows an example of a configured HashiCorp SSH Secrets Engine credential.

12.1.5. Microsoft Azure Key Vault
When Microsoft Azure Key Vault is selected for Credential Type, provide the following metadata to properly configure your lookup:
Vault URL (DNS Name) (required): provide the URL used for communicating with MS Azure’s key management system
Client ID (required): provide the identifier as obtained by the Azure Active Directory
Client Secret (required): provide the secret as obtained by the Azure Active Directory
Tenant ID (required): provide the unique identifier that is associated with an Azure Active Directory instance within an Azure subscription
Cloud Environment: select the applicable cloud environment to apply
Below shows an example of a configured Microsoft Azure KMS credential.

