8. OpenShift Deployment and Configuration
Ansible Tower supports container-based clusters running on OpenShift. This section provides a high-level overview of OpenShift and Tower Pod configuration, notably the following:
The main Differences in standard Tower vs OpenShift Tower (i.e., auto-removal of instances)
Tower deploys as a single pod first and can scale up after migrations
Migrations run in the task-runner pod
8.1. Tower and OpenShift Basics
The Tower OpenShift documentation assumes an understanding of how to use OpenShift at an administrative level and should include some experience maintaining container based infrastructure. The differences are:
Standalone Tower and OpenShift Tower use different installers. For the OpenShift installer, go to http://releases.ansible.com/ansible-tower/setup_openshift.
Tower links to OpenShift itself in order to facilitate scaling up and down without requiring you to manually execute the playbook (to bring up new nodes) or run management commands in the shell (to take nodes offline purposefully). You can configure the Tower Deployment once the system is up to add more or remove extra Tower Pods.
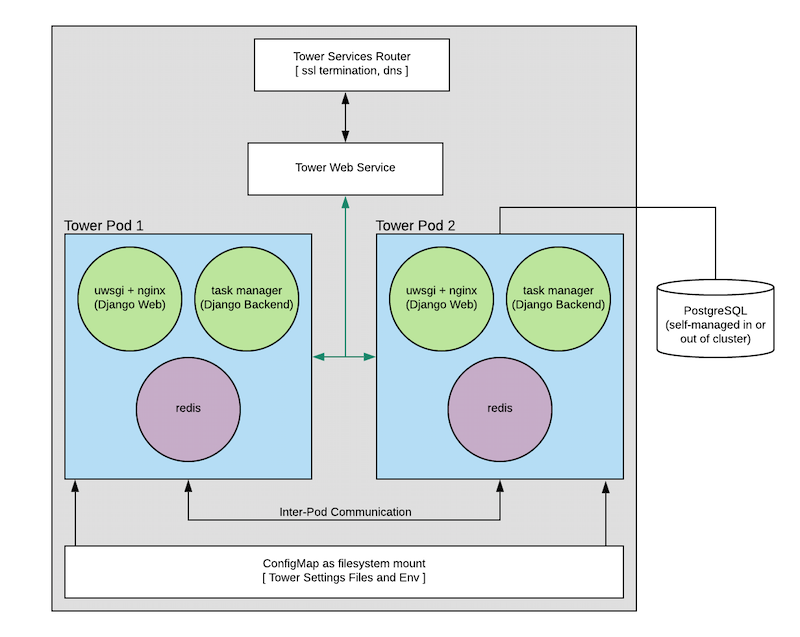
Tower pods are configured without HTTPs and the installer will configure an OpenShift Route which will handle SSL termination and distribute requests to all Tower Pods. This is somewhat of an internal OpenShift load balancer.
Database migrations run as part of the process of bringing up the task executor container within the pod (see diagram) and thus will likely happen after the playbook has completed.
Capacity / Performance Detection (see the section on Resource Requests and Request Planning).
Isolated instances are not supported in conjunction with running Ansible Tower in OpenShift.
8.2. Configuration Options
Requirements
Latest supported OpenShift versions 3.x and 4.x (see Red Hat Container Registry Authentication for detail)
- Per pod default resource requirements:
6GB RAM
3CPU cores
Openshift command-line tool (oc) on the machine running the installer
A setup and running Openshift cluster
Admin privileges for the account running the openshift installer (
cluster-adminrole is required)
8.3. Basic Configuration
An OpenShift install requires the following parameters to be set:
openshift_hostopenshift_projectopenshift_useropenshift_passwordadmin_passwordsecret_keypg_usernamepg_password
For OpenShift install method, the settings are the same as the traditional Tower install method, except:
SSL termination for the Tower UI and API is handled through the OpenShift service object. The certificates used here will be generated and signed by the OpenShift internal CA.
The containerized PostgreSQL pod optionally deployed to OpenShift installs cannot be configured for SSL. If you want SSL-enabled PostgreSQL in an OpenShift environment, you must deploy your PostgreSQL server separately, and configure the Tower nodes (using
pg_sslmode).
The Project will be created if it doesn’t exist but the user given there should have either:
The ability to create the project and populate it with Tower-needed pods
OR
Access to create whatever pods are needed in the project, if it already exists
The password should be given on the command line as shown when executing the installer.
The oc command line client should be installed and available and the client version should match the server version.
The secret-key, admin password, and postgresql username and password should be populated in the inventory file prior to running the installer.
./setup_openshift.sh -e openshift_password=$OPENSHIFT_PASSWORD -- -v
Note
Tower uses Bubblewrap (from Project Atomic) as a mechanism to give the (relatively) unprivileged awx user the ability to isolate Ansible processes from each other. There are certain privileges that need to be granted to the container that necessitates running the Tower web and task containers in privileged mode.
The default type for the Tower web service is NodePort. To customize this, set kubernetes_web_svc_type to ClusterIP or LoadBalancer in your inventory file, or pass it as an extra var.
8.4. Resource Requests and Request Planning
Normally Tower examines the system that it runs on in order to determine what its own capacity is for running Jobs and performing background requests. On OpenShift this works differently since pods and containers will tend to coexist on systems. Pods can also migrate between hosts depending on current conditions (for instance, if the OpenShift cluster is being upgraded or is experiencing an outage).
It’s common for Pods and Containers to Request the resources that they need. OpenShift then uses this information to decide Where things run (or even if they can run).
Tower will also use this information to configure its own capacity for how many (and the size of) individual jobs can be run.
Each Tower pod is made up of 3 containers (see diagram), each container is configured with a conservative default, but taken all together they can be somewhat substantial. These defaults are also configurable but it’s helpful to know what effect that has on the Tower cluster.
The two most important values control the CPU and memory allocation for the task execution container. This container is the one that is actually responsible for launching jobs, as such these values directly control how many and what size jobs can run. The settings can be changed in the inventory and here are the default values:
task_cpu_request=1500
This is the amount of CPU to dedicate, the value of 1500 refers to how OpenShift itself views CPU requests (see https://docs.OpenShift.com/container-platform/3.9/dev_guide/compute_resources.html#dev-cpu-requests) (for value meanings see: https://docs.OpenShift.com/container-platform/3.9/dev_guide/compute_resources.html#dev-compute-resources)
1500 is 1500 millicores which translates to roughly 1.5 CPU Cores.
This value is used to configure the Tower capacity in the following way:
((task_cpu_request/ 1000) * 4)
Which is to say that, by default, Tower in OpenShift (when configured entirely for cpu-based algorithm) can run at most 6 simultaneous forks.
The other value that can be tuned:
task_mem_request=2 - This is the amount of memory to dedicate (in gigabytes).
This value is used to configure the Tower capacity in the following way
((task_mem_request * 1024) / 100)
Which is to say that, by default, Tower can run at most 40 simultaneous forks when configured for mem-based algorithm.
For the default resource requests, see roles/kubernetes/defaults/main.yml.
All together the default requested resources for a single Tower pod total to:
3 CPU Cores
6 GB memory
The OpenShift instances that you want to run Tower on should at least match that. If the defaults are changed then the system will need to be updated to match the new requirements.
Note
If other Pods are running on the OpenShift instance or the systems are too small to meet these requirements then Tower may not be able to run anywhere. Refer to Capacity Algorithm for more detail.
8.5. Database Configuration and Usage
There are two methods for configuring the Tower PostgreSQL database for Tower running in Openshift:
(Recommended) Externally Managed Database (not installed by the Tower setup playbook). The PostgreSQL server is installed before Tower either inside or outside of the Openshift cluster and Tower is configured to point at it
PostgreSQL is installed in Openshift using the Tower Installer by providing a pre-created
PersistentVolumeClaimand providing it the Tower install playbook inventory file asopenshift_pg_pvc_name.
If you are installing Tower for demo/evaluation purposes you may set openshift_pg_emptydir=true and OpenShift will create a temporary volume for use by the pod.
Warning
This volume is temporary for demo/evaluation purposes only, and will be deleted when the pod is stopped.
8.6. Backup and Restore
The process for backup and restore resembles that of traditional Tower. From the root of the installer directory of the current Tower version, run:
./setup_openshift.sh -b # Backup
./setup_openshift.sh -r # Restore
Note
configmap will be recreated from values in the inventory file. The inventory file is included in backup tarball.
8.7. Upgrading
To upgrade a Tower deployment in OpenShift, you need to download and use the most recent installer from http://releases.ansible.com/ansible-tower/setup_openshift. Expect some downtime, just as traditional Tower installations.
8.8. Migrating
Tower supports migration from traditional setup to a setup in OpenShift, as outlined below:
First, upgrade your traditional Tower setup to the latest release of Ansible Tower (or to version 3.3 at minimum), using the normal upgrade procedure.
Download the OpenShift installer.
Edit the
inventoryfile and changepg_username,pg_password,pg_database, andpg_portto point to the upgraded Tower database from your traditional Tower setup.Run the OpenShift installer as normal.
Warning
Do not use special characters in pg_password as it may cause the setup to fail.
8.9. Build custom virtual environments
It is possible to override the base container image to build custom virtual environments (virtualenvs). Overriding the base container is used for customization and custom virtualenv support or for local mirroring. If you want to use custom virtual environments with Tower deployed in OpenShift, you will need to customize the container image used by Tower.
Here is a Dockerfile that can be used as an example. This installs Ansible into a custom virtual environment:
FROM registry.redhat.io/ansible-tower-38/ansible-tower-rhel7
USER root
RUN yum install -y gcc python-devel openssl-devel
RUN umask 0022
RUN virtualenv /var/lib/awx/venv/ansible2.7
RUN /var/lib/awx/venv/ansible2.7/bin/pip install psutil python "ansible==2.7.9"
If you need to install other python dependencies (such as those for custom modules) you can add additional RUN commands to the docker file that activate the virtual environment and call pip.
Once the image is built, make sure that image is in your registry and that the OpenShift cluster and installer have access to it.
Override the following variables in group_vars/all in the OpenShift installer to point to the image you have pushed to your registry:
kubernetes_web_image: registry.example.com/my-custom-tower
kubernetes_task_image: registry.example.com/my-custom-tower
If mirroring the vanilla Red Hat images:
kubernetes_web_image: registry.example.com/ansible-tower
kubernetes_task_image: registry.example.com/ansible-tower
8.10. Configure TLS with Ansible Tower OpenShift Installer
Configuring TLS for with the Ansible Tower 3.8.x OpenShift installer is done by editing the inventory file, or creating a separate vars.yml file, which can be specified when running ./setup_openshift.sh. In Tower 3.8.x, after running the installer, an additional step is required to set up TLS in order to create a secure Route. The changes needed to the Route and Service objects for your deployment of Tower are described below and can be done from the YAML section in the UI for each resource, or from the command line using oc edit <resource> <resource-name>.
In the inventory file for the OpenShift installer, before running
./openshift_installer.sh, setkubernetes_web_svc_type="ClusterIP". For example, the entry in your inventory file should look like this:kubernetes_web_svc_type: "ClusterIP"
Because the route already exists, we recommend that you modify it as needed (mainly to add the certs). To do this, edit the existing
ansible-tower-web-svcRoute resource by setting the termination toEdge. This may be different for your environment, refer to the OpenShift documentation, Creating an edge route with a custom certificate to figure out which is best for you.Create a TLS cert and key then register them with your Certificate Authority.
Use that cert and key under the
spec.tls.certandspec.tls.keysections of the Route YAML similar to the example below.
kind: Route
apiVersion: route.openshift.io/v1
metadata:
  name: ansible-tower-web-svc
  namespace: my-namespace
  labels:
    name: ansible-tower-web-svc
spec:
  host: ansible-tower-web-svc-ca-tower.ocp3.ansible.eng.rdu2.redhat.com
  to:
    kind: Service
    name: ansible-tower-web-svc
    weight: 100
  port:
    targetPort: http
  tls:
    termination: edge
    certificate: |
        -----BEGIN CERTIFICATE-----
        ...
        -----END CERTIFICATE-----

    key: |
        -----BEGIN RSA PRIVATE KEY-----
        ...
        -----END RSA PRIVATE KEY-----
  wildcardPolicy: None
An unaltered installation of Ansible Tower on OpenShift contains a Service with
service_type = NodePortsimilar to the sample YAML below.
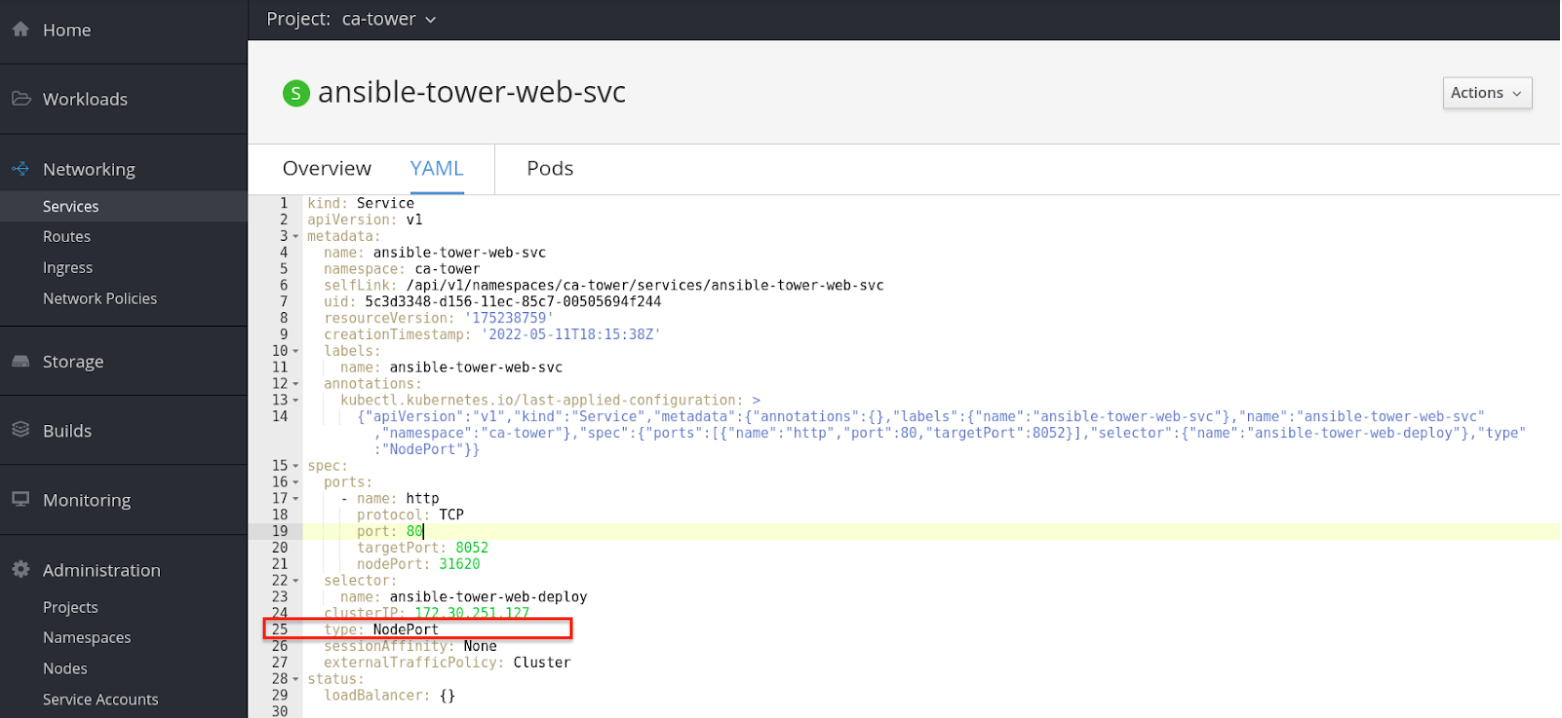
This is the Route prior to selecting edge as the type instead of passthrough:
spec:
  ports:
    - name: http
      protocol: TCP
      port: 80
      targetPort: 8052
      nodePort: 31620
  selector:
    name: ansible-tower-web-deploy
  clusterIP: 172.30.251.127
  type: NodePort
  sessionAffinity: None
  externalTrafficPolicy: Cluster
Optionally, if you do not want to re-run the OpenShift installer with
kubernetes_web_svc_typeset in the inventory file, you can patch the Service resource manually by changing the type fromNodePorttoClusterIPon this Service object and remove thespec.ports[0].nodePortline, as shown in the example below.
spec:
  ports:
    - name: http
      protocol: TCP
      port: 80
      targetPort: 8052
  selector:
    name: ansible-tower-web-deploy
  clusterIP: 172.30.251.127
  type: ClusterIP
  sessionAffinity: None
  externalTrafficPolicy: Cluster