19. ジョブテンプレート
job template (ジョブテンプレート) は、Ansible ジョブを実行するためのパラメーターの定義およびパラメーターセットです。ジョブテンプレートは同じジョブを何度も実行する場合に便利です。また、ジョブテンプレートは Ansible Playbook コンテンツの再利用およびチーム間のコラボレーションを促進します。
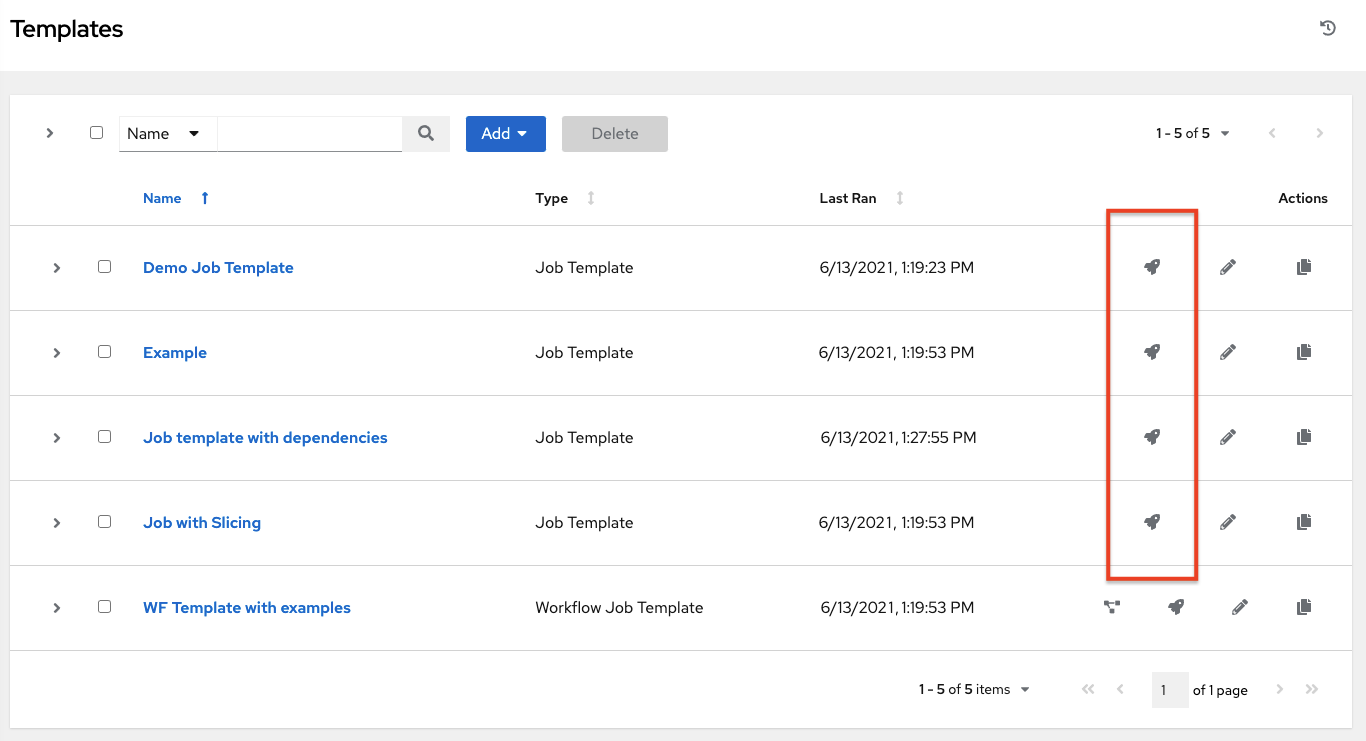
The Templates menu opens a list of the job templates that are currently available. The default view is collapsed (Compact), showing the template name, template type, and the timestamp of last job that ran using that template. You can click Expanded (arrow next to each entry) to expand to view more information. This list is sorted alphabetically by name, but you can sort by other criteria, or search by various fields and attributes of a template.
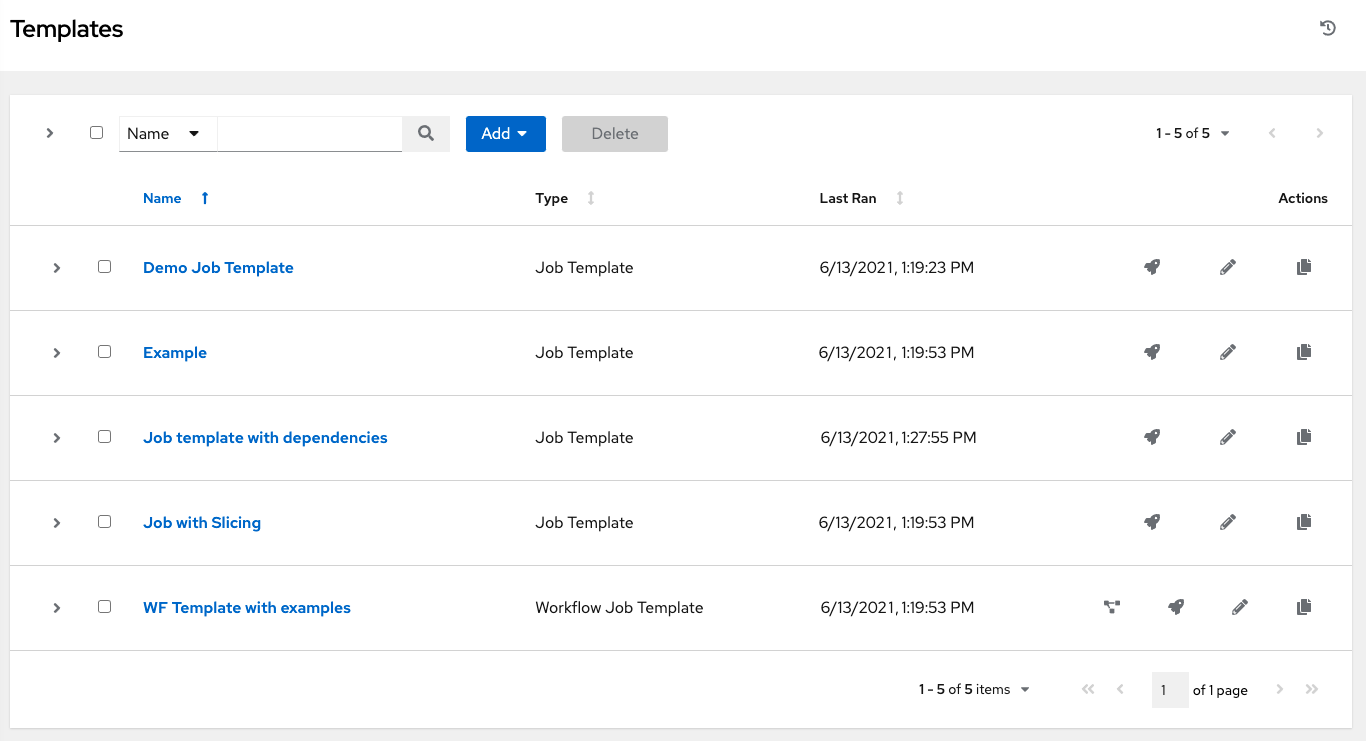
From this screen, you can launch ( ), edit (
 ), and copy (
 ) a job template. To delete a job template, you must select one or more templates and click the Delete button. Before deleting a job template, be sure it is not used in a workflow job template.
注釈
他の作業アイテムが使用するアイテムを削除する場合は、メッセージが開き、削除されるアイテムと、削除の確認を促すプロンプトが表示されます。画面によっては、無効なアイテムや、過去に削除されたアイテムが含まれる場合があるので、それらのアイテムは実行に失敗します。以下は、これらのメッセージ例です。

注釈
ジョブテンプレートは、ワークフローテンプレートの構築に使用できます。隣にワークフロービジュアライザー (![]() ) アイコンが表示されているテンプレートは、ワークフローテンプレートです。クリックすると、図形式でワークフローをビルドできるようになります。ジョブテンプレートに含まれるパラメーターの多くで、Prompt on Launch (起動プロンプト) を有効にして、ワークフローレベルで変更でき、ジョブテンプレートレベルで割り当てられた値に影響を与えることはありません。詳しくは、「ワークフロービジュアライザー」のセクションを参照してください。
) アイコンが表示されているテンプレートは、ワークフローテンプレートです。クリックすると、図形式でワークフローをビルドできるようになります。ジョブテンプレートに含まれるパラメーターの多くで、Prompt on Launch (起動プロンプト) を有効にして、ワークフローレベルで変更でき、ジョブテンプレートレベルで割り当てられた値に影響を与えることはありません。詳しくは、「ワークフロービジュアライザー」のセクションを参照してください。
19.1. ジョブテンプレートの作成
新規ジョブテンプレートを作成するには、以下を実行します。
追加 ボタンをクリックしてから、メニュー一覧で ジョブテンプレート を選択します。
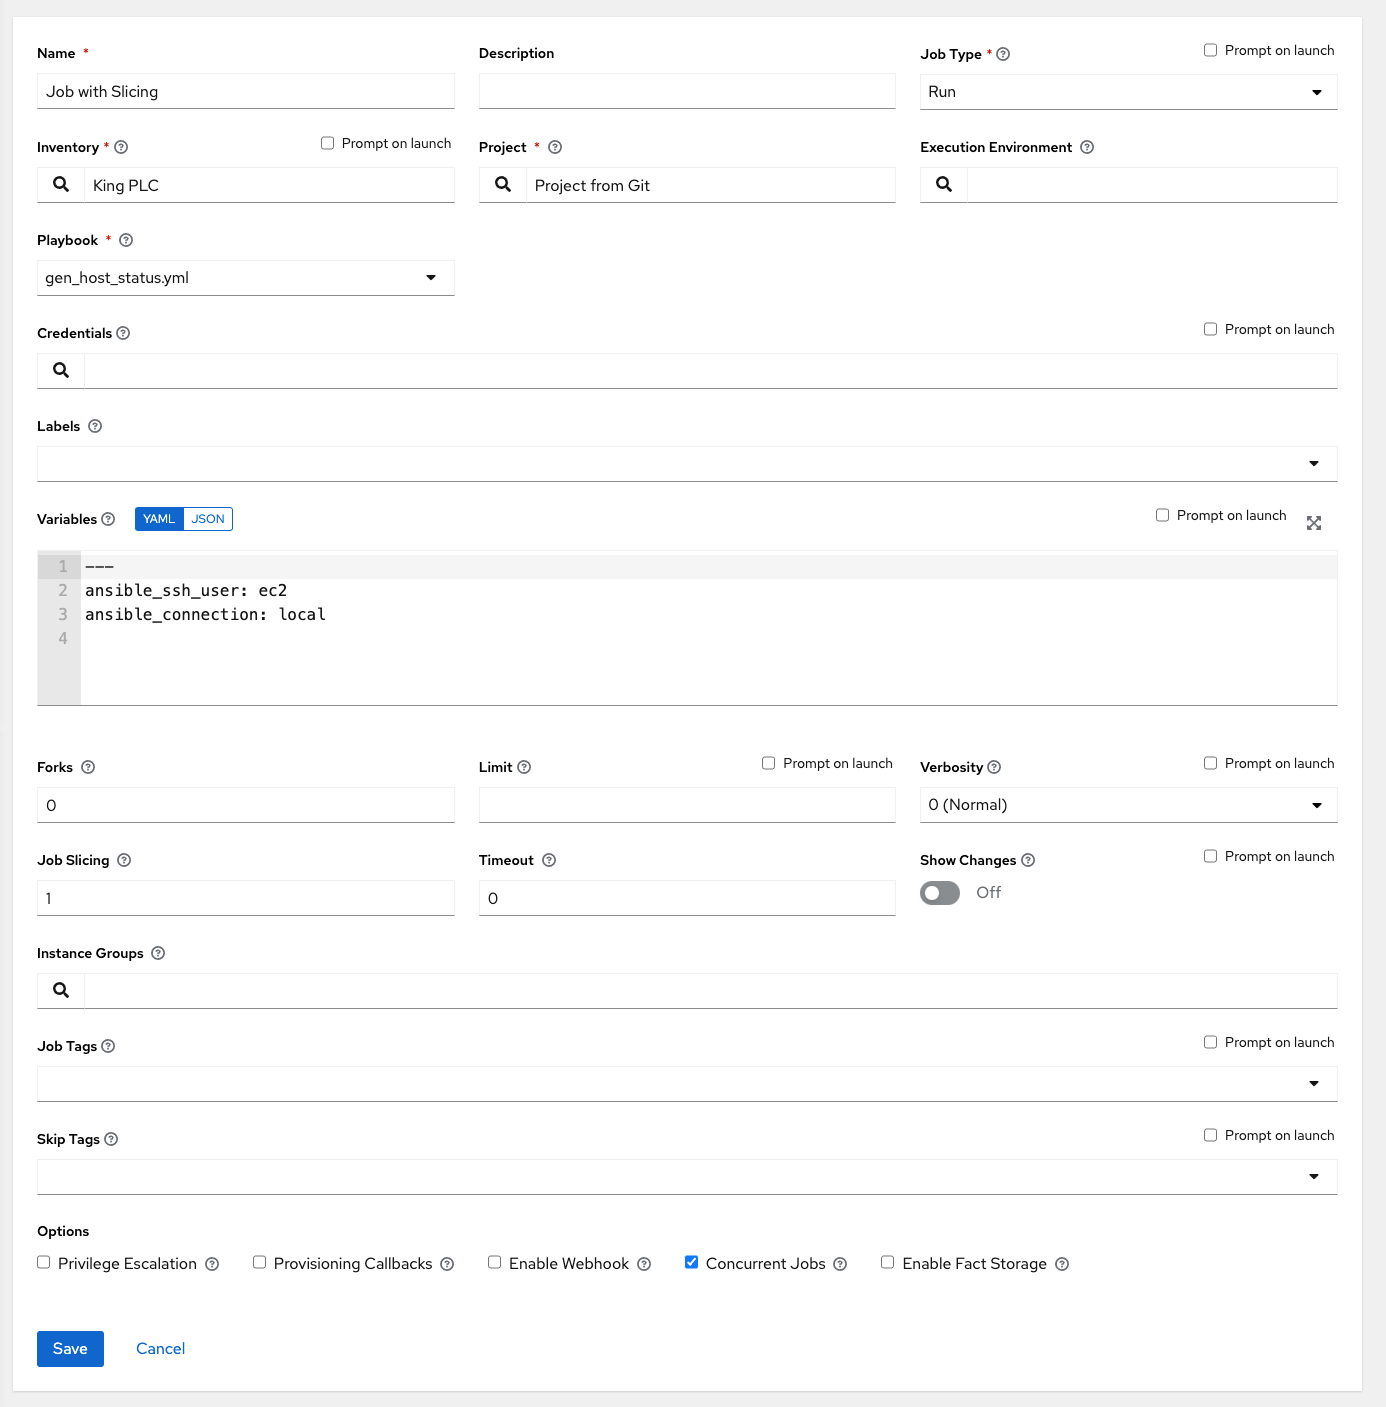
以下のフィールドに該当する詳細を入力します。
名前: ジョブの名前を入力します。
説明: 任意の説明を入力します (オプション)。
ジョブタイプ: ジョブタイプを選択します。
実行: 起動時に Playbook を実行し、選択されたホストで Ansible タスクを実行します。
チェック: Playbook の「ドライラン」を実行し、実際に変更せずに変更について報告します。チェックモードをサポートしないタスクはスキップされ、予想される変更については報告されません。
起動プロンプト: これが選択されている場合、デフォルト値が指定されている場合でも、起動時に実行またはチェックするジョブタイプを選択するようプロンプトが出されます。
注釈
ジョブタイプの詳細情報は、Ansible ドキュメントの Playbooks: Special Topics セクションを参照してください。
インベントリー: このジョブテンプレートで使用するインベントリーを、現在ログインしているユーザーが利用できるインベントリーから選択します。
起動プロンプト: これが選択されている場合、デフォルト値が指定されている場合でも、起動時にこのジョブテンプレート実行に使用するインベントリーの選択を求めるプロンプトが出されます。
プロジェクト: このジョブテンプレートで使用するプロジェクトを、現在ログインしているユーザーが利用できるプロジェクトから選択します。
** SCM ブランチ**: このフィールドは、ブランチのオーバーライドを許可するプロジェクトを選択した場合にのみ表示されます。ジョブ実行で使用するオーバーライドブランチを指定します。空白のままにすると、プロジェクトからの指定の SCM ブランチ (またはコミットハッシュまたはタグ) が使用されます。詳細については、「job branch overriding」を参照してください。
起動プロンプト: これが選択されている場合、デフォルト値が指定されている場合でも、起動時に SCM ブランチを選択するようプロンプトが出されます。
Playbook: 利用可能な Playbook から、このジョブテンプレートで起動する Playbook を選択します。このフィールドには、選択したプロジェクトのプロジェクトベースパスにある Playbook の名前が自動的に入力されます。または、Playbook が表示されていない場合は、Playbook で実行するために使用するファイルの名前 (たとえば
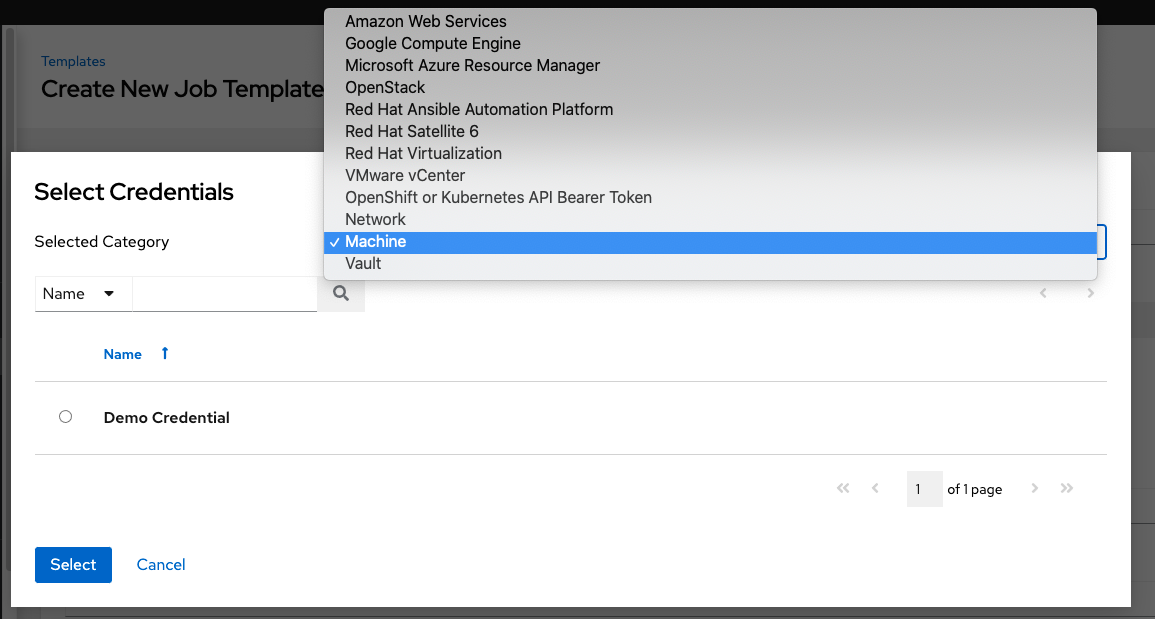
foo.yml) のように、Playbook の名前を入力できます。無効なファイル名を入力すると、テンプレートにエラーが表示されるか、ジョブが失敗します。認証情報:
 ボタンをクリックして別個のウィンドウを開きます。このジョブテンプレートで使用する選択可能なオプションから認証情報を選択します。一覧に多くのオプションが含まれる場合、ドロップダウンメニューの一覧を使用し、認証情報タイプでフィルターします。
注釈
Some credential types are not listed because they do not apply to certain job templates.
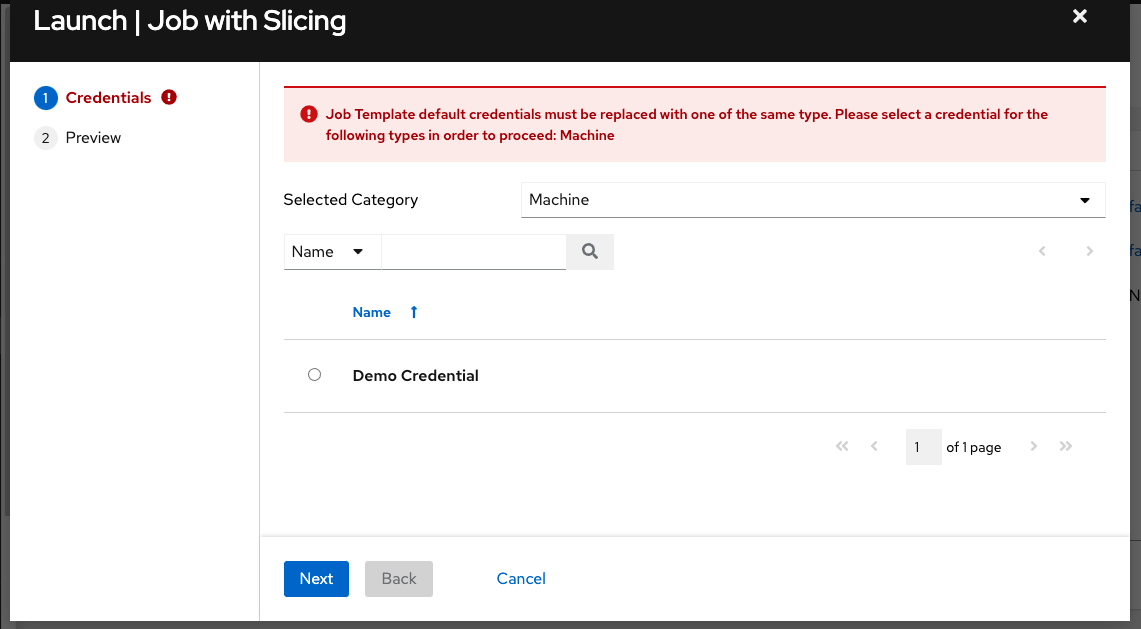
起動プロンプト: この項目が選択されている場合には、デフォルトのマシンの認証情報が含まれるジョブテンプレートを起動すると、別のマシンの認証情報に置き換えてからでないと、プロンプトダイアログのデフォルトマシンの認証情報を削除できず、起動できません。または、適切な認証情報をさらに追加することもできます。以下は、このようなメッセージの例です。
フォーク: Playbook の実行中に使用する並行または同時プロセスの数です。値がゼロの場合には、
/etc/ansible/ansible.cfgで上書きが実行されない限り Ansible のデフォルト設定 (5 つの並行プロセス) が使用されます。**Limit (制限) **: Playbook が管理または影響を与えるホストの一覧をさらに制限するためのホストのパターンです。複数のパターンは、コロン (「:」) で区切ることができます。Core Ansible の場合のように「a:b」は「in group a or b」を、「a:b:&c」は「in a or b but must be in c」を、「a:!b」は「in a, and definitely not in b」を意味します。
起動プロンプト: これが選択されている場合、デフォルト値が指定されている場合でも、起動時に制限を選択するようプロンプトが出されます。
注釈
詳細情報と例については、Ansible ドキュメントの Patterns を参照してください。
詳細: Playbook の実行時に Ansible が生成する出力レベルを制御します。通常からさまざまな詳細レベルを選択するか、デバッグ設定を選択します。これは、「詳細」レポートビューにのみ表示されます。詳細ロギングには、すべてのコマンドの出力が含まれます。デバッグのロギングはきわめて詳細になり、特定のサポートインスタンスで役に立つ SSH 操作についての情報が含まれます。大半のユーザーは「デバッグ」モードの出力を確認する必要はありません。
警告
「詳細」の値が 5 の場合、automation controller はジョブの実行時にブロックを実行し、これによりジョブが終了したことを示すレポートが遅延するため (レポートが作成されている場合でも)、ブラウザータブがロックアップする可能性があります。
起動プロンプト: これが選択されている場合、デフォルト値が指定されている場合でも、起動時に詳細レベルを選択するようプロンプトが出されます。
ジョブタグ: Playbook タグのコンマ区切りの一覧を提供し、実行する Playbook の部分を指定します。詳細情報および例は、Ansible ドキュメントの「Tags 」を参照してください。
起動プロンプト: これが選択されている場合、デフォルト値が指定されている場合でも、起動時にジョブタグを選択するようプロンプトが出されます。
タグの省略: 実行する Playbook の特定のタスクまたは一部を省略するように、Playbook タグのコンマ区切りの一覧を指定します。詳細情報および例は、Ansible ドキュメントの「 Tags 」を参照してください。
起動プロンプト: これが選択されている場合、デフォルト値が指定されている場合でも、起動時に省略するタグを選択するようプロンプトが出されます。
ラベル: 「dev」、「test」などのこのジョブテンプレートを説明する任意のラベルを指定します。ラベルを使用してディスプレイでのジョブテンプレートおよび完了したジョブの分類およびフィルター設定を実行します。
ラベルは、ジョブテンプレートに追加される際に作成されます。ラベルはジョブテンプレートで提供されるプロジェクトを使用する単一の組織に割り当てられます。組織のメンバーは、(管理者ロールなどの) 編集パーミッションがある場合にジョブテンプレートでラベルを作成できます。
ジョブテンプレートが保存されると、ラベルは 展開 ビューのジョブテンプレートの概要に表示されます。
ラベルの横にある「x」をクリックしてこれを削除します。ラベルが削除され、ジョブまたはジョブテンプレートの関連付けが解除されると、ラベルは組織ラベルの一覧から完全に削除されます。
ジョブは起動時にジョブテンプレートからラベルを継承します。ラベルがジョブテンプレートから削除される場合、ジョブからも削除されます。
インスタンスグループ:
ボタンをクリックして別個のウィンドウを開きます。このジョブ テンプレートの実行に使用するインスタンスグループを選択します。一覧に多くのオプションが含まれる場合、検索を使用してオプションの範囲を絞ります。ジョブのスライス: このジョブテンプレートに実行させるスライス数を指定します。各スライスは、部分的なインベントリーに対して同じタスクを実行します。ジョブのスライスに関する詳細は、「ジョブスライス」を参照してください。
タイムアウト: キャンセルされるまでジョブを実行できる時間 (秒単位) を指定できます。デフォルトは 0 で、ジョブはタイムアウトしません。
変更の表示: Ansible タスクで加えられた変更を表示できます。
起動プロンプト: これが選択されている場合、デフォルト値が指定されている場合でも、起動時に変更を表示するかどうかを選択するように、プロンプトが出されます。
Options: Specify options for launching this template, if necessary.
Privilege Escalation: If checked, you enable this playbook to run as an administrator. This is the equivalent of passing the
--becomeoption to theansible-playbookcommand.Provisioning Callbacks: If checked, you enable a host to call back to automation controller via the REST API and invoke the launch of a job from this job template. Refer to プロビジョニングコールバック for additional information.
Webhook の有効化: ジョブテンプレートを起動するために使用される定義済みの SCM システム Web サービスとのインターフェース機能を有効にします。現在サポートされている SCM システムは GitHub と GitLab です。
Webhook を有効にすると、他のフィールドが表示され、以下の追加情報の入力を求められます。

Webhook サービス: Webhook からリッスンするサービスを選択します
Webhook URL: POST 要求を送信する Webhook サービスの URL が自動的に入力されます。
Webhook Key: automation controller に送信されたペイロードへの署名に Webhook サービスが使用するために生成された共有シークレット。automation controller がこのサービスから Webhook を受け入れるには、Webhook サービスでこの設定が行われている必要があります。
Webhook の認証情報: オプションで、ステータス更新を Webhook サービスに送り返すために使用する認証情報として GitHub または GitLab のパーソナルアクセストークン (PAT) を指定します。選択するには認証情報が存在する必要があります。作成するには、「認証情報タイプ」を参照してください。
Webhook の設定に関する追加情報は、「Webhook の使用」を参照してください。
Concurrent Jobs: If checked, you are allowing jobs in the queue to run simultaneously if not dependent on one another. Check this box if you want to run job slices simultaneously. Refer to automation controller の容量判断およびジョブの影響 for additional information.
Enable Fact Storage: When checked, automation controller will store gathered facts for all hosts in an inventory related to the job running.
追加変数:
追加のコマンドライン変数を Playbook に渡します。これは、ansible-playbook の -e または --extra-vars コマンドラインパラメーターで、これについては、Ansible Tower ドキュメント (Passing Variables on the Command Line ) に説明されています。
YAML または JSON のいずれかを使用してキー/値のペアを指定します。このような変数には、優先順位を示す最大値があり、他の場所で指定された他の変数よりも優先されます。値の例には、以下が含まれます。
git_branch: production release_version: 1.5詳細は、「追加変数」を参照してください。
起動プロンプト: これが選択されている場合、デフォルト値が指定されている場合でも、起動時にコマンドライン変数を選択するようプロンプトが出されます。
注釈
スケジュールに extra_vars を指定可能にするには、ジョブテンプレートの EXTRA VARIABLES で 起動プロンプト を選択するか、ジョブテンプレートの Survey を有効にする必要があります。これにより、回答済みの Survey の質問が extra_vars に指定されます。
ジョブテンプレートの詳細の設定が完了したら、保存 をクリックします。
Saving the template does not exit the job template page but advances to the Job Template Details tab for viewing. After saving the template, you can click Launch to launch the job, or click Edit to add or change the attributes of the template, such as permissions, notifications, view completed jobs, and add a survey (if the job type is not a scan). You must first save the template prior to launching, otherwise, the Launch button remains grayed-out.
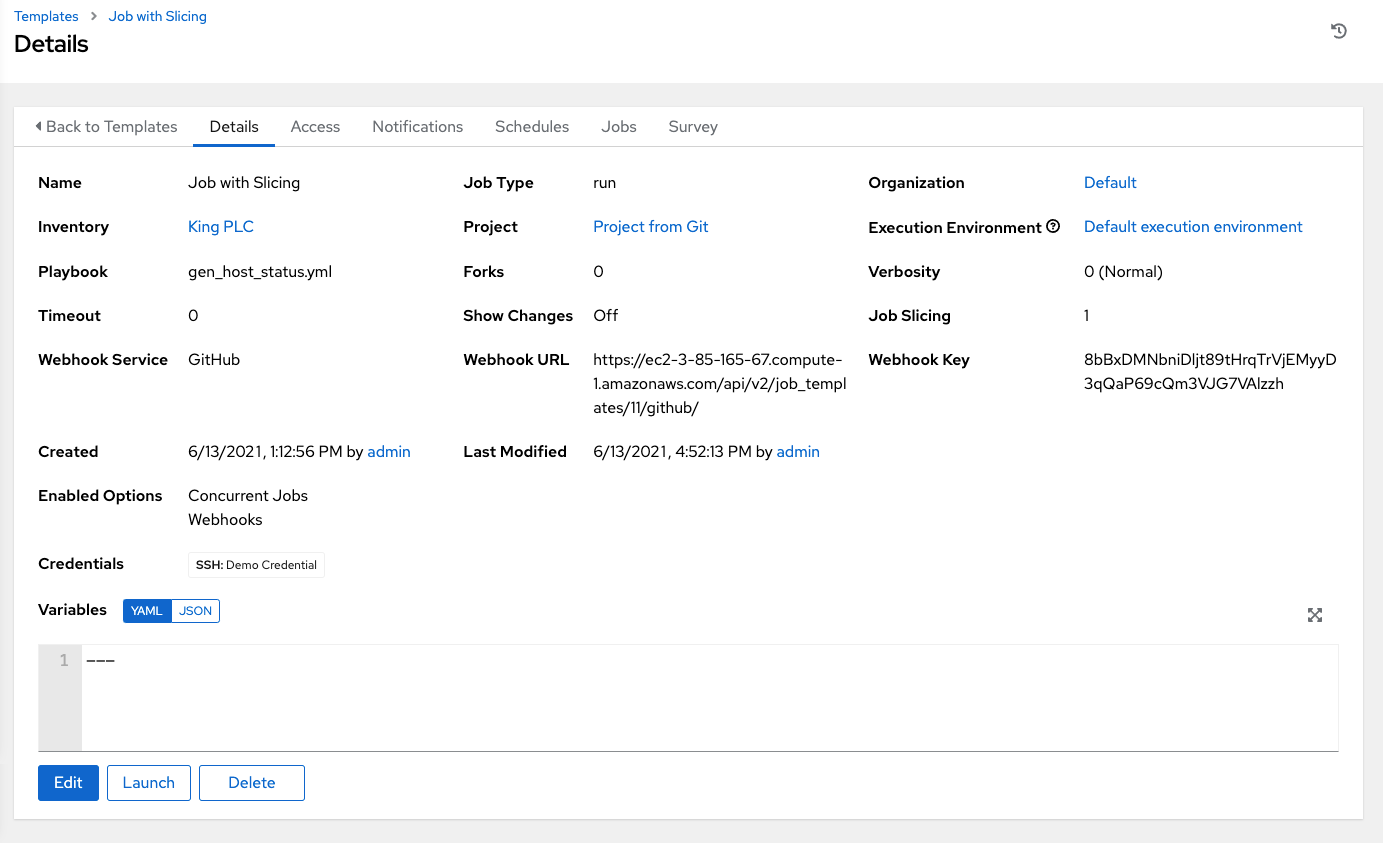
You can verify the template is saved when the newly created template appears on the Templates list view.
19.2. パーミッションの追加
アクセス タブで 追加 ボタンをクリックします。
追加するユーザーまたはチームを選択し、**次へ**をクリックします。
リストから 1 つまたは複数のユーザーを選択します。これには、メンバーとして追加するユーザーの隣にあるチェックボックスをクリックして、次へ をクリックします。

この例では、追加するユーザーが 2 つ選択されています。
選択したユーザーやチームに割り当てるロールを選択します。役割の一覧は、下にスクロールして確認してください。リソースによって利用できるオプションが異なります。
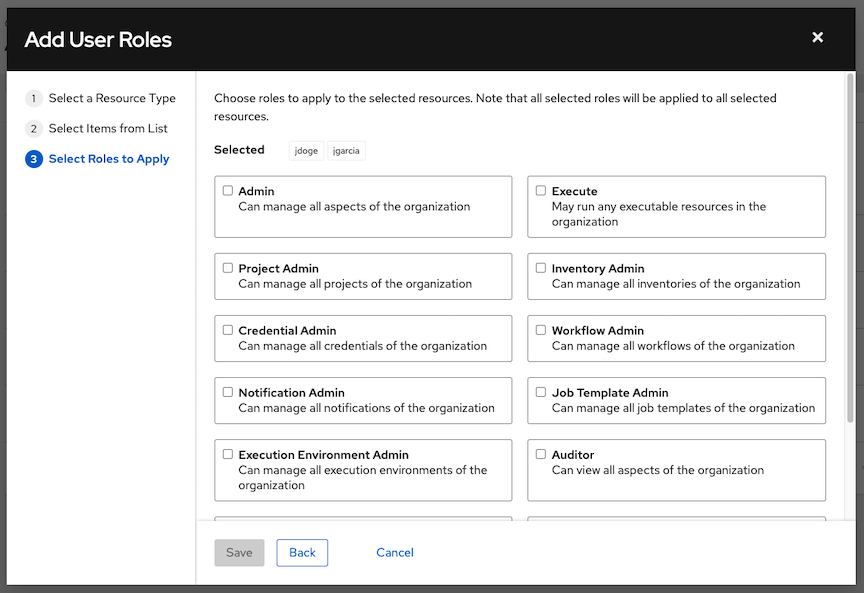
保存 ボタンをクリックすると、選択したユーザーまたはチームにロールが適用され、メンバーとして追加されます。
ユーザー/チームの追加ウィンドウが閉じ、各ユーザーやチームに割り当てられた更新済みのロールが表示されます。

特定ユーザーのロールを削除するには、そのリソースの横にある「関連付けの解除」(x) ボタンをクリックします。

これにより確認ダイアログが起動し、関連付けの解除を確定するように求められます。

19.3. 通知の使用
Clicking the Notifications tab allows you to review any notification integrations you have setup and their statuses, if they have ran.
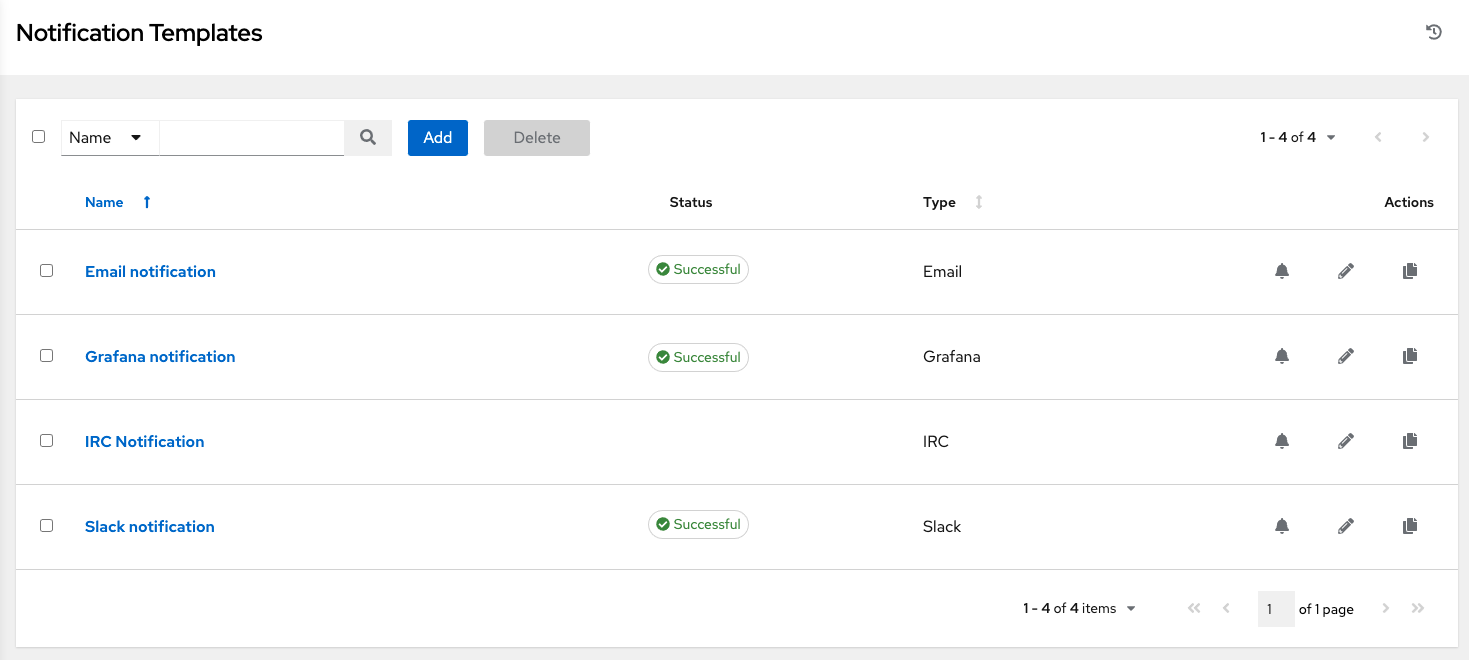
トグルを使用して、特定のテンプレートで使用する通知を有効または無効にします。詳細については、「通知の有効化と無効化」を参照してください。
If no notifications have been set up, click the Add button to create a new notification. Refer to 通知タイプ for additional details on configuring various notification types and extended messaging.
19.4. 完了したジョブの表示
完了したジョブ タブでは、実行済みのジョブテンプレートの一覧が表示されます。展開 をクリックして、ステータス ID、名前、ジョブタイプ、開始時間と完了時間、ジョブを開始したユーザー、使用したテンプレート、インベントリー、プロジェクトおよび認証情報など、各ジョブの詳細を表示します。これらの条件を使用して完了したジョブの一覧をフィルタリングできます。
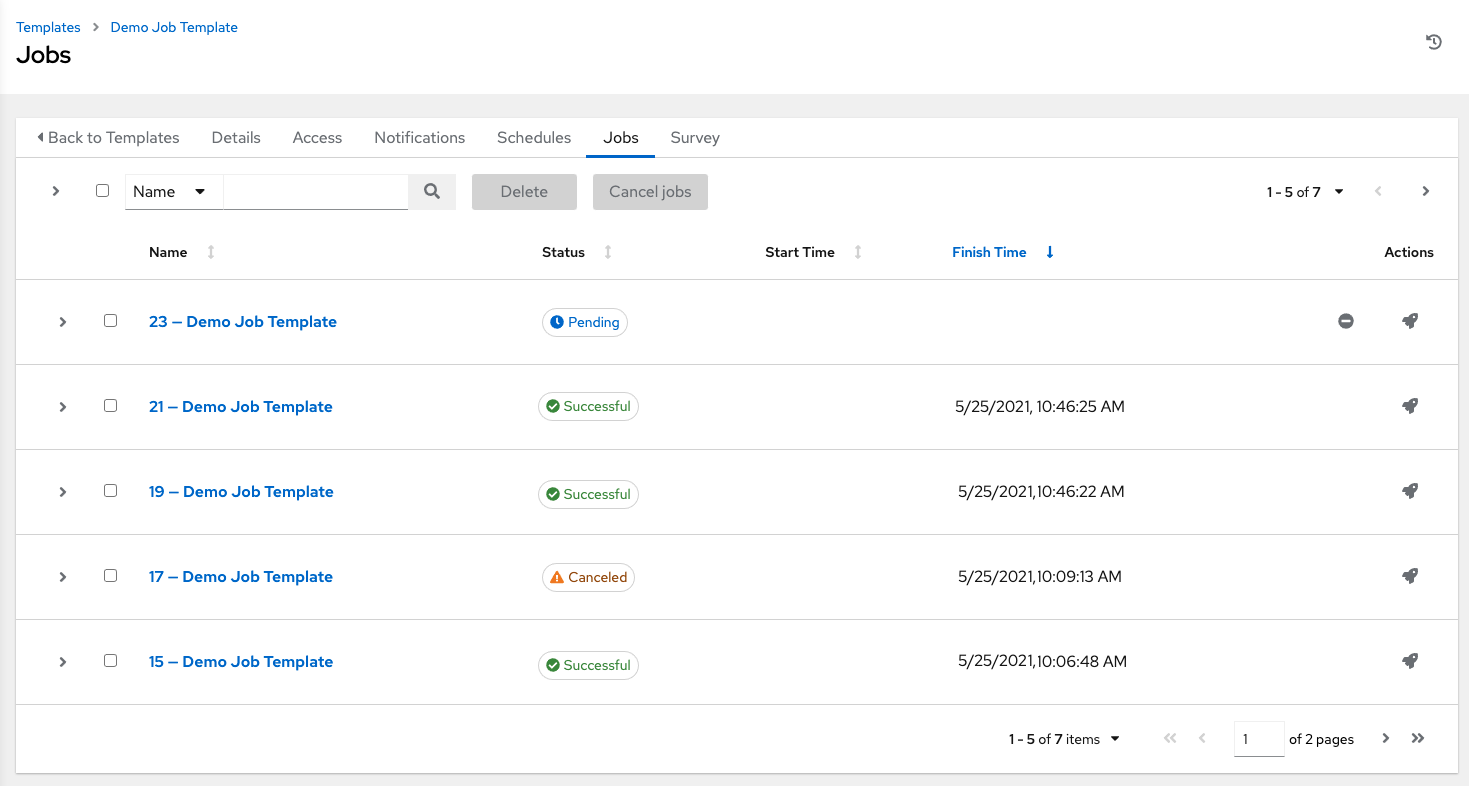
このリストに表示スライスされたジョブは適宜、実行したスライスジョブ数でラベルが付けられます。

19.5. スケジューリング
スケジュール タブから特定のジョブテンプレートのスケジュールにアクセスします。
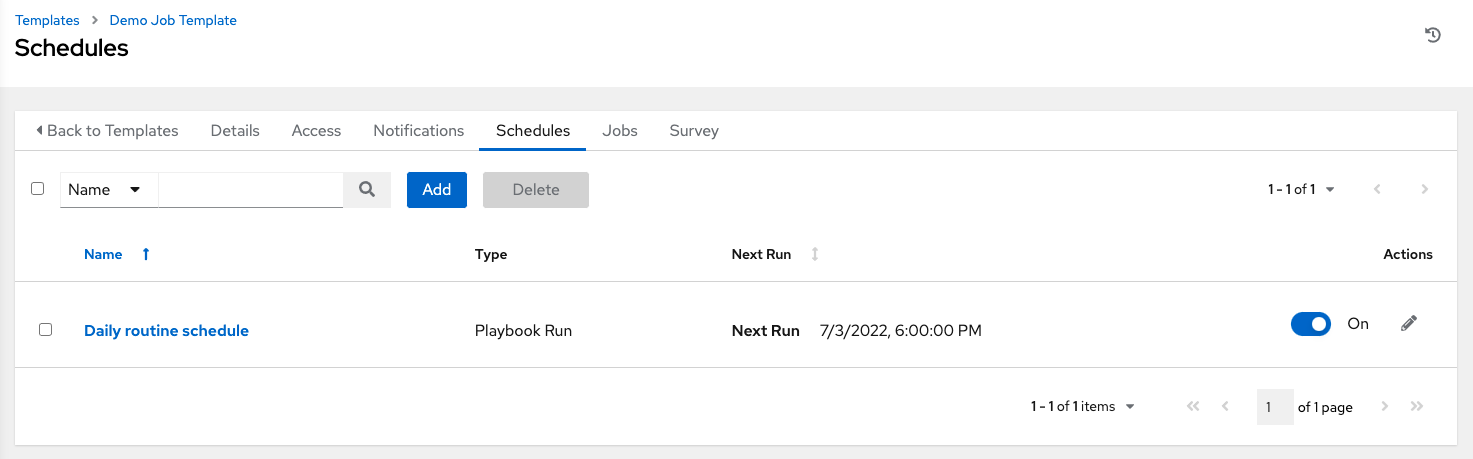
19.5.1. ジョブテンプレートのスケジュール
ジョブテンプレートの実行をスケジュールするには、スケジュール タブをクリックします。
スケジュールがすでに設定されている場合には、スケジュールの設定をレビュー、編集、または有効化/無効化します。
スケジュールが設定されていない場合には、詳細情報を「スケジュール」で参照してください。
認証情報 フィールドで、起動プロンプト が選択されており、ジョブテンプレートのスケジュール情報を作成または編集する場合に、プロンプト ボタンがスケジュールフォームの一番下に表示されます。別のマシンの認証情報に置き換えてからでないと、プロンプトダイアログのデフォルトマシンの認証情報を削除できず、保存できません。以下はこのようなメッセージの例です。
注釈
スケジュールに extra_vars を設定可能にするには、ジョブテンプレートの EXTRA VARIABLES で 起動プロンプト を選択するか、ジョブテンプレートの Survey を有効にする必要があります。これにより、回答済みの Survey の質問が extra_vars に指定されます。
19.6. Survey
「実行」または「チェック」のジョブタイプを選択すると、ジョブテンプレートの作成または編集画面で Survey を設定できます。Survey は、「Prompt for Extra Variables (追加変数のプロンプト)」と同様に Playbook の追加変数を設定しますが、ユーザーが使いやすい質問と回答を使ってこれを実行します。また、Survey ではユーザー入力を検証することもできます。Survey ボタンをクリックして Survey を作成します。
Survey のユースケースは多岐に及びます。一例として、開発者に「push to stage」ボタンを付与する操作が必要な場合、これは Ansible の高度な知識がなくても実行できます。起動時に、このタスクは「What tag should we release?」などといった質問への回答を求めるプロンプトを出す可能性があります。
多項選択式の質問など、多種の質問を尋ねることができます。
19.6.1. Survey の作成
Survey を作成するには、以下を実行します。
Click the Survey tab and click the Add button.
Survey には複数の質問を含めることができます。それぞれの質問について、以下の情報を入力します。
名前: ユーザーに尋ねる質問
説明: (オプション) ユーザーに尋ねられる内容の説明。
Answer Variable Name (回答の変数名): ユーザーの応答の保存に使用する Ansible 変数名。これは Playbook で使用される変数です。変数名にはスペースを含めることができません。
回答タイプ: 以下の質問のタイプから選択します。
テキスト: 単一行のテキスト。この回答の最小および最大の長さ (文字数) を設定できます。
Textarea (テキスト領域): 複数行のテキストフィールド。この回答の最小および最大の長さ (文字数) を設定できます。
パスワード: 応答は、実際のパスワードが処理される場合と同様に機密情報として処理されます。この回答の最小および最大の長さ (文字数) を設定できます。
Multiple Choice (single select) (複数の選択 (単一選択)): 1 度に 1 つのみを選択できるオプションの一覧。複数の選択オプション ボックスに 1 行に 1 つのオプションを入力します。
Multiple Choice (multiple select)(複数の選択 (複数選択)): 1 度に任意の数のオプションを選択できるオプションの一覧。複数の選択オプション ボックスに 1 行に 1 つのオプションを入力します。
Integer (整数): 整数。この回答の最小および最大の長さ (文字数) を設定できます。
Float (浮動): 10 進数。この回答の最小および最大の長さ (文字数) を設定できます。
必須: この質問に対する回答がユーザーから求められているかどうかを示します。
Minimum length and Maximum length: Specify if a certain length in the answer is required.
Default Answer (デフォルトの回答): 質問に対するデフォルトの回答。この値は、回答がユーザーによって提供されていない場合にインターフェースに事前に入力され、使用されます。
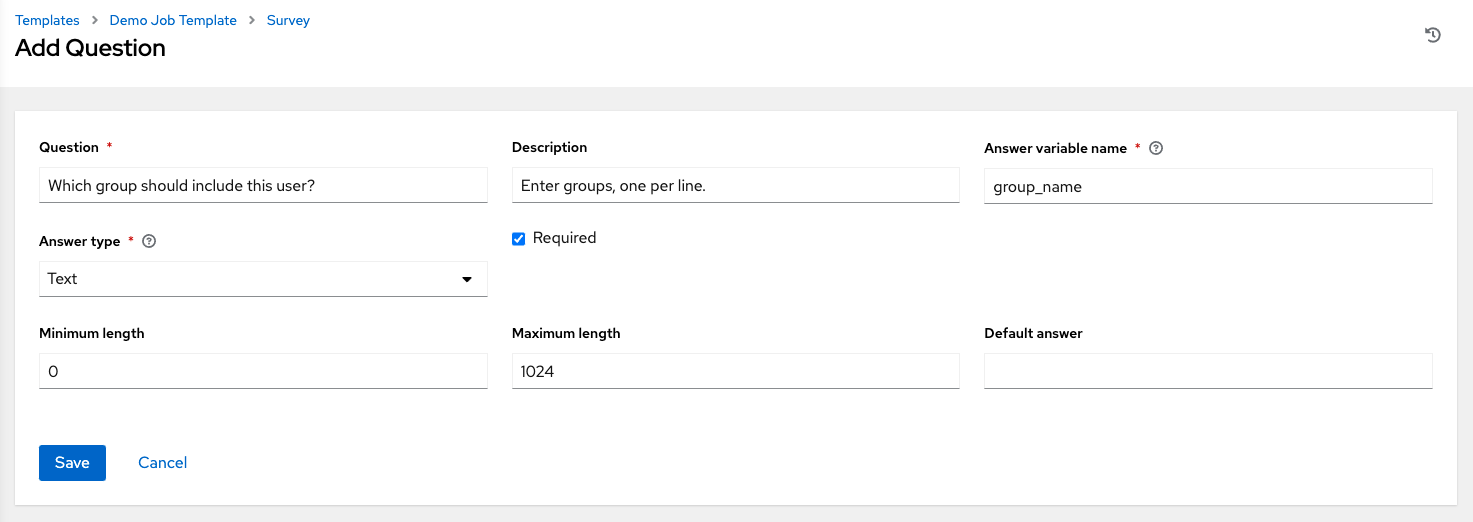
Once you have entered the question information, click Save to add the question.
The survey question displays in the Survey list. For any question, you can click to edit the question, or check the box next to each question and click Delete to delete the question, or use the toggle button at the top of the screen to enable or disable the survey prompt(s).
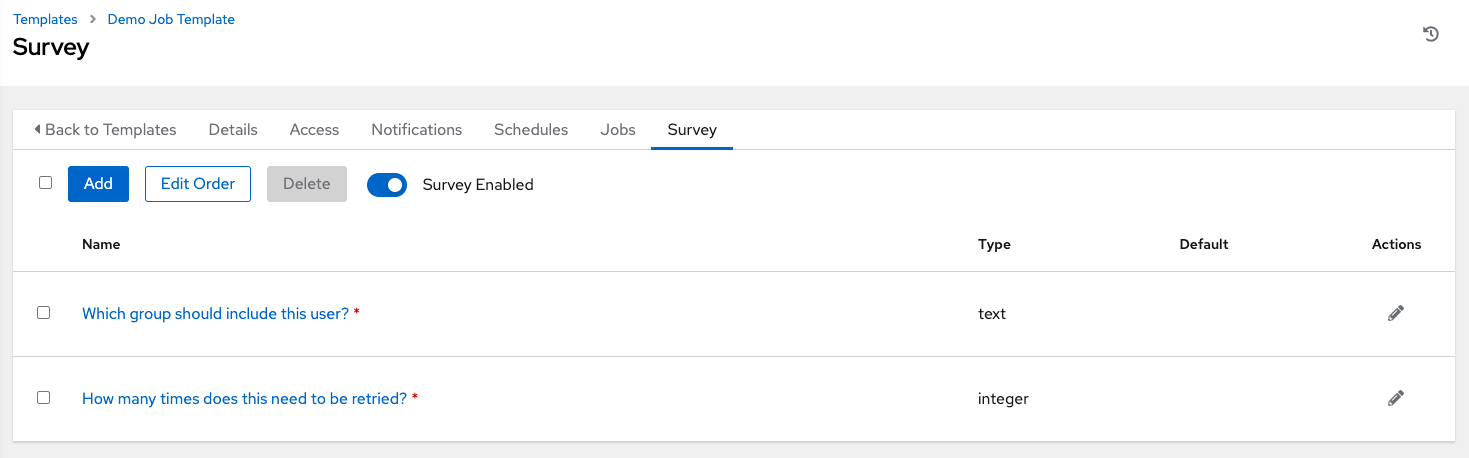
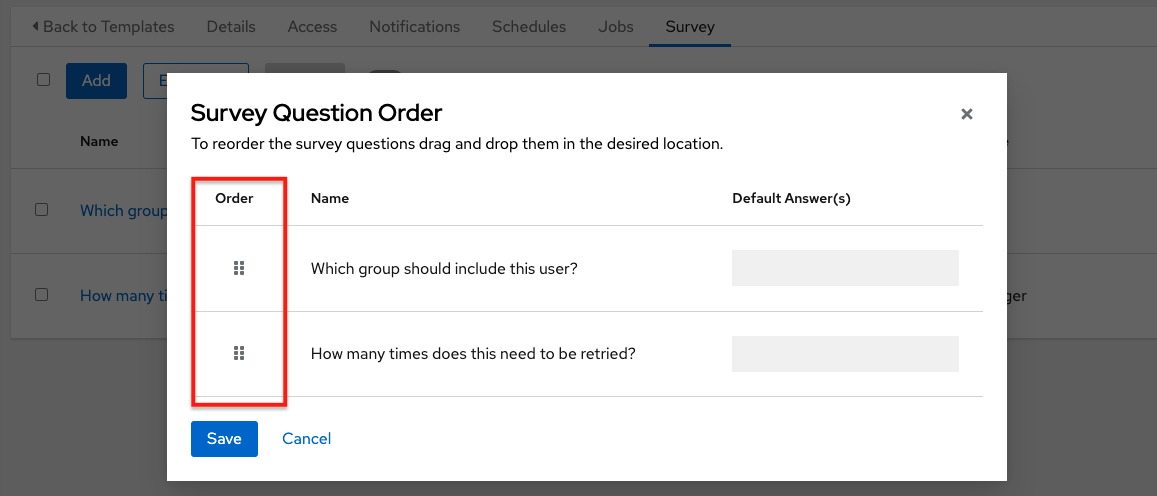
If you have more than one survey question, use the Edit Order button to rearrange the order of the questions by clicking and dragging on the grid icon.
To add more questions, click the Add button to add additional questions.
19.6.2. オプションの Survey の質問
Survey の質問に対する 必須 の設定は、対話するユーザーにとって回答がオプションかどうかを決定します。
背後では、オプションの Survey 変数が入力されていない場合でも extra_vars の Playbook に渡すことができます。
テキスト以外の変数 (入力タイプ) がオプションとマークされ、入力されていない場合には、Survey の
extra_varは Playbook に渡されません。テキスト入力またはテキスト領域の入力がオプションとしてマークされていて、この内容が入力されておらず、最小の
length > 0が設定されている場合に、Survey のextra_varは Playbook に渡されません。テキスト入力またはテキスト領域の入力がオプションとしてマークされていて、この内容が入力されておらず、最小の
length === 0が設定されている場合に、Survey のextra_varは、値が空のストリング ( “” ) に設定された状態で Playbook に渡されます。
19.7. ジョブテンプレートの起動
automation controller の大きな利点として、Ansible Playbook のプッシュボタンによるデプロイメントが挙げられます。テンプレートを簡単に定義し、通常はコマンドラインで ansible-playbook に渡すすべてのパラメーター (Playbook だけでなく、インベントリー、認証情報、追加変数、およびコマンドラインで指定できるすべてのオプションおよび設定など) を保存できます。
デプロイメントが簡単になり、Playbook が毎回同じ方法で実行されるため一貫性が確保され、責任を委譲することも可能になります。Ansible に精通していないユーザーであっても、他のユーザーが作成した Playbook を実行できます。
以下のいずれかの方法でジョブテンプレートを起動します。
左のナビゲーションバーの テンプレート メニューからジョブテンプレートリストにアクセスするか、ジョブテンプレートの詳細ビューで一番下までスクロールして、
テンプレートの一覧からボタンにアクセスします。
起動するジョブテンプレートのジョブテンプレートの詳細ビューで、起動 をクリックします。
ジョブを実行するには、追加の情報が必要になる場合があります。以下のデータは起動時に必要になることがあります。
設定された認証情報
Prompt on Launchオプションが任意のパラメーターに対して選択されているAsk に設定されたパスワードまたはパスフレーズ
Survey (ジョブテンプレート用に設定されている場合)
追加変数 (ジョブテンプレートで必要な場合)
注釈
ジョブにユーザー指定の値があると、再起動時に使用されます。ユーザーが値を指定しないと、ジョブはジョブテンプレートのデフォルト値を使用します。ジョブがそのまま再起動するのではなく、それらは、ジョブテンプレートに再適用されたユーザープロンプトで再起動されます。
以下は、ジョブタグのプロンプトを出し、「Survey」で作成された Survey サンプルを実行するジョブの起動例です。

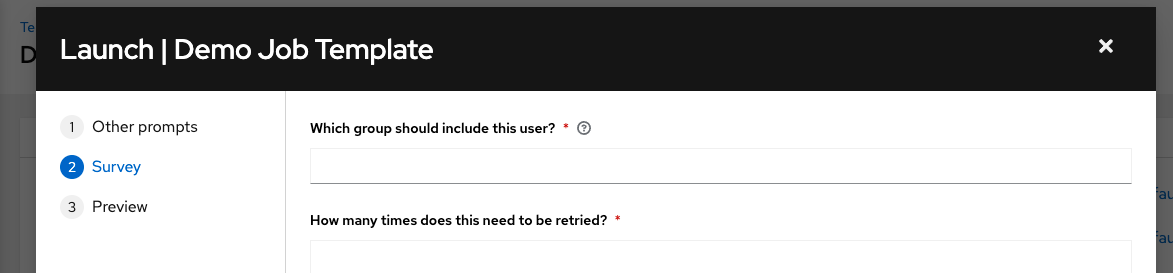
注釈
1 つのタブで値を指定し、前のタブに戻って次のタブに進むと、残りのタブで値を再指定する必要があります。これを回避するために、プロンプトが表示される順序でタブに入力してください。
ジョブテンプレートおよび Survey に設定される追加変数と共に、automation controller は以下の変数をジョブ環境に自動的に追加します。
awx_job_id: このジョブ実行のジョブ IDawx_job_launch_type: ジョブの起動方法を示す説明:手動: ジョブがユーザーにより手動で開始されました。
再起動: ジョブは再起動機能を使用して開始されました。
コールバック: ジョブはホストのコールバックを使用して開始されました。
スケジュール済み: ジョブはスケジュールから開始されました。
依存関係: ジョブは別のジョブの依存関係として開始されました。
ワークフロー: ジョブはワークフローのジョブから開始されました。
同期: ジョブはプロジェクトの同期により開始されました。
scm: ジョブはインベントリーの SCM 同期として作成されました。
awx_job_template_id: このジョブ実行が使用するジョブテンプレート IDawx_job_template_name: このジョブが使用するジョブテンプレート名awx_project_revision: この特定のジョブが使用するソースツリーのリビジョン ID (ジョブのフィールドscm_revisionとも同じです)awx_project_scm_branch: ジョブテンプレートが使用するプロジェクトに設定されたデフォルトのプロジェクト SCM ブランチawx_job_scm_branchSCM ブランチがジョブによって上書きされると、その値はここに表示されます。awx_user_email: The user email of the controller user that started this job. This is not available for callback or scheduled jobs.awx_user_first_name: The user's first name of the controller user that started this job. This is not available for callback or scheduled jobs.awx_user_id: The user ID of the controller user that started this job. This is not available for callback or scheduled jobs.awx_user_last_name: The user's last name of the controller user that started this job. This is not available for callback or scheduled jobs.awx_user_name: The user name of the controller user that started this job. This is not available for callback or scheduled jobs.awx_schedule_id: このジョブを起動したスケジュールの ID (該当する場合)。awx_schedule_name: このジョブを起動したスケジュール名 (該当する場合)。awx_workflow_job_id: このジョブを起動したワークフロージョブの ID (該当する場合)。awx_workflow_job_name: このジョブを起動したワークフロージョブ名 (該当する場合)。これは、ワークフロージョブテンプレートとも同じである点に注意してください。awx_inventory_id: 該当する場合、このジョブが使用するインベントリーの ID。awx_inventory_name: 該当する場合、このジョブが使用するインベントリーの名前。
For compatibility, all variables are also given an "awx" prefix, for example, awx_job_id.
起動時に、automation controller は Web ブラウザーを ジョブ タブにあるこのジョブの「ジョブステータス」ページに自動的にリダイレクトします。
注釈
一覧ビューから最近のジョブを再起動し、全ホストで再実行するか、特定のインベントリーで失敗したホストだけを再実行します。詳細は、『Automation Controller User Guide』の「ジョブ」を参照してください。
スライスジョブが実行中の場合は、ジョブリストはワークフローとジョブスライス以外に、個別の詳細が確認できるリンクを表示します。
19.8. ジョブテンプレートのコピー
If you choose to copy Job Template, it does not copy any associated schedule, notifications, or permissions. Schedules and notifications must be recreated by the user or admin creating the copy of the Job Template. The user copying the Job Template will be granted the admin permission, but no permissions are assigned (copied) to the Job Template.
左のナビゲーションバーの テンプレート メニューからジョブテンプレートの一覧にアクセスするか、ジョブテンプレートの詳細ビューで一番下までスクロールして、テンプレートのリストからアクセスします。
Click the
button associated with the template you want to copy.
The new template with the name of the template from which you copied and a timestamp displays in the list of templates.
Click to open the new template and click Edit.
名前 フィールドの内容を新規の名前に置き換え、他のフィールドのエントリーを指定または変更してこのページを完了します。
完了したら 保存 をクリックします。
19.9. スキャンジョブテンプレート
Scan jobs are no longer supported starting with automation controller 3.2. This system tracking feature was used as a way to capture and store facts as historical data. Facts are now stored in the controller via fact caching. For more information, see ファクトのキャッシング.
automation controller 3.2 よりも前のバージョンのシステムにジョブテンプレートのスキャンジョブがある場合、それらはタイプの実行 (通常のジョブテンプレートと同様) に変換されており、それらの関連リソース (つまりインベントリー、認証情報) を保持しています。関連プロジェクトのないジョブテンプレートのスキャンジョブにはデフォルトで特殊な Playbook が割り当てられるか、ユーザーが自身のスキャン Playbook でプロジェクトを指定することができます。https://github.com/ansible/tower-fact-modules をポイントするプロジェクトが各組織に作成され、ジョブテンプレートは Playbook に設定されていました (https://github.com/ansible/tower-fact-modules/blob/master/scan_facts.yml)。
19.9.1. ファクトスキャン Playbook
スキャンジョブ Playbook scan_facts.yml には、3 つの fact scan modules パッケージ、サービスおよびファイルの呼び出し機能が Ansible の標準的なファクト収集機能と共に含まれます。scan_facts.yml Playbook ファイルは以下のようになります。
- hosts: all
  vars:
    scan_use_checksum: false
    scan_use_recursive: false
  tasks:
    - scan_packages:
    - scan_services:
    - scan_files:
        paths: '{{ scan_file_paths }}'
        get_checksum: '{{ scan_use_checksum }}'
        recursive: '{{ scan_use_recursive }}'
      when: scan_file_paths is defined
scan_files ファクトモジュールは、スキャンジョブテンプレートの extra_vars で渡されるパラメーターを受け入れる唯一のモジュールです。
scan_file_paths: '/tmp/'
scan_use_checksum: true
scan_use_recursive: true
scan_file_pathsパラメーターには複数の設定を含まれる場合があります (/tmp/または/var/logなど)。scan_use_checksumおよびscan_use_recursiveパラメーターは false に設定したり、省略したりすることもできます。設定の省略と、False の設定は同じです。
スキャンジョブテンプレートは become を有効にし、become が使用される可能性のある認証情報を使用するはずです。「オプション」メニューの 権限昇格の有効化 にチェックを付けて become を有効にすることができます。

19.9.2. scan_facts.yml の対応 OS
ファクトキャッシュと共に scan_facts.yml Playbook を使用する場合には、OS がサポートされていることを確認してください。
Red Hat Enterprise Linux 5, 6, & 7
Ubunto 16.04 (Ubunto は非推奨となり、今後のリリースで削除されます)
OEL 6 & 7
SLES 11 & 12
Debian 6, 7, 8
Fedora 22, 23, 24
Amazon Linux 2016.03
Windows Server 2008 以降
一部のオペレーティングシステムには、python を実行したり、スキャンモジュールが依存する python パッケージ (python-apt など) にアクセスしたりするために初期設定が必要になる場合があります。
19.9.3. スキャン前の設定
以下は、スキャンジョブを実行できるように特定のディストリビューションを設定する Playbook の例です。
Bootstrap Ubuntu (16.04)
---

- name: Get Ubuntu 16, and on ready
 hosts: all
 sudo: yes
 gather_facts: no

 tasks:

 - name: install python-simplejson
   raw: sudo apt-get -y update
   raw: sudo apt-get -y install python-simplejson
   raw: sudo apt-get install python-apt
Bootstrap Fedora (23, 24)
---

- name: Get Fedora ready
 hosts: all
 sudo: yes
 gather_facts: no

 tasks:

 - name: install python-simplejson
   raw: sudo dnf -y update
   raw: sudo dnf -y install python-simplejson
   raw: sudo dnf -y install rpm-python
19.9.4. カスタムファクトスキャン
カスタムファクトスキャンの Playbook は上記のファクトスキャン Playbook の例と似ています。例として、カスタム scan_foo Ansible ファクトモジュールのみを使用する Playbook は以下のようになります。
scan_custom.yml:
- hosts: all
  gather_facts: false
  tasks:
    - scan_foo:
scan_foo.py:
def main():
    module = AnsibleModule(
        argument_spec = dict())

    foo = [
      {
        "hello": "world"
      },
      {
        "foo": "bar"
      }
    ]
    results = dict(ansible_facts=dict(foo=foo))
    module.exit_json(**results)

main()
カスタムファクトモジュールを使用するには、それがスキャンジョブテンプレートで使用される Ansible プロジェクトの /library/ サブディレクトリーにあることを確認します。このファクトスキャンモジュールは非常に単純で、ハードコーディングされたファクトのセットを返します。
[
   {
     "hello": "world"
   },
   {
     "foo": "bar"
   }
 ]
詳細は、Ansible ドキュメントの Module Provided 'Facts' セクションを参照してください。
19.10. ファクトのキャッシング
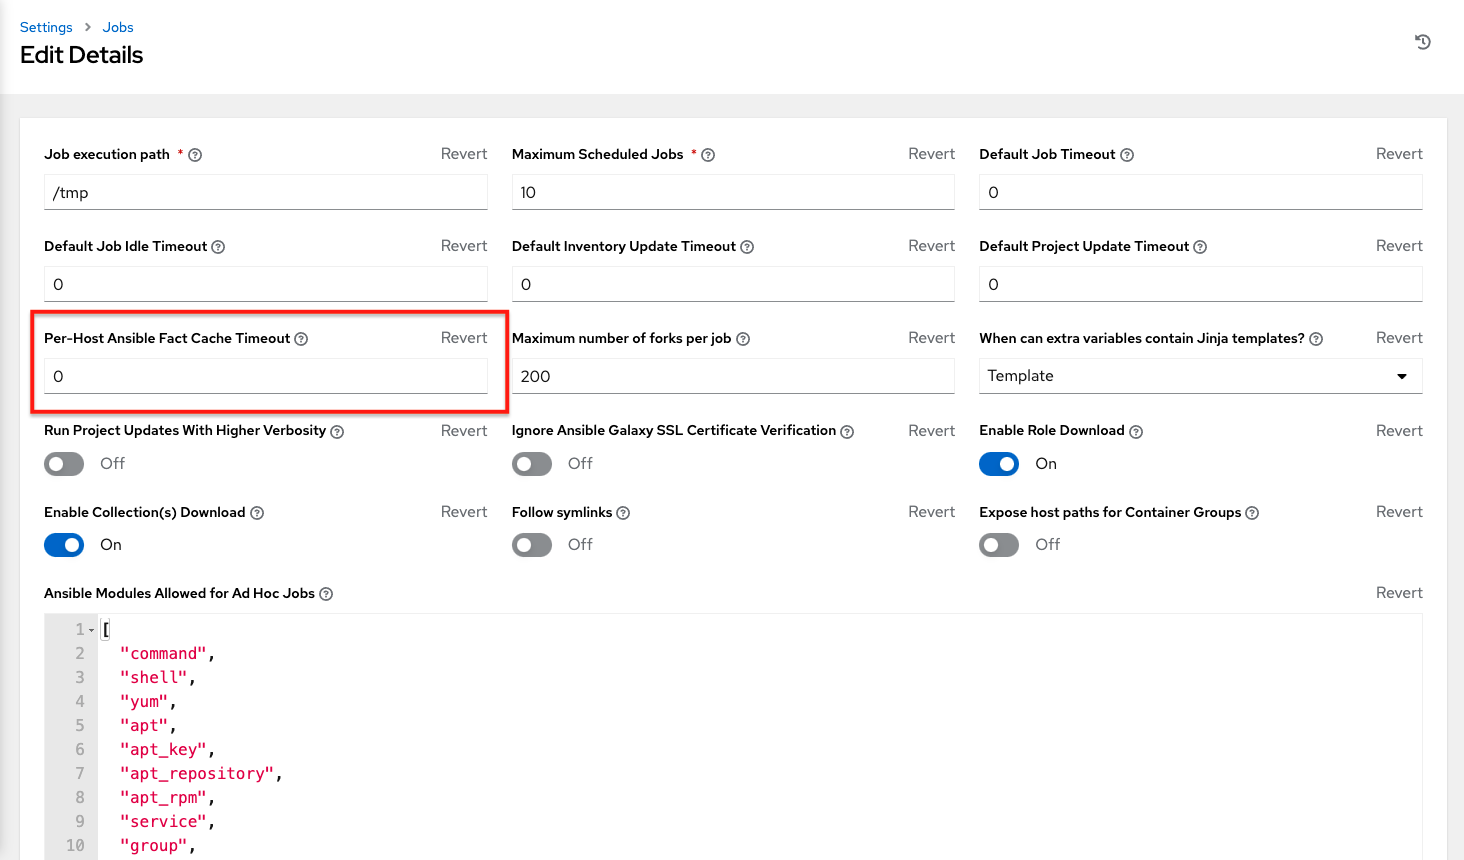
The controller can store and retrieve facts on a per-host basis through an Ansible Fact Cache plugin. This behavior is configurable on a per-job template basis. Fact caching is turned off by default but can be enabled to serve fact requests for all hosts in an inventory related to the job running. This allows you to use job templates with --limit while still having access to the entire inventory of host facts. A global timeout setting that the plugin enforces per-host, can be specified (in seconds) through the Job Settings menu:
Upon launching a job that uses fact cache (use_fact_cache=True), the controller will store all ansible_facts associated with each host in the inventory associated with the job. The Ansible Fact Cache plugin that ships with automation controller will only be enabled on jobs with fact cache enabled (use_fact_cache=True).
When a job that has fact cache enabled (use_fact_cache=True) finishes running, the controller will restore all records for the hosts in the inventory. Any records with update times newer than the currently stored facts per-host will be updated in the database.
New and changed facts will be logged via automation controller's logging facility. Specifically, to the system_tracking namespace or logger. The logging payload will include the fields:
host_name
inventory_id
ansible_facts
where ansible_facts is a dictionary of all Ansible facts for host_name in the controller inventory, inventory_id.
注釈
ホスト名にスラッシュ (/) が含まれている場合には、ファクトキャッシュはそのホストでは機能しません。インベントリーにホストが 100 台あり、1 台の名前に / が含まれている場合には、これらのホストの 99 台はファクトを収集します。
19.10.1. ファクトキャッシングの利点
ファクトのキャッシングにより、ファクトの収集を実行する場合よりも大幅の時間を節約できます。数千のホストおよびフォークに対して実行されるジョブに Playbook がある場合に、それらのホスト全体でファクトを収集するだけで 10 分程度の時間がかかってしまう可能性があります。一方、ジョブを定期的に実行する場合に最初の実行時にそれらのファクトがキャッシュされると、次回実行時にはそれらがデータベースからプルされるようになります。これにより、スマートインベントリーなどの大規模なインベントリーに対するジョブの実行時間が大幅に削減されます。
注釈
Do not modify the ansible.cfg file to apply fact caching. Custom fact caching could conflict with the controller's fact caching feature. It is recommended to use the fact caching module that comes with automation controller. Fact caching is not supported for isolated nodes.
キャッシュされたファクトのジョブでの使用は、「ジョブテンプレート」ウィンドウの オプション フィールドでこれを有効にして選択できます。

ファクトを削除するには、Ansible clear_facts meta task を実行する必要があります。以下は、Ansible clear_facts meta task を使用する Playbook の例となります。
- hosts: all
  gather_facts: false
  tasks:
    - name: Clear gathered facts from all currently targeted hosts
      meta: clear_facts
The API endpoint for fact caching can be found at: http://<controller server name>/api/v2/hosts/x/ansible_facts.
19.11. クラウド認証情報の利用
クラウド認証情報は、それぞれのクラウドインベントリーの同期時に使用されます。クラウド認証情報をジョブテンプレートに関連付け、Playbook で使用できるようにランタイム環境に組み込むこともできます。現在サポートされているクラウド認証情報は次のとおりです。
19.11.1. OpenStack
The sample playbook below invokes the nova_compute Ansible OpenStack cloud module and requires credentials to do anything meaningful, and specifically requires the following information: auth_url, username, password, and project_name. These fields are made available to the playbook via the environmental variable OS_CLIENT_CONFIG_FILE, which points to a YAML file written by the controller based on the contents of the cloud credential. This sample playbook loads the YAML file into the Ansible variable space.
OS_CLIENT_CONFIG_FILE の例:
clouds:
  devstack:
    auth:
      auth_url: http://devstack.yoursite.com:5000/v2.0/
      username: admin
      password: your_password_here
      project_name: demo
Playbook の例:
- hosts: all
  gather_facts: false
  vars:
    config_file: "{{ lookup('env', 'OS_CLIENT_CONFIG_FILE') }}"
    nova_tenant_name: demo
    nova_image_name: "cirros-0.3.2-x86_64-uec"
    nova_instance_name: autobot
    nova_instance_state: 'present'
    nova_flavor_name: m1.nano

    nova_group:
      group_name: antarctica
      instance_name: deceptacon
      instance_count: 3
  tasks:
    - debug: msg="{{ config_file }}"
    - stat: path="{{ config_file }}"
      register: st
    - include_vars: "{{ config_file }}"
      when: st.stat.exists and st.stat.isreg

    - name: "Print out clouds variable"
      debug: msg="{{ clouds|default('No clouds found') }}"

    - name: "Setting nova instance state to: {{ nova_instance_state }}"
      local_action:
        module: nova_compute
        login_username: "{{ clouds.devstack.auth.username }}"
        login_password: "{{ clouds.devstack.auth.password }}"
19.11.2. Amazon Web Services
Amazon Web Services クラウド認証情報は Playbook の実行時に以下の環境変数として公開されます (ジョブテンプレートで、設定に必要なクラウド認証情報を選択します):
AWS_ACCESS_KEY_IDAWS_SECRET_ACCESS_KEY
All of the AWS modules will implicitly use these credentials when run via the controller without having to set the aws_access_key_id or aws_secret_access_key module options.
19.11.3. Google
Google クラウド認証情報は、Playbook の実行時に以下の環境変数として公開されます (ジョブテンプレートで、設定に必要なクラウド認証情報を選択します)。
GCE_EMAILGCE_PROJECTGCE_CREDENTIALS_FILE_PATH
All of the Google modules will implicitly use these credentials when run via the controller without having to set the service_account_email, project_id, or pem_file module options.
19.11.4. Azure
Azure クラウド認証情報は、Playbook の実行時に以下の環境変数として公開されます (ジョブテンプレートで、設定に必要なクラウド認証情報を選択します)。
AZURE_SUBSCRIPTION_IDAZURE_CERT_PATH
All of the Azure modules implicitly use these credentials when run via the controller without having to set the subscription_id or management_cert_path module options.
19.11.5. VMware
VMware クラウド認証情報は、Playbook の実行時に以下の環境変数として公開されます (ジョブテンプレートで、設定に必要なクラウド認証情報を選択します)。
VMWARE_USERVMWARE_PASSWORDVMWARE_HOST
以下のサンプル Playbook は、これらの認証情報の使用方法を示しています。
- vsphere_guest:
    vcenter_hostname: "{{ lookup('env', 'VMWARE_HOST') }}"
    username: "{{ lookup('env', 'VMWARE_USER') }}"
    password: "{{ lookup('env', 'VMWARE_PASSWORD') }}"
    guest: newvm001
    from_template: yes
    template_src: linuxTemplate
    cluster: MainCluster
    resource_pool: "/Resources"
    vm_extra_config:
      folder: MyFolder
19.12. プロビジョニングコールバック
Provisioning callbacks are a feature of Automation Controller that allow a host to initiate a playbook run against itself, rather than waiting for a user to launch a job to manage the host from the Automation Controller console. Please note that provisioning callbacks are only used to run playbooks on the calling host. Provisioning callbacks are meant for cloud bursting (i.e. new instances with a need for client to server communication for configuration (such as transmitting an authorization key)), not to run a job against another host. This provides for automatically configuring a system after it has been provisioned by another system (such as AWS auto-scaling, or a OS provisioning system like kickstart or preseed) or for launching a job programmatically without invoking the Automation Controller API directly. The Job Template launched only runs against the host requesting the provisioning.
これは firstboot タイプのスクリプトまたは cron からアクセスされることが多くあります。
To enable callbacks, check the Provisioning Callbacks checkbox in the Job Template. This displays the Provisioning Callback URL for this job template.
注釈
If you intend to use Automation Controller's provisioning callback feature with a dynamic inventory, Update on Launch should be set for the inventory group used in the Job Template.
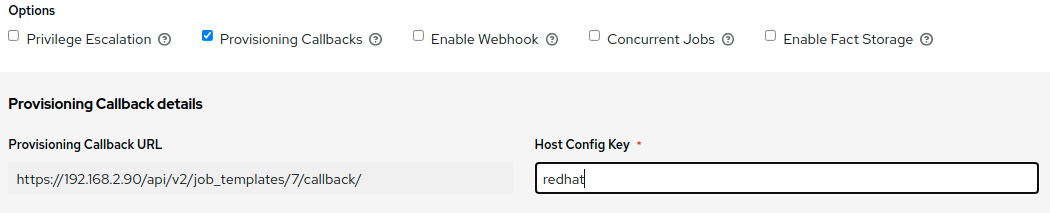
Callbacks also require a Host Config Key, to ensure that foreign hosts with the URL cannot request configuration. Please provide a custom value for Host Config Key. The host key may be reused across multiple hosts to apply this job template against multiple hosts. Should you wish to control what hosts are able to request configuration, the key may be changed at any time.
REST 経由で手動のコールバックを実行するには、以下の形式のコールバック URL を UI で確認します。
https://<CONTROLLER_SERVER_NAME>/api/v2/job_templates/7/callback/
The '7' in this sample URL is the job template ID in Automation Controller.
ホストからの要求は POST である必要があります。以下は、curl を使用した例になります (すべて単一行にあります)。
curl -k -f -i -H 'Content-Type:application/json' -XPOST -d '{"host_config_key": "redhat"}' \
                  https://<CONTROLLER_SERVER_NAME>/api/v2/job_templates/7/callback/
The requesting host must be defined in your inventory for the callback to succeed. If Automation Controller fails to locate the host either by name or IP address in one of your defined inventories, the request is denied. When running a Job Template in this way, the host initiating the playbook run against itself must be in the inventory. If the host is missing from the inventory, the Job Template will fail with a "No Hosts Matched" type error message.
注釈
If your host is not in inventory and Update on Launch is set for the inventory group, Automation Controller attempts to update cloud based inventory source before running the callback.
要求が成功した場合は、「ジョブ」タブにエントリーが作成されます。ここで結果および履歴を確認できます。
While the callback can be accessed via REST, the suggested method of using the callback is to use one of the example scripts that ships with Automation Controller - /usr/share/awx/request_tower_configuration.sh (Linux/UNIX) or /usr/share/awx/request_tower_configuration.ps1 (Windows). Usage is described in the source code of the file by passing the -h flag, as shown below:
./request_tower_configuration.sh -h
Usage: ./request_tower_configuration.sh <options>

Request server configuration from Ansible Tower.

OPTIONS:
 -h      Show this message
 -s      Controller server (e.g. https://ac.example.com) (required)
 -k      Allow insecure SSL connections and transfers
 -c      Host config key (required)
 -t      Job template ID (required)
 -e      Extra variables
This script has some intelligence, it knows how to retry commands and is therefore a more robust way to use callbacks than a simple curl request. As written, the script retries once per minute for up to ten minutes.
注釈
これはスクリプトのサンプルであることに注意してください。200 エラーコード以外のエラーコードは再試行を要求する一時的なエラーでない場合があるため、失敗シナリオを検出する際により動的な動作が必要な場合にはこのスクリプトを編集する必要があります。
Most likely you will use callbacks with dynamic inventory in Automation Controller, such as pulling cloud inventory from one of the supported cloud providers. In these cases, along with setting Update On Launch, be sure to configure an inventory cache timeout for the inventory source, to avoid hammering of your Cloud's API endpoints. Since the request_tower_configuration.sh script polls once per minute for up to ten minutes, a suggested cache invalidation time for inventory (configured on the inventory source itself) would be one or two minutes.
While we recommend against running the request_tower_configuration.sh script from a cron job, a suggested cron interval would be perhaps every 30 minutes. Repeated configuration can be easily handled by scheduling in Automation Controller, so the primary use of callbacks by most users is to enable a base image that is bootstrapped into the latest configuration upon coming online. To do so, running at first boot is a better practice. First boot scripts are just simple init scripts that typically self-delete, so you would set up an init script that called a copy of the request_tower_configuration.sh script and make that into an autoscaling image.
19.12.1. 追加変数をプロビジョニングコールバックに渡す方法
通常のジョブテンプレートで extra_vars を渡せるように、追加変数をプロビジョニングコールバックに渡すこともできます。extra_vars を渡すには、送信されたデータはアプリケーション/json として (コンテンツタイプとして) POST 要求の本体に含める必要があります。独自の extra_vars を渡せるように追加するには、以下の JSON 形式を例として使用してください。
'{"extra_vars": {"variable1":"value1","variable2":"value2",...}}'
また、以下の例に示されているように、curl を使用してジョブテンプレートの呼び出しに追加の変数を渡すこともできます。
root@localhost:~$ curl -f -H 'Content-Type: application/json' -XPOST \
                 -d '{"host_config_key": "redhat", "extra_vars": "{\"foo\": \"bar\"}"}' \
                 https://<CONTROLLER_SERVER_NAME>/api/v2/job_templates/7/callback
詳細については、「Launching Jobs with Curl」を参照してください。
19.13. 追加変数
注釈
ジョブ起動 API に渡される extra_vars は、以下のいずれかが該当する場合のみ有効です。
それらは有効な survey の変数に対応する。
ask_variables_on_launchが True に設定されている。
When you pass survey variables, they are passed as extra variables (extra_vars) within the controller. This can be tricky, as passing extra variables to a job template (as you would do with a survey) can override other variables being passed from the inventory and project.
たとえば、インベントリーの定義された変数が debug = true であるとします。この変数 debug = true がジョブテンプレート Survey で上書きされる可能性はあります。
渡す必要のある変数が上書きされないようにするには、この変数を Survey で再定義して組み込むことができます。追加変数はインベントリー、グループおよびホストのレベルで定義できることに注意してください。
ALLOW_JINJA_IN_EXTRA_VARS パラメーターを指定する場合は、Automation Controller Administration Guide の Controller Tips and Tricks セクションで、コントローラー UI のジョブ設定画面でこれを設定します。
注釈
ジョブテンプレートの追加変数ディクショナリーは Survey 変数にマージされます。
以下は、YAML および JSON 形式の extra_vars を簡素化した例です。
YAML 形式の設定:
launch_to_orbit: true
satellites:
  - sputnik
  - explorer
  - satcom
JSON 形式の設定:
{
  "launch_to_orbit": true,
  "satellites": ["sputnik", "explorer", "satcom"]
}
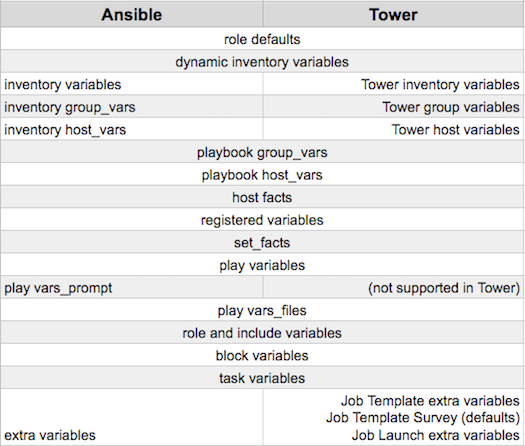
以下の表では、Ansible の変数の順序との比較で、automation controller の変数の順序の動作 (階層) を示しています。
Automation Controller Variable Precedence Hierarchy (last listed wins)
19.13.1. ジョブテンプレートの再起動
ジョブを手動で再起動せずに、再起動は launch_type を relaunch に設定して表示されます。再起動の動作は、extra_vars を 継承しない 点で、起動の動作とは異なります。
ジョブを再起動しても継承ロジックが実行される訳でありません。再起動されるジョブについて計算されたものと同じ extra_vars を使用します。
たとえば、extra_vars を指定せずにジョブテンプレートを起動するとします。これにより、j1 というジョブが作成されます。次に、そのジョブテンプレートを編集し、一部の extra_vars の追加 ("{ "hello": "world" }" の追加など) を実行するとします。
j1 を再起動すると j2 が作成されますが、継承するロジックがなく、j1 には extra_vars がないため、j2 には extra_vars が指定されません。
この例では、j1 の作成後に追加した extra_vars でジョブテンプレートを起動した場合、作成される再起動ジョブ (j3) には extra_vars が含まれます。j3 を再起動すると j4 が作成され、これにも extra_vars が含まれます。