10. Credentials
Credentials are utilized for authentication when launching Jobs against machines, synchronizing with inventory sources, and importing project content from a version control system.
You can grant users and teams the ability to use these credentials, without actually exposing the credential to the user. If you have a user move to a different team or leave the organization, you don’t have to re-key all of your systems just because that credential was available in the automation controller.
Note
The automation controller encrypts passwords and key information in the database and never makes secret information visible via the API. See Automation Controller Administration Guide for details.
10.1. Understanding How Credentials Work
The automation controller uses SSH to connect to remote hosts (or the Windows equivalent). In order to pass the key from the automation controller to SSH, the key must be decrypted before it can be written a named pipe. The automation controller then uses that pipe to send the key to SSH (so that it is never written to disk).
If passwords are used, the automation controller handles those by responding directly to the password prompt and decrypting the password before writing it to the prompt.
10.2. Getting Started with Credentials
Click Credentials from the left navigation bar to access the Credentials page. The Credentials page displays a search-able list of all available Credentials and can be sorted by Name.
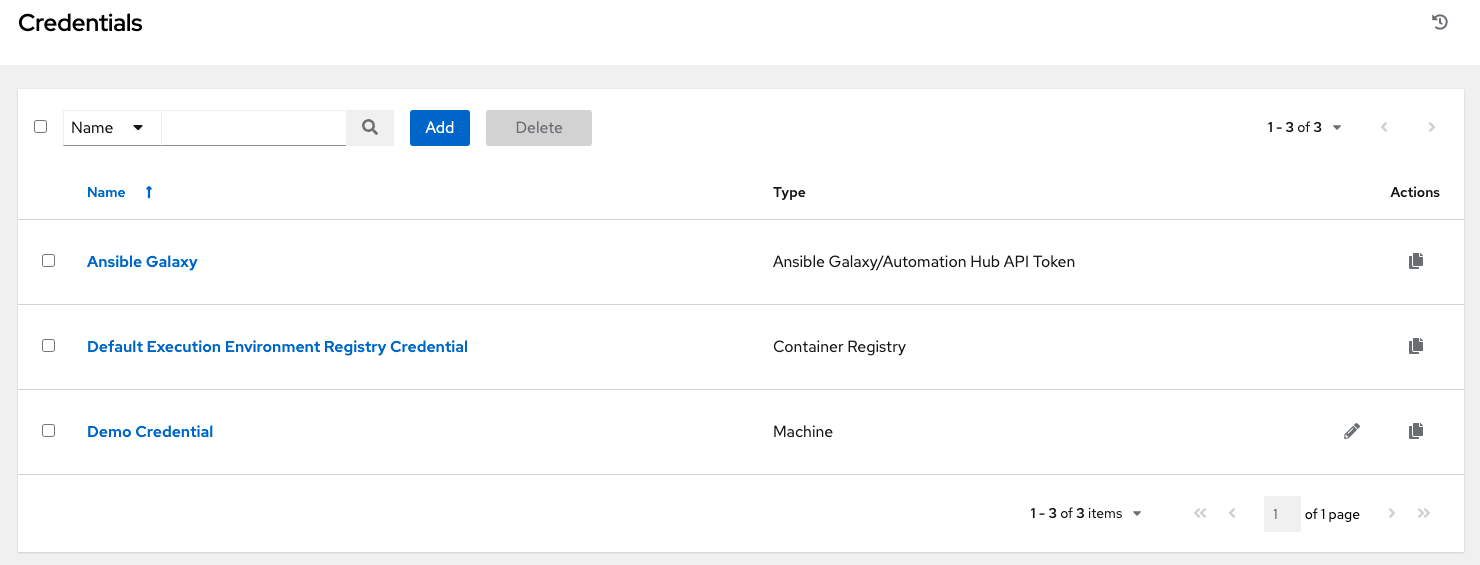
Credentials added to a Team are made available to all members of the Team, whereas credentials added to a User are only available to that specific User by default.
Note
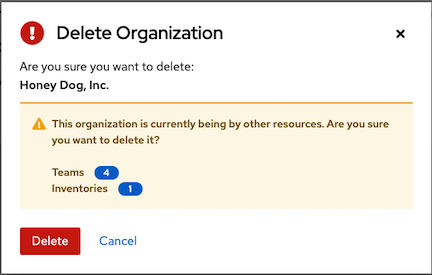
If deleting items that are used by other work items, a message opens listing the items are affected by the deletion and prompts you to confirm the deletion. Some screens will contain items that are invalid or previously deleted, so they will fail to run. Below is an example of such a message:
To help you get started, a Demo Credential has been created for your use.
Clicking on the link for the Demo Credential takes you to the Details view of this Credential.

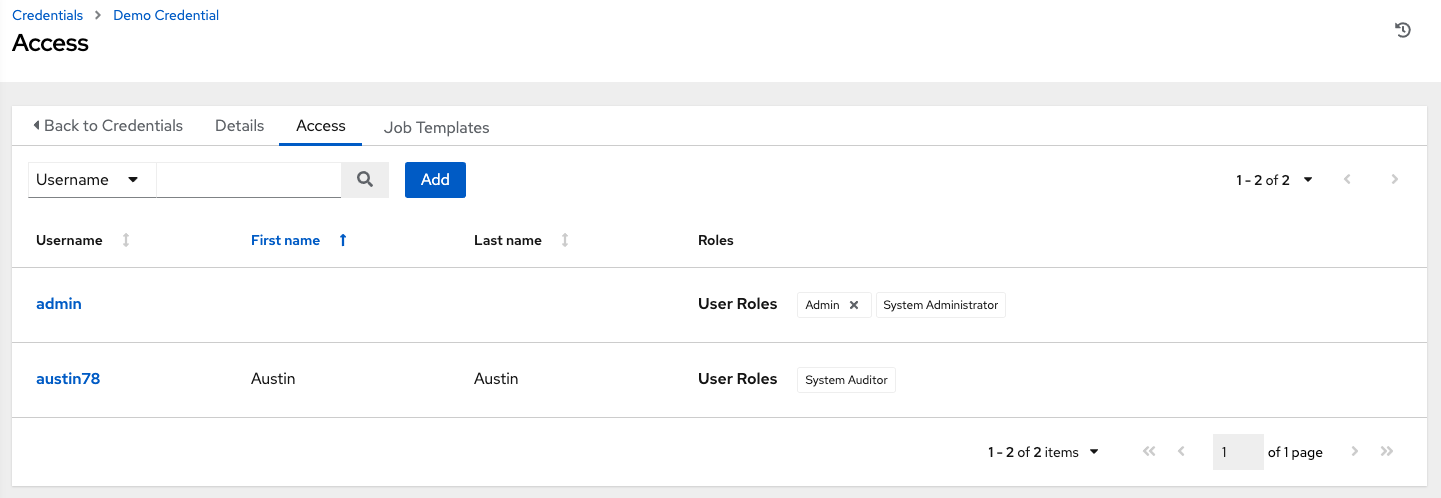
Clicking the Access tab shows you users and teams associated with this Credential and their granted roles (owner, admin, auditor, etc.)
Note
A credential with roles associated will retain them even after the credential has been reassigned to another organization.
You can click the Add button to assign this Demo Credential to additional users. If no users exist, add them from the Users menu and refer to the Users section for further detail.
Clicking the Job Templates tab shows you the job templates associated with this Credential and which jobs recently ran using this particular credential.

You can click the Add button to assign this Demo Credential to additional job templates. Refer to the Job Templates section for further detail on creating a new job template.
10.3. Add a New Credential
To create a new credential:
Click the Add button from the Credentials screen.

Enter the name for your new credential in the Name field.
Optionally enter a description and enter or select the name of the organization with which the credential is associated.
Note
A credential with a set of permissions associated with one organization will remain even after the credential is reassigned to another organization.
Enter or select the credential type you want to create.
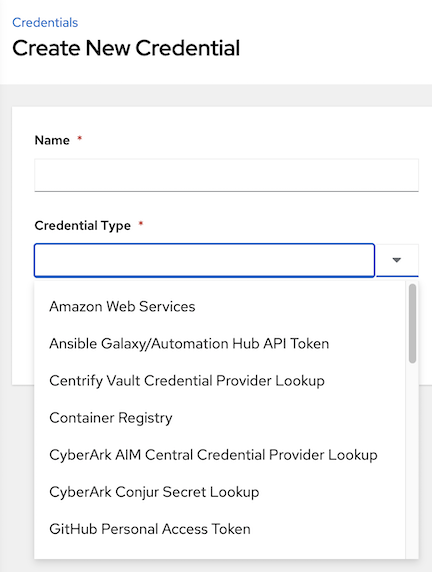
Enter the appropriate details depending on the type of credential selected, as described in the next section, Credential Types.
Click Save when done.
10.4. Credential Types
The following credential types are supported with the automation controller:
The credential types associated with Centrify, CyberArk, HashiCorp Vault, Microsoft Azure Key Management System (KMS), and Thycotic are part of the credential plugins capability that allows an external system to lookup your secrets information. See the Secret Management System section for further detail.
10.4.1. Amazon Web Services
Selecting this credential type enables synchronization of cloud inventory with Amazon Web Services.
The automation controller uses the following environment variables for AWS credentials and are fields prompted in the user interface:
AWS_ACCESS_KEY_ID
AWS_SECRET_ACCESS_KEY
AWS_SECURITY_TOKEN
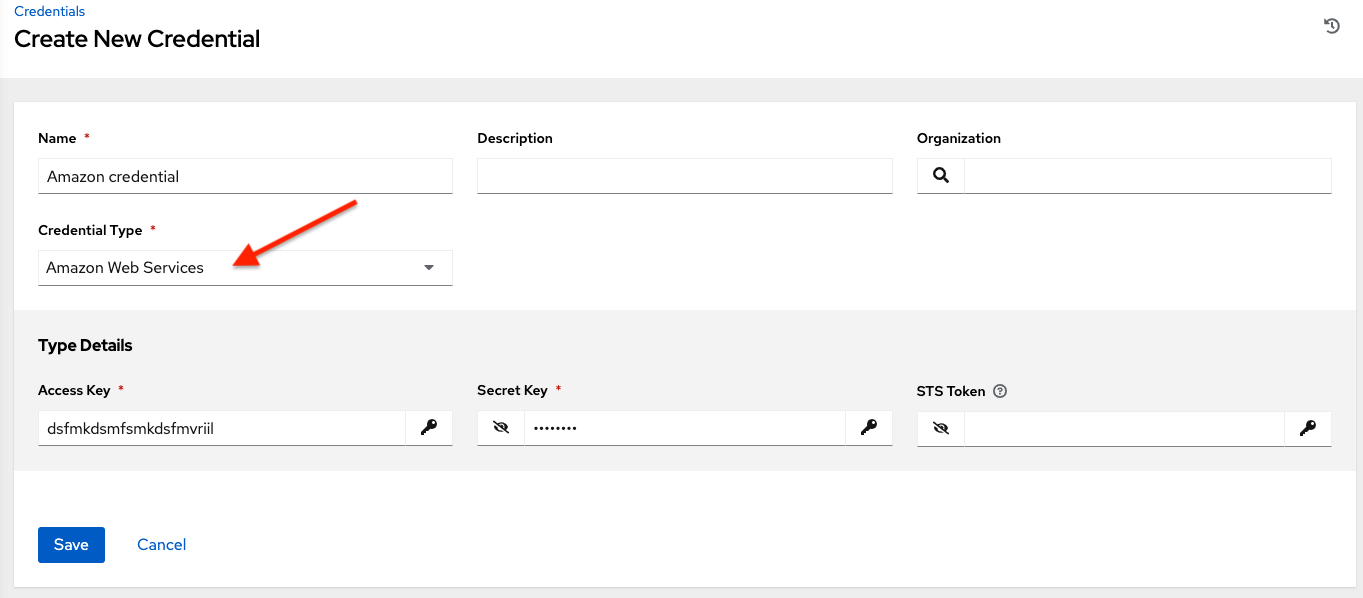
Traditional Amazon Web Services credentials consist of the AWS Access Key and Secret Key.
The automation controller provides support for EC2 STS tokens (sometimes referred to as IAM STS credentials). Security Token Service (STS) is a web service that enables you to request temporary, limited-privilege credentials for AWS Identity and Access Management (IAM) users. To learn more about the IAM/EC2 STS Token, refer to: http://docs.aws.amazon.com/IAM/latest/UserGuide/id_credentials_temp.html
Note
If the value of your tags in EC2 contain booleans (yes/no/true/false), you must remember to quote them.
Warning
To use implicit IAM role credentials, do not attach AWS cloud credentials in the automation controller when relying on IAM roles to access the AWS API. While it may seem to make sense to attach your AWS cloud credential to your job template, doing so will force the use of your AWS credentials and will not “fall through” to use your IAM role credentials (this is due to the use of the boto library.)
10.4.2. Ansible Galaxy/Automation Hub API Token
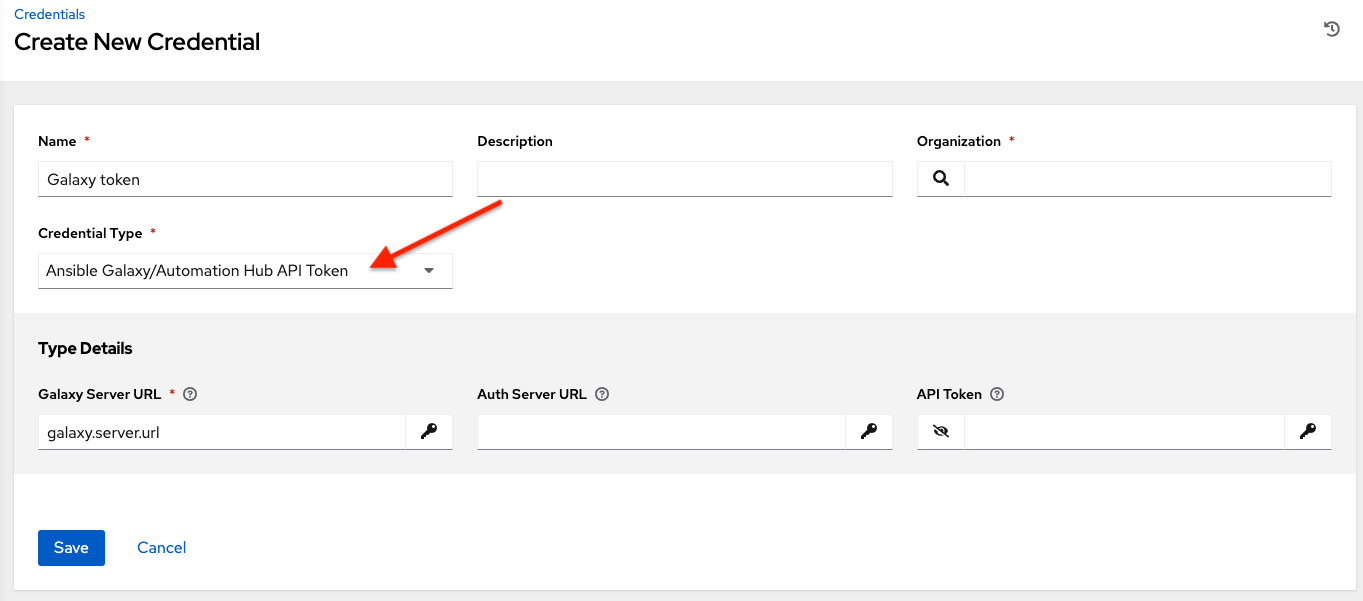
Selecting this credential allows the automation controller to access Galaxy or use a collection published on a local Automation Hub. See Using Collections via Hub for detail. Entering the Galaxy server URL is the only required value on this screen.
10.4.3. Centrify Vault Credential Provider Lookup
This is considered part of the secret management capability. See Centrify Vault Credential Provider Lookup for more detail.
10.4.4. Container Registry
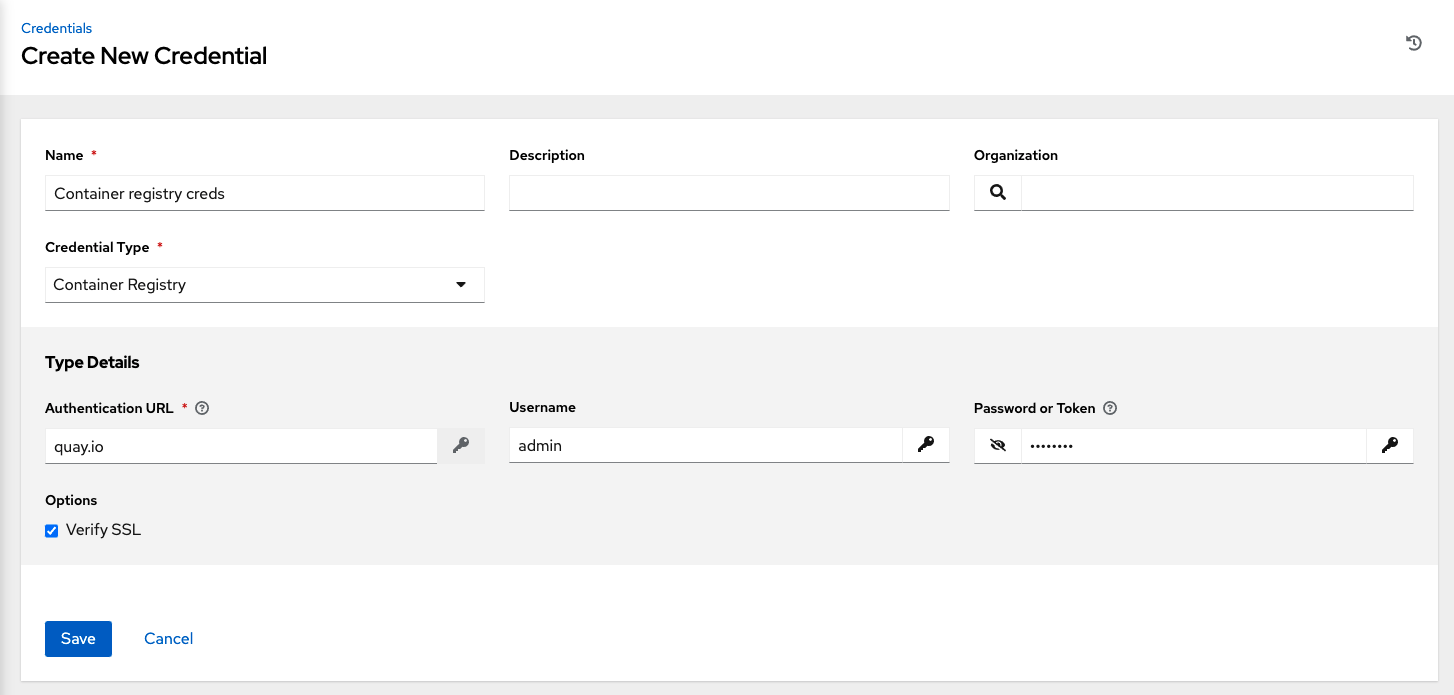
Selecting this credential allows the automation controller to access a collection of container images. See What is a container registry? for more information.
Aside from specifying a name, the Authentication URL is the only required field on this screen, and it is already pre-populated with a default value. You may change this default by specifying the authentication endpoint for a different container registry.
10.4.5. CyberArk AIM Credential Provider Lookup
This is considered part of the secret management capability. See CyberArk AIM Credential Provider Lookup for more detail.
10.4.6. CyberArk Conjur Secret Lookup
This is considered part of the secret management capability. See CyberArk Conjur Secret Lookup for more detail.
10.4.7. GitHub Personal Access Token
Selecting this credential allows you to access GitHub using a Personal Access Token (PAT), which is obtained through GitHub. See Working with Webhooks for detail. Entering the provided token is the only required value in this screen.
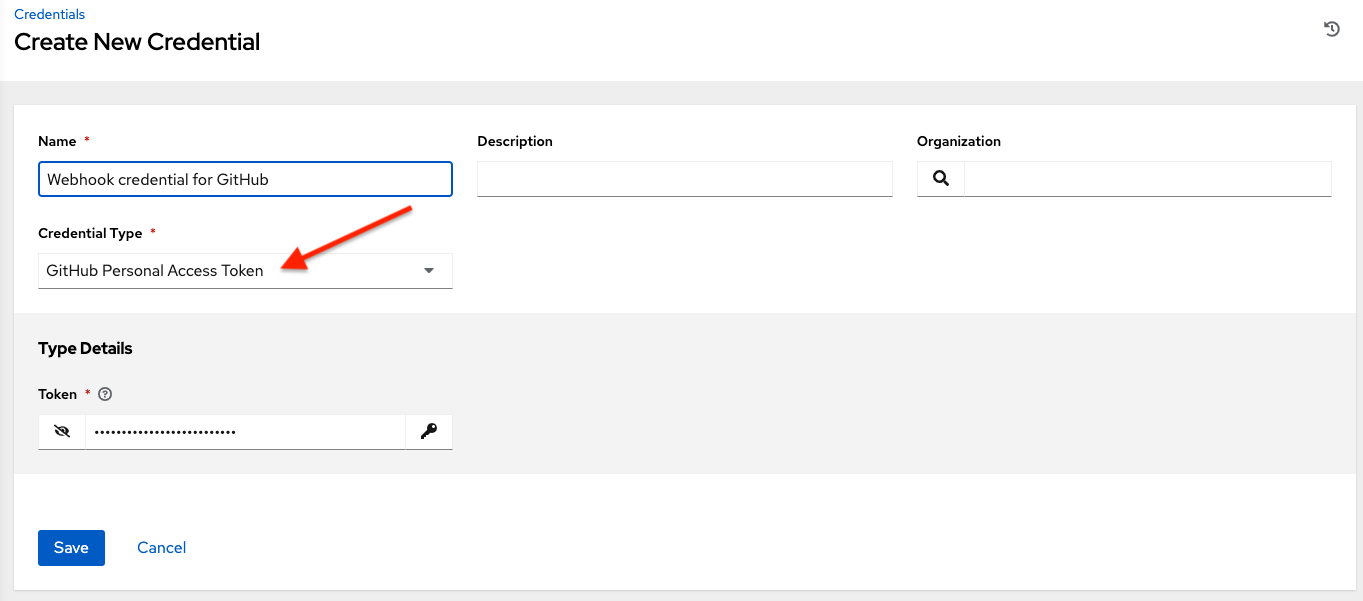
GitHub PAT credentials require a value in the Token field, which is provided in your GitHub profile settings.
This credential can be used for establishing an API connection to GitHub for use in webhook listener jobs, to post status updates.
10.4.8. GitLab Personal Access Token
Selecting this credential allows you to access GitLab using a Personal Access Token (PAT), which is obtained through GitLab. See Working with Webhooks for detail. Entering the provided token is the only required value in this screen.
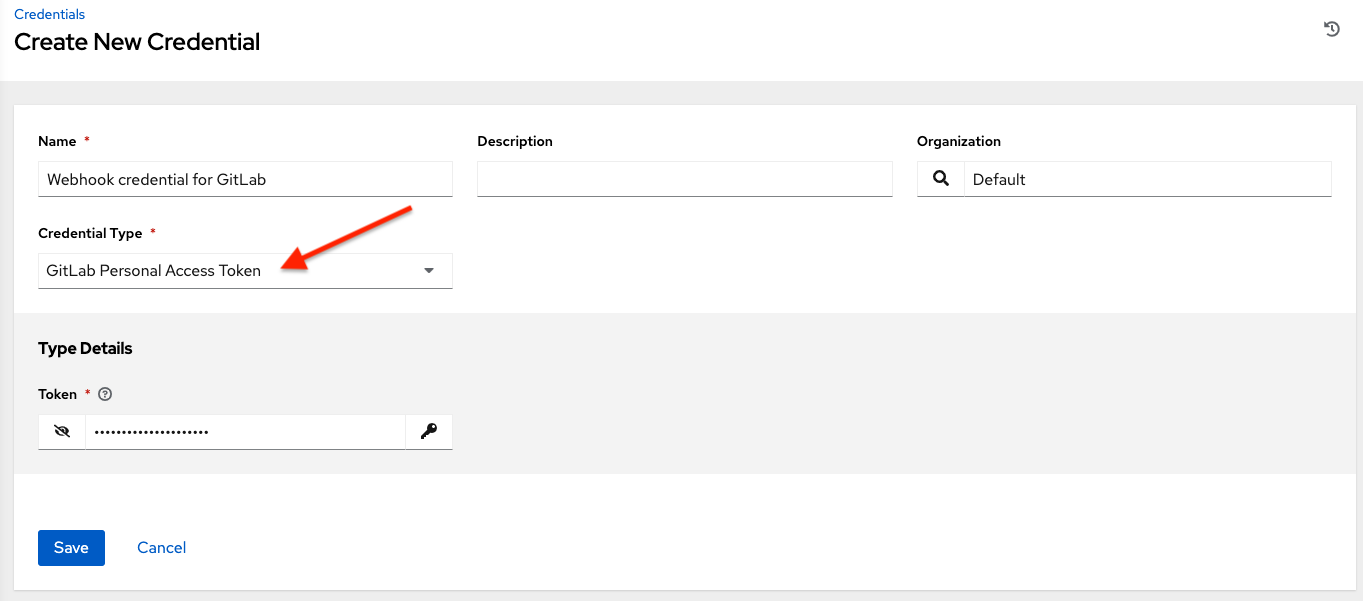
GitLab PAT credentials require a value in the Token field, which is provided in your GitLab profile settings.
This credential can be used for establishing an API connection to GitLab for use in webhook listener jobs, to post status updates.
10.4.9. Google Compute Engine
Selecting this credential type enables synchronization of cloud inventory with Google Compute Engine (GCE).
The automation controller uses the following environment variables for GCE credentials and are fields prompted in the user interface:
GCE_EMAIL
GCE_PROJECT
GCE_CREDENTIALS_FILE_PATH
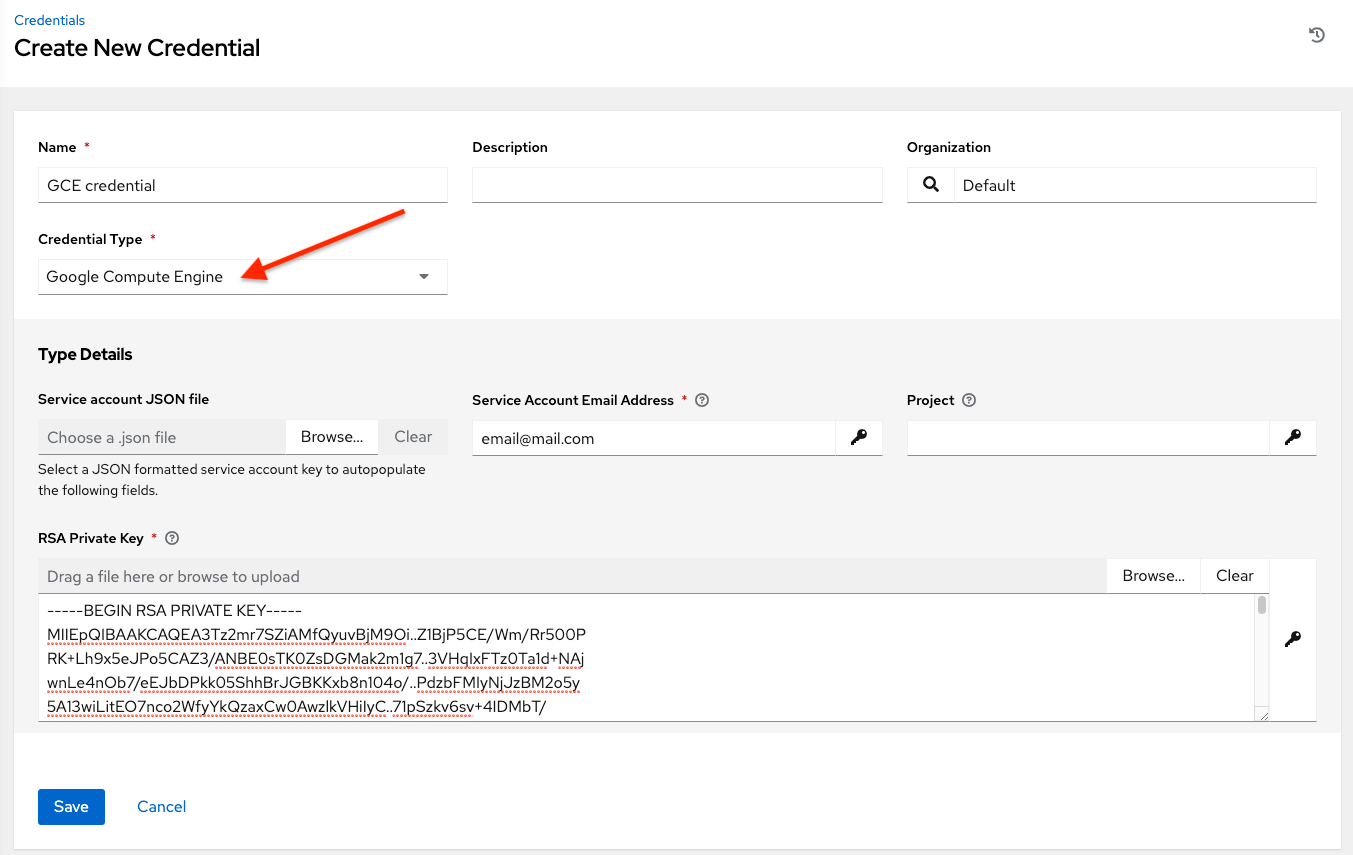
GCE credentials have the following inputs that are required:
Service Account Email Address: The email address assigned to the Google Compute Engine service account.
Project: Optionally provide the GCE assigned identification or the unique project ID you provided at project creation time.
Service Account JSON File: Optionally upload a GCE service account file. Use the folder (
 ) icon to browse for the file that contains the special account information that can be used by services and applications running on your GCE instance to interact with other Google Cloud Platform APIs. This grants permissions to the service account and virtual machine instances.
RSA Private Key: The PEM file associated with the service account email.
10.4.10. GPG Public Key
Selecting this credential type allows you to create a credential that gives the controller the ability to verify the integrity of the project when syncing from source control.
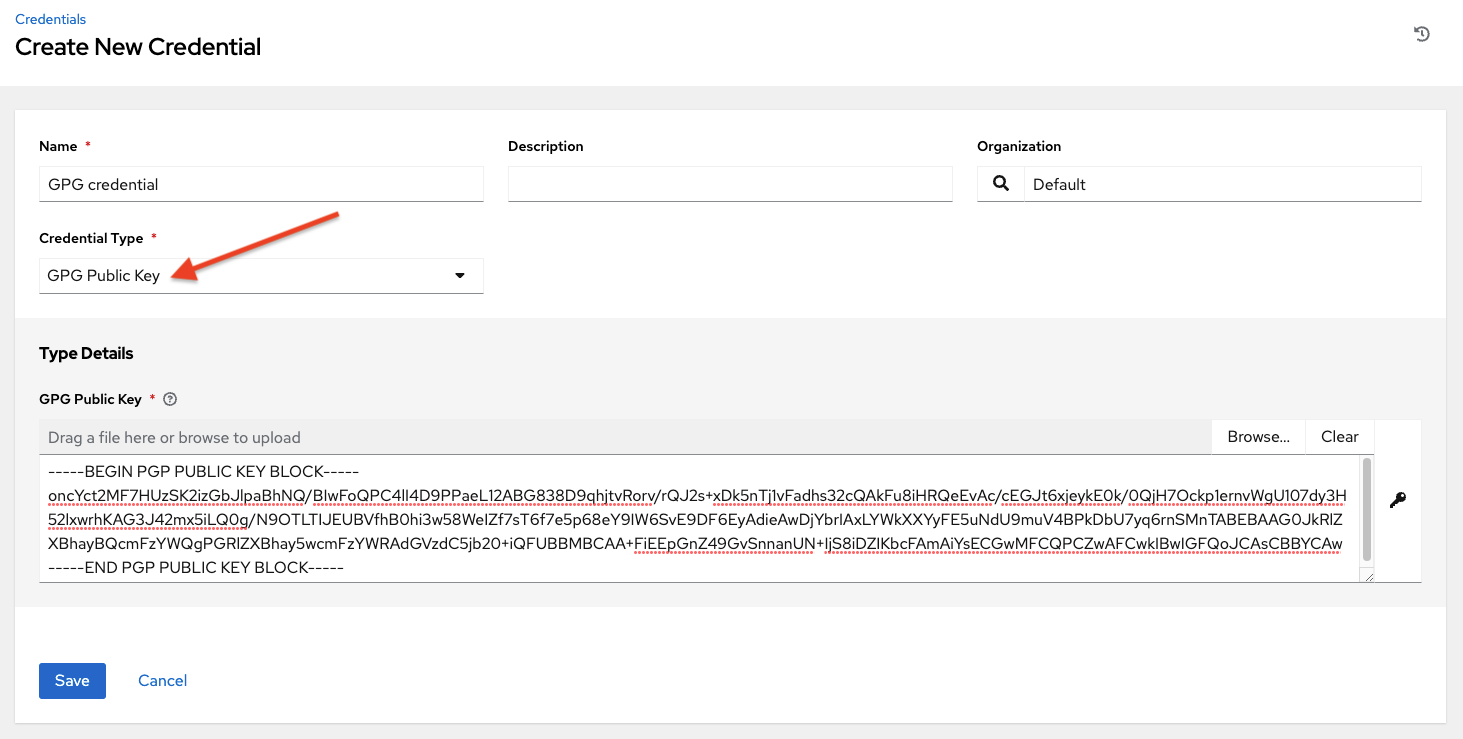
See Project Signing and Verification for detailed information on how to generate a valid keypair, use the CLI tool to sign content, and how to add the public key to the controller.
10.4.11. HashiCorp Vault Secret Lookup
This is considered part of the secret management capability. See HashiCorp Vault Secret Lookup for more detail.
10.4.12. HashiCorp Vault Signed SSH
This is considered part of the secret management capability. See HashiCorp Vault Signed SSH for more detail.
10.4.13. Insights
Selecting this credential type enables synchronization of cloud inventory with Red Hat Insights.
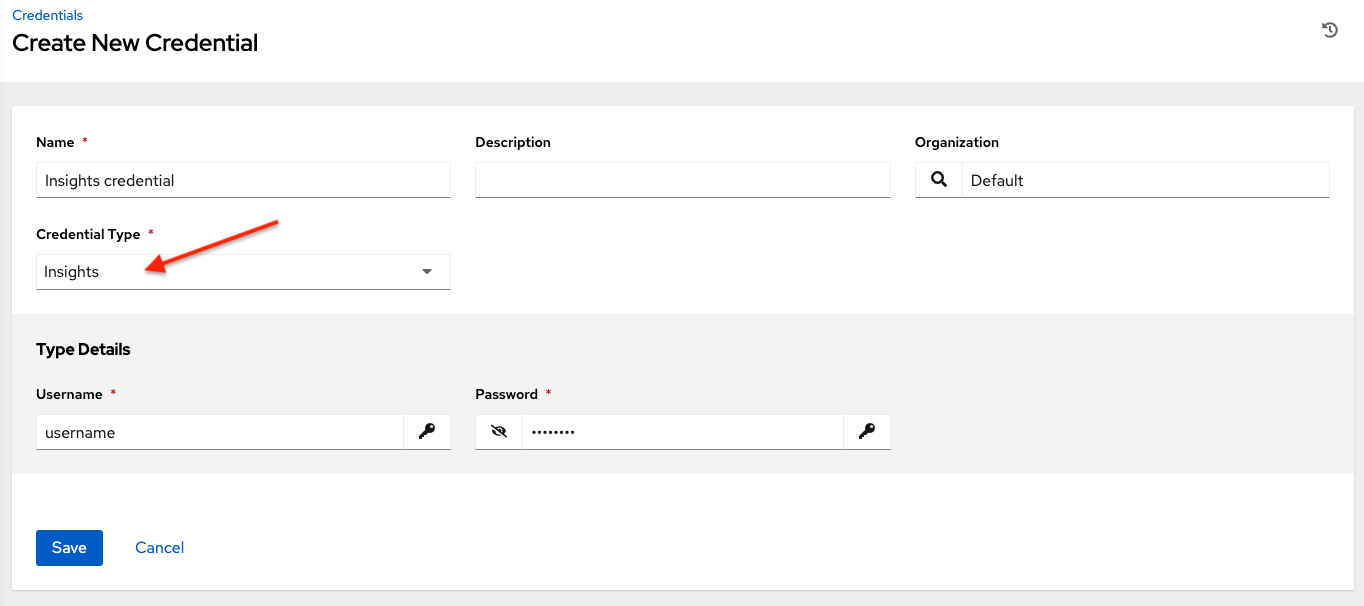
Insights credentials consist of the Insights Username and Password, which is the user’s Red Hat Customer Portal Account username and password.
10.4.14. Machine
Machine credentials enable the automation controller to invoke Ansible on hosts under your management. Just like using Ansible on the command line, you can specify the SSH username, optionally provide a password, an SSH key, a key password, or even have the automation controller prompt the user for their password at deployment time. They define ssh and user-level privilege escalation access for playbooks, and are used when submitting jobs to run playbooks on a remote host. Network connections (httpapi, netconf, and network_cli) use Machine for the credential type.
Machine/SSH credentials do not use environment variables. Instead, they pass the username via the ansible -u flag, and interactively write the SSH password when the underlying SSH client prompts for it.
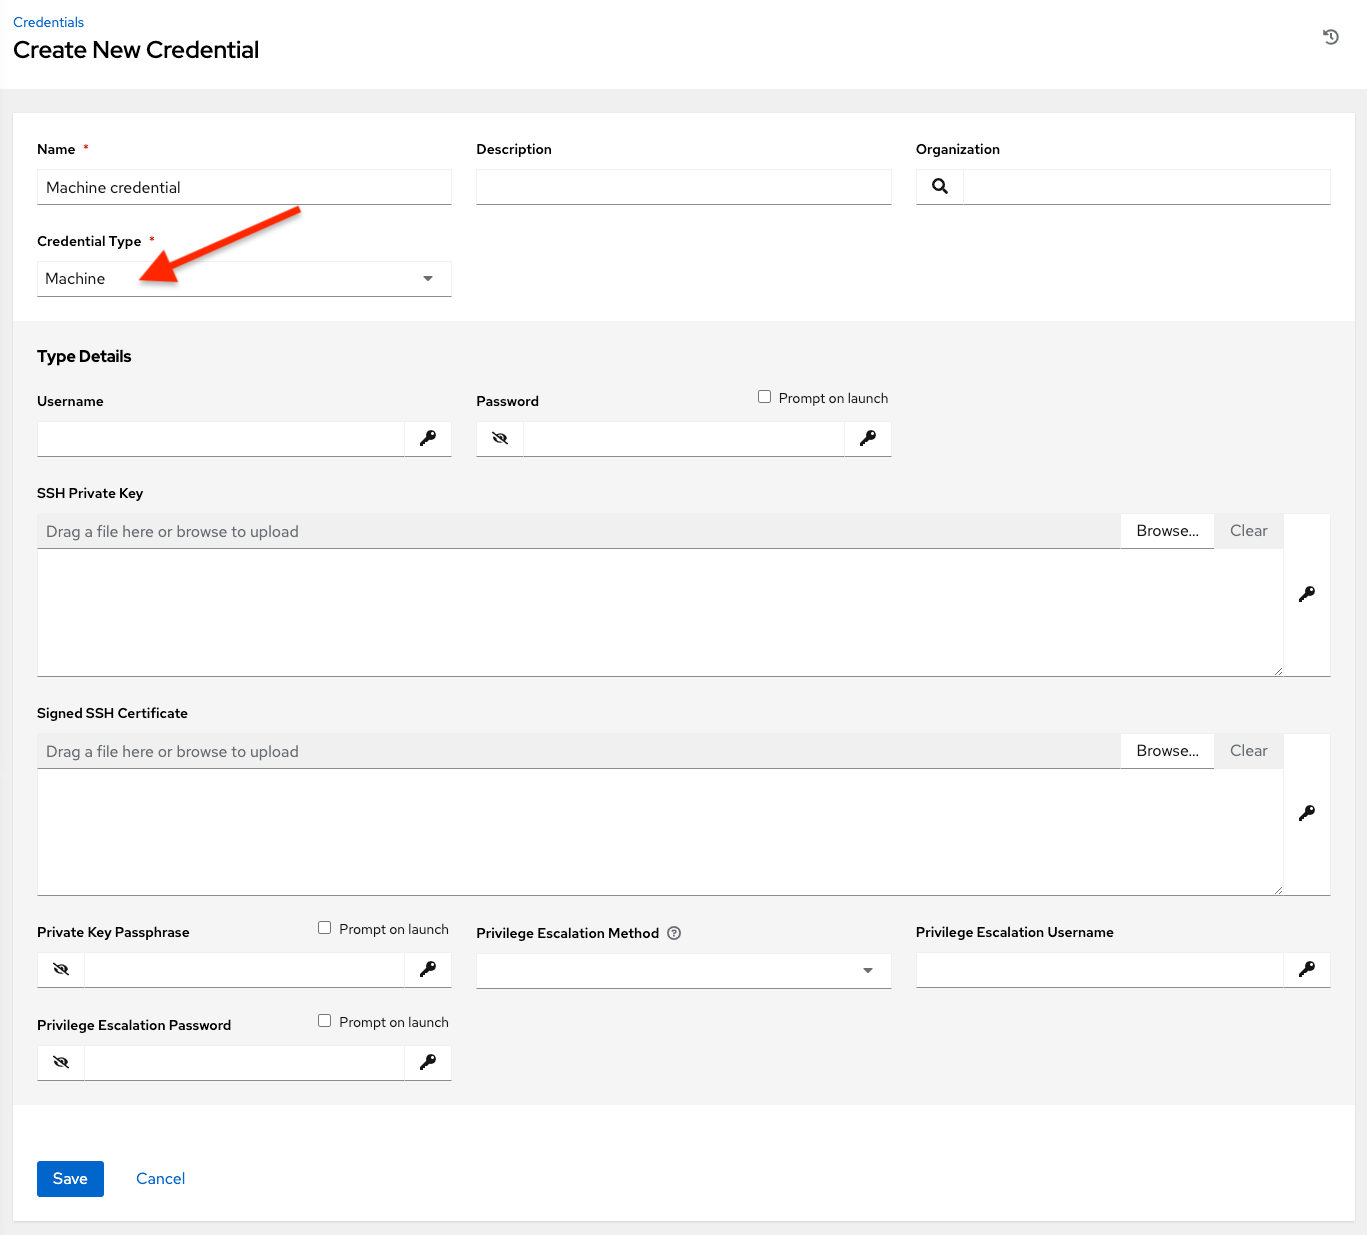
Machine credentials have several attributes that may be configured:
Username: The username to be used for SSH authentication.
Password: The actual password to be used for SSH authentication. This password will be stored encrypted in the database, if entered. Alternatively, you can configure the automation controller to ask the user for the password at launch time by selecting Prompt on launch. In these cases, a dialog opens when the job is launched, promoting the user to enter the password and password confirmation.
SSH Private Key: Copy or drag-and-drop the SSH private key for the machine credential.
Private Key Passphrase: If the SSH Private Key used is protected by a password, you can configure a Key Password for the private key. This password will be stored encrypted in the database, if entered. Alternatively, you can configure the automation controller to ask the user for the password at launch time by selecting Prompt on launch. In these cases, a dialog opens when the job is launched, prompting the user to enter the password and password confirmation.
Privilege Escalation Method: Specifies the type of escalation privilege to assign to specific users. This is equivalent to specifying the
--become-method=BECOME_METHODparameter, whereBECOME_METHODcould be any of the typical methods described below, or a custom method you’ve written. Begin entering the name of the method, and the appropriate name auto-populates.

empty selection: If a task/play has
becomeset toyesand is used with an empty selection, then it will default tosudosudo: Performs single commands with super user (root user) privileges
su: Switches to the super user (root user) account (or to other user accounts)
pbrun: Requests that an application or command be run in a controlled account and provides for advanced root privilege delegation and keylogging
pfexec: Executes commands with predefined process attributes, such as specific user or group IDs
dzdo: An enhanced version of sudo that uses RBAC information in an Centrify’s Active Directory service (see Centrify’s site on DZDO)
pmrun: Requests that an application is run in a controlled account (refer to Privilege Manager for Unix 6.0)
runas: Allows you to run as the current user
enable: Switches to elevated permissions on a network device
doas: Allows your remote/login user to execute commands as another user via the doas (“Do as user”) utility
ksu: Allows your remote/login user to execute commands as another user via Kerberos access
machinectl: Allows you to manage containers via the systemd machine manager
sesu: Allows your remote/login user to execute commands as another user via the CA Privileged Access Manager
Note
Custom become plugins are available only starting with Ansible 2.8. For more detail on this concept, refer to Understanding Privilege Escalation https://docs.ansible.com/ansible/latest/user_guide/become.html and the list of become plugins https://docs.ansible.com/ansible/latest/plugins/become.html#plugin-list.
Privilege Escalation Username field is only seen if an option for privilege escalation is selected. Enter the username to use with escalation privileges on the remote system.
Privilege Escalation Password: field is only seen if an option for privilege escalation is selected. Enter the actual password to be used to authenticate the user via the selected privilege escalation type on the remote system. This password will be stored encrypted in the database, if entered. Alternatively, you may configure the automation controller to ask the user for the password at launch time by selecting Prompt on launch. In these cases, a dialog opens when the job is launched, promoting the user to enter the password and password confirmation.
Note
Sudo Password must be used in combination with SSH passwords or SSH Private Keys, since the automation controller must first establish an authenticated SSH connection with the host prior to invoking sudo to change to the sudo user.
Warning
Credentials which are used in Scheduled Jobs must not be configured as “Prompt on launch”.
10.4.15. Microsoft Azure Key Vault
This is considered part of the secret management capability. See Microsoft Azure Key Vault for more detail.
10.4.16. Microsoft Azure Resource Manager
Selecting this credential type enables synchronization of cloud inventory with Microsoft Azure Resource Manager.
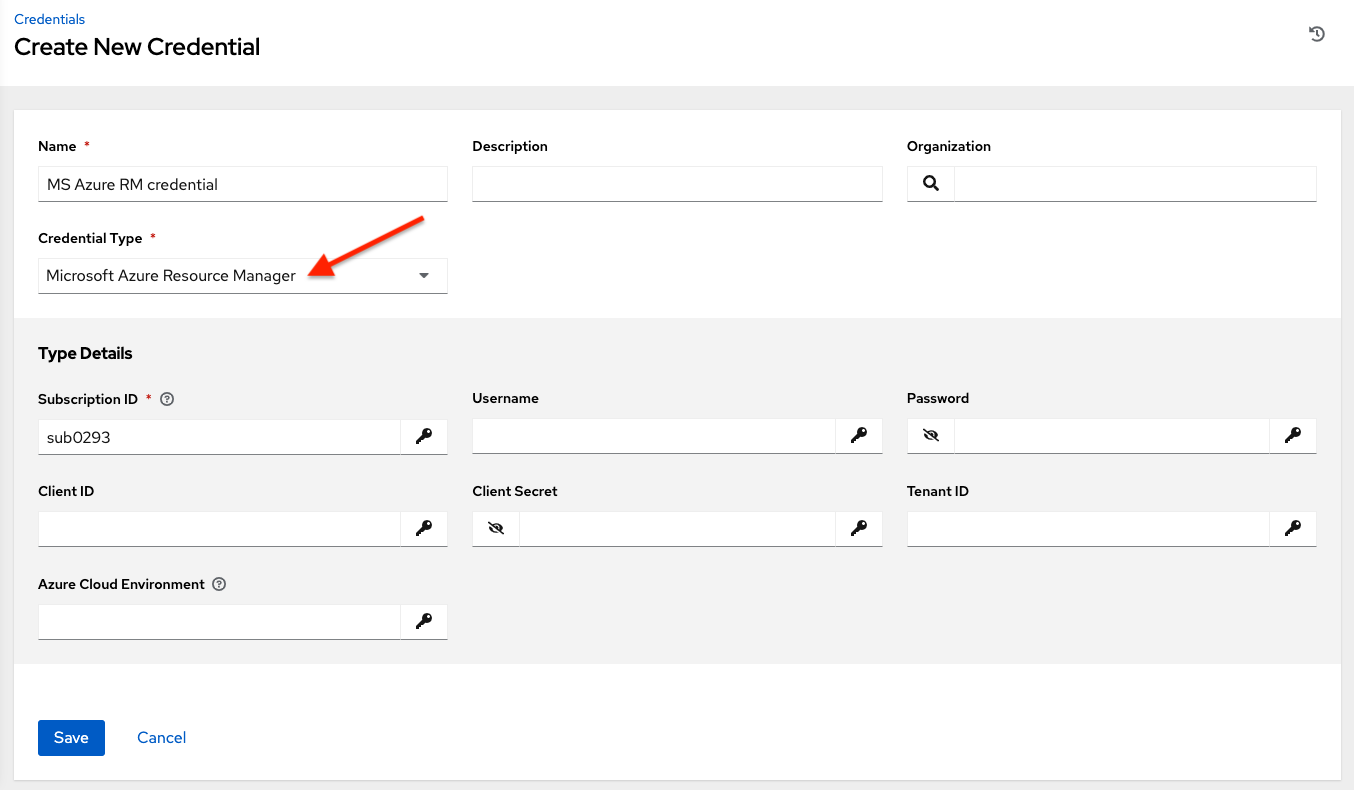
Microsoft Azure Resource Manager credentials have several attributes that may be configured:
Subscription ID: The Subscription UUID for the Microsoft Azure account (required).
Username: The username to use to connect to the Microsoft Azure account.
Password: The password to use to connect to the Microsoft Azure account.
Client ID: The Client ID for the Microsoft Azure account.
Client Secret: The Client Secret for the Microsoft Azure account.
Tenant ID: The Tenant ID for the Microsoft Azure account.
Azure Cloud Environment: The variable associated with Azure cloud or Azure stack environments.
These fields are equivalent to the variables in the API. To pass service principal credentials, define the following variables:
AZURE_CLIENT_ID
AZURE_SECRET
AZURE_SUBSCRIPTION_ID
AZURE_TENANT
AZURE_CLOUD_ENVIRONMENT
To pass an Active Directory username/password pair, define the following variables:
AZURE_AD_USER
AZURE_PASSWORD
AZURE_SUBSCRIPTION_ID
You can also pass credentials as parameters to a task within a playbook. The order of precedence is parameters, then environment variables, and finally a file found in your home directory.
To pass credentials as parameters to a task, use the following parameters for service principal credentials:
client_id
secret
subscription_id
tenant
azure_cloud_environment
Or, pass the following parameters for Active Directory username/password:
ad_user
password
subscription_id
10.4.17. Network
Select the Network credential type only if you are using a local connection with provider to use Ansible networking modules to connect to and manage networking devices. When connecting to network devices, the credential type must match the connection type:
For
localconnections usingprovider, credential type should be NetworkFor all other network connections (
httpapi,netconf, andnetwork_cli), credential type should be Machine
For an overview of connection types available for network devices, refer to Multiple Communication Protocols.
The automation controller uses the following environment variables for Network credentials and are fields prompted in the user interface:
ANSIBLE_NET_USERNAME
ANSIBLE_NET_PASSWORD
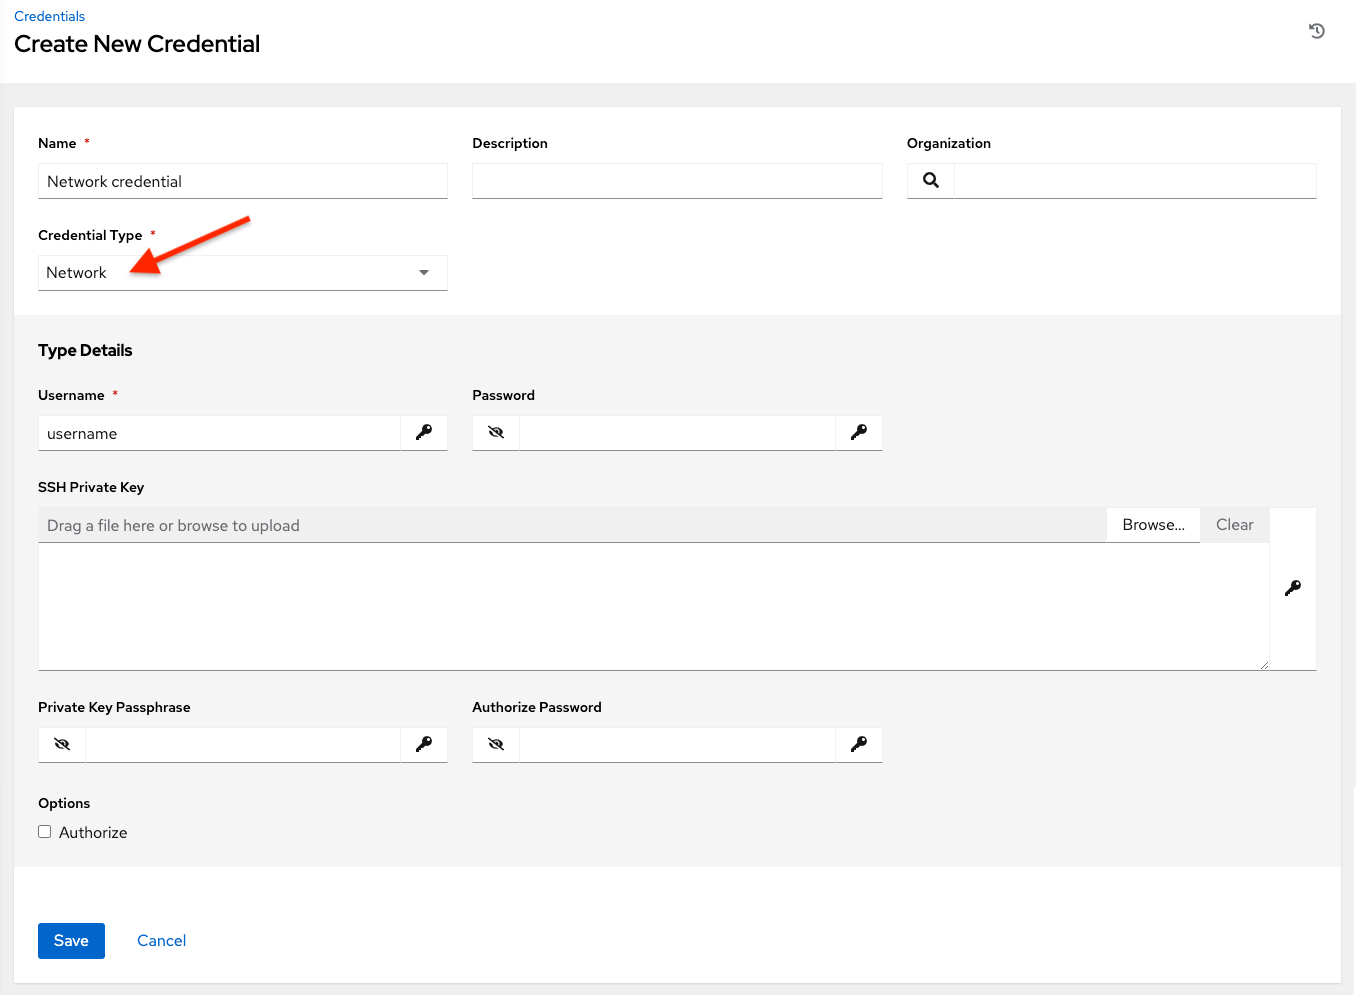
Network credentials have several attributes that may be configured:
Username: The username to use in conjunction with the network device (required).
Password: The password to use in conjunction with the network device.
SSH Private Key: Copy or drag-and-drop the actual SSH Private Key to be used to authenticate the user to the network via SSH.
Private Key Passphrase: The actual passphrase for the private key to be used to authenticate the user to the network via SSH.
Authorize: Select this from the Options field to control whether or not to enter privileged mode.
If Authorize is checked, enter a password in the Authorize Password field to access privileged mode.
For more information, refer to the Inside Playbook blog, Porting Ansible Network Playbooks with New Connection Plugins.
10.4.18. OpenShift or Kubernetes API Bearer Token
Selecting this credential type allows you to create instance groups that point to a Kubernetes or OpenShift container. For more information about this concept, refer to Container and Instance Groups.
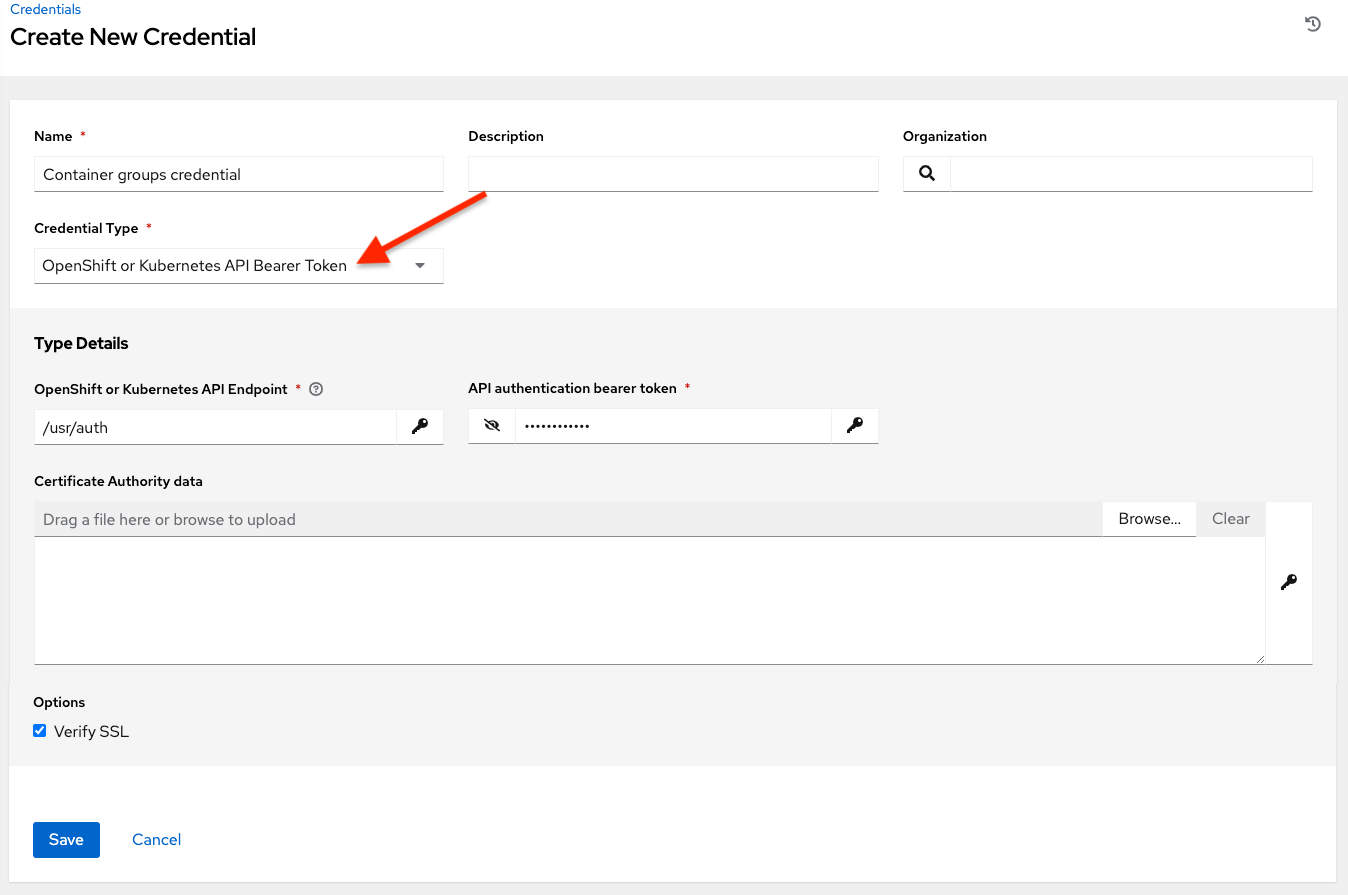
Container credentials have the following inputs:
OpenShift or Kubernetes API Endpoint (required): the endpoint to be used to connect to an OpenShift or Kubernetes container
API Authentication Bearer Token (required): The token to use to authenticate the connection
Verify SSL: Optionally you can check this option to verify the server’s SSL certificate is valid and trusted. Environments that use internal or private CA’s should leave this option unchecked to disable verification.
Certificate Authority Data: include the
BEGIN CERTIFICATEandEND CERTIFICATElines when pasting the certificate, if provided
A ContainerGroup is a type of InstanceGroup that has an associated Credential that allows for connecting to an OpenShift cluster. To set up a container group, you must first have the following:
A namespace you can launch into (every cluster has a “default” namespace, but you may want to use a specific namespace)
A service account that has the roles that allow it to launch and manage Pods in this namespace
If you will be using execution environments in a private registry, and have a Container Registry credential associated to them in the automation controller, the service account also needs the roles to get, create, and delete secrets in the namespace. If you do not want to give these roles to the service account, you can pre-create the
ImagePullSecretsand specify them on the pod spec for the ContainerGroup. In this case, the execution environment should NOT have a Container Registry credential associated, or the controller will attempt to create the secret for you in the namespace.A token associated with that service account (OpenShift or Kubernetes Bearer Token)
A CA certificate associated with the cluster
This section describes creating a Service Account in an Openshift cluster (or K8s) in order to be used to run jobs in a container group via automation controller. After the Service Account is created, its credentials are provided to the controller in the form of an Openshift or Kubernetes API bearer token credential. Below describes how to create a service account and collect the needed information for configuring automation controller.
To configure the controller:
To create a service account, you may download and use this sample service account,
containergroup saand modify it as needed to obtain the above credentials.Apply the configuration from
containergroup-sa.yml:oc apply -f containergroup-sa.yml
Get the secret name associated with the service account:
export SA_SECRET=$(oc get sa containergroup-service-account -o json | jq '.secrets[0].name' | tr -d '"')
Get the token from the secret:
oc get secret $(echo ${SA_SECRET}) -o json | jq '.data.token' | xargs | base64 --decode > containergroup-sa.tokenGet the CA cert:
oc get secret $SA_SECRET -o json | jq '.data["ca.crt"]' | xargs | base64 --decode > containergroup-ca.crt
Use the contents of
containergroup-sa.tokenandcontainergroup-ca.crtto provide the information for the OpenShift or Kubernetes API Bearer Token required for the container group.
10.4.19. OpenStack
Selecting this credential type enables synchronization of cloud inventory with OpenStack.
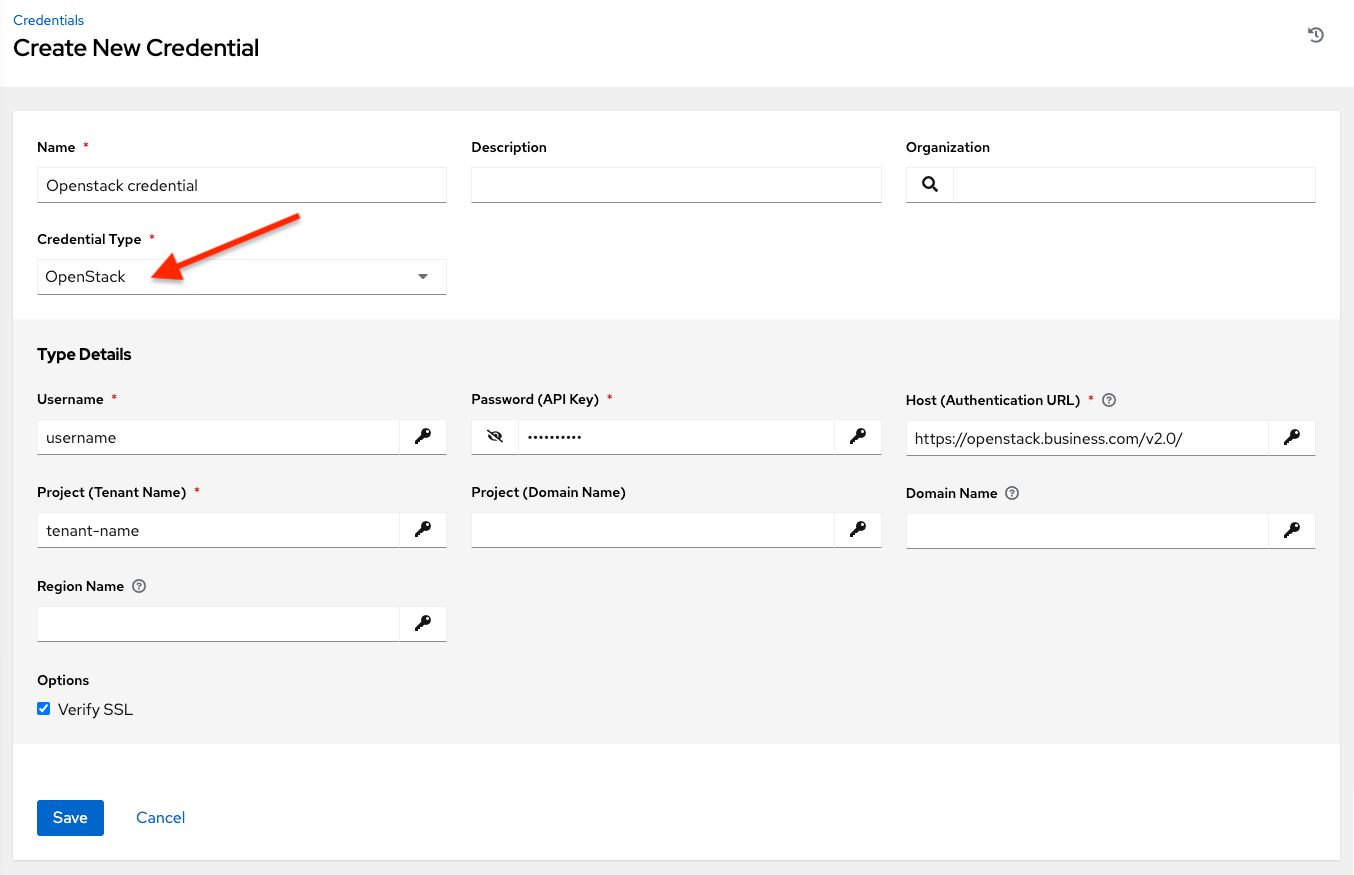
OpenStack credentials have the following inputs that are required:
Username: The username to use to connect to OpenStack.
Password (API Key): The password or API key to use to connect to OpenStack.
Host (Authentication URL): The host to be used for authentication.
Project (Tenant Name): The Tenant name or Tenant ID used for OpenStack. This value is usually the same as the username.
Project (Domain Name): Optionally provide the project name associated with your domain.
Domain name: Optionally provide the FQDN to be used to connect to OpenStack.
If you are interested in using OpenStack Cloud Credentials, refer to Utilizing Cloud Credentials in this guide for more information, including a sample playbook.
10.4.20. Red Hat Ansible Automation Platform
Selecting this credential allows you to access another automation controller instance.
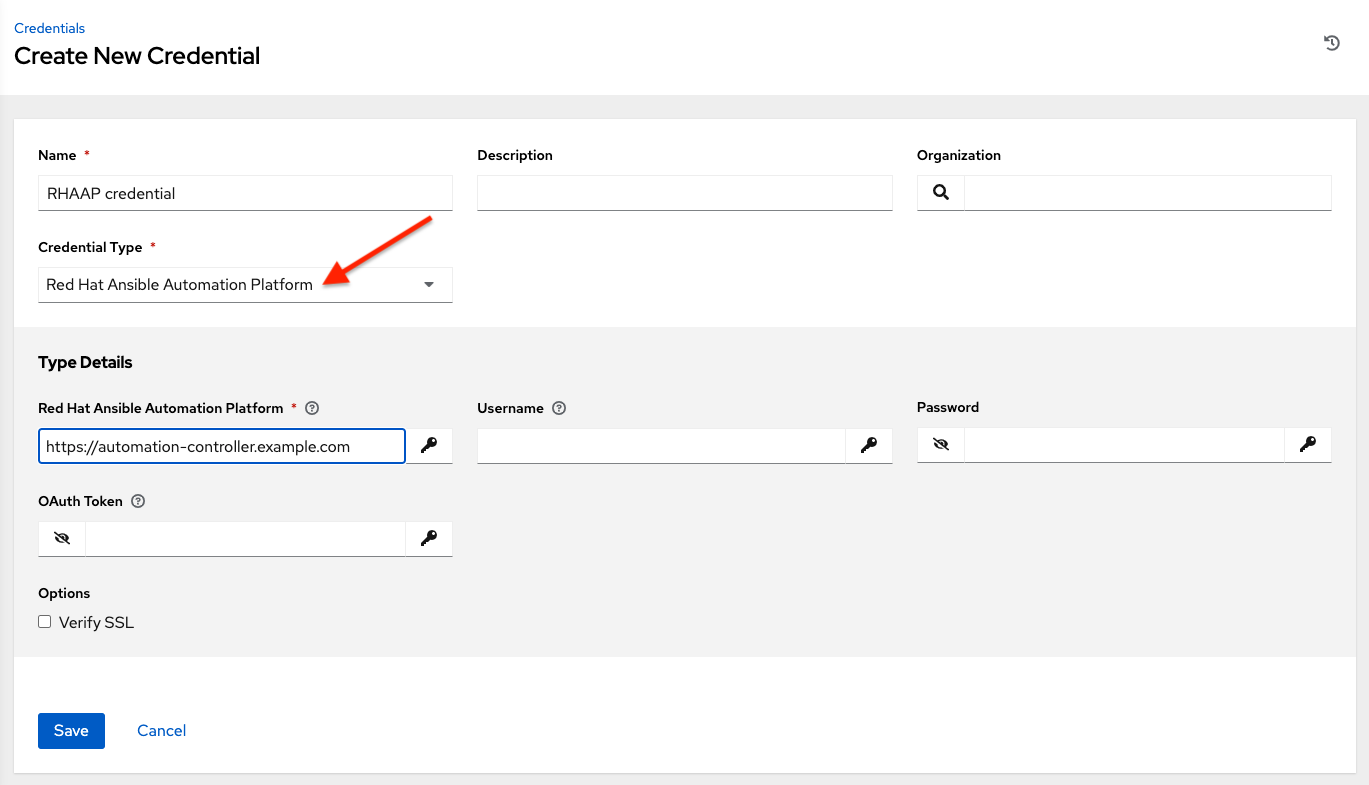
Automation controller credentials have the following inputs that are required:
Controller Hostname: The base URL or IP address of the other instance to connect to.
Username: The username to use to connect to it.
Password: The password to use to connect to it.
Oauth Token: If username and password is not used, provide an OAuth token to use to authenticate.
10.4.21. Red Hat Satellite 6
Selecting this credential type enables synchronization of cloud inventory with Red Hat Satellite 6.
The automation controller writes a Satellite configuration file based on fields prompted in the user interface. The absolute path to the file is set in the following environment variable:
FOREMAN_INI_PATH
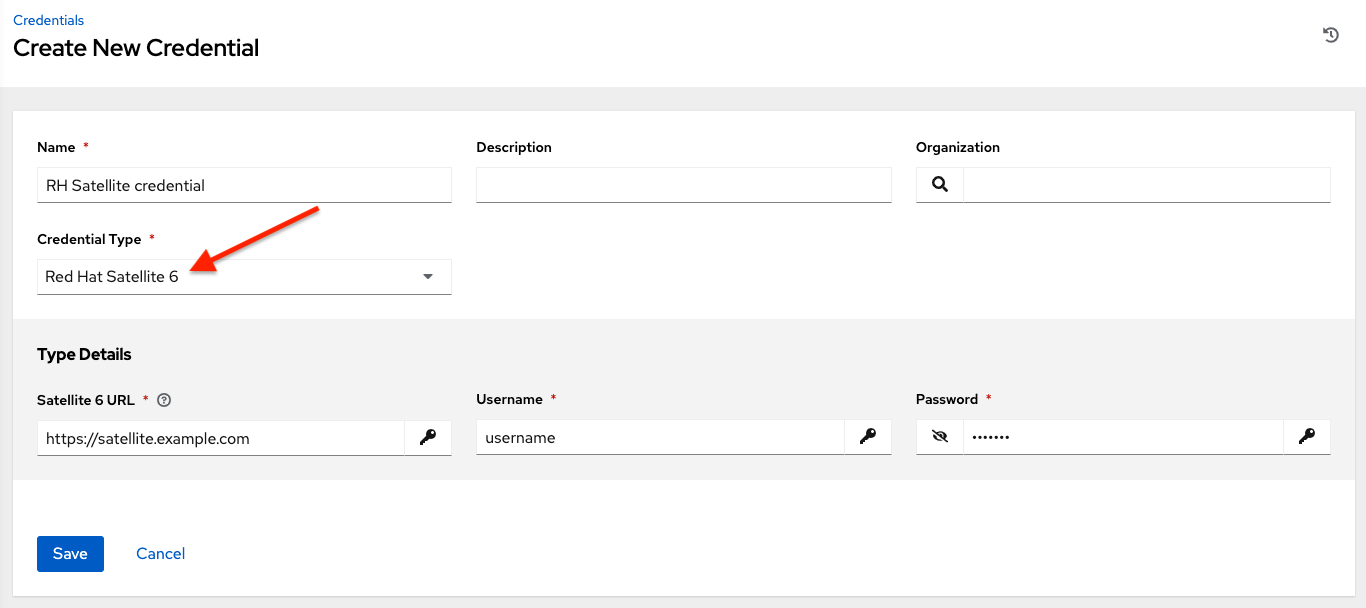
Satellite credentials have the following inputs that are required:
Satellite 6 URL: The Satellite 6 URL or IP address to connect to.
Username: The username to use to connect to Satellite 6.
Password: The password to use to connect to Satellite 6.
10.4.22. Red Hat Virtualization
This credential allows the automation controller to access Ansible’s oVirt4.py dynamic inventory plugin, which is managed by Red Hat Virtualization (RHV).
The automation controller uses the following environment variables for Red Hat Virtualization credentials and are fields in the user interface:
OVIRT_URL
OVIRT_USERNAME
OVIRT_PASSWORD
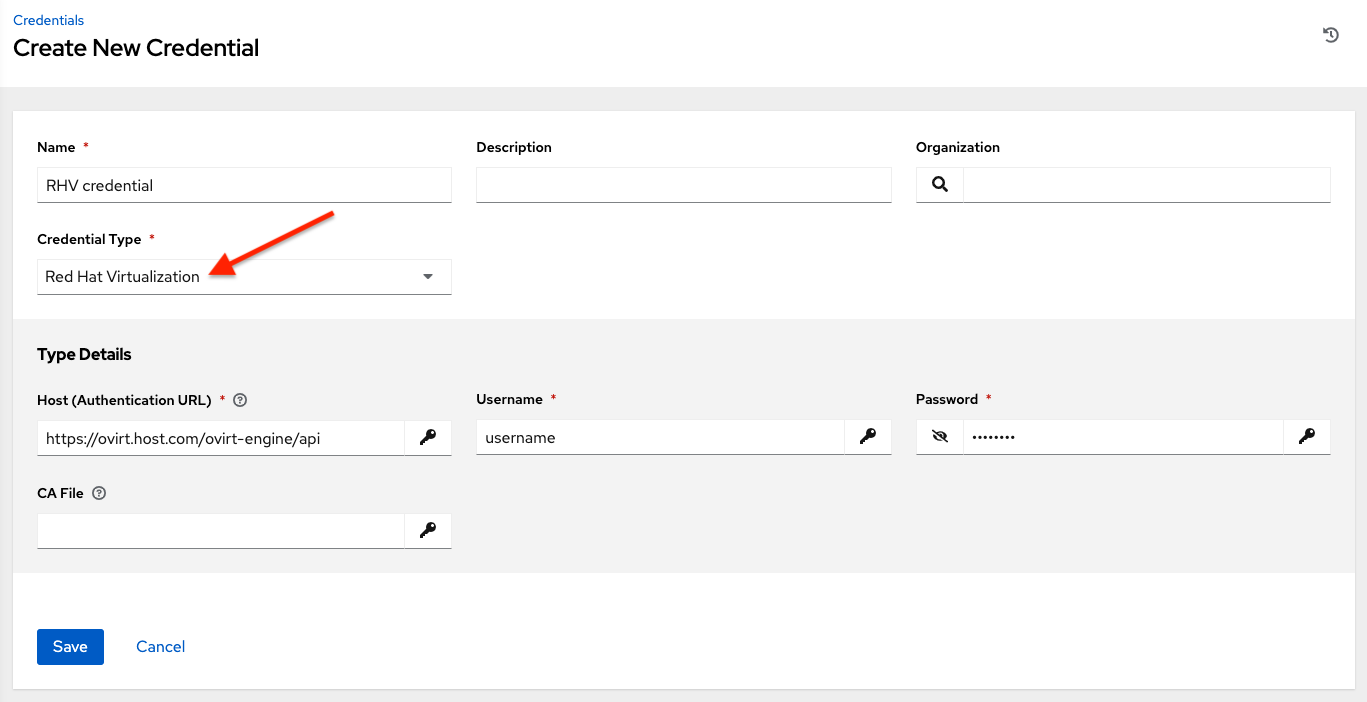
RHV credentials have the following inputs that are required:
Host (Authentication URL): The host URL or IP address to connect to. In order to sync with the inventory, the credential URL needs to include the
ovirt-engine/apipath.Username: The username to use to connect to oVirt4. This needs to include the domain profile to succeed, for example
username@ovirt.host.com.Password: The password to use to connect to it.
CA File: Optionally provide an absolute path to the oVirt certificate file (it may end in
.pem,.cerand.crtextensions, but preferably.pemfor consistency)
10.4.23. Source Control
SCM (source control) credentials are used with Projects to clone and update local source code repositories from a remote revision control system such as Git or Subversion.
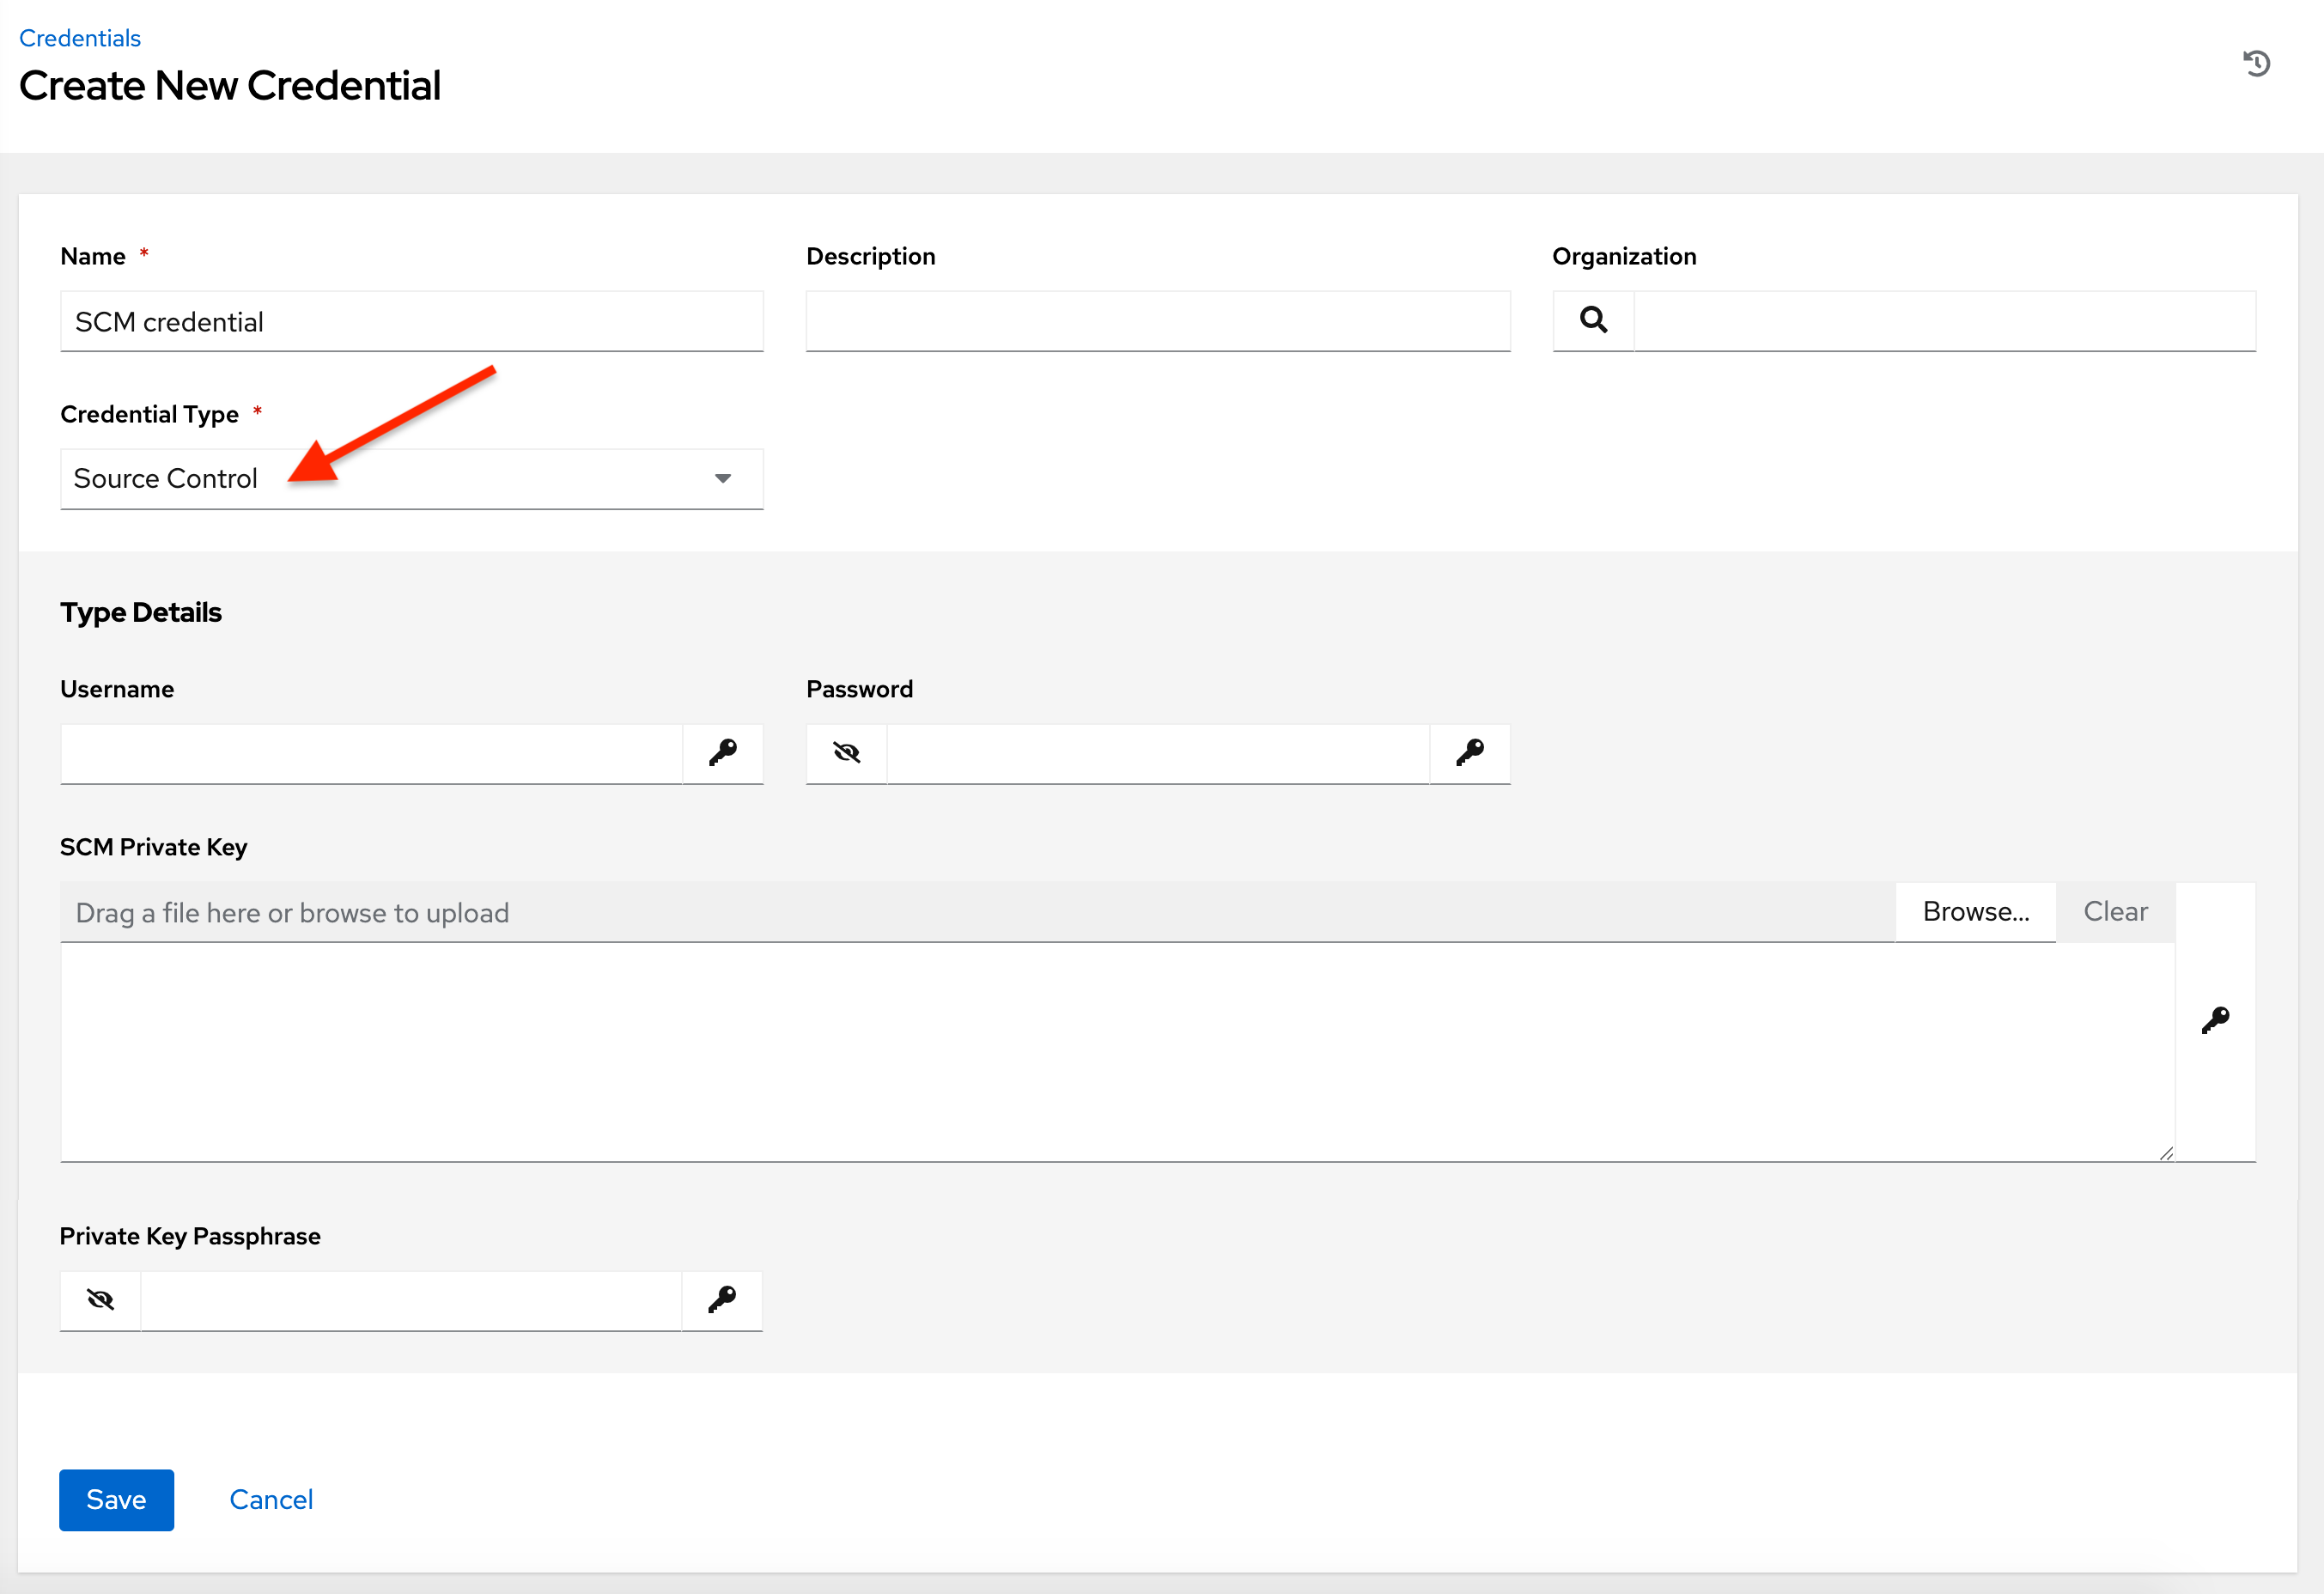
Source Control credentials have several attributes that may be configured:
Username: The username to use in conjunction with the source control system.
Password: The password to use in conjunction with the source control system.
SCM Private Key: Copy or drag-and-drop the actual SSH Private Key to be used to authenticate the user to the source control system via SSH.
Private Key Passphrase: If the SSH Private Key used is protected by a passphrase, you may configure a Key Passphrase for the private key.
Note
Source Control credentials cannot be configured as “Prompt on launch”. If you are using a GitHub account for a Source Control credential and you have 2FA (Two Factor Authenication) enabled on your account, you will need to use your Personal Access Token in the password field rather than your account password.
10.4.24. Thycotic DevOps Secrets Vault
This is considered part of the secret management capability. See Thycotic DevOps Secrets Vault for more detail.
10.4.25. Thycotic Secret Server
This is considered part of the secret management capability. See Thycotic Secret Server for more detail.
10.4.26. Vault
Selecting this credential type enables synchronization of inventory with Ansible Vault.
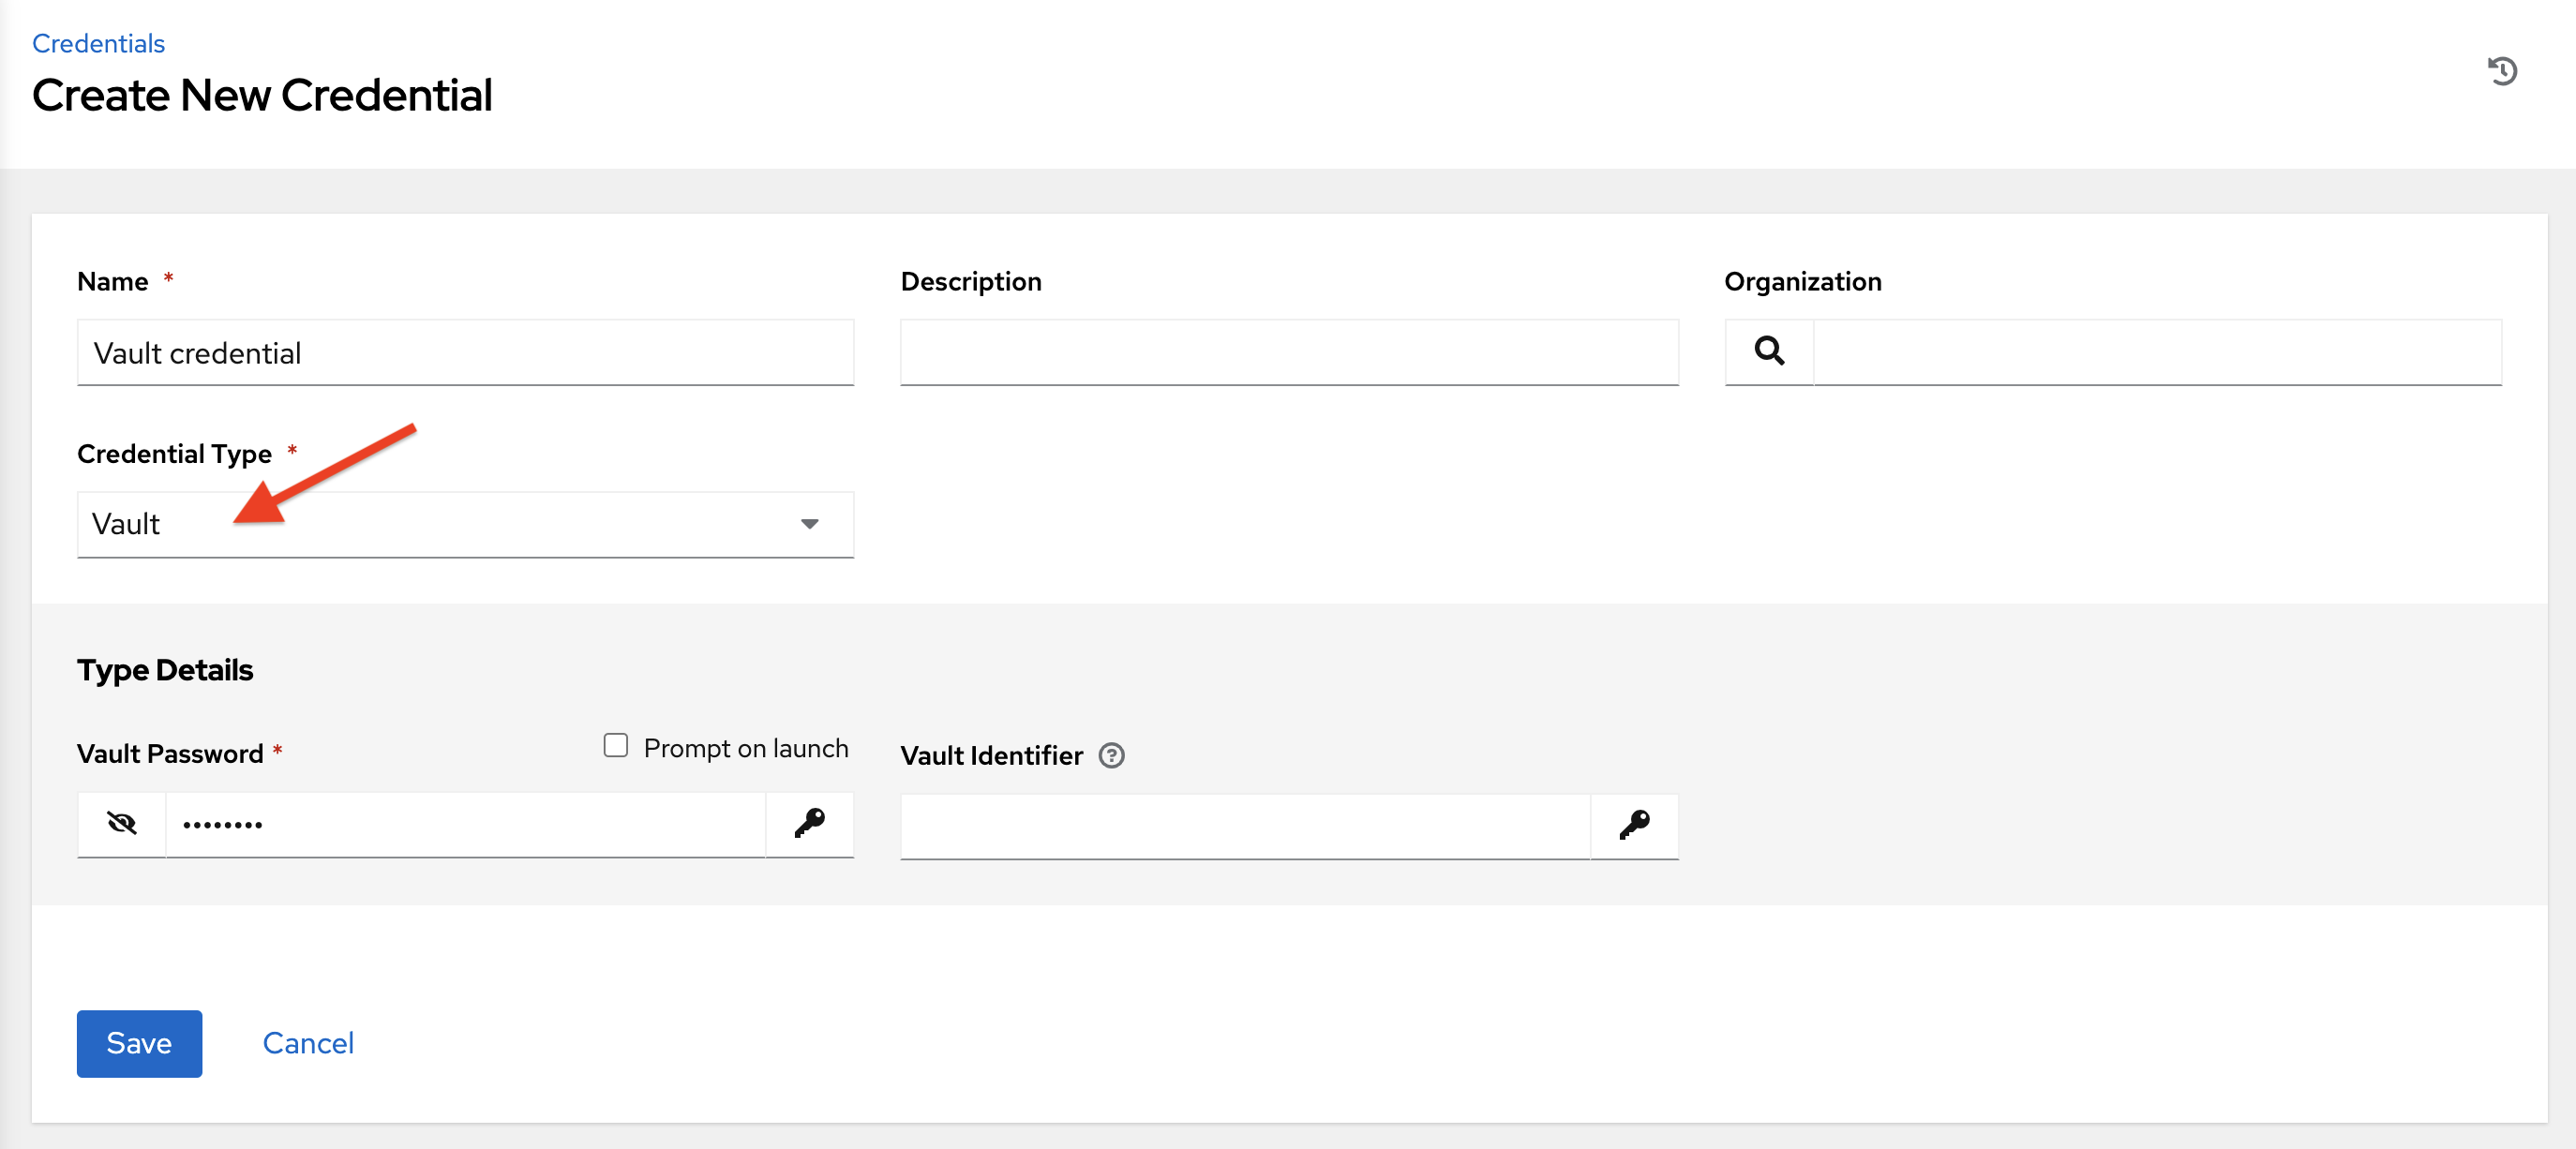
Vault credentials require the Vault Password and an optional Vault Identifier if applying multi-Vault credentialing. For more information on the automation controller Multi-Vault support, refer to the Multi-Vault Credentials section of the Automation Controller Administration Guide.
You may configure the automation controller to ask the user for the password at launch time by selecting Prompt on launch. In these cases, a dialog opens when the job is launched, promoting the user to enter the password and password confirmation.
Warning
Credentials which are used in Scheduled Jobs must not be configured as “Prompt on launch”.
For more information about Ansible Vault, refer to: http://docs.ansible.com/ansible/playbooks_vault.html
10.4.27. VMware vCenter
Selecting this credential type enables synchronization of inventory with VMware vCenter.
The automation controller uses the following environment variables for VMware vCenter credentials and are fields prompted in the user interface:
VMWARE_HOST
VMWARE_USER
VMWARE_PASSWORD
VMWARE_VALIDATE_CERTS
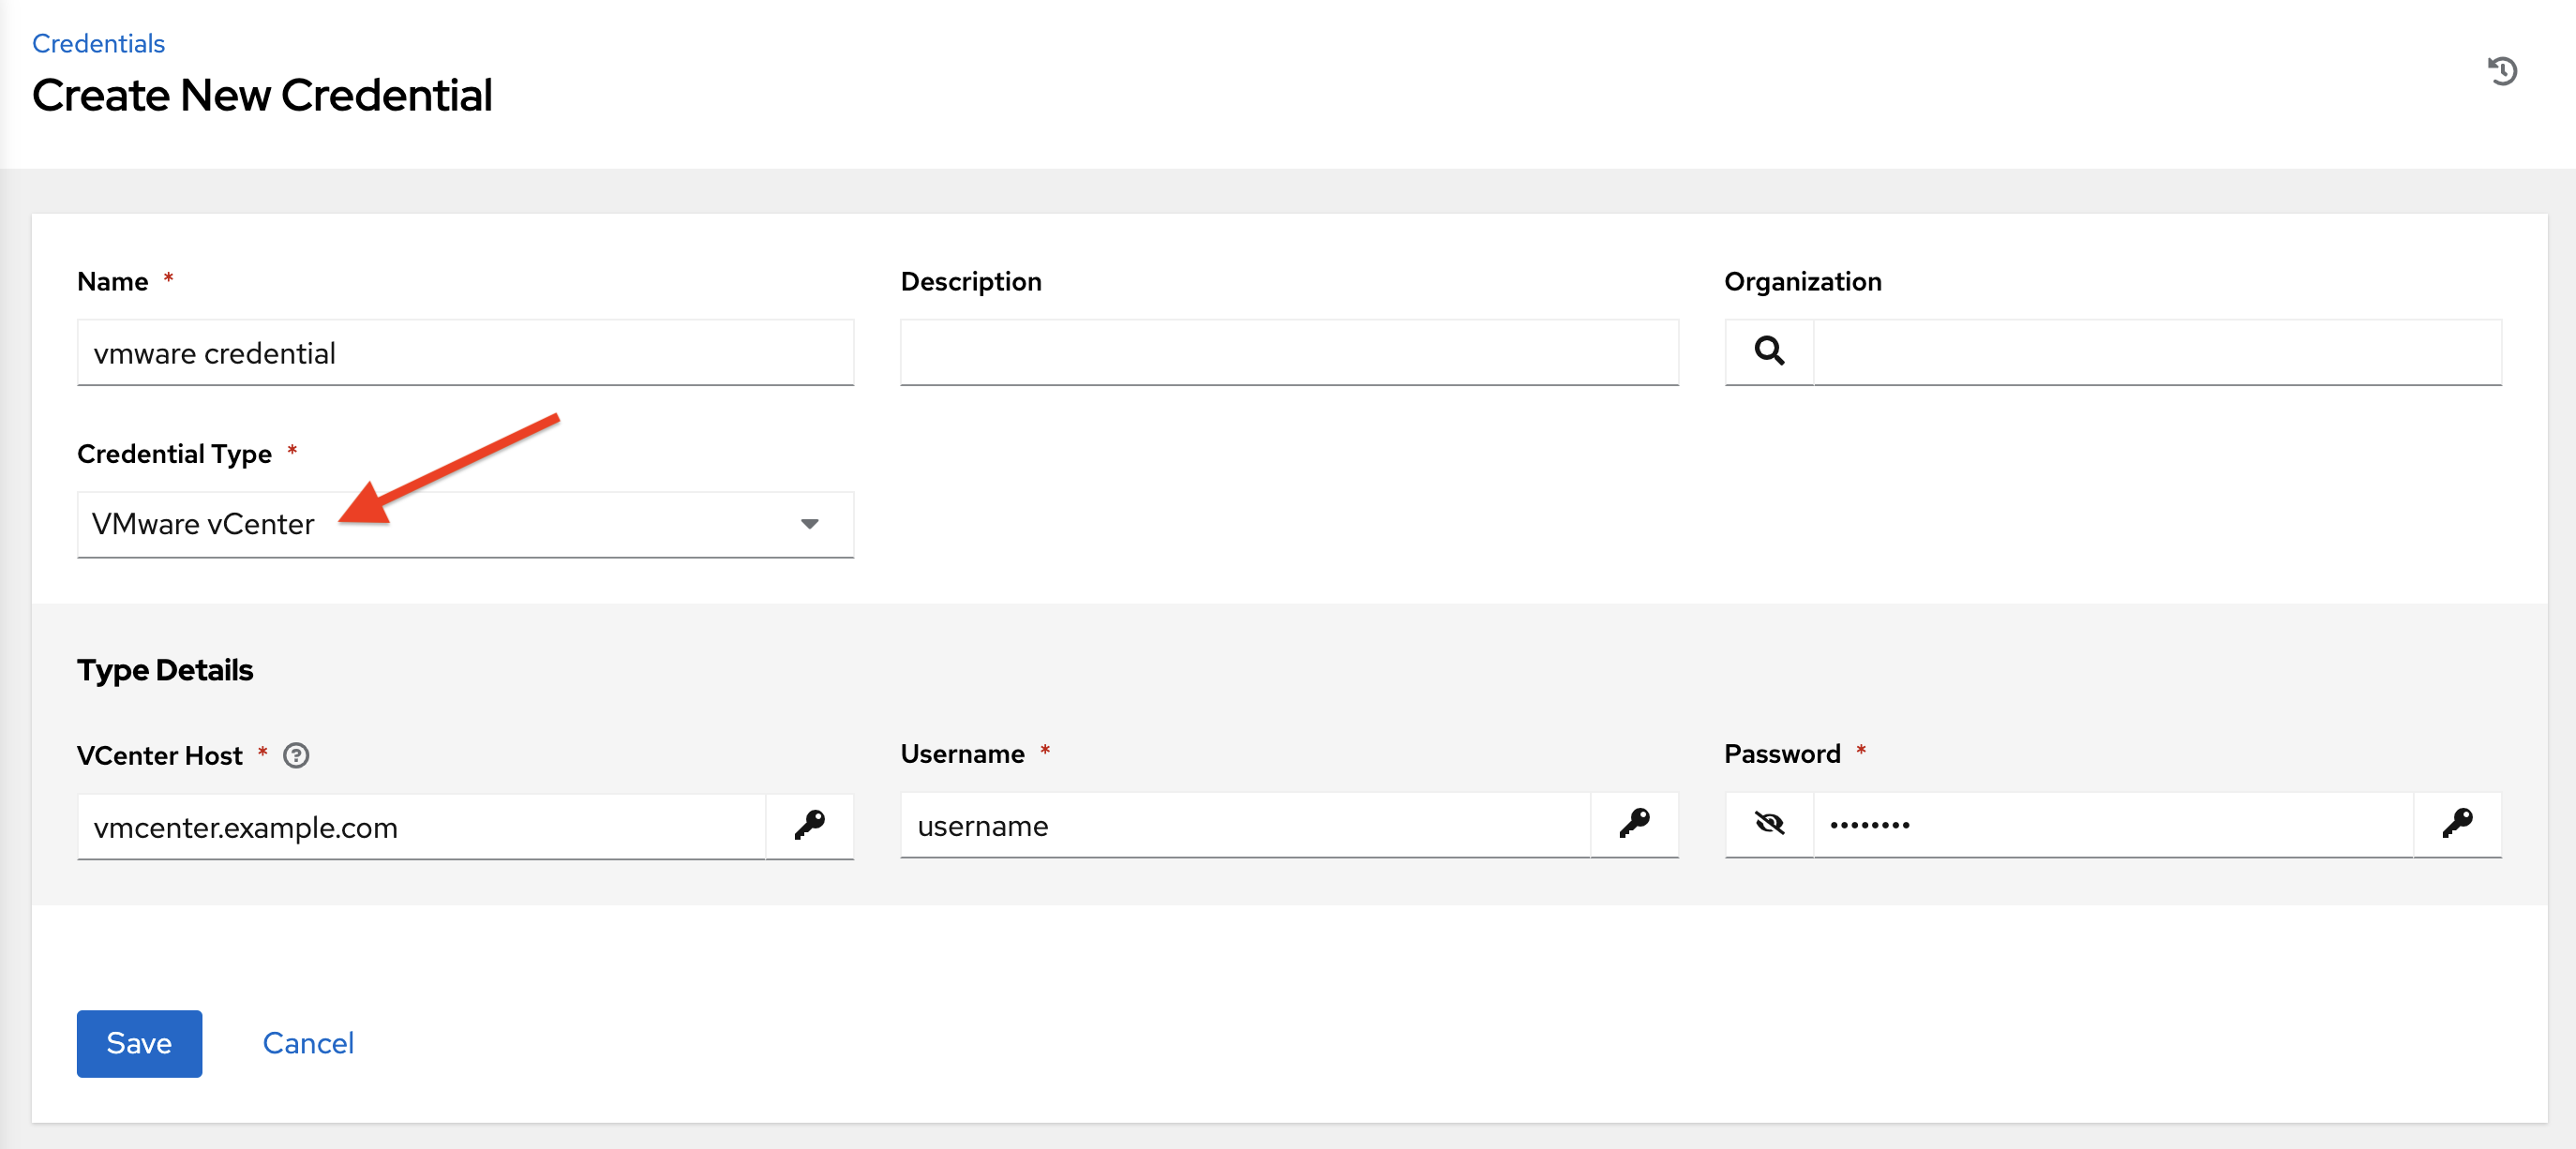
VMware credentials have the following inputs that are required:
vCenter Host: The vCenter hostname or IP address to connect to.
Username: The username to use to connect to vCenter.
Password: The password to use to connect to vCenter.
Note
If the VMware guest tools are not running on the instance, VMware inventory sync may not return an IP address for that instance.
