10. Authentication Methods Using the API
This chapter describes the numerous enterprise authentication methods, the best use case for each, and examples:
Automation controller is designed for organizations to centralize and control their automation with a visual dashboard for out-of-the box control while providing a REST API to integrate with your other tooling on a deeper level. Automation controller supports a number of authentication methods to make it easy to embed the controller into existing tools and processes to help ensure the right people can access controller resources.
10.1. Session Authentication
Session authentication is used when logging in directly to automation controller’s API or UI to manually create resources (inventory, project, job template) and launch jobs in the browser. With this method, you can remain logged in for a prolonged period of time, not just for that HTTP request, but for instance, when browsing the UI or API in a browser like Chrome or Firefox. When a user logs in, a session cookie is created, which enables the user to remain logged in when navigating to different pages within the automation controller. Below represents the communication that occurs between the client and server in a session.
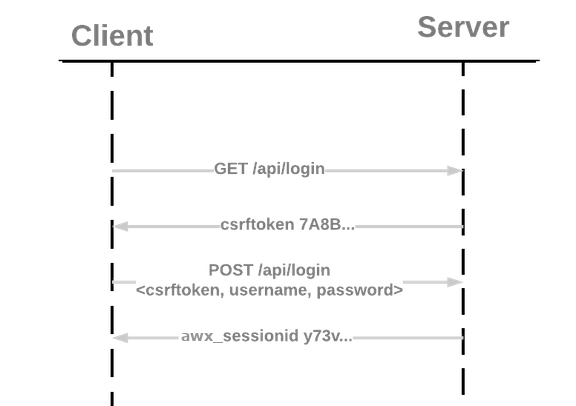
Using the curl tool, you can see the activity that occurs when you log into the controller.
GET to the
/api/login/endpoint to grab thecsrftokencookie.
curl -k -c - https://<controller-host>/api/login/

localhost       FALSE   /       FALSE   0   csrftoken
AswSFn5p1qQvaX4KoRZN6A5yer0Pq0VG2cXMTzZnzuhaY0L4tiidYqwf5PXZckuj
POST to the
/api/login/endpoint with username, password, and X-CSRFToken=<token-value>.
curl -X POST -H 'Content-Type: application/x-www-form-urlencoded' \
--referer https://<controller-host>/api/login/ \
-H 'X-CSRFToken: K580zVVm0rWX8pmNylz5ygTPamgUJxifrdJY0UDtMMoOis5Q1UOxRmV9918BUBIN' \
--data 'username=root&password=reverse' \
--cookie 'csrftoken=K580zVVm0rWX8pmNylz5ygTPamgUJxifrdJY0UDtMMoOis5Q1UOxRmV9918BUBIN' \
https://<controller-host>/api/login/ -k -D - -o /dev/null
All of this is done by the automation controller when you log in to the UI or API in the browser, and should only be used when authenticating in the browser. For programmatic integration with automation controller, see OAuth 2 Token Authentication.
A typical response might look like:
Server: nginx
Date: <current date>
Content-Type: text/html; charset=utf-8
Content-Length: 0
Connection: keep-alive
Location: /accounts/profile/
X-API-Session-Cookie-Name: awx_sessionid
Expires: <date>
Cache-Control: max-age=0, no-cache, no-store, must-revalidate, private
Vary: Cookie, Accept-Language, Origin
Session-Timeout: 1800
Content-Language: en
X-API-Total-Time: 0.377s
X-API-Request-Id: 700826696425433fb0c8807cd40c00a0
Access-Control-Expose-Headers: X-API-Request-Id
Set-Cookie: userLoggedIn=true; Path=/
Set-Cookie: current_user=<user cookie data>; Path=/
Set-Cookie: csrftoken=<csrftoken>; Path=/; SameSite=Lax
Set-Cookie: awx_sessionid=<your session id>; expires=<date>; HttpOnly; Max-Age=1800; Path=/; SameSite=Lax
Strict-Transport-Security: max-age=15768000
When a user is successfully authenticated with this method, the server will respond with a header called X-API-Session-Cookie-Name, indicating the configured name of the session cookie. The default value is awx_session_id which you can see later in the Set-Cookie headers.
注解
The session expiration time can be changed by specifying it in the SESSION_COOKIE_AGE parameter. Refer to Working with Session Limits for further detail.
10.2. Basic Authentication
Basic Authentication (Basic Auth) is stateless, thus the base64-encoded username and password must be sent along with each request via the Authorization header. This can be used for API calls from curl requests, python scripts, or individual requests to the API. OAuth 2 Token Authentication is recommended for accessing the API when at all possible.
Example with curl:
curl -X GET -H 'Authorization: Basic dXNlcjpwYXNzd29yZA==’ https://<controller-host>/api/v2/credentials -k -L

# the --user flag adds this Authorization header for us
curl -X GET --user 'user:password' https://<controller-host>/api/v2/credentials -k -L
For more information about the Basic HTTP Authentication scheme, see RFC 7617.
注解
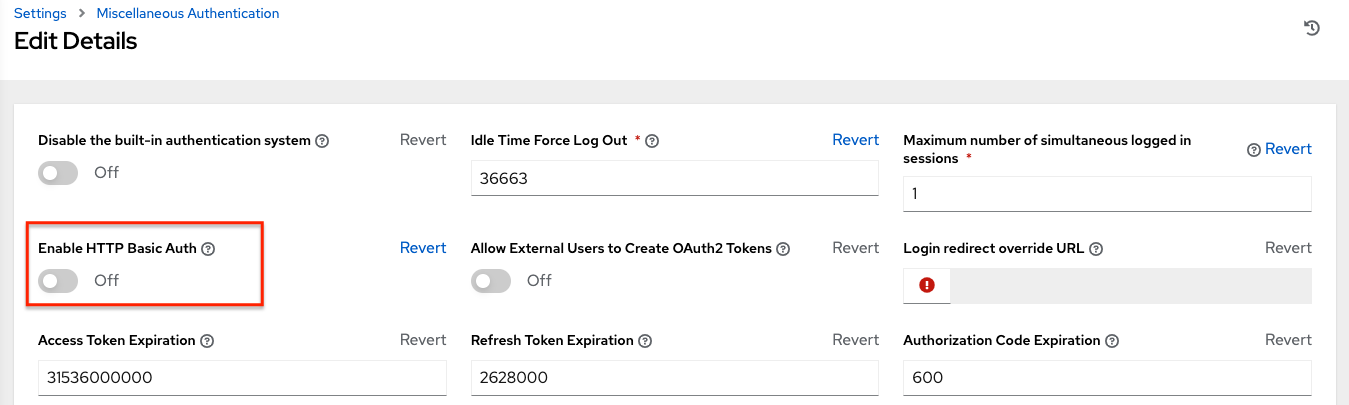
You can disable the Basic Auth for security purposes from the Miscellaneous Authentication settings of the controller UI Settings menu:
10.3. OAuth 2 Token Authentication
OAuth (Open Authorization) is an open standard for token-based authentication and authorization. OAuth 2 authentication is commonly used when interacting with the controller API programmatically. Like Basic Auth, an OAuth 2 token is supplied with each API request via the Authorization header. Unlike Basic Auth, OAuth 2 tokens have a configurable timeout and are scopable. Tokens have a configurable expiration time and can be easily revoked for one user or for the entire automation controller system by an admin if needed. This can be done with the revoke_oauth2_tokens management command, which is covered in more detail in Automation Controller Administration Guide or by using the API as explained in Revoke an access token.
注解
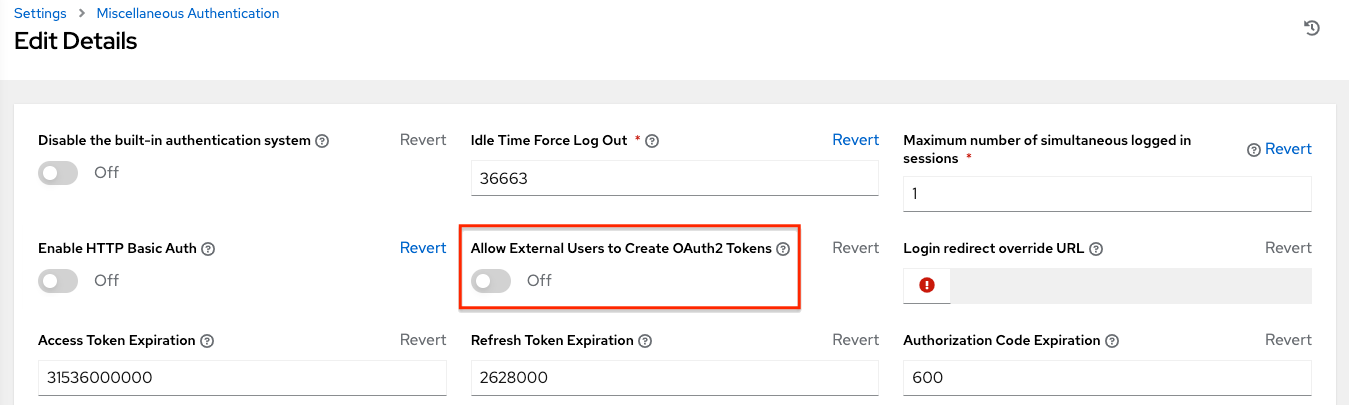
By default, external users such as those created by SSO are not allowed to generate OAuth tokens for security purposes. This can be changed from the Miscellaneous Authentication settings of the controller UI Settings menu:
The different methods for obtaining OAuth 2 Access Tokens in automation controller are:
Personal access tokens (PAT)
Application Token: Password grant type
Application Token: Implicit grant type
Application Token: Authorization Code grant type
For more information on the above methods, see Token-Based Authentication in the Automation Controller Administration Guide.
First, a user needs to create an OAuth 2 Access Token in the API or in their User’s Tokens tab in the UI. For further detail on creating them through the UI, see Users - Tokens. For the purposes of this example, use the PAT method for creating a token in the API. Upon token creation, the user can set the scope.
注解
The expiration time of the token can be configured system-wide. See Using OAuth 2 Token System for Personal Access Tokens (PAT) for more detail.
Token authentication is best used for any programmatic use of the automation controller API, such as Python scripts or tools like curl, as in the example for creating a PAT (without an associated application) below.
Curl Example
curl -u user:password -k -X POST https://<controller-host>/api/v2/tokens/
This call will return JSON data like:
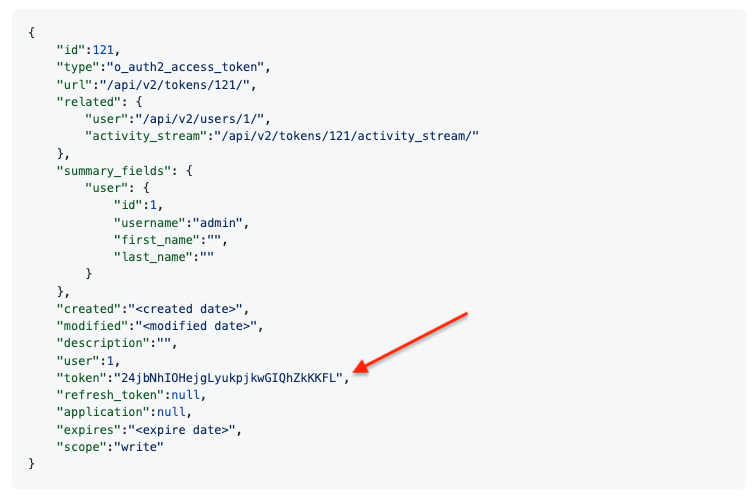
The value of the token property is what you can now use to perform a GET request for an automation controller resource, e.g., Hosts.
curl -k -X POST \
  -H “Content-Type: application/json”
  -H “Authorization: Bearer <oauth2-token-value>” \
  https://<controller-host>/api/v2/hosts/
Similarly, you can launch a job by making a POST to the job template that you want to launch.
curl -k -X POST \
  -H "Authorization: Bearer <oauth2-token-value>" \
  -H "Content-Type: application/json" \
  --data '{"limit" : "ansible"}' \
  https://<controller-host>/api/v2/job_templates/14/launch/
Python Example
awxkit is an open source tool that makes it easy to use HTTP requests to access the automation controller API.
You can have awxkit acquire a PAT on your behalf by using the awxkit login command. Refer to the AWX Command Line Interface for more detail.
For more information on how to use OAuth 2 in the automation controller in the context of integrating external applications, see Token-Based Authentication in the Automation Controller Administration Guide.
If you need to write custom requests, you can write a Python script using Python library requests, like in this example:
import requests
oauth2_token_value = 'y1Q8ye4hPvT61aQq63Da6N1C25jiA'   # your token value from controller
url = 'https://<controller-host>/api/v2/users/'
payload = {}
headers = {'Authorization': 'Bearer ' + oauth2_token_value,}

# makes request to controller user endpoint
response = requests.request('GET', url, headers=headers, data=payload,
allow_redirects=False, verify=False)

# prints json returned from controller with formatting
print(json.dumps(response.json(), indent=4, sort_keys=True))
10.4. SSO Authentication
Single sign-on (SSO) authentication methods are fundamentally different from other methods because the authentication of the user happens external to the automation controller, like Google SSO, Azure SSO, SAML, or GitHub. For example, with GitHub SSO, GitHub is the single source of truth, which verifies your identity based on the username and password you gave the controller.
You can configure SSO authentication using the automation controller inside a large organization with a central Identity Provider. Once you have configured an SSO method in the controller, a button for that SSO will be present on the login screen. If you click that button, it will redirect you to the Identity Provider, in this case GitHub, where you will present your credentials. If the Identity Provider verifies you successfully, then the controller will make a user linked to your GitHub user (if this is your first time logging in via this SSO method), and log you in.
For the various types of supported SSO authentication methods, see Setting up Social Authentication and Setting up Enterprise Authentication in the Automation Controller Administration Guide.