11. Jobs
A job is an instance of Tower launching an Ansible playbook against an inventory of hosts.
The Jobs link displays a list of jobs and their status–shown as completed successfully or failed, or as an active (running) job.

- Jobs can be searched by Job Failed?, job ID, Name, Status, or Type.
- Jobs can be filtered by job ID, Finished, Type, or Name.
From this screen, you can relaunch jobs, remove jobs, or view the standard output of a particular job.
Clicking on a Name for an SCM Update job opens the Job Results screen, while clicking on a manually created Playbook Run job takes you to the Job Status page for this job (also accessible after launching a job from the Job Templates link in the main Tower navigational menu).
11.1. Job Results
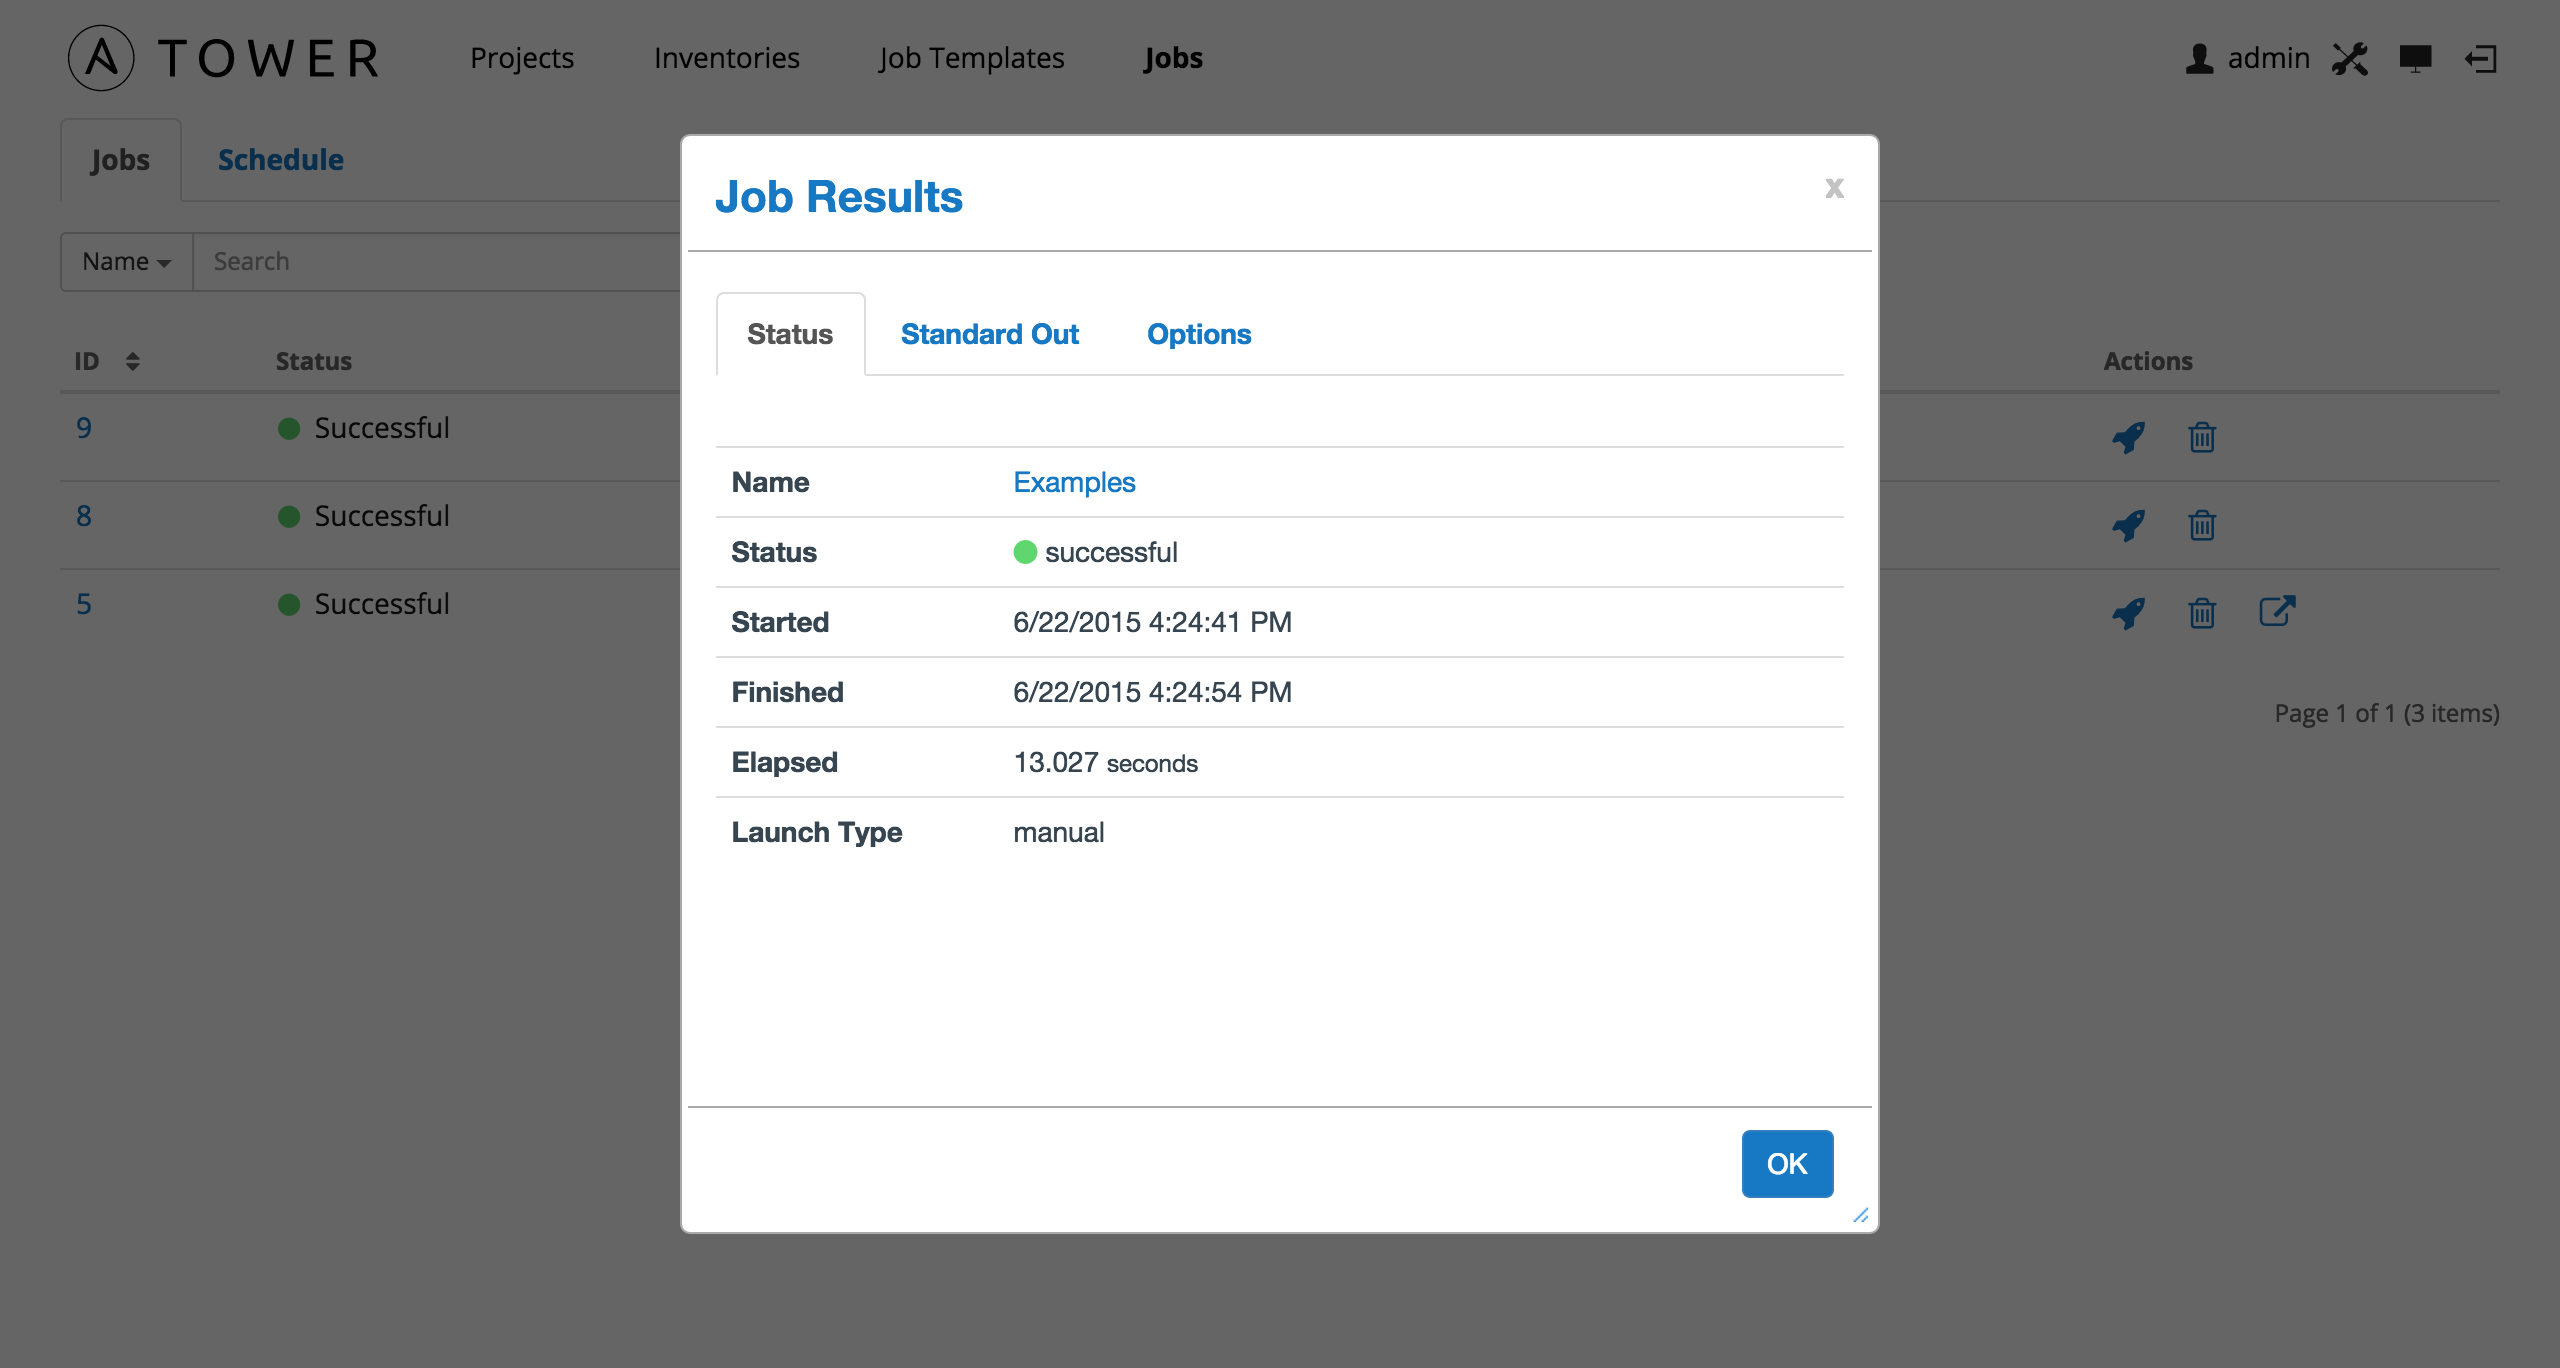
The Job Results window displays information about jobs of type Inventory Sync and SCM Update.

This display consists of three tabs. The Status tab includes details on the job execution:
- Name: The name of the job template from which this job was launched.
- Status: Can be any of Pending, Running, Successful, or Failed.
- License Error: Only shown for Inventory Sync jobs. If this is True, the hosts added by the inventory sync caused Tower to exceed the licensed number of managed hosts.
- Started: The timestamp of when the job was initiated by Tower.
- Finished: The timestamp of when the job was completed.
- Elapsed: The total time the job took.
- Launch Type: Manual or Scheduled.
The Standard Out tab shows the full results of running the SCM Update or Inventory Sync playbook. This shows the same information you would see if you ran the Ansible playbook using Ansible from the command line, and can be useful for debugging.
The Options tab describes the details of this job:
For SCM Update jobs, this consists of the **Project* associated with the job.
For Inventory Sync jobs, this consists of:
- Credential: The cloud credential for the job
- Group: The group being synced
- Source: The type of cloud inventory
- Regions: Any region filter, if set
- Overwrite: The value of Overwrite for this Inventory Sync. Refer to Inventories for details.
- Overwrite Vars: The value of Overwrite Vars for this Inventory Sync. Refer to Inventories for details.
11.2. Job Status
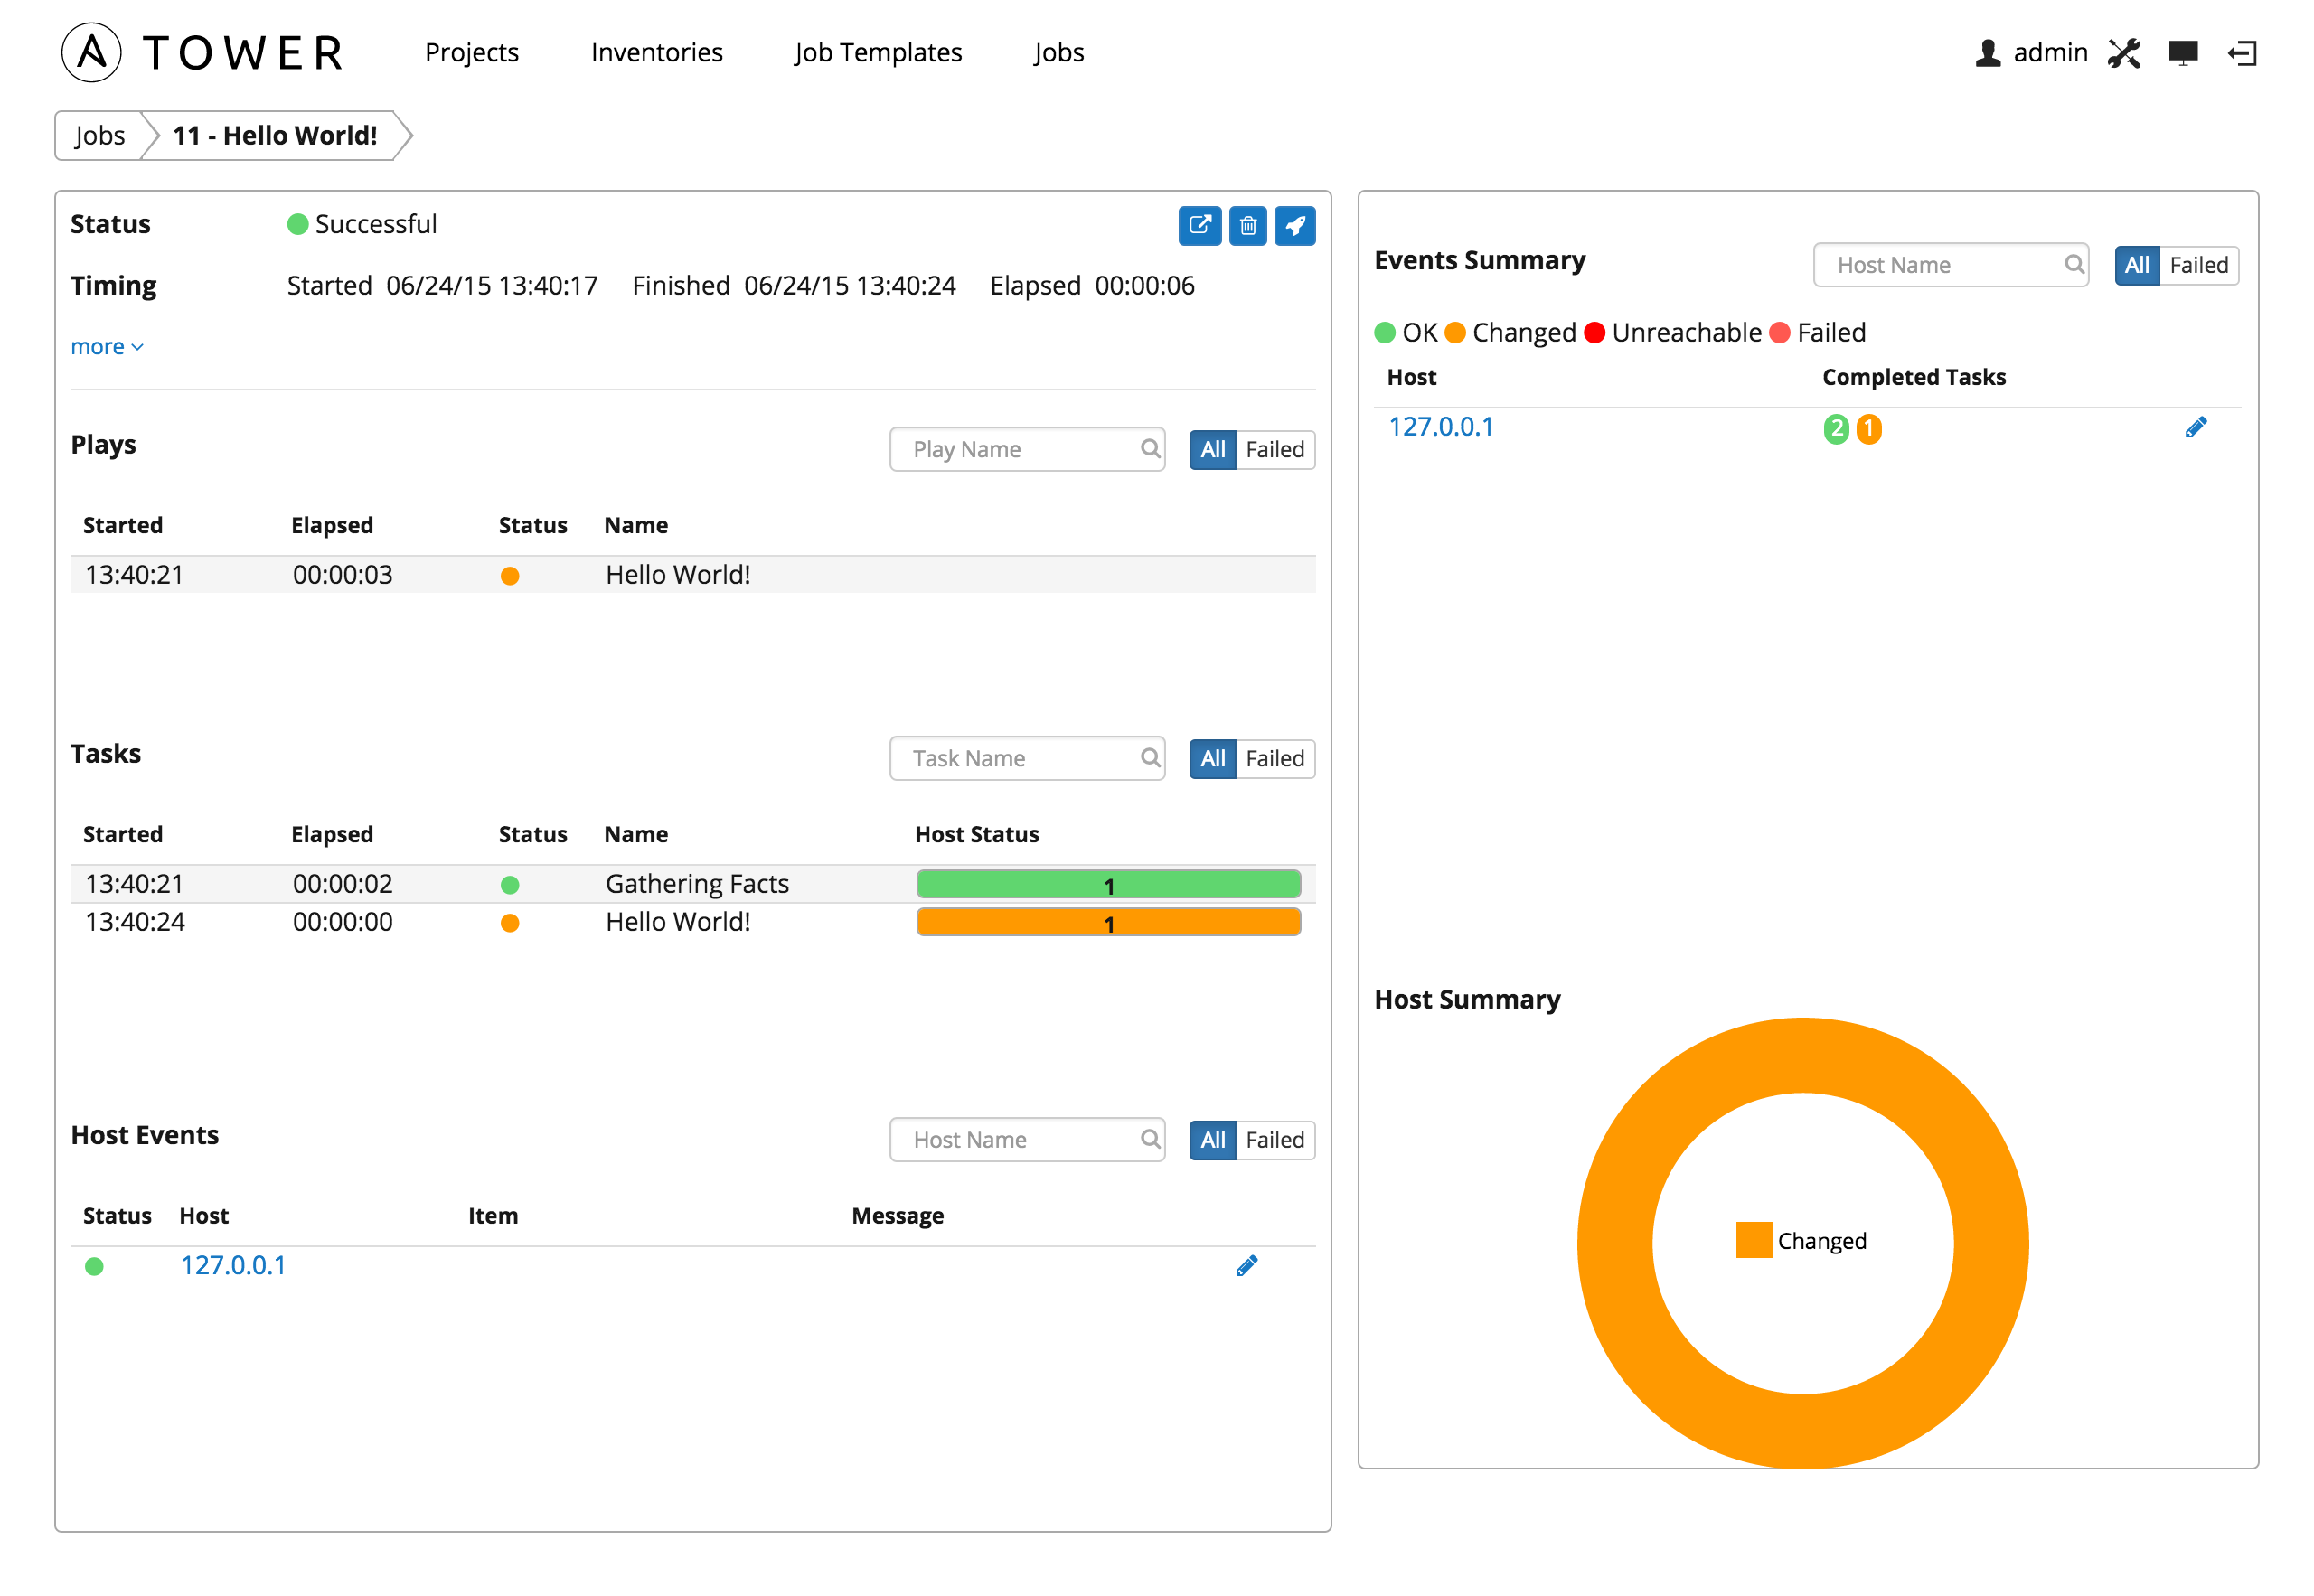
The Jobs page for Playbook Run jobs shows details of all the tasks and events for that playbook run.
The Jobs page consists of multiple areas: Status, Plays, Tasks, Host Events, Events Summary, and Hosts Summary.

11.2.1. Status
The Status area shows the basic status of the job–Running, Pending, Successful, or Failed–and its start time. The buttons in the top right of the status page allow you to view the standard output of the job run, delete the job run, or relaunch the job.
Clicking on more gives the basic settings for this job:
- the job Template for this job
- the Job Type of Run, Check, or Scan
- the Launched by username associated with this job
- the Inventory associated with this job
- the Project associated with this job
- the Playbook that is being run
- the Credential in use
- the Verbosity setting for this job
- any Extra Variables that this job used
By clicking on these items, where appropriate, you can view the corresponding job templates, projects, and other Tower objects.
11.2.2. Plays
The Plays area shows the plays that were run as part of this playbook. The displayed plays can be filtered by Name, and can be limited to only failed plays.
For each play, Tower shows the start time for the play, the elapsed time of the play, the play Name, and whether the play succeeded or failed. Clicking on a specific play filters the Tasks and Host Events area to only display tasks and hosts relative to that play.
11.2.3. Tasks
The Tasks area shows the tasks run as part of plays in the playbook. The displayed tasks can be filtered by Name, and can be limited to only failed tasks.
For each task, Tower shows the start time for the task, the elapsed time of the task, the task Name, whether the task succeeded or failed, and a summary of the host status for that task. The host status displays a summary of the hosts status for all hosts touched by this task. Host status can be one of the following:
- Success: the playbook task returned “Ok”.
- Changed: the playbook task actually executed. Since Ansible tasks should be written to be idempotent, tasks may exit successfully without executing anything on the host. In these cases, the task would return Ok, but not Changed.
- Failure: the task failed. Further playbook execution was stopped for this host.
- Unreachable: the host was unreachable from the network or had another fatal error associated with it.
- Skipped: the playbook task was skipped because no change was necessary for the host to reach the target state.
Clicking on a specific task filters the Host Events area to only display hosts relative to that task.
11.2.4. Host Events
The Host Events area shows hosts affected by the selected play and task. For each host, Tower shows the host’s status, its name, and any Item or Message set by that task.
Click the  button to edit the host’s properites (hostname, description, enabled or not, and variables).
Clicking on the linked hostname brings up the Host Event dialog for that host and task.
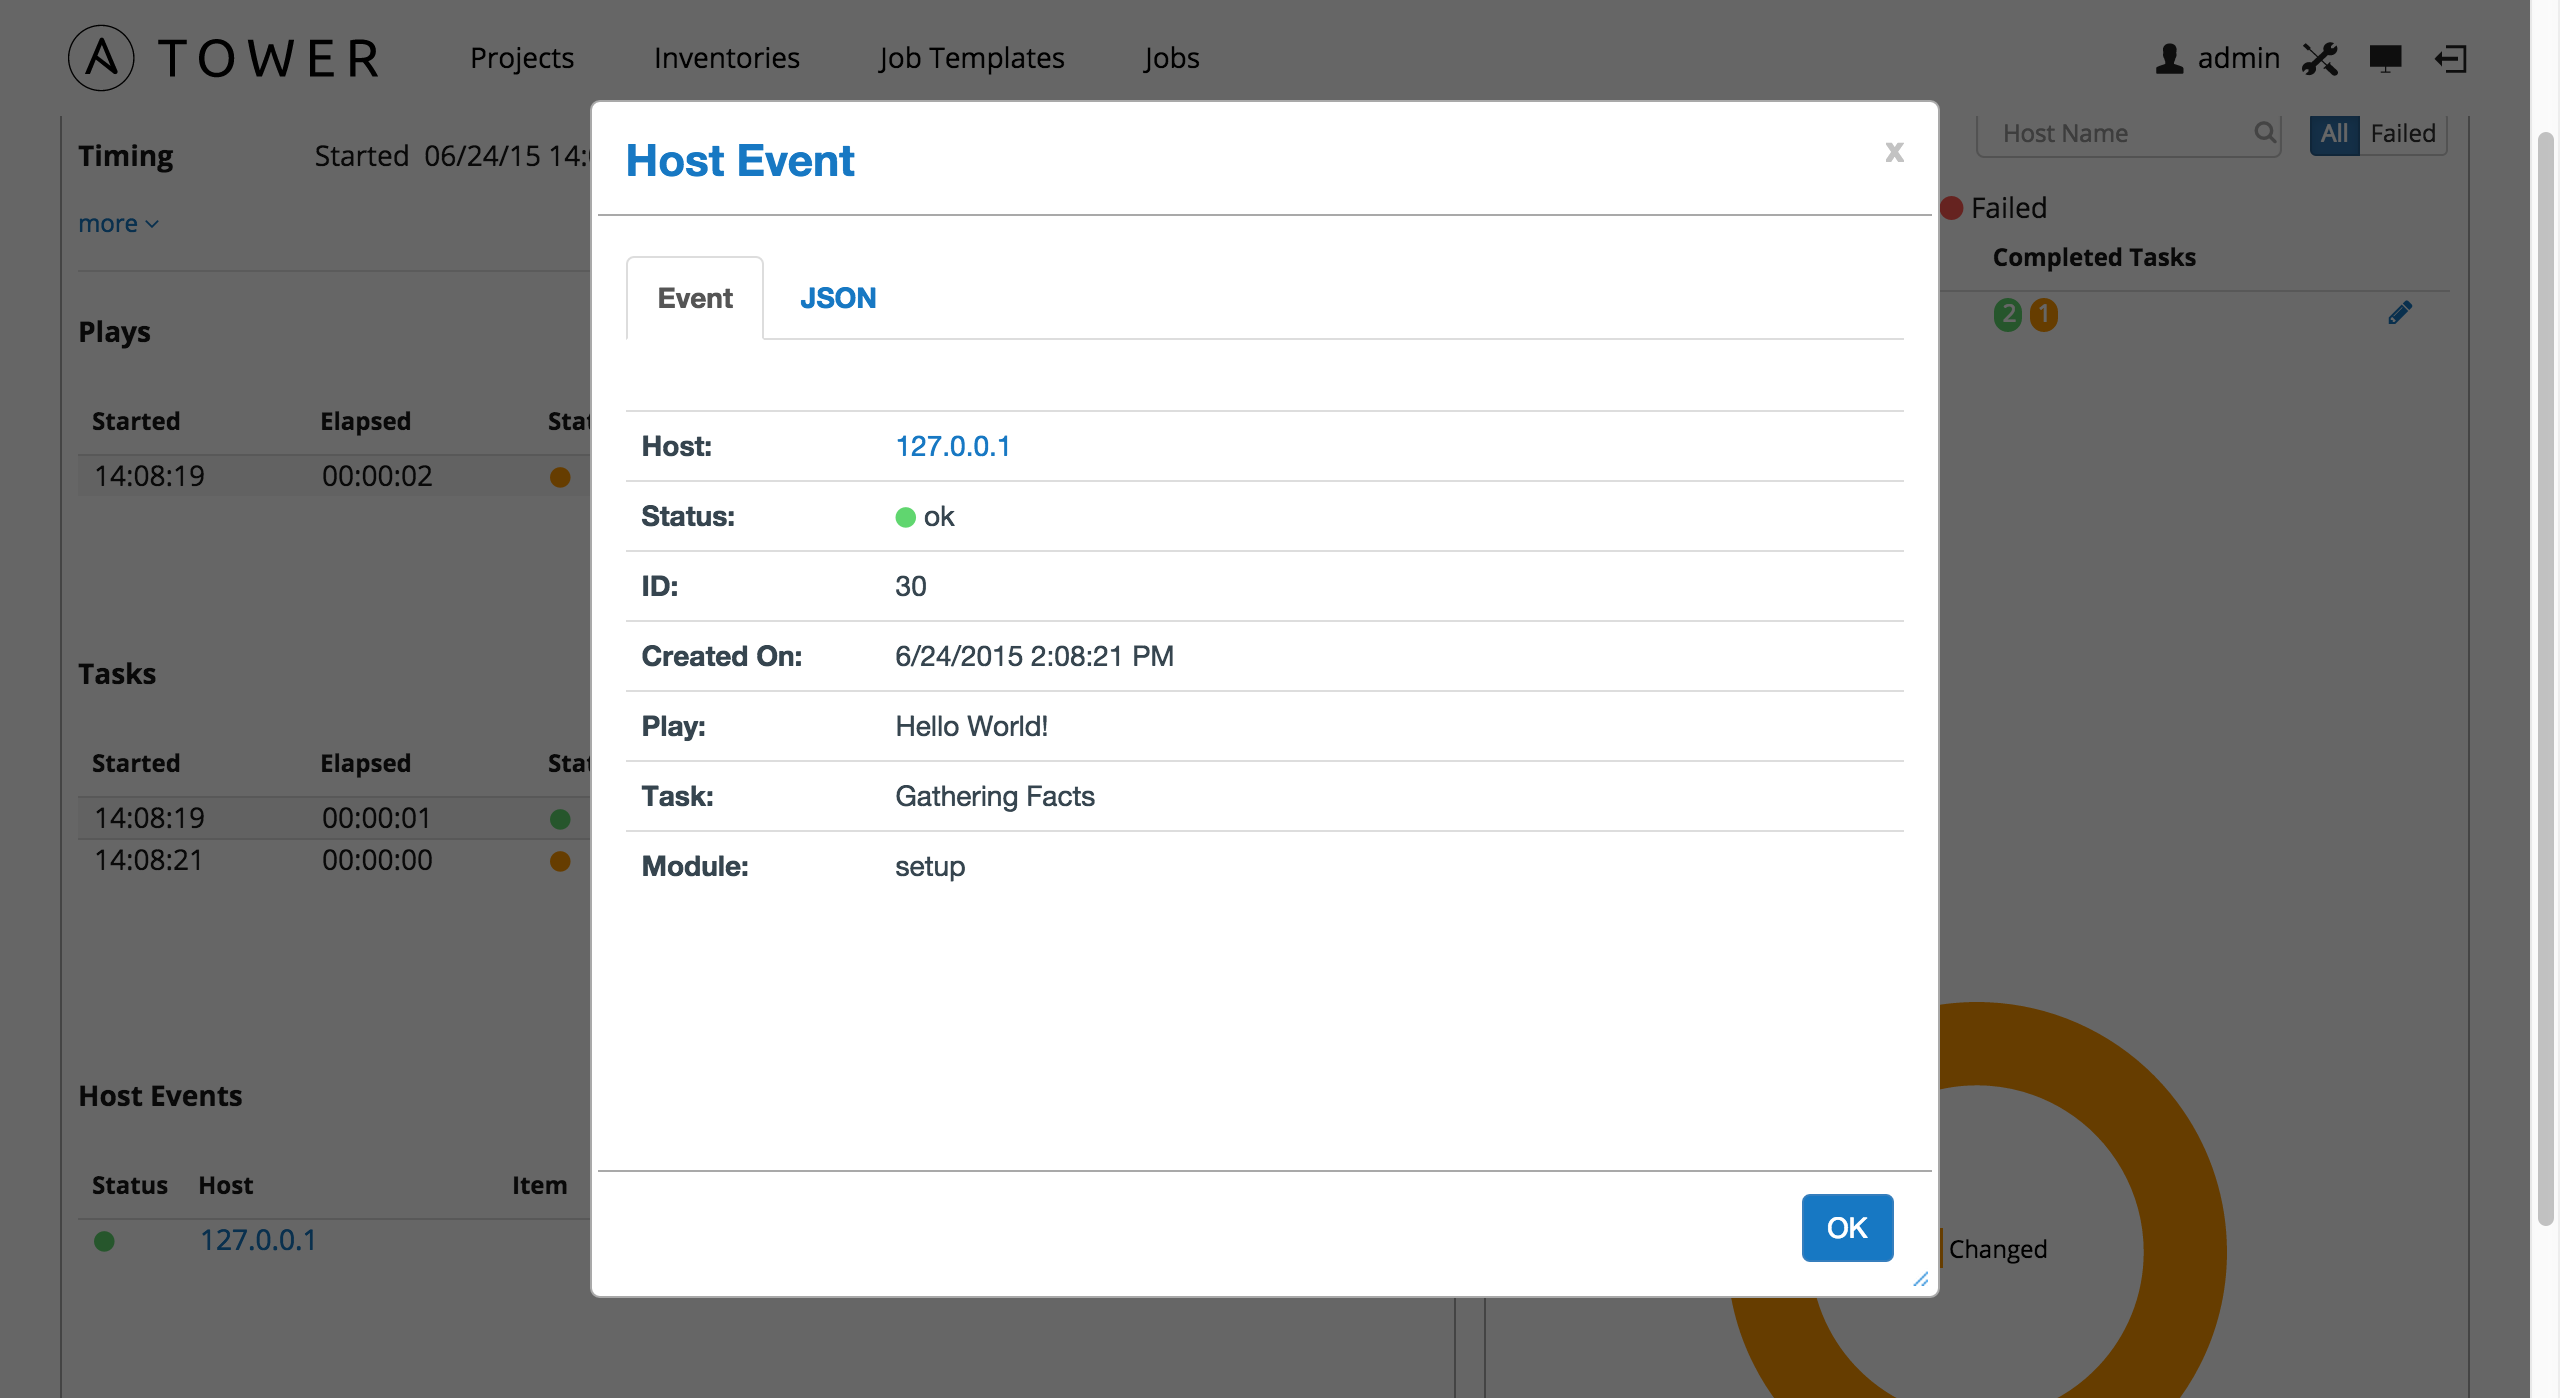
The Host Event dialog shows the events for this host and the selected play and task:
- the Host
- the Status
- a unique ID
- a Created On time stamp
- the Role for this task
- the name of the Play
- the name of the Task
- if applicable, the Ansible Module for the task, and any arguments for that module
There is also a JSON tab which displays the result in JSON format.

11.2.5. Events Summary
The Events Summary area shows a summary of events for all hosts affected by this playbook. Hosts can be filtered by their hostname, and can be limited to showing only changed, failed, OK, and unreachable hosts.
For each host, the Events Summary area shows the hostname and the number of completed tasks for that host, sorted by status.
Click the  button to edit the host’s properites (hostname, description, enabled or not, and variables).
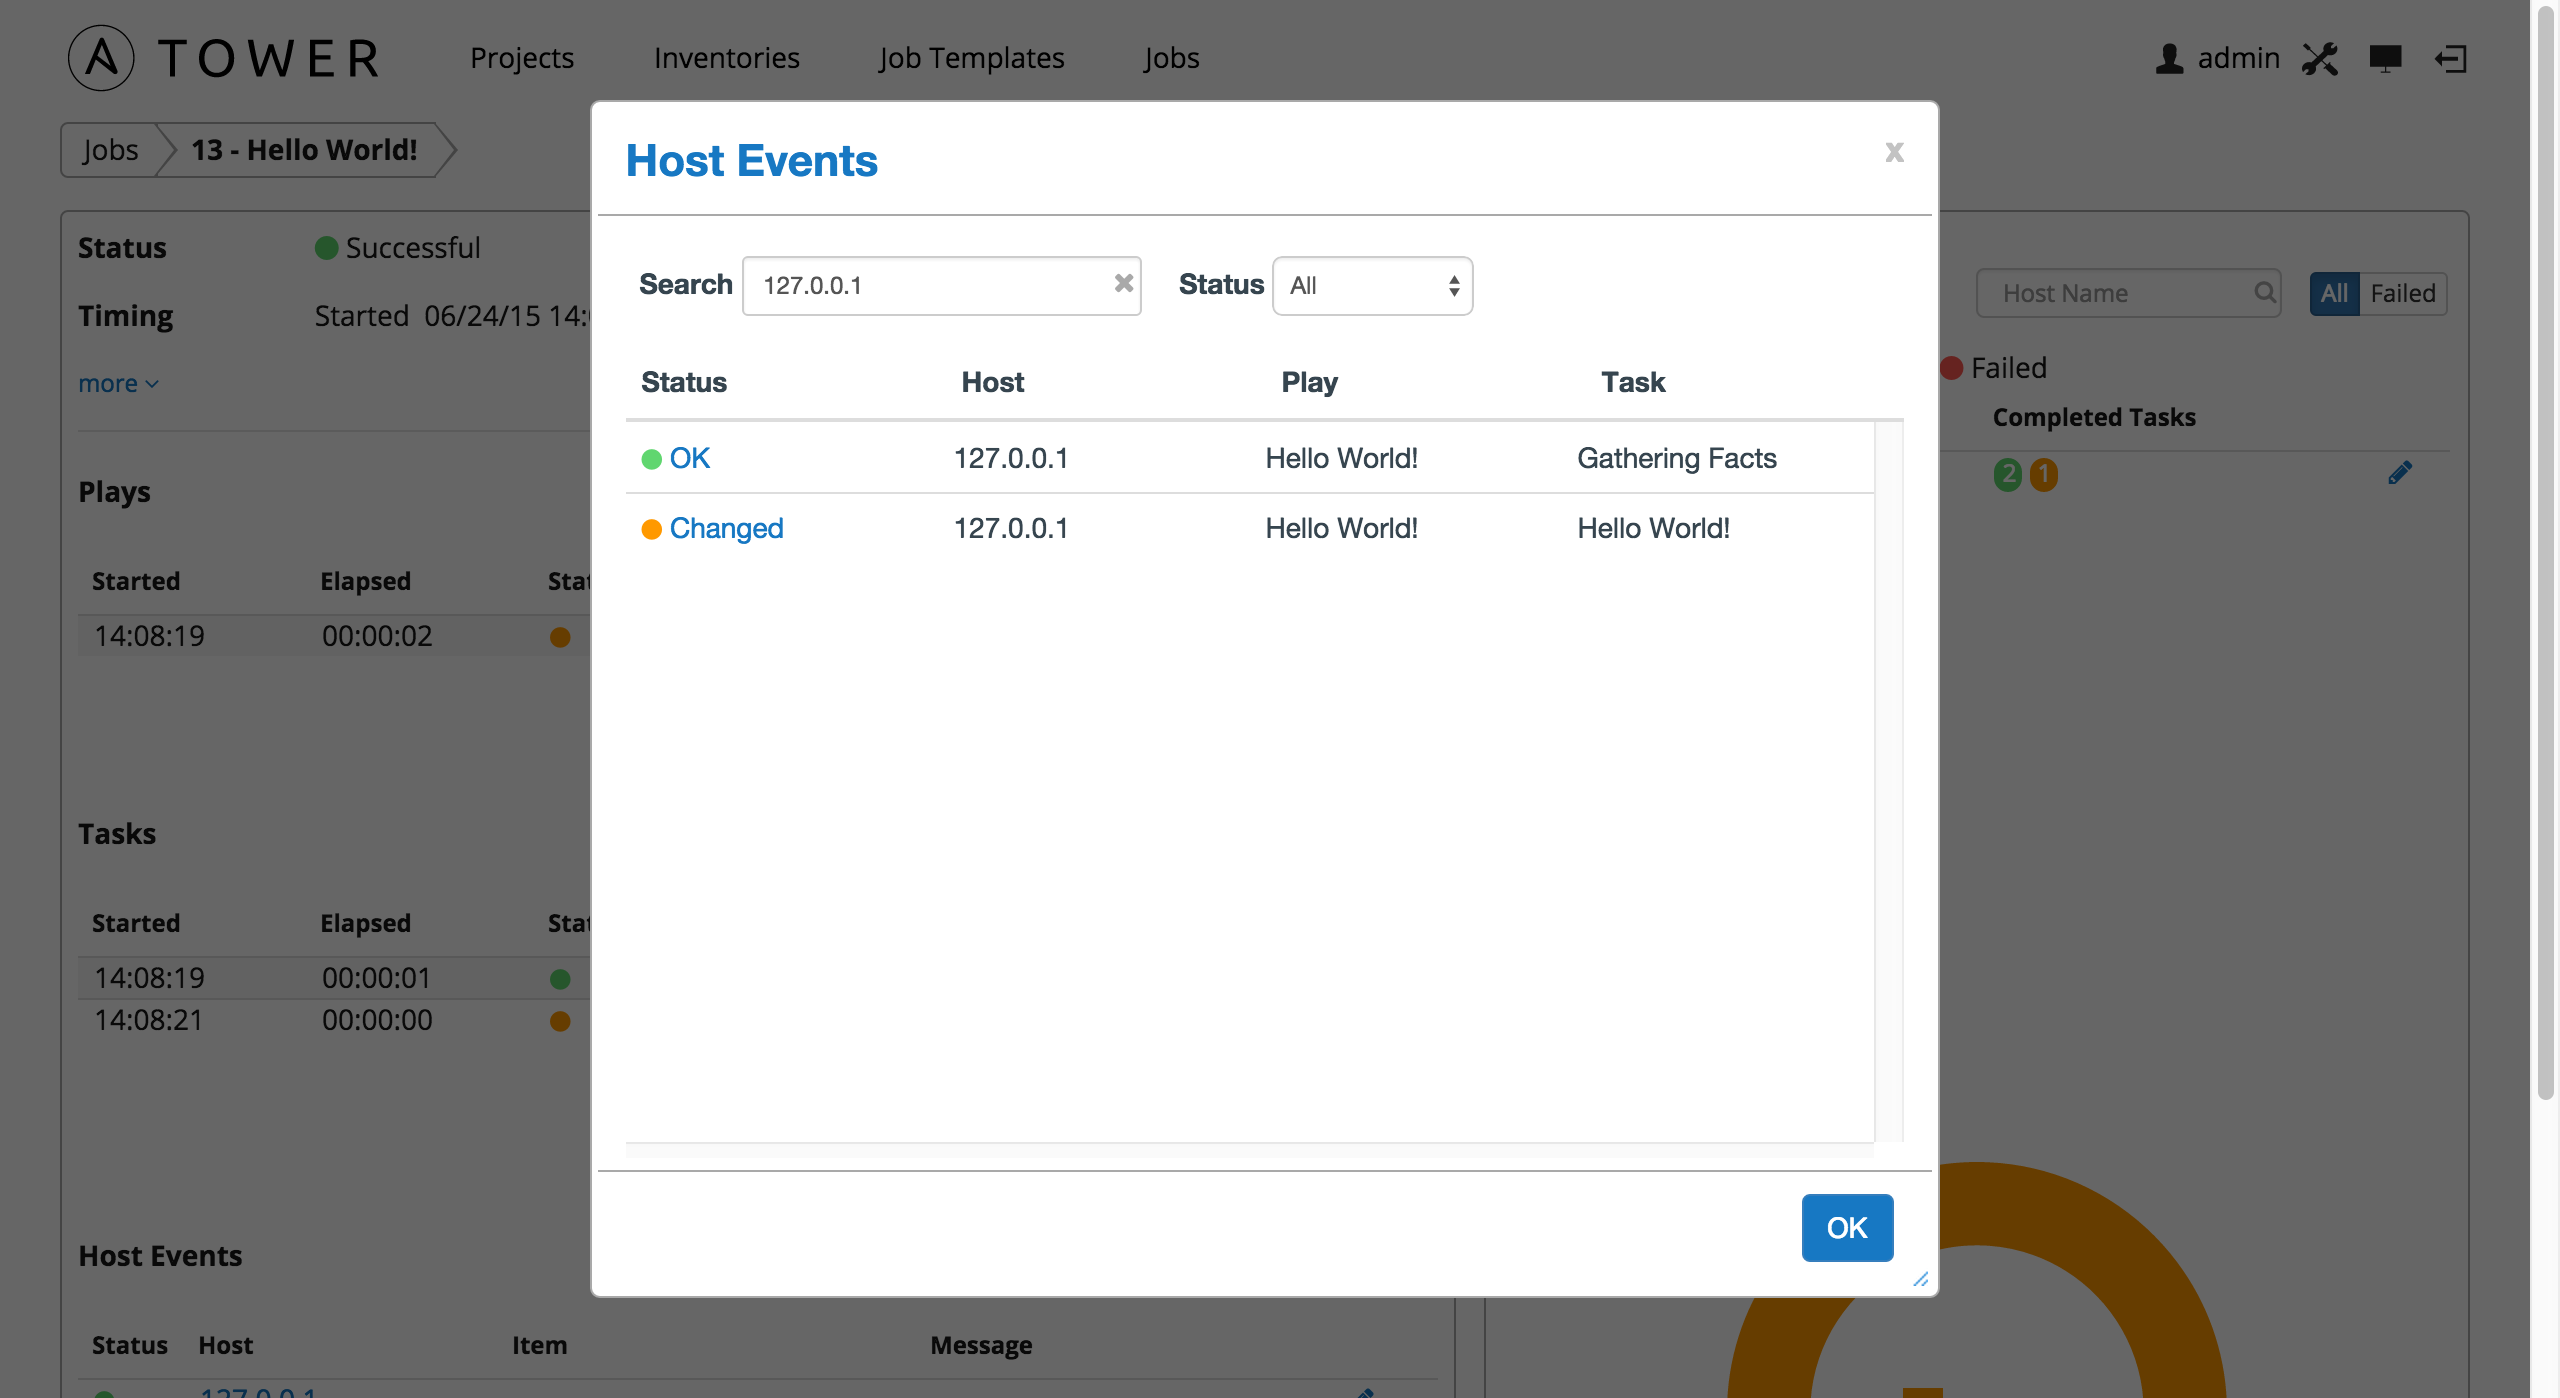
Clicking on the hostname brings up a Host Events dialog, displaying all tasks that affected that host.
This dialog can be filtered by the result of the tasks, and also by the hostname. For each event, Tower displays the status, the affected host, the play name, and the task name. Clicking on the status brings up a the same Host Event dialog that would be shown for that host and event from the Host Events area.

11.2.6. Host Summary
The Host Summary area shows a graph summarizing the status of all hosts affected by this playbook run.
11.3. Job Concurrency
Tower limits the number of simultaneous jobs that can run based on the amount of physical memory and the complexity of the playbook.
If the “Update on Launch” setting is checked, job templates that rely on the inventory or project also trigger an update on them if it is within the cache timeout. If multiple jobs are launched within the cache timeout that depend on the same project or inventory, only one of those project or inventory updates is created (instead of one for each job that relies on it).
If you are having trouble, try setting the cache timeout on the project or inventory source to 60 seconds.
The restriction related to the amount of RAM on your Tower server and the size of your inventory equates to the total number of machines from which facts can be gathered and stored in memory. The algorithm used is:
50 + ((total memory in megabytes) / 1024) - 2) * 75
With 50 as the baseline.
Each job that runs is:
(number of forks on the job) * 10
Which defaults to 50 if the limit is set to 0 in Tower, the default value.
Forks determine the default number of parallel processes to spawn when communicating with remote hosts. The fork number is automatically limited to the number of possible hosts, so this is really a limit of how much network and CPU load you can handle. Many users set this to 50, while others set it to 500 or more. If you have a large number of hosts, higher values will make actions across all of those hosts complete faster. You can edit the ansible.cfg file to change this value.
The Ansible fork number default is extremely conservative and is set to five (5). When you do not pass a forks value in Tower (leaving it as 0), Ansible uses 5 forks (the default). If you set your forks value to one (1) in Tower, Ansible uses the value entered and one (1) fork is created. Non-zero inputs are used as instructed.
As an example, if you have a job with 0 forks (the Tower default) on a system with 2 GB of memory, your algorithm would look like the following:
50 + ((2048 / 1024) - 2) * 75 = 50
If you have a job with 0 forks (the Tower default) on a system with 4 GB of memory then you can run four (4) tasks simultaneously which includes callbacks.
50 + ((4096 / 1024) - 2) * 75 = 200
This can be changed by setting a value in the Tower settings file (/etc/tower/conf.d) such as:
SYSTEM_TASK_CAPACITY = 300
If you want to override the setting, use caution, as you may run out of RAM if you set this value too high. You can determine what the calculated setting is by reviewing /var/log/supervisor/awx-task-manager.log and looking for a line similar to:
Running Nodes: []; Capacity: 50; Running Impact: 0; Remaining Capacity: 50
The Capacity: 50 is the current calculated setting.
As long as you have the capacity to do so, Tower attempts to reorder and run the most number of jobs possible. There are some blockers and exceptions worth noting, however.
- A Job Template will block the same instance of another Job Template.
- A project update will block for another project requiring the same update.
- Job Templates which launch via a provisioning callbacks can run, just not as an instance on the same host. This allows running two (2) templates on the same inventory. However, if the inventory requires an update, they will not run. Callbacks are special types of job templates which receive “push requests” from the host to the inventory. They run on one host only and can run parallel with other jobs as long as they are different callbacks and different hosts.
- System Jobs can only run one at a time. They block all other jobs and must be run on their own to avoid conflict. System jobs will finish behind jobs schedule ahead of them, but will finish ahead of those jobs scheduled behind it.
- Ad hoc jobs are blocked by any inventory updates running against the inventory for that ad hoc job as specified.
