19. トークンベースの認証
Ansible Tower 3.3 以降、OAuth 2 がトークンベースの認証に使用されます。OAuth トークン、アプリケーション、トークン生成に使用する API クライアントのサーバー側の表現を管理できます。HTTP 認証ヘッダーの一部として OAuth トークンを追加して、自身の認証を行い、基本の RBAC パーミッションの他に制限するパーミッション範囲を調節します。OAuth 2 仕様の詳細は、「 RFC 6749 」を参照してください。
manage ユーティリティーを使用してトークンを作成する方法は、「トークンおよびセッション管理 」セクションを参照してください。
19.1. OAuth 2 アプリケーションおよびトークンの管理
アプリケーションおよびトークンは、/api/<version>/applications および /api/<version>/tokens でトップレベルリソースとして管理できます。これらのリソースは、各ユーザーに対応する /api/<version>/users/N/<resource> からもアクセスできます。アプリケーションは、api/<version>/applications または /api/<version>/users/N/applications に POST を要求することで作成できます。
OAuth 2 アプリケーションはそれぞれ、サーバー側で特定の API クライントを表現します。API クライアントがアプリケーショントークン経由で API を使用するには、アプリケーションを先に用意し、アクセストークンを発行する必要があります。個別のアプリケーションは、/api/<version>/applications/<pk>/ の主要キー経由でアクセス可能です。以下は、一般的なアプリケーションです。
    {
    "id": 1,
    "type": "o_auth2_application",
    "url": "/api/v2/applications/2/",
    "related": {
        "tokens": "/api/v2/applications/2/tokens/"
    },
    "summary_fields": {
        "organization": {
            "id": 1,
            "name": "Default",
            "description": ""
        },
        "user_capabilities": {
            "edit": true,
            "delete": true
        },
        "tokens": {
            "count": 0,
            "results": []
        }
    },
    "created": "2018-07-02T21:16:45.824400Z",
    "modified": "2018-07-02T21:16:45.824514Z",
    "name": "My Application",
    "description": "",
    "client_id": "Ecmc6RjjhKUOWJzDYEP8TZ35P3dvsKt0AKdIjgHV",
    "client_secret": "7Ft7ym8MpE54yWGUNvxxg6KqGwPFsyhYn9QQfYHlgBxai74Qp1GE4zsvJduOfSFkTfWFnPzYpxqcRsy1KacD0HH0vOAQUDJDCidByMiUIH4YQKtGFM1zE1dACYbpN44E",
    "client_type": "confidential",
    "redirect_uris": "",
    "authorization_grant_type": "password",
    "skip_authorization": false,
    "organization": 1
}
As shown in the example above, name is the human-readable identifier of the application. The rest of the fields, like client_id and redirect_uris, are mainly used for OAuth2 authorization, which is covered later in パーソナルアクセストークン (PAT) 向けの OAuth2 トークンシステムの使用.
client_id および client_secret フィールドの値は作成時に生成されるアプリケーション識別子で、編集できません。反対に、organization および authorization_grant_type は作成時に必要で、その後に編集不可になります。
19.1.1. アプリケーションのアクセスルール
アプリケーションのアクセスルールは以下のとおりです。
システム管理者は、システム内の全アプリケーションを表示し、操作できます。
組織の管理者は、組織メンバーに属するアプリケーションすべてを表示し、操作できます。
他のユーザーは、自身のアプリケーションの表示、更新、削除が可能ですが、新規アプリケーションは作成できません。
Tokens, on the other hand, are resources used to actually authenticate incoming requests and mask the permissions of the underlying user. There are two ways to create a token:
POST to the
/api/v2/tokens/endpoint withapplicationandscopefields to point to the related application and specify token scopePOST to the
/api/v2/applications/<pk>/tokens/endpoint with thescopefield (the parent application will be automatically linked)
Individual tokens are accessible via their primary keys: /api/<version>/tokens/<pk>/. Here is an example of a typical token:
{
    "id": 4,
    "type": "o_auth2_access_token",
    "url": "/api/v2/tokens/4/",
    "related": {
        "user": "/api/v2/users/1/",
        "application": "/api/v2/applications/1/",
        "activity_stream": "/api/v2/tokens/4/activity_stream/"
},
    "summary_fields": {
        "application": {
            "id": 1,
            "name": "Default application for root",
            "client_id": "mcU5J5uGQcEQMgAZyr5JUnM3BqBJpgbgL9fLOVch"
        },
        "user": {
            "id": 1,
            "username": "root",
            "first_name": "",
            "last_name": ""
        }
    },
    "created": "2018-02-23T14:39:32.618932Z",
    "modified": "2018-02-23T14:39:32.643626Z",
    "description": "App Token Test",
    "user": 1,
    "token": "*************",
    "refresh_token": "*************",
    "application": 1,
    "expires": "2018-02-24T00:39:32.618279Z",
    "scope": "read"
},
OAuth 2 トークンでは、完全に編集可能なフィールドは scope と description だけです。以下のように、application フィールドは更新時に編集不可で、他のフィールドはすべて編集できず、作成時に自動生成されます。
userフィールドは、作成したトークンの対象ユーザーと同じです。今回は、トークンを作成したユーザーもこれになります。expiresは、Tower の設定OAUTH2_PROVIDERに基づいて生成されます。tokenおよびrefresh_tokenは、クラッシュなしの乱数文字列として自動生成されます。
アプリケーショントークンとパーソナルアクセストークンは両方、/api/v2/tokens/ エンドポイントに表示されます。パーソナルアクセストークンの application フィールドは常に null です。これは、2 種類のトークンを区別するのに適した方法です。
19.1.2. トークンのアクセスルール
トークンのアクセスルールは以下のとおりです。
ユーザーは、関連のアプリケーションを表示できる場合にはトークンを作成でき、自身の個人トークンも作成可能です。
システム管理者は、システム内の全トークンを表示し、操作できます。
組織の管理者は、組織メンバーに属する全トークンの表示と操作が可能です。
システム監査者は全トークンおよびアプリケーションの表示が可能です。
他の通常ユーザーは自身のトークンのみの表示と操作が可能です。
注釈
ユーザーは、トークンの表示または、作成時にのみトークンの値の更新が可能です。
19.2. パーソナルアクセストークン (PAT) 向けの OAuth2 トークンシステムの使用
The easiest and most common way to obtain an OAuth 2 token is to create a personal access token at the /api/v2/users/<userid>/personal_tokens/ endpoint, as shown in this example below:
curl -ku <user>:<password> -H "Content-Type: application/json" -X POST \
-d '{"description":"Personal Tower CLI token", "application":null, "scope":"write"}' \
https://<tower>/api/v2/users/<userid>/personal_tokens/ | python -m json.tool
以下は、curl を使用して API エンドポイントにアクセスするためにパーソナルトークンを使用する例です。
curl -k -H "Authorization: Bearer <token>" -H "Content-Type: application/json" -X POST -d '{}' https://tower/api/v2/job_templates/5/launch/
In Ansible Tower, the OAuth 2 system is built on top of the Django Oauth Toolkit, which provides dedicated endpoints for authorizing, revoking, and refreshing tokens. These endpoints can be found under the /api/o/ endpoint, which also provides detailed examples on some typical usage of those endpoints. These special OAuth 2 endpoints only support using the x-www-form-urlencoded Content-type, so none of the api/o/* endpoints accept application/json.
注釈
/api/o/ エンドポイントは、アプリケーショントークン用としてだけ使用でき、パーソナルアクセストークンには有効ではありません。
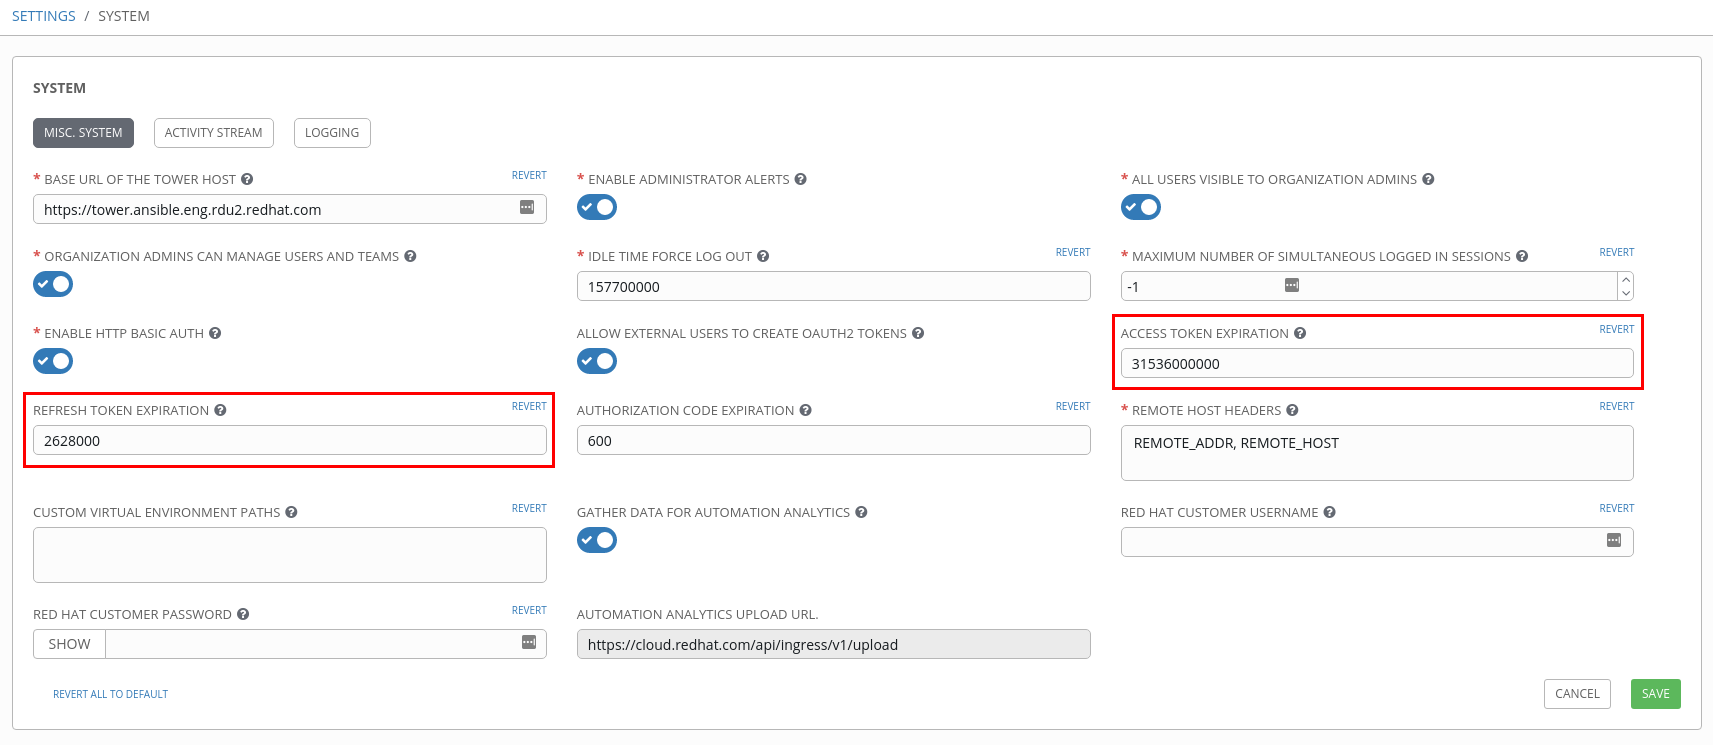
Alternatively, you can add tokens for users through the Tower User Interface, as well as configure the expiration of an access token and its associated refresh token (if applicable).

19.2.1. RBAC システム全体のトークンスコープのマスク
OAuth 2 トークンのスコープは、有効なスコープキーワード「read」と「write」で構成されるスペース区切りの文字列です。これらのキーワードは、設定可能で、認証済みの API クライアントのパーミッションレベルを指定するのに使用します。Read (読み取り) および Write (書き込み) スコープを設定することで、Ansible Tower のロールベースアクセス制御 (RBAC: Role-Based Access Control) パーミッションシステムにマスク層を提供します。具体的には、「write」スコープでは、RBAC システムが提供する全パーミッションを認証済みのユーザーに付与し、「read」スコープでは RBAC システムが提供する読み取りパーミッションのみを認証済みのユーザーに付与します。「write」パーミッションには、「read」も含まれている点に注意してください。
たとえば、ジョブテンプレートに管理者権限がある場合には、セッションまたは Basic 認証で認証済みであればジョブテンプレートの表示、変更、起動、削除が可能です。反対に、OAuth 2 トークンを使用して認証しており、関連のトークンスコープが 'read' の場合は、管理者であってもジョブテンプレートの表示はできますが、操作や起動はできません。トークンスコープが 'write' または 'read write' の場合は、管理者としてジョブテンプレートをすべて活用できます。
トークンを取得して使用するには、まずアプリケーショントークンを作成します。
アプリケーションの
authorization_grant_typeをpasswordに設定します。以下の HTTP POST 要求を/api/v2/applications/エンドポイントに実行します (独自の組織 ID を指定)。
{
    "name": "Admin Internal Application",
    "description": "For use by secure services & clients. ",
    "client_type": "confidential",
    "redirect_uris": "",
    "authorization_grant_type": "password",
    "skip_authorization": false,
    "organization": <organization-id>
}
トークンを作成して、POST 要求を
/api/v2/tokens/エンドポイントに実行します。
{
    "description": "My Access Token",
    "application": <application-id>,
    "scope": "write"
}
これで、今後の要求の認証に使用できるように <token-value> を返します (これは今後表示されません)。
このトークンを使用してリソースにアクセスします。以下は、例として curl を使用します。
curl -H "Authorization: Bearer <token-value>" -H "Content-Type: application/json" -X GET https://<tower>/api/v2/users/
CA をまだ設定しておらず、SSL を使用する場合には、-k フラグが必要な場合があります。
トークンを取り消すには、そのトークンに対して、トークンの ID を使用し、詳細ページで DELETE 要求を実行します。以下に例を示します。
curl -ku <user>:<password> -X DELETE https://<tower>/api/v2/tokens/<pk>/
同様に、トークンを使用する場合:
curl -H "Authorization: Bearer <token-value>" -X DELETE https://<tower>/api/v2/tokens/<pk>/ -k
19.3. アプリケーションの機能
このページには、認証、トークンの更新、および取り消しに使用される OAuth 2 ユーティリティーエンドポイントが一覧表示されます。/api/o/ エンドポイントはブラウザーで使用するためのものではなく、HTTP GET をサポートしていません。ここで示されているエンドポイントは、OAuth 2 の RFC 仕様に厳密に準拠しているため、詳細なリファレンスとして使用してください。以下は、特にさまざまな付与タイプでアプリケーションを作成する場合など、Tower でこのようなエンドポイントを使用する一般的な例を紹介しています。
認可コード
パスワード
implicit の付与タイプは Ansible Tower 3.6 では削除されました。
注釈
Tower ユーザーインターフェースを使用して、個々に記載のアプリケーション機能を実行できます。詳細は、『Ansible Tower User Guide 』の「 Applications 」セクションを参照してください。
19.3.1. authorization code 付与タイプを使用したアプリケーション
アクセストークンを外部アプリケーションまたはサービスに直接発行する必要がある場合は、アプリケーションの authorization code 付与タイプを使用する必要があります。authorization-code の付与タイプを使用して AuthCodeApp という名前のアプリケーションを作成するには、以下のようにして、/api/v2/applications/ エンドポイントに対して POST を実行します。
{
    "name": "AuthCodeApp",
    "user": 1,
    "client_type": "confidential",
    "redirect_uris": "http://<tower>/api/v2",
    "authorization_grant_type": "authorization-code",
    "skip_authorization": false
}


.. _`Django-oauth-toolkit simple test application`: http://django-oauth-toolkit.herokuapp.com/consumer/
response_type、client_id、redirect_uris および scope で、クライアントアプリケーションから authorize エンドポイントに、GET 要求を実行すると発生するワークフロー
Tower は、アプリケーションに指定されている
redirect_uriに対して、認可コードとステータスで応答します。次にクライアントアプリケーションは、
code、client_id、client_secret、grant_typeおよびredirect_uriを指定して、Tower のapi/o/token/エンドポイントに、POST 要求を実行します。Tower は、
access_token、token_type、refresh_tokenおよびexpires_inで応答します。
このフローのテストは、「 Django's Test Your Authorization Server 」ツールキットを参照してください。
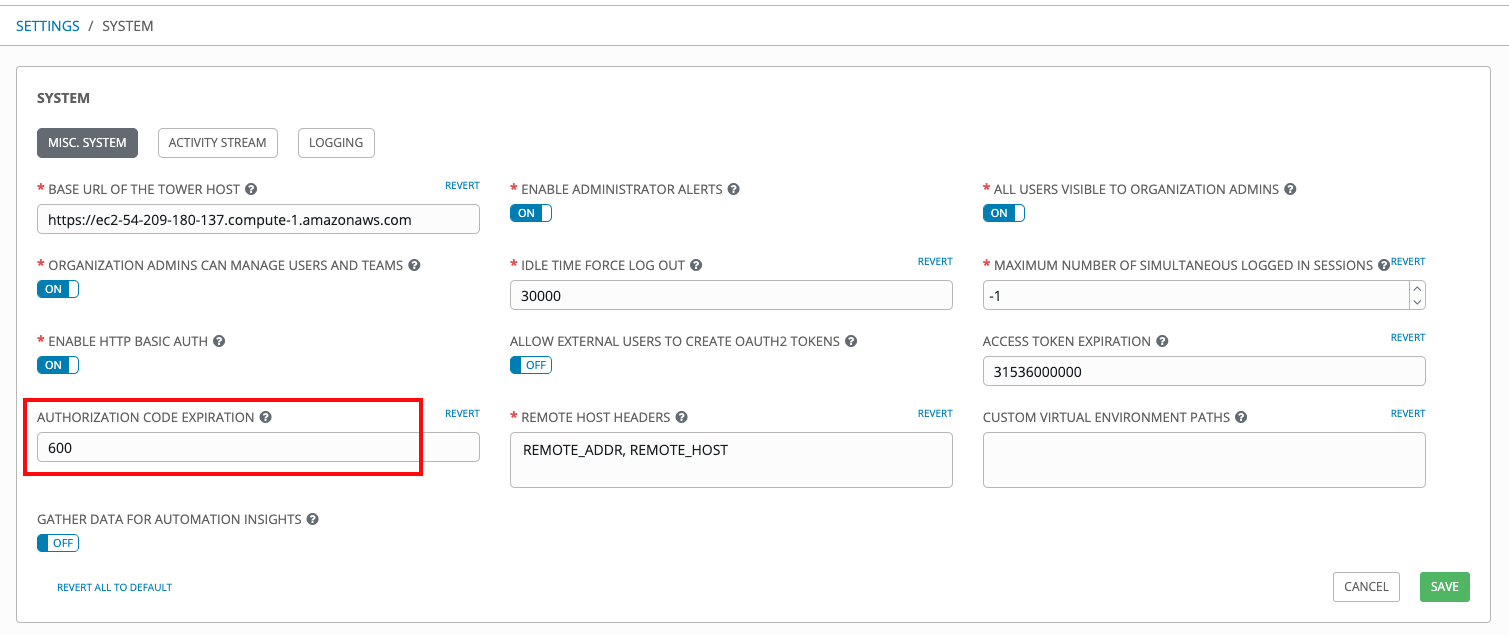
Tower の設定の System 設定から、認可コードが有効な期間を秒単位で指定します。

この期間を過ぎてからアクセストークンを要求すると失敗します。「RFC6749 」の推奨をもとに、この期間は、600 秒 (10 分) にデフォルト設定されています。
認可コードの付与タイプを使用して Ansible Tower とのアプリの統合を設定する最適な方法は、これらのクロスサイト要求の送信元をホワイトリストに設定することです。より一般的に説明すると、アクセストークンを提供する対象である、Tower と統合するサービスやアプリケーションをホワイトリスト化する必要があります。そのためには、管理者に依頼して、以下のようにこのホワイトリストをローカルの Tower の設定に追加してもらいます。
CORS_ORIGIN_REGEX_WHITELIST = [
    r"http://django-oauth-toolkit.herokuapp.com*",
    r"http://www.example.com*"
]
ここで、http://django-oauth-toolkit.herokuapp.com および http://www.example.com は Tower にアクセスするのにトークンを必要とするアプリケーションです。
19.3.2. password 付与タイプを使用したアプリケーション
このタイプは、resource owner credentials grant とも呼ばれます。これは、Web アプリケーションにネイティブアクセスのあるユーザーに最適で、クライアントがリソースの所有者である場合に使用すると良いでしょう。以下は、付与タイプが password の 'Default Application' のアプリケーションを前提としています。
{
    "id": 6,
    "type": "application",
    ...
    "name": "Default Application",
    "user": 1,
    "client_id": "gwSPoasWSdNkMDtBN3Hu2WYQpPWCO9SwUEsKK22l",
    "client_secret": "fI6ZpfocHYBGfm1tP92r0yIgCyfRdDQt0Tos9L8a4fNsJjQQMwp9569eIaUBsaVDgt2eiwOGe0bg5m5vCSstClZmtdy359RVx2rQK5YlIWyPlrolpt2LEpVeKXWaiybo",
    "client_type": "confidential",
    "redirect_uris": "",
    "authorization_grant_type": "password",
    "skip_authorization": false
}
password の付与タイプにはロギングは必要ないので、curl を使用して /api/v2/tokens/ エンドポイントからパーソナルアクセストークンを取得するだけです。
curl -k --user <user>:<password> -H "Content-type: application/json" \
-X POST \
--data '{
    "description": "Token for Nagios Monitoring app",
    "application": 1,
    "scope": "write"
}' \
https://<tower>/api/v2/tokens/
注釈
特別な OAuth 2 エンドポイントは、x-www-form-urlencoded Content-type の使用のみをサポートするので、api/o/* のエンドポイントで application/json を受け入れるものはありません。
成功すると、JSON 形式でアクセストークンを含めて応答が表示され、トークンと他の情報が更新されます。
HTTP/1.1 200 OK
Server: nginx/1.12.2
Date: Tue, 05 Dec 2017 16:48:09 GMT
Content-Type: application/json
Content-Length: 163
Connection: keep-alive
Content-Language: en
Vary: Accept-Language, Cookie
Pragma: no-cache
Cache-Control: no-store
Strict-Transport-Security: max-age=15768000

{"access_token": "9epHOqHhnXUcgYK8QanOmUQPSgX92g", "token_type": "Bearer", "expires_in": 315360000000, "refresh_token": "jMRX6QvzOTf046KHee3TU5mT3nyXsz", "scope": "read"}
19.4. アプリケーショントークンの機能
このセクションでは、トークンに関連する更新および取り消し機能について説明します。以降のすべて (/api/o/ エンドポイントでのトークンの更新と取り消し) は、現在アプリケーショントークンでしか実行できません。
19.4.1. 既存のアクセストークンの更新
以下の例には、提供された更新トークンと既存のアクセストークンが示されています。
{
    "id": 35,
    "type": "access_token",
    ...
    "user": 1,
    "token": "omMFLk7UKpB36WN2Qma9H3gbwEBSOc",
    "refresh_token": "AL0NK9TTpv0qp54dGbC4VUZtsZ9r8z",
    "application": 6,
    "expires": "2017-12-06T03:46:17.087022Z",
    "scope": "read write"
}
/api/o/token/ エンドポイントは、アクセストークンの更新に使用します。
curl -X POST \
    -d "grant_type=refresh_token&refresh_token=AL0NK9TTpv0qp54dGbC4VUZtsZ9r8z" \
    -u "gwSPoasWSdNkMDtBN3Hu2WYQpPWCO9SwUEsKK22l:fI6ZpfocHYBGfm1tP92r0yIgCyfRdDQt0Tos9L8a4fNsJjQQMwp9569eIaUBsaVDgt2eiwOGe0bg5m5vCSstClZmtdy359RVx2rQK5YlIWyPlrolpt2LEpVeKXWaiybo" \
    http://<tower>/api/o/token/ -i
上記の POST 要求では、refresh_token は、その上にあるアクセストークンの refresh_token フィールドから渡されます。認証情報の形式は <client_id>:<client_secret> で、client_id と client_secret は、配下にあるアクセストークンの関連アプリケーションの対応するフィールドに置き換えます。
注釈
特別な OAuth 2 エンドポイントは、x-www-form-urlencoded Content-type の使用のみをサポートするので、api/o/* のエンドポイントで application/json を受け入れるものはありません。
成功すると、JSON 形式で以前のものと同じスコープ情報を含む、新しい (更新済み) アクセストークンを含めて応答が表示されます。
HTTP/1.1 200 OK
Server: nginx/1.12.2
Date: Tue, 05 Dec 2017 17:54:06 GMT
Content-Type: application/json
Content-Length: 169
Connection: keep-alive
Content-Language: en
Vary: Accept-Language, Cookie
Pragma: no-cache
Cache-Control: no-store
Strict-Transport-Security: max-age=15768000

{"access_token": "NDInWxGJI4iZgqpsreujjbvzCfJqgR", "token_type": "Bearer", "expires_in": 315360000000, "refresh_token": "DqOrmz8bx3srlHkZNKmDpqA86bnQkT", "scope": "read write"}
基本的に、更新の操作では、元のトークンを削除した直後に、元のトークンと同じスコープと関連のアプリケーションを持つ新規トークンを作成することで、既存のトークンを置き換えます。/api/v2/tokens/ エンドポイントに、新しいトークンがあり、以前のトークンが削除されていることを確認してください。
19.4.2. アクセストークンの取り消し
同様に、/api/o/revoke-token/ エンドポイントを使用してアクセストークンを取り消すことができます。
この方法でアクセストークンを取り消すのも、トークンリソースオブジェクトを削除するのも同じですが、トークンの値と関連の client_id (およアプリケーションが confidential の場合には client_secret) を指定してトークンを削除することができます。
curl -X POST -d "token=rQONsve372fQwuc2pn76k3IHDCYpi7" \
-u "gwSPoasWSdNkMDtBN3Hu2WYQpPWCO9SwUEsKK22l:fI6ZpfocHYBGfm1tP92r0yIgCyfRdDQt0Tos9L8a4fNsJjQQMwp9569eIaUBsaVDgt2eiwOGe0bg5m5vCSstClZmtdy359RVx2rQK5YlIWyPlrolpt2LEpVeKXWaiybo" \
http://<tower>/api/o/revoke_token/ -i
注釈
特別な OAuth 2 エンドポイントは、x-www-form-urlencoded Content-type の使用のみをサポートするので、api/o/* のエンドポイントで application/json を受け入れるものはありません。
注釈
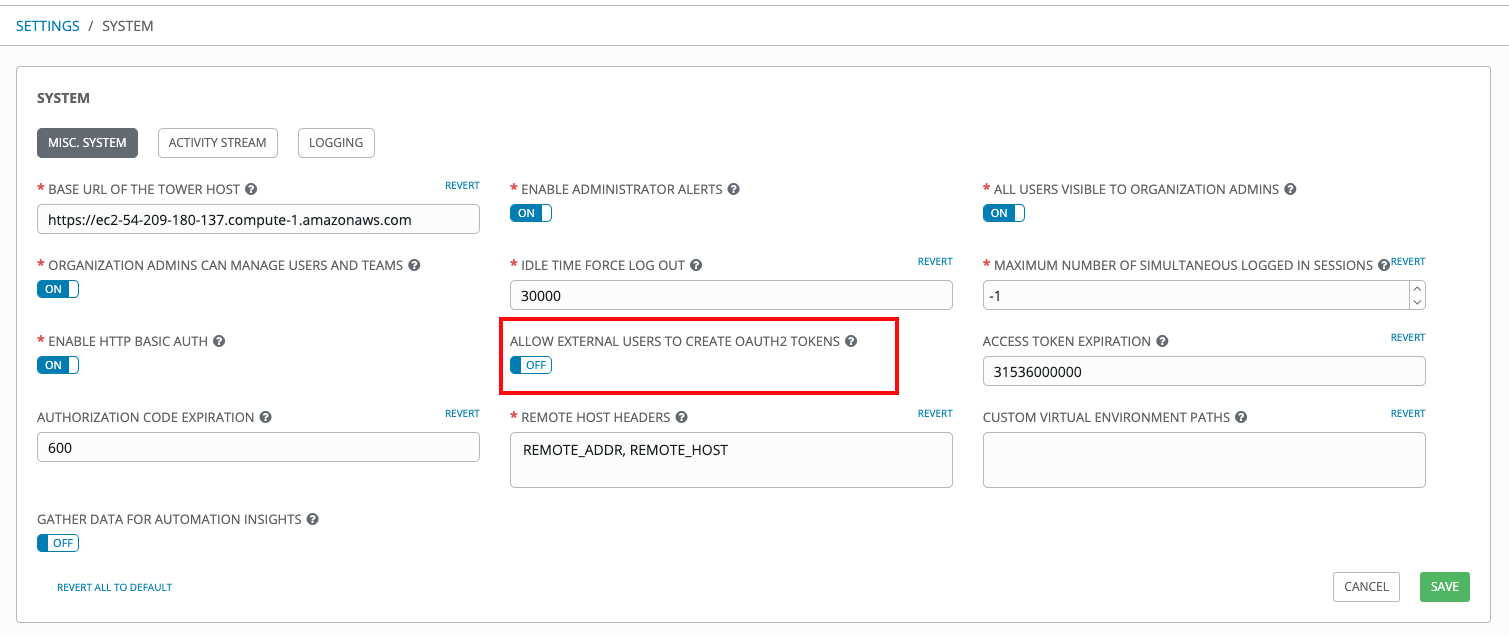
外部ユーザーによる OAuth2 トークンの作成を許可 (API では ALLOW_OAUTH2_FOR_EXTERNAL_USERS) の設定はデフォルトでは無効になっています。外部ユーザーは、LDAP やその他の SSO サービスなどのサービスで外部認証されたユーザーを指します。この設定では、外部ユーザーは独自のトークンを*作成*できません。有効にしてから再度無効にした場合には、有効にしていた期間に外部ユーザーが作成したトークンは依然として存在しますが、自動的に呼び出されません。
または、manage ユーティリティー 「 revoke_oauth2_tokens」を使用して、「トークンおよびセッション管理 」セクションに記載されているように、トークンを呼び出すことができます。
この設定は、Ansible Tower ユーザーインターフェースからシステムレベルで構成できます。

成功すると、200 OK の応答が表示されます。トークンが /api/v2/tokens/ エンドポイントに存在するかどうかをチェックして、削除されていることを確認します。
