Contributing to Ansible Navigator
Details can be found below on how to run these manually, our CI will also check them for you.
In order to contribute, you'll need to:
-
Fork the repository.
-
Create a branch, push your changes there.
-
Send it to us as a PR.
-
Iterate on your PR, incorporating the requested improvements and participating in the discussions.
Prerequisites:
-
Have {doc}
tox <tox:index>. -
Use {doc}
tox <tox:index>to run the tests. -
Before sending a PR, make sure that
lintpasses:$ tox -e lint lint create: .tox/lint lint installdeps: .[test] lint installed: ... lint run-test-pre: PYTHONHASHSEED='4242713142' lint run-test: commands[0] | pylint ansible_navigator tests ... ... _________________________________ summary __________________________________ lint: commands succeeded congratulations :)
Notice
Because the version of python is pinned to a specific version to ensure the
outcome of running tox -e lint locally is the same as tox -e lint being run
by github actions, you may see the following error: RuntimeError: failed to
find interpreter for Builtin discover of python_spec='python3.XX'. This
indicates the version of python that needs to be installed for tox to run
locally. In this case, the version of python that needs to be installed is
Getting started with Ansible Navigator
Building from the source and installing packages for testing
After cloning the repository, create and activate a new virtual environment in the root of the repository. Once that is done all we need is to install ansible-navigator from the source. Use the following command in workspace (root folder of navigator).This will install package in editable/development mode, along with its additional dependencies required for testing.
In case of any errors, try to run pip install --upgrade pip. Then run the
above command again.
Testing process and examples
Once all the dependencies are installed, we can execute our tests using pytest. To run tests inside a file test_xyz.py, we will need to traverse to that file.
Example: To run an unit test "test_circular_imports.py", we will execute:
pytest tests/unit/test_circular_imports.py
Example: To run an integration test "test_stdout_vault.py ", we will execute:
pytest tests/integration/actions/exec/test_stdout_vault.py
and so on ...
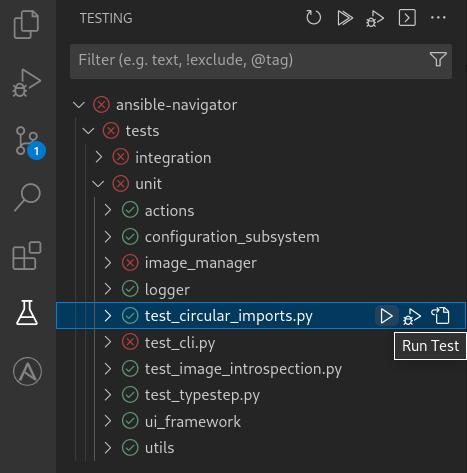
Additionally, leverage the ability of VSCode test tree to run and debug tests in a more easier and interactive way. There is a dedicated configuration provided inside launch.json named as Debug tests to interactively debug the tests through VSCode test tree.
Hover to the Testing icon in the Activity Bar to see VSCode test tree. From
there expand and reach to the desired unit or integration test and hit
Run Test or Debug Test appropriately.
Overview of Base Entry Points and Summary of src files
src/ansible_navigator/cli.pyacts as the main entry point where the application starts.src/ansible_navigator/ui.pycontains show() function which is the entry point for rendering the UI.src/ansible_navigator/actionshas the implementation of all the actions ansible-navigator can perform (i.e. its subcommands) like run, collections, images, doc, inventory, settings and a lot more.src/ansible_navigator/command_runnercommand runner is a wrapper around subprocess to run shell commands.src/ansible_navigator/configuration_subsystemherein lies the logic behind all the CLI parameters from their declaration to processing.src/ansible_navigator/datathis directory includes non-python files and stand alone scripts that will be run from inside an execution environment.src/ansible_navigator/image_managercontains all the operations related to introspect, access, pull container images.src/ansible_navigator/runnerherein lies ability for all the interaction with ansible-runner.src/ansible_navigator/tm_tokenizehas the tokenization subsystem which allows for syntax highlighting of json and yaml files.src/ansible_navigator/ui_frameworkhas the implementation of our user-interface.src/ansible_navigator/utilsconsists of all the common utilities use throughout the application.
Configure VSCode settings
Once we are inside vscode with project installed, we should see a .vscode
folder in our workspace. Having a launch configuration file is beneficial
because it allow us to configure and save debugging setup details. VS Code keeps
debugging configuration information in a launch.json file located in a
.vscode folder in our workspace (project root folder).
Similarly, The workspace settings file settings.json is also located under the
.vscode folder in our root folder. These are the project specific settings
shared by all users of that project.
Use the existing settings or drop in the required changes in configuration of
these launch.json and settings.json files.
Now, the final steps!
- Put breakpoint(s) in the code where needed.
- Hover to the Run and Debug icon in the Activity Bar to start the debugger.
At this point, the debugger should hit your breakpoint and start the debugging session.
Debug Ansible-Navigator Subcommands
Ansible-Navigator comes in with bunch of subcommands. To debug around any
specific subcommand, use the Run and Debug drop down menu to select the
appropriate entry from launch.json configuration. We add args attribute
(arguments passed to the program to debug) in our launch.json configuration
file.
Example:
- To Debug
ansible-navigator runsubcommand, use args attribute, provide playbook name and absolute path to the playbook in cwd. Following configuration will allow to debugansible-navigator site.yml --mode stdout.
{
  "version": "0.2.0",
  "configurations": [
    {
      "name": "Debug subcommand: run",
      "type": "python",
      "request": "launch",
      "module": "ansible_navigator",
      "args": ["run", "site.yml", "--mode", "stdout"],
      "cwd": "/home/user/../path/to/the/playbook",
      "justMyCode": false
    }
  ]
}
Similar configuration entries are present inside the launch.json file to debug different subcommands. Choose an entry from the drop-down while debugging and modify accordingly if needed.
Useful Links
- VS code debugging guide.
- Facilitate Python Debugger (pdb) in navigator for pure command line debugging.
Contributing docs
The documentation source code is located under the docs directory in the repository's root.
We use mkdocs to generate our docs website. You can trigger the process locally by executing:
It is also integrated with Read The Docs that builds and publishes each commit to the main branch and generates live docs previews for each pull request.