5. Clustering
Ansible Tower 3.1 introduces Clustering as an alternate approach to redundancy, replacing the redundancy solution configured with the active-passive nodes that involves primary and secondary instances. For versions older than 3.1, refer to the older versions of this chapter of the Administration Guide.
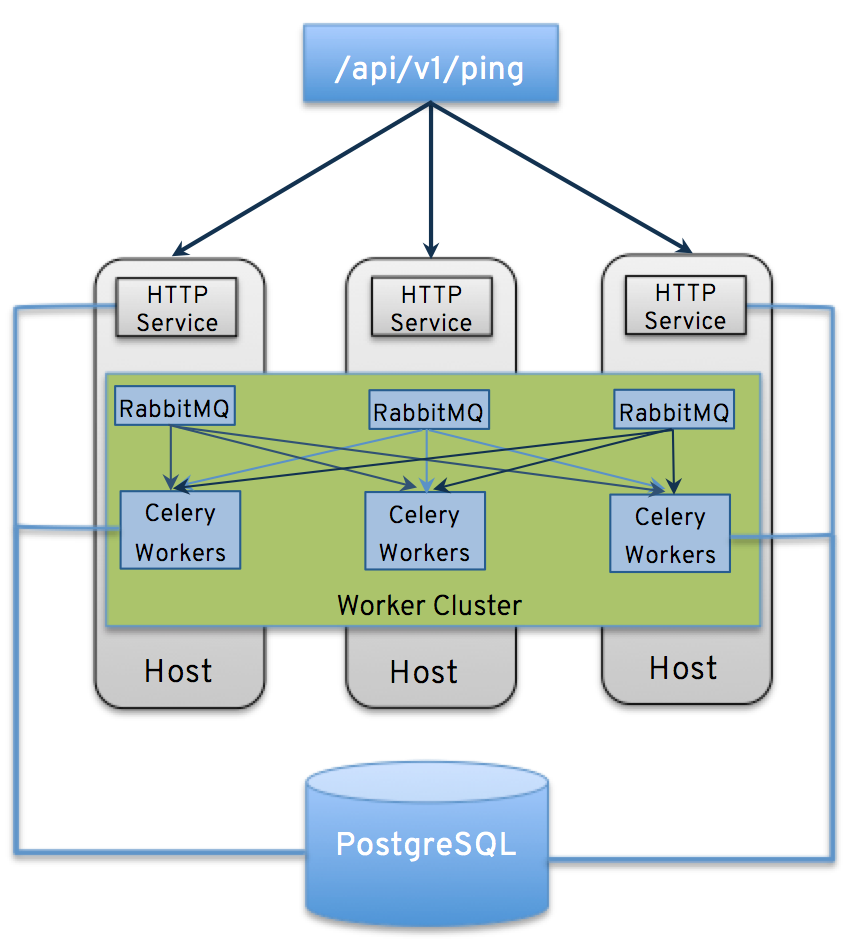
Clustering is sharing load between hosts. Each node should be able to act as an entry point for UI and API access. This should enable Tower administrators to use load balancers in front of as many nodes as they wish and maintain good data visibility.
Note
Load balancing is optional and is entirely possible to have ingress on one or all nodes as needed.
Each node should be able to join the Tower cluster and expand its ability to execute jobs. This is currently a simple system where jobs can and will run anywhere rather than be directed on where to run.
5.1. Setup Considerations
Important considerations to note in the new clustering environment:
- PostgreSQL is still a standalone instance node and is not clustered. Tower does not manage replica configuration or database failover (if the user configures standby replicas).
- All nodes should be reachable from all other nodes and they should be able to reach the database. It is also important for the hosts to have a stable address and/or hostname (depending on how the Tower host is configured).
- RabbitMQ is the cornerstone of Tower’s clustering system. A lot of the configuration requirements and behavior is dictated by its needs. Therefore, customization beyond Tower’s setup playbook is limited. Each Tower node has a deployment of RabbitMQ that will cluster with the other nodes’ RabbitMQ instances.
- Existing old-style HA deployments will be migrated automatically to the new HA system during the upgrade process.
- Manual projects must be manually synced to all nodes by the customer, and updated on all nodes at once.
- There is no concept of primary/secondary in the new Tower system. All systems are primary.
- Setup playbook changes to configure RabbitMQ and provide the type of network the hosts are on.
- The
inventoryfile for Tower deployments should be saved/persisted. If new nodes are to be provisioned, the passwords and configuration options, as well as host names, must be made available to the installer.
5.2. Install and Configure
Provisioning new nodes should be as simple as updating the inventory file and re-running the setup playbook. It is important that this file contain all passwords and information used when installing the cluster or other nodes may be reconfigured. The current standalone node configuration does not change for a 3.1 deployment. The inventory file does change in some important ways:
- Since there is no primary/secondary configuration, those inventory groups go away and are replaced with a single inventory group,
tower. The database group remains for specifying an external Postgres, however:
[tower]
hostA
hostB
hostC

[database]
hostDB
The
redis_passwordfield is removed from[all:vars]New fields for RabbitMQ are as follows:
rabbitmq_port=5672: RabbitMQ is installed on each node and is not optional, it’s also not possible to externalize it. This setting configures what port it listens on.rabbitmq_vhost=tower: Controls the setting for which Tower configures a RabbitMQ virtualhost to isolate itself.rabbitmq_username=towerandrabbitmq_password=tower: Each node and and each node’s Tower instance are configured with these values. This is similar to Tower’s other uses of usernames/passwords.rabbitmq_cookie=<somevalue>: This value is unused in a standalone deployment but is critical for clustered deployments. This acts as the secret key that allows RabbitMQ cluster members to identify each other.rabbitmq_use_long_names: RabbitMQ is sensitive to what each node is named. Tower is flexible enough to allow FQDNs (host01.example.com), short names (host01), or ip addresses (192.168.5.73). Depending on what is used to identify each host in the inventory file, this value may need to be changed:- For FQDNs and IP addresses, this value needs to be
true. - For short names, set the value to
false. - If you are using localhost, do not change the default setting of
rabbitmq_use_long_name=falseto true.
- For FQDNs and IP addresses, this value needs to be
5.2.1. RabbitMQ Default Settings
The following configuration shows the default settings for RabbitMQ:
rabbitmq_port=5672
rabbitmq_vhost=tower
rabbitmq_username=tower
rabbitmq_password=''
rabbitmq_cookie=cookiemonster

# For FQDNs and IP addresses, this value needs to be true
rabbitmq_use_long_name=false
# Needs to remain false if you are using localhost
5.2.2. Nodes and Ports Used by Tower
Ports and nodes used by Tower are as follows:
- 80, 443 (normal Tower ports)
- 22 (ssh)
- 5432 (database node - if the database is installed on an external node, needs to be opened to the tower nodes)
Clustering/RabbitMQ ports:
- 4369, 25672 (ports specifically used by RabbitMQ to maintain a cluster, needs to be open between each node)
- 15672 (if the RabbitMQ Management Interface is enabled, this port needs to be opened (optional))
5.3. Status and Monitoring via Browser API
Tower itself reports as much status as it can via the Browsable API at /api/v1/ping in order to provide validation of the health of the cluster, including:
- The node servicing the HTTP request
- The timestamps of the last heartbeat of all other nodes in the cluster
- The state of the Job Queue, any jobs each node is running
- The RabbitMQ cluster status
5.4. Node Services and Failure Behavior
Each Tower node is made up of several different services working collaboratively:
- HTTP Services - This includes the Tower application itself as well as external web services.
- Callback Receiver - Receives job events from running Ansible jobs.
- Celery - The worker queue that processes and runs all jobs.
- RabbitMQ - This message broker is used as a signaling mechanism for Celery as well as any event data propogated to the application.
- Memcached - local caching service for the node it lives on.
Tower is configured in such a way that if any of these services or their components fail, then all services are restarted. If these fail sufficiently often in a short span of time, then the entire node will be placed offline in an automated fashion in order to allow remediation without causing unexpected behavior.
5.5. Job Runtime Behavior
The way jobs are run and reported to a ‘normal’ user of Tower does not change. On the system side, some differences are worth noting:
- When a job is submitted from the API interface it gets pushed into the Celery queue on RabbitMQ. A single RabbitMQ node is the responsible master for individual queues but each Tower node will connect to and receive jobs from that queue using a particular scheduling algorithm. Any node in the cluster is just as likely to receive the work and execute the task. If a node fails while executing jobs, then the work is marked as permanently failed.
As Tower nodes are brought online, it effectively expands the work capacity of the Tower system which is measured as one entire unit (the cluster’s capacity). Conversely, de-provisioning a node will remove capacity from the cluster. See Deprovision Nodes in the next section for more details.
Note
Not all nodes are required to be provisioned with an equal capacity.
Project updates behave differently than they did before. Previously, they were ordinary jobs that ran on a single node. It’s now important that they run successfully on any node that could potentially run a job. Projects will now sync themselves to the correct version on the node immediately prior to running the job.
5.6. Deprovision Nodes
Deprovisioning Tower does not automatically deprovision nodes since clusters do not currently distinguish between a node that was taken offline intentionally or due to failure. Instead, shutdown all services on the Tower node and then run the deprovisioning tool from any other node:
Shut down the node or stop the service with the command,
ansible-tower-service stop.Run the deprovision command
$ tower-manage deprovision_node —-name=<name used in inventory file>from another node to remove it from the Tower cluster registry AND the RabbitMQ cluster reigstry.Example:
tower-manage deprovision_node -—name=hostB