A workflow job template links together a sequence of disparate resources that accomplishes the task of tracking the full set of jobs that were part of the release process as a single unit. These resources may include:
job templates
workflow templates
project syncs
inventory source syncs
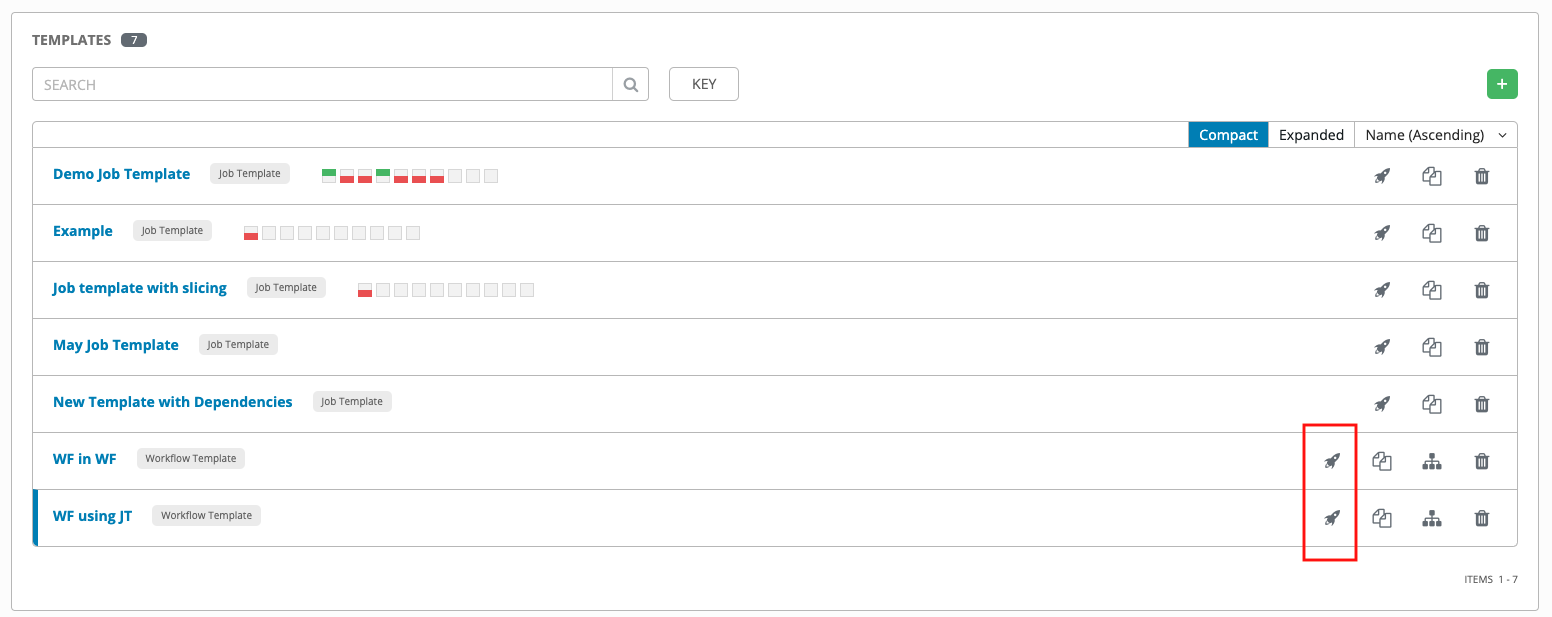
The () menu opens a list of the workflow and job templates that are currently available. The default view is collapsed (Compact), showing the template name, template type, and the statuses of the jobs that ran using that template, but you can click Expanded to view more information. This list is sorted alphabetically by name, but you can sort by other criteria, or search by various fields and attributes of a template. From this screen, you can launch (), copy ( ), and remove ( ) a job template. Before deleting a job template, be sure it is not used in a workflow job template.
Only workflow templates have the Workflow Visualizer icon () as a shortcut for accessing the workflow editor.
Note
Workflow templates can be used as building blocks for another workflow template. Many parameters in a workflow template allow you to enable Prompt on Launch that can be modified at the workflow job template level, and do not affect the values assigned at the individual workflow template level. For instructions, see the Workflow Visualizer section.
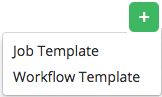
Click the button then select Workflow Template from the menu list.
Enter the appropriate details into the following fields:
Name: Enter a name for the workflow template.
Description: Enter an arbitrary description as appropriate (optional).
Organization: Optionally enter or search for an organization to associate the workflow.
Inventory: Optionally enter or search for an inventory to be used with this workflow template from the inventories available to the currently logged in Tower user.
Prompt on Launch: If selected, you can provide an inventory when this workflow template is launched, or when this workflow template is used within another workflow template.
Limit: Optionally specify a limit for subset of servers that your workflow is going to run. This value is a host pattern to further constrain the list of hosts managed or affected by the playbook. Multiple patterns can be separated by colons (“:”). As with core Ansible, “a:b” means “in group a or b”, “a:b:&c” means “in a or b but must be in c”, and “a:!b” means “in a, and definitely not in b”.
Prompt on Launch: If selected, even if a default value is supplied, you will be prompted upon launch to choose a limit.
SCM Branch: Optionally specify the branch to override all job template nodes that prompt for a branch.
Prompt on Launch: If selected, even if a default value is supplied, you will be prompted upon launch to choose an SCM branch.
Labels: Supply optional labels that describe this workflow template, such as “dev” or “test”. Labels can be used to group and filter workflow templates and completed jobs in the Tower display.
Labels are created when they are added to the Workflow Template. Labels are associated to a single Organization using the Project that is provided in the Workflow Template. Members of the Organization can create labels on a Workflow Template if they have edit permissions (such as an admin role).
Once the Workflow Template is saved, the labels appear in the Templates overview.
Click on the “x” beside a label to remove it. When a label is removed, and is no longer associated with a Workflow or Workflow Template, the label is permanently deleted from the list of Organization labels.
Jobs inherit labels from the Workflow Template at the time of launch. If a label is deleted from a Workflow Template, it is also deleted from the Job.
Check Enable Webhooks to turn on the ability to interface with a predefined SCM system web service that is used to launch a job template. Currently supported SCM systems are GitHub and GitLab.
If you enable webhooks, other fields display, prompting for additional information:
Webhook Service: Select which service to listen for webhooks from
Webhook Credential: Optionally, provide a GitHub or GitLab personal access token (PAT) as a credential to use to send status updates back to the webhook service. Before you can select it, the credential must exist. See Credential Types to create one.
Upon Save, additional fields populate and the Workflow Visualizer automatically opens.
Webhook URL: Automatically populated with the URL for the webhook service to POST requests to.
Webhook Key: Generated shared secret to be used by the webhook service to sign payloads sent to Tower. This must be configured in the settings on the webhook service in order for Tower to accept webhooks from this service.
Pass extra command line variables to the playbook. This is the “-e” or “–extra-vars” command line parameter for ansible-playbook that is documented in the Ansible documentation at Passing Variables on the Command Line.
Provide key/value pairs using either YAML or JSON. These variables have a maximum value of precedence and overrides other variables specified elsewhere. An example value might be:
git_branch:productionrelease_version:1.5
For more information about extra variables, refer to Extra Variables.
Prompt on Launch: If selected, even if a default value is supplied, you will be prompted upon launch to choose command line variables.
Note
If you want to be able to specify extra_vars on a schedule, you must select Prompt on Launch for EXTRA VARIABLES on the workflow template, or a enable a survey on the workflow template, then those answered survey questions become extra_vars.
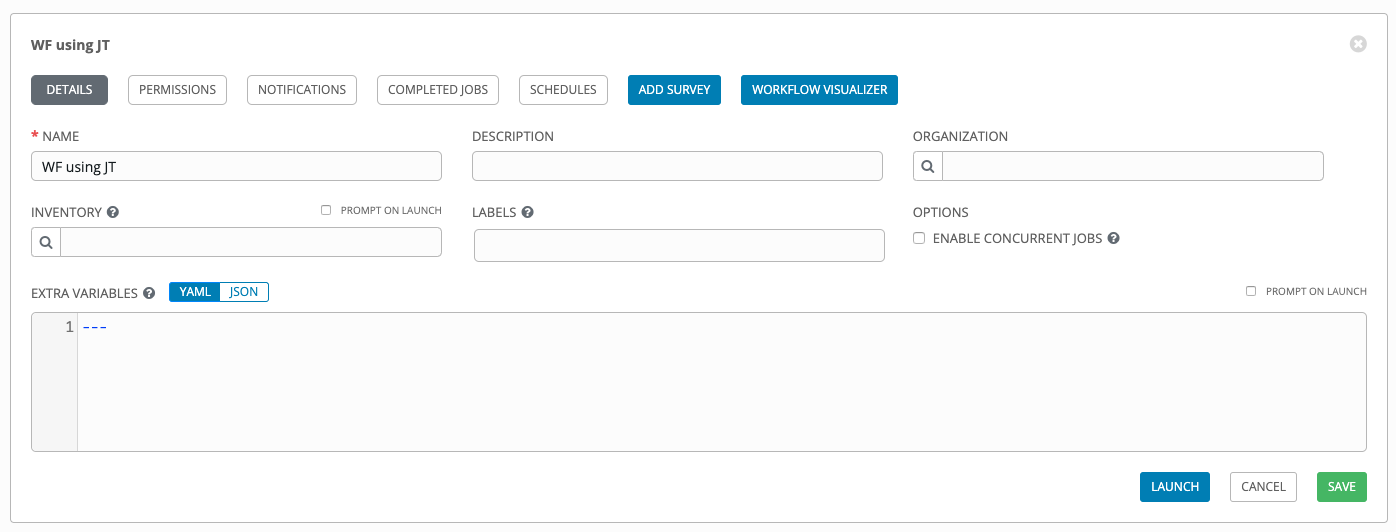
When you have completed configuring the workflow template, click Save.
Saving the template exits the Workflow Template page and the Workflow Visualizer opens to allow you to build a workflow. See the Workflow Visualizer section for further instructions. Otherwise, you may close the Workflow Visualizer to return to the Details tab of the newly saved template in order to review, edit, add permissions, notifications, schedules, and surveys, or view completed jobs and build a workflow template at a later time. Alternatively, you can click Launch to launch the workflow, but you must first save the template prior to launching, otherwise, the Launch button remains grayed-out. Also, note the Notifications tab is present only after the template has been saved.
You can verify the template is saved when the newly created workflow template appears on the list of templates at the bottom of the screen.
Note
If an inventory was specified on the workflow template, the inventory displays in the Templates list view.
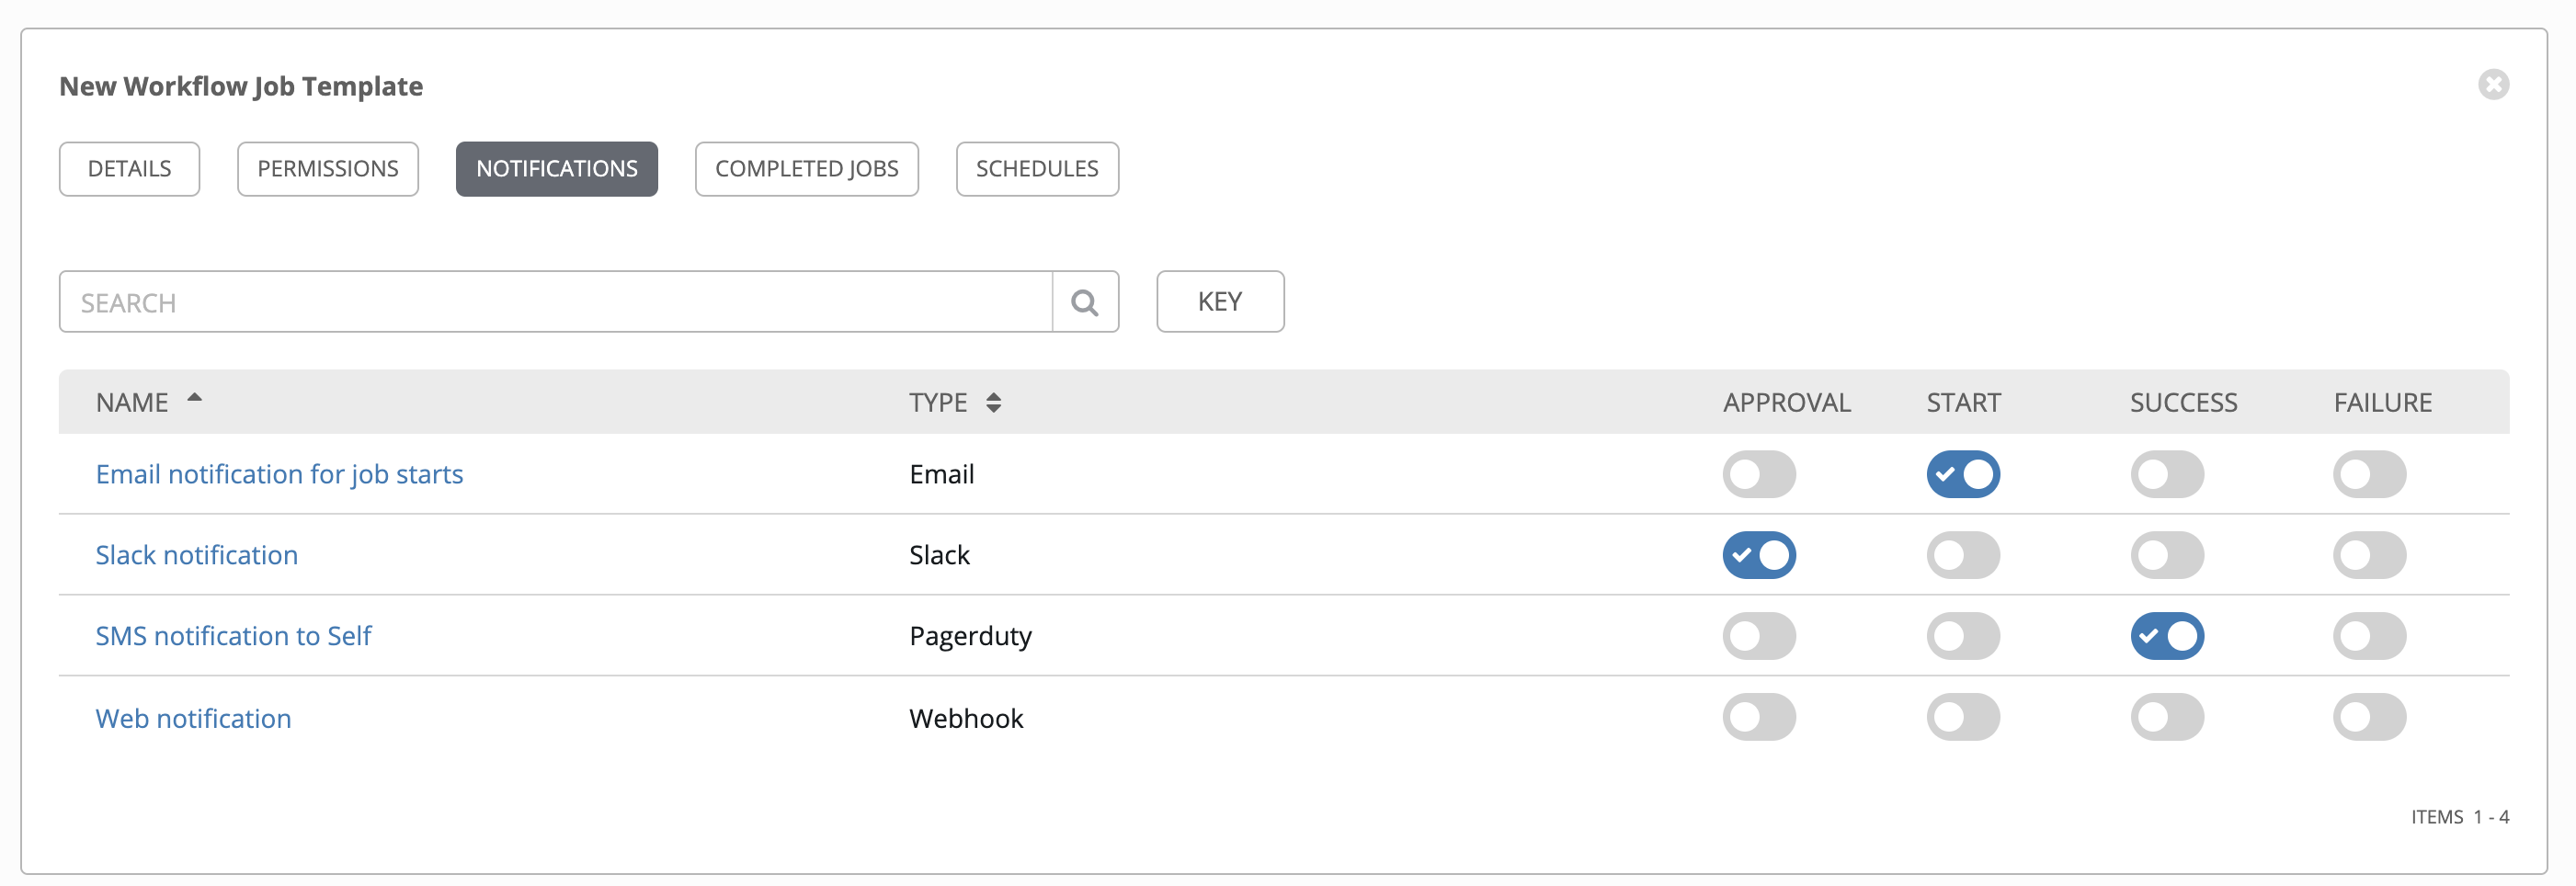
Clicking on Notifications allows you to review any notification integrations you have setup. The Notifications tab is present only after the template has been saved.
Use the toggles to enable or disable the notifications to use with your particular template. For more detail, see Enable and Disable Notifications.
If no notifications have been set up, click the NOTIFICATIONS link from inside the gray box to create a new notification.
Refer to Notification Types for additional details on configuring various notification types.
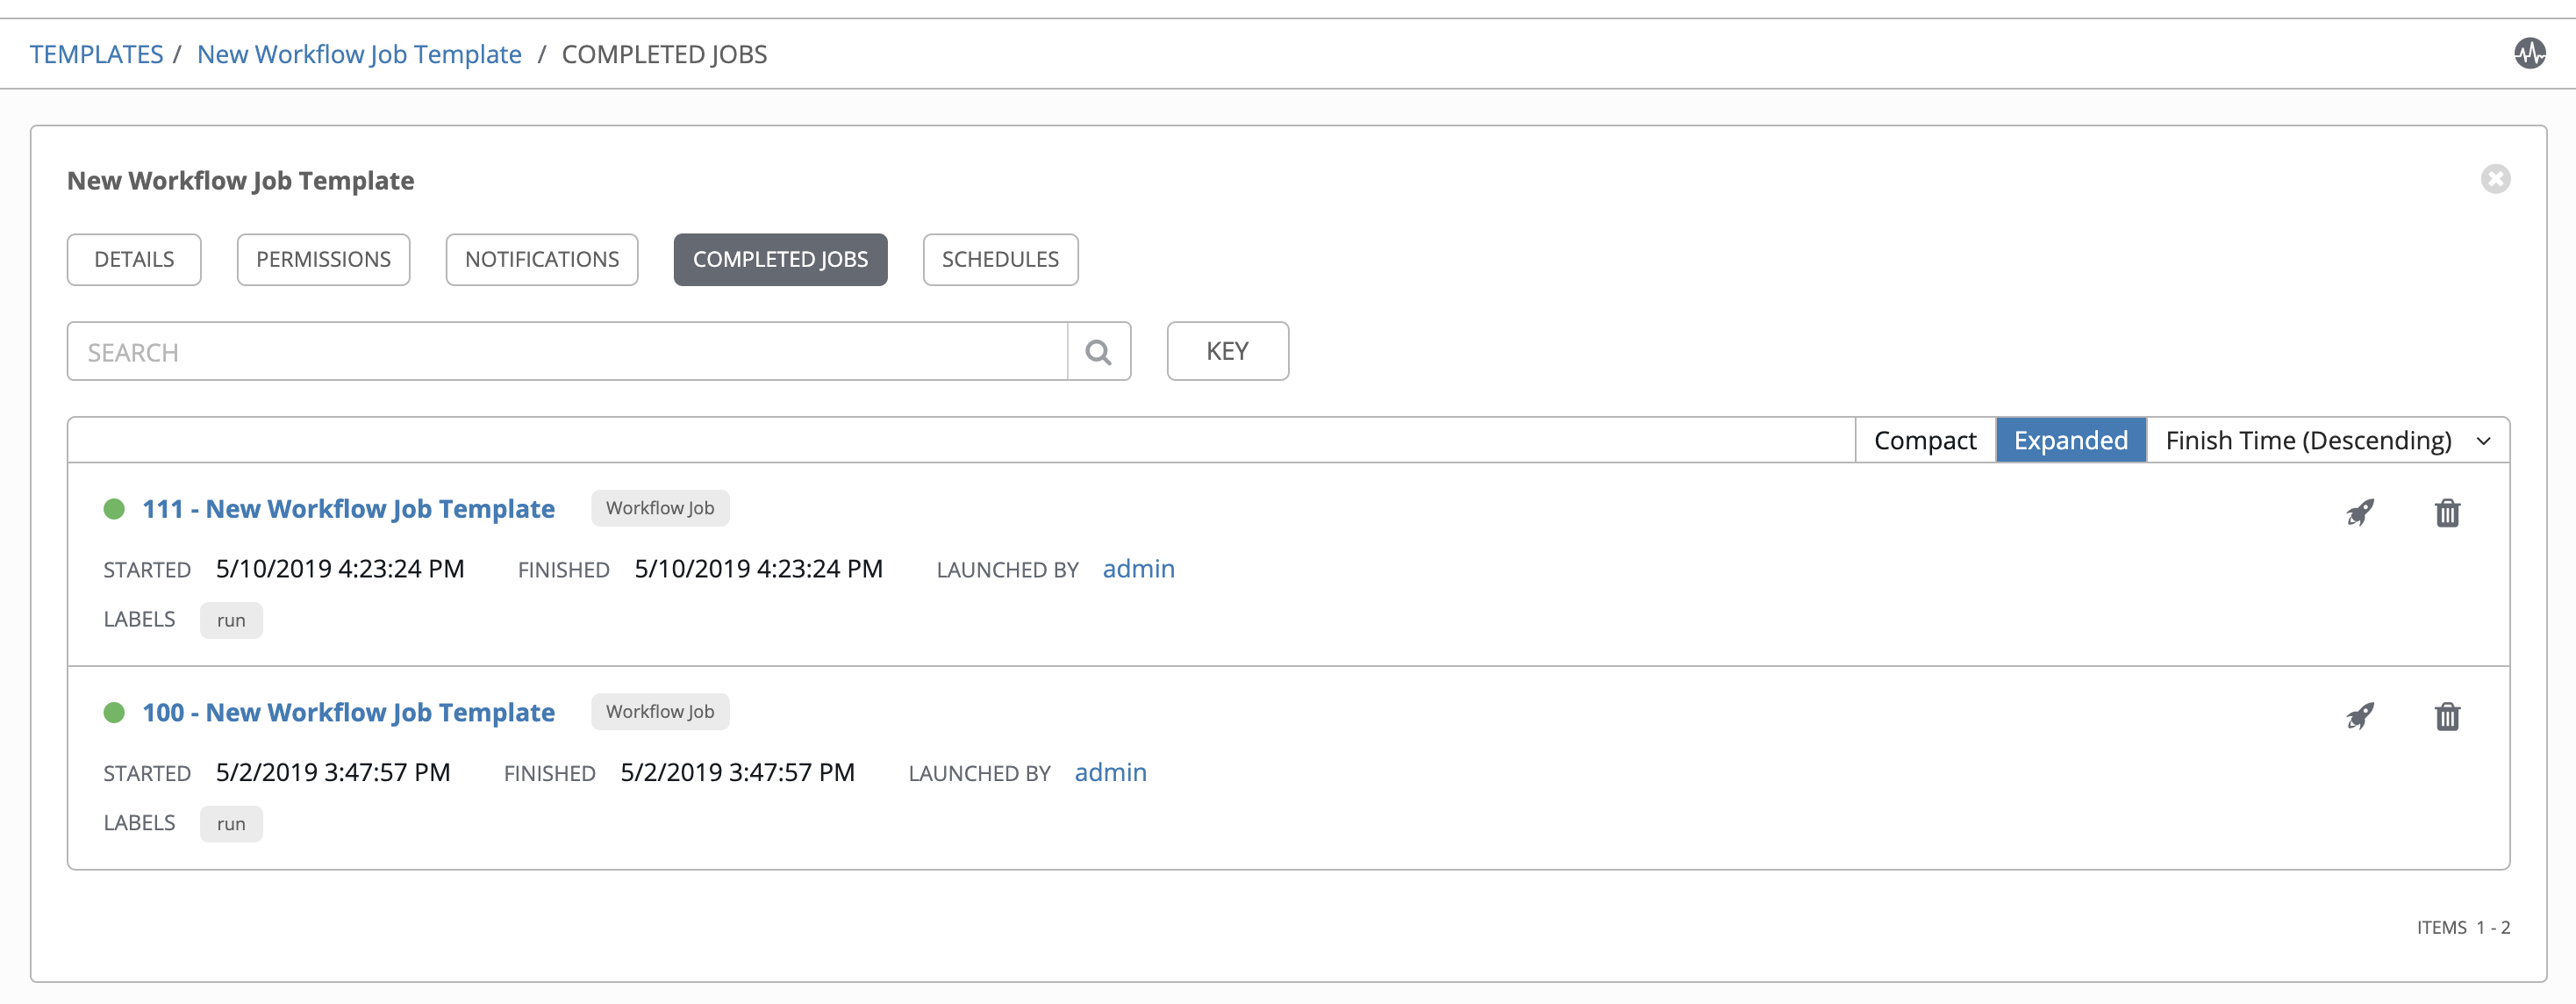
The Completed Jobs tab provides the list of workflow templates that have ran. Click Expanded to view the various details of each job.
Note
If a workflow-level inventory was specified at run-time, the inventory name displays in the workflow job in the jobs list:
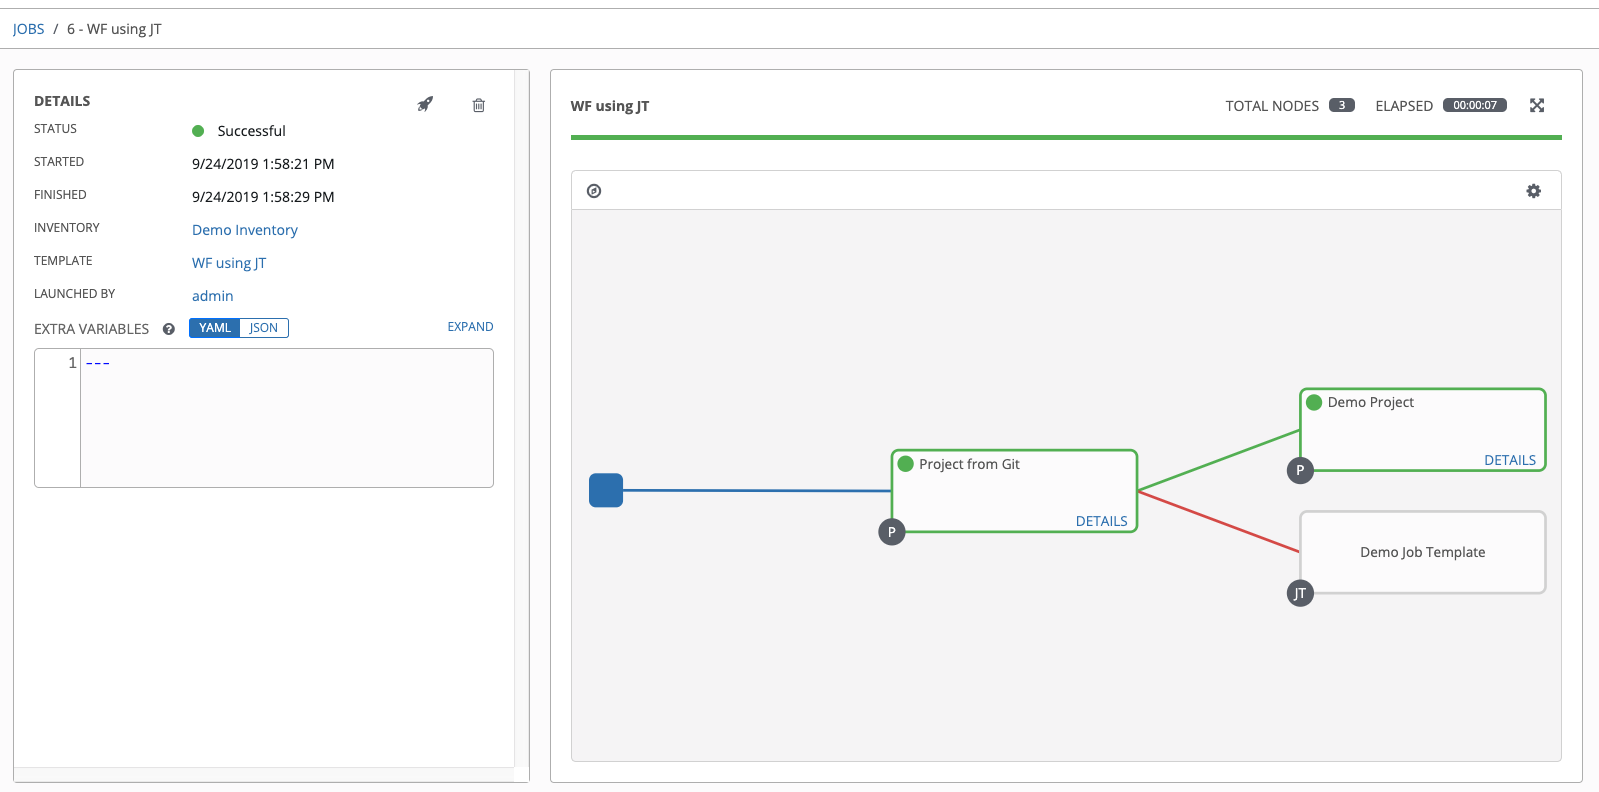
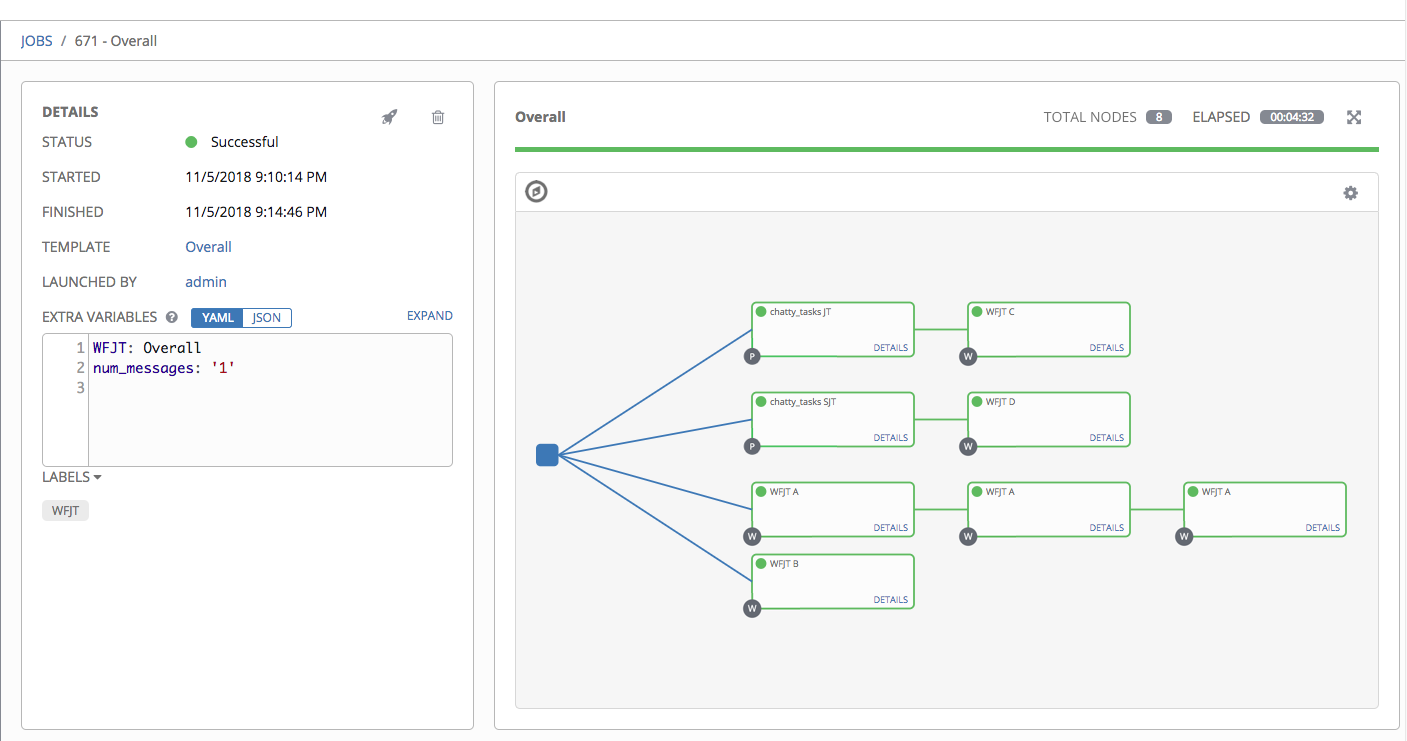
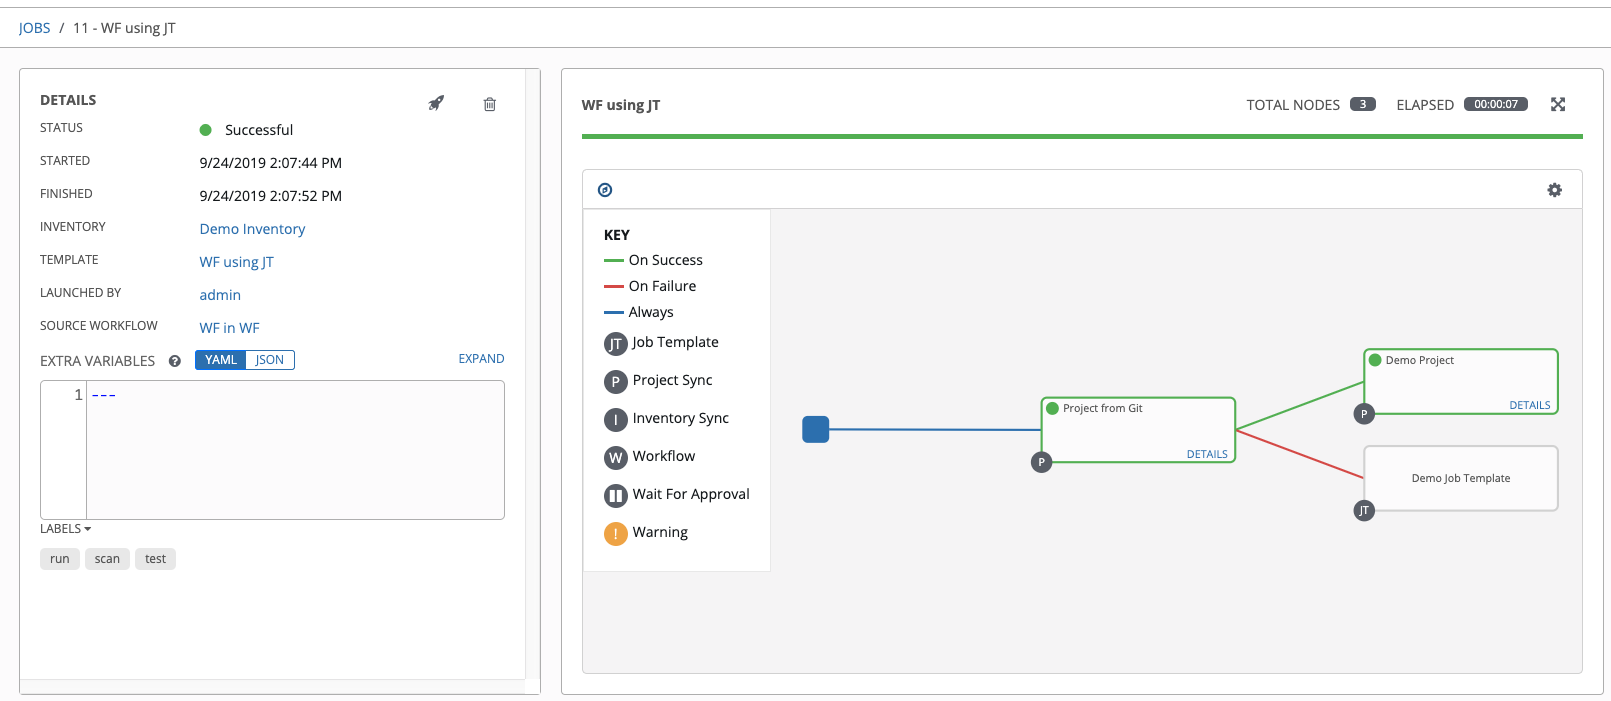
From this view, you can click the job ID - name of the workflow job and see its graphical representation. The example below shows the job details of the 141 - WF using JT workflow job.
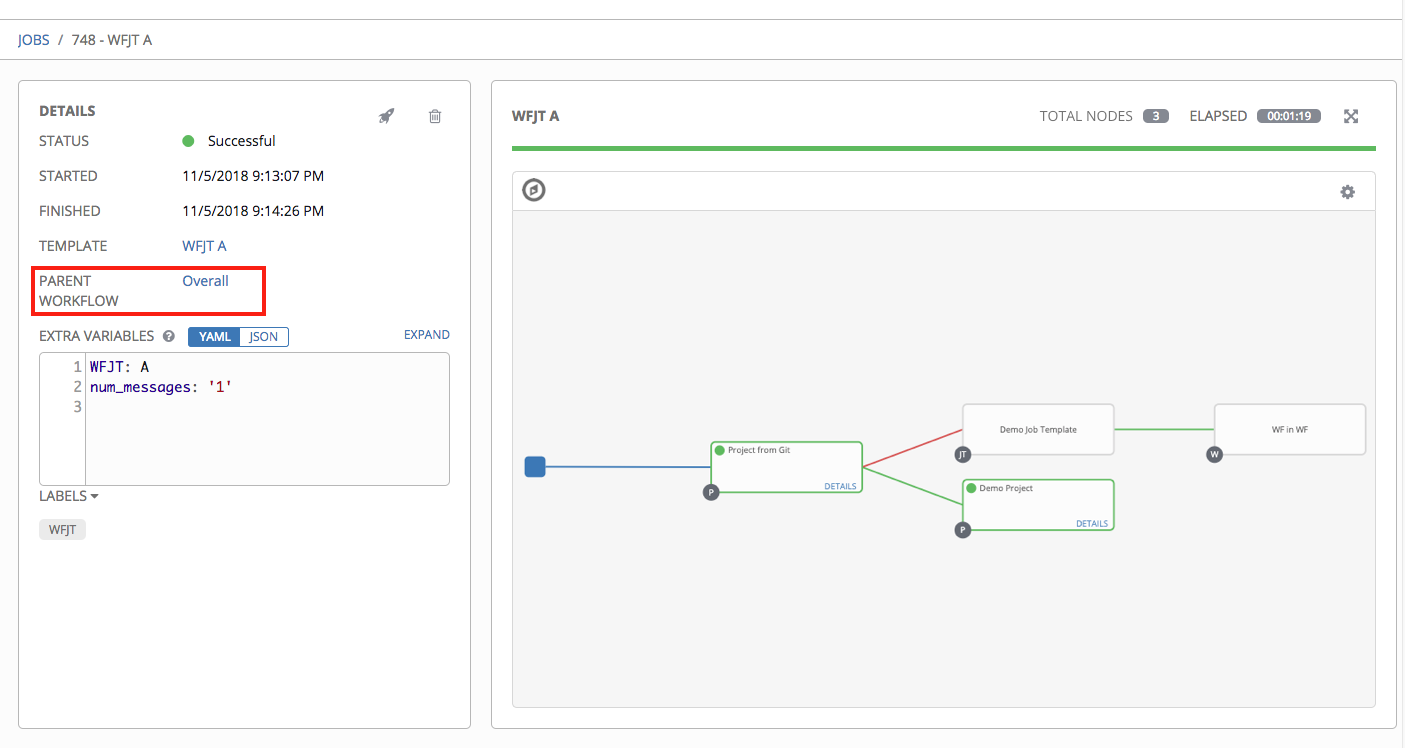
If a workflow template is used in another workflow, the jobs details indicate a parent workflow.
In the above example, click the parent workflow template, Overall, to view its Job Details page and the graphical details of the nodes and statuses of each as they were launched.
The nodes are marked with labels that help you identify them at a glance. See the legend in the Workflow Visualizer section for more information.
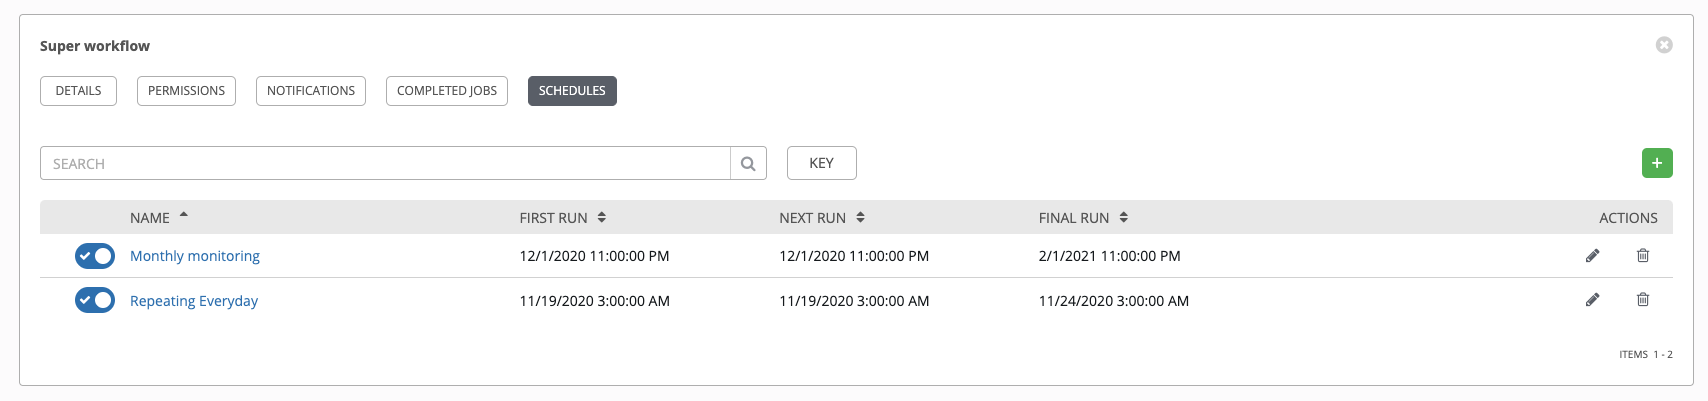
To schedule a job template run, click the Schedules tab.
If schedules are already set up; review, edit, or enable/disable your schedule preferences.
If schedules have not been set up, refer to Schedules for more information.
If a workflow template used in a nested workflow has a survey, or the Prompt on Launch selected for the inventory option, the PROMPT button displays next to the SAVE and CANCEL buttons on the schedule form. Clicking the PROMPT button shows an optional INVENTORY step where you can provide or remove an inventory or skip this step without any changes.
Workflows containing job types of Run or Check provide a way to set up surveys in the Workflow Job Template creation or editing screens. Surveys set extra variables for the playbook similar to ‘Prompt for Extra Variables’ does, but in a user-friendly question and answer way. Surveys also allow for validation of user input. Click the button to create a survey.
Use cases for surveys are numerous. An example might be if operations wanted to give developers a “push to stage” button they could run without advanced Ansible knowledge. When launched, this task could prompt for answers to questions such as, “What tag should we release?”
Many types of questions can be asked, including multiple-choice questions.
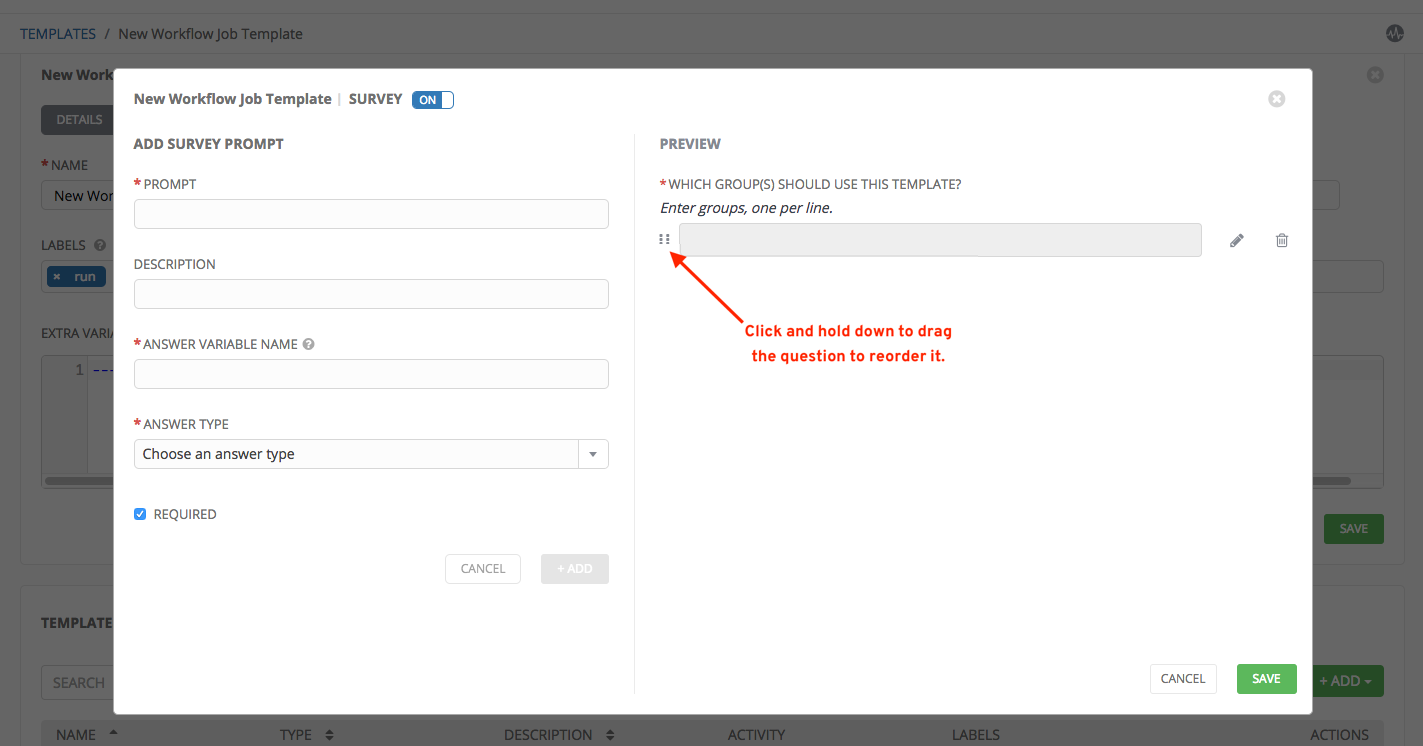
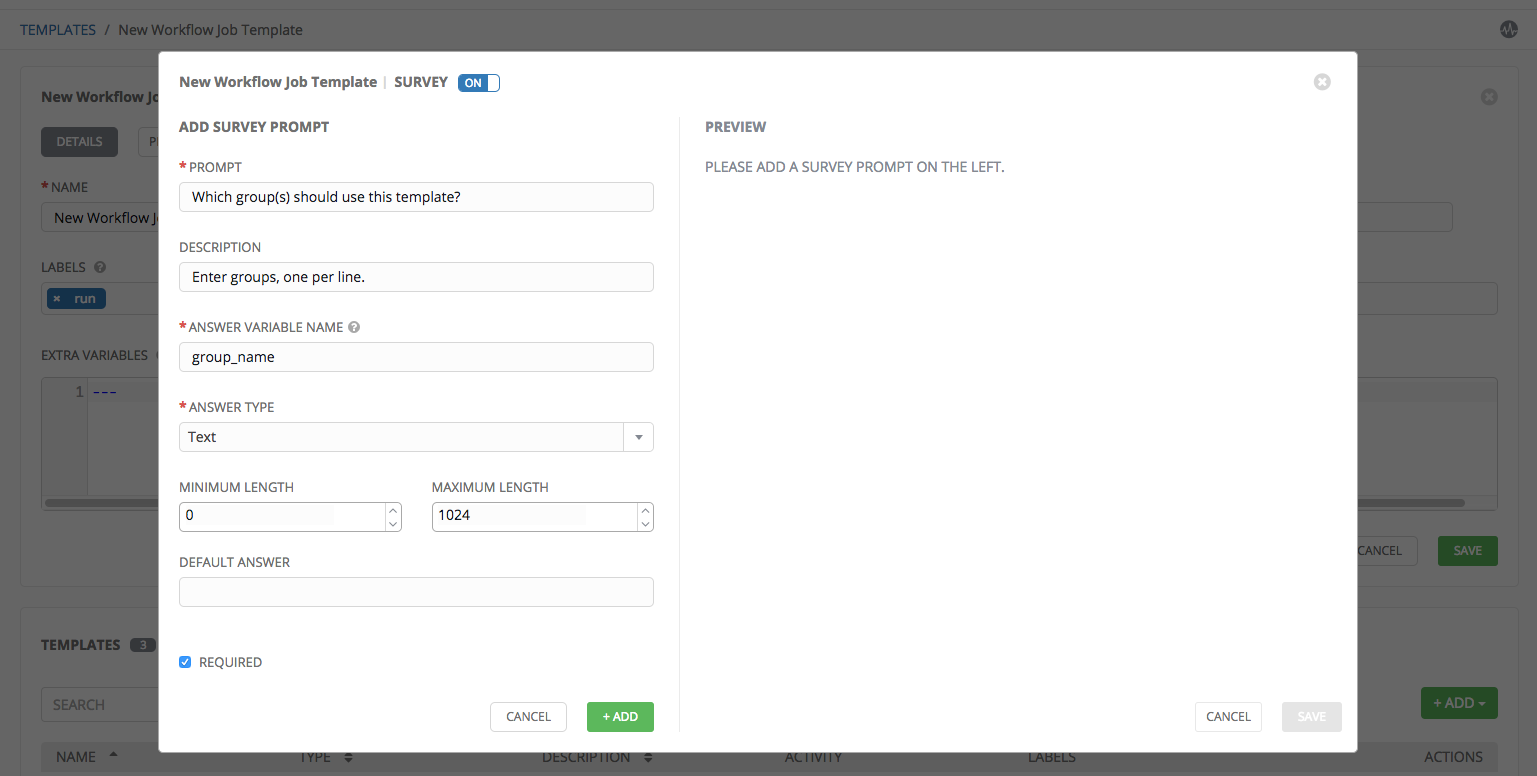
Click on the button to bring up the Add Survey window.
Use the ON/OFF toggle button at the top of the screen to quickly activate or deactivate this survey prompt.
A survey can consist of any number of questions. For each question, enter the following information:
Name: The question to ask the user.
Description: (optional) A description of what’s being asked of the user.
Answer Variable Name: The Ansible variable name to store the user’s response in. This is the variable to be used by the playbook. Variable names cannot contain spaces.
Answer Type: Choose from the following question types.
Text: A single line of text. You can set the minimum and maximum length (in characters) for this answer.
Textarea: A multi-line text field. You can set the minimum and maximum length (in characters) for this answer.
Password: Responses are treated as sensitive information, much like an actual password is treated. You can set the minimum and maximum length (in characters) for this answer.
Multiple Choice (single select): A list of options, of which only one can be selected at a time. Enter the options, one per line, in the Multiple Choice Options box.
Multiple Choice (multiple select): A list of options, any number
of which can be selected at a time. Enter the options, one per
line, in the Multiple Choice Options box.
Integer: An integer number. You can set the minimum and maximum length (in characters) for this answer.
Float: A decimal number. You can set the minimum and maximum length (in characters) for this answer.
Default Answer: Depending on which type chosen, you can supply the default answer to the question. This value is pre-filled in the interface and is used if the answer is not provided by the user.
Required: Whether or not an answer to this question is required from the user.
Once you have entered the question information, click the button to add the question.
A stylized version of the survey is presented in the Preview pane. For any question, you can click on the Edit button to edit the question, the Delete button to delete the question, and click and drag on the grid icon to rearrange the order of the questions.
Return to the left pane to add additional questions.
The Required setting on a survey question determines whether the answer is optional or not for the user interacting with it.
Behind the scenes, optional survey variables can be passed to the playbook in extra_vars, even when they aren’t filled in.
If a non-text variable (input type) is marked as optional, and is not filled in, no survey extra_var is passed to the playbook.
If a text input or text area input is marked as optional, is not filled in, and has a minimum length>0, no survey extra_var is passed to the playbook.
If a text input or text area input is marked as optional, is not filled in, and has a minimum length===0, that survey extra_var is passed to the playbook, with the value set to an empty string ( “” ).
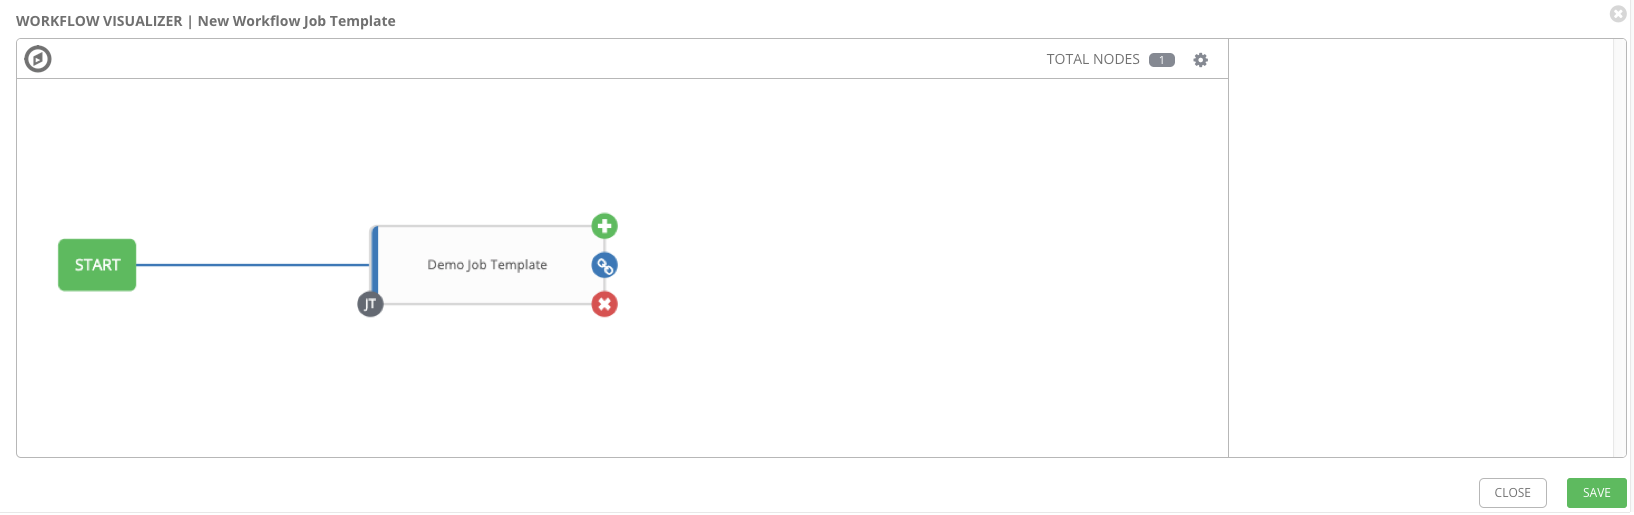
The Workflow Visualizer provides a graphical way of linking together job templates, workflow templates, project syncs, and inventory syncs to build a workflow template. Before building a workflow template, refer to the Workflows section for considerations associated with various scenarios on parent, child, and sibling nodes.
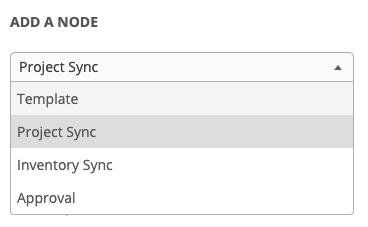
You can set up any combination of two or more of the following node types to build a workflow: Template (Job Template or Workflow Job Template), Project Sync, Inventory Sync, or Approval. Each node is represented by a rectangle while the relationships and their associated edge types are represented by a line (or link) that connects them.
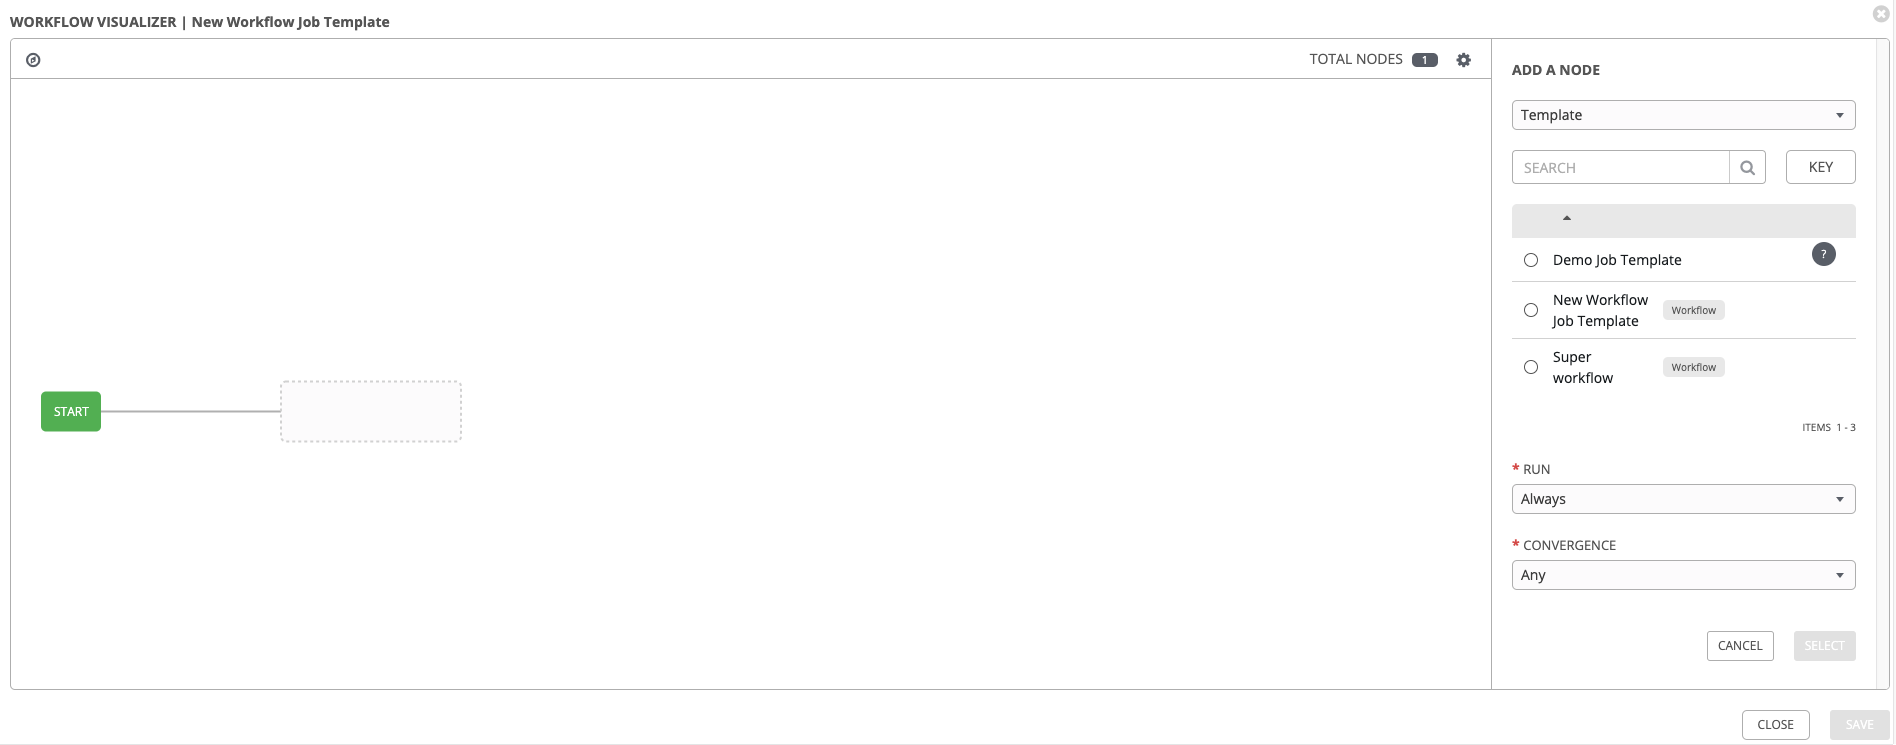
In the details/edit view of a workflow template, click the button or from the Templates list view, click the () icon to launch the Workflow Visualizer.
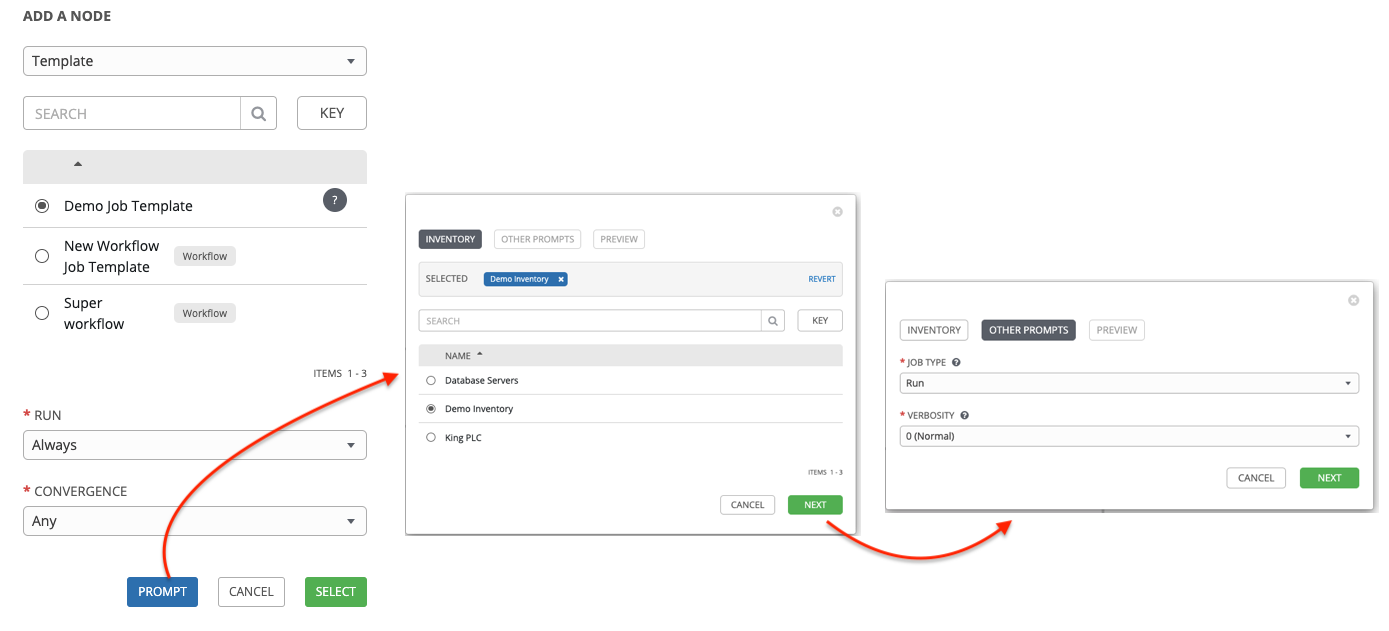
Click the button to display a list of nodes to add to your workflow.
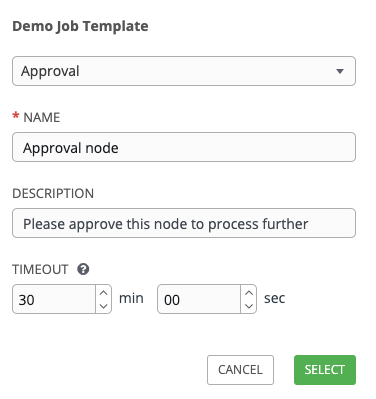
On the right pane, select the type of node you want to add from the drop-down menu:
If selecting an Approval node, see Approval nodes for further detail.
Selecting a node provides the available valid options associated with it. Access detail about the node by clicking the tooltip next to it.
Note
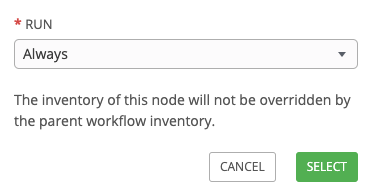
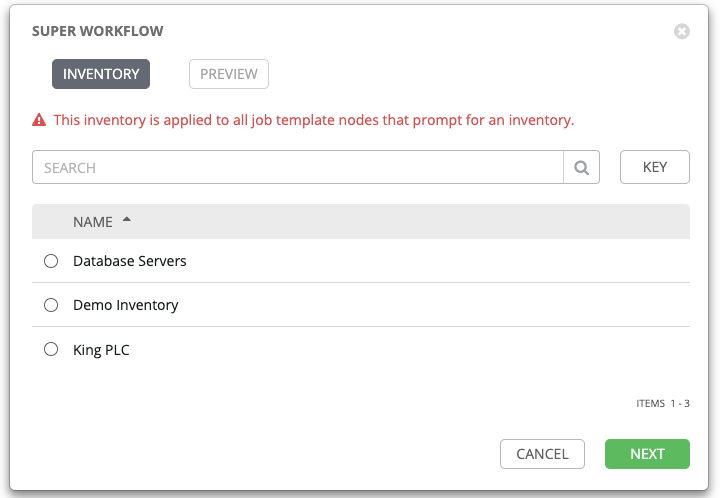
If you select a job template that does not have a default inventory when populating a workflow graph, the inventory of the parent workflow will be used. Though a credential is not required in a job template, you will not be able to choose a job template for your workflow if it has a credential that requires a password, unless the credential is replaced by a prompted credential.
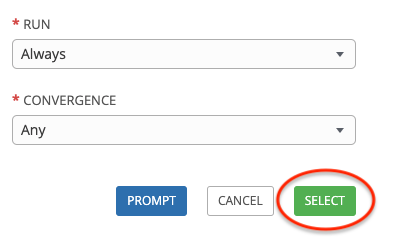
Once a node is selected, the workflow begins to build, and you must specify the type of action to be taken for the selected node. This action is also referred to as edge type.
If the node is a root node, the edge type defaults to Always and is non-editable.
For subsequent nodes, you can select one of the following scenarios (edge type) to apply to each:
Always: Continue to execute regardless of success or failure.
On Success: Upon successful completion, execute the next template.
On Failure: Upon failure, execute a different template.
Select the behavior of the node if it is a convergent node from the Convergence field:
Any is the default behavior, allowing any of the nodes to complete as specified, before triggering the next converging node. As long as the status of one parent meets one of those run conditions, an ANY child node will run. In other words, an ANY node requires all nodes to complete, but only one node must complete with the expected outcome.
Choose All to ensure that all nodes complete as specified, before converging and triggering the next node. The purpose of ALL nodes is to make sure that every parent met it’s expected outcome in order to run the child node. The workflow checks to make sure every parent behaved as expected in order to run the child node. Otherwise, it will not run the child node.
If selected, the graphical view will label the node as ALL.
Note
If a node is a root node, or a node that does not have any nodes converging into it, setting the Convergence rule does not apply, as its behavior is dictated by the action that triggers it.
If a job template used in the workflow has Prompt on Launch selected for any of its parameters, a Prompt button appears, allowing you to change those values at the node level. Use the wizard to change the value(s) in each of the tabs and click Confirm in the Preview tab.
Likewise, if a workflow template used in the workflow has Prompt on Launch selected for the inventory option, use the wizard to supply the inventory at the prompt. If the parent workflow has its own inventory, it will override any inventory that is supplied here.
Note
For job templates with promptable fields that are required, but don’t have a default, you must provide those values when creating a node before the Select button becomes enabled. The two cases that disable the Select button until a value is provided via the Prompt button: 1) when you select the Prompt on Launch checkbox in a job template, but do not provide a default, or 2) when you create a survey question that is required but don’t provide a default answer. However, this is NOT the case with credentials. Credentials that require a password on launch are not permitted when creating a workflow node, since everything needed to launch the node must be provided when the node is created. So, if a job template prompts for credentials, Tower prevents you from being able to select a credential that requires a password.
You must also click Select when the prompt wizard closes in order to apply the changes at that node. Otherwise, any changes you make will revert back to the values set in the actual job template.
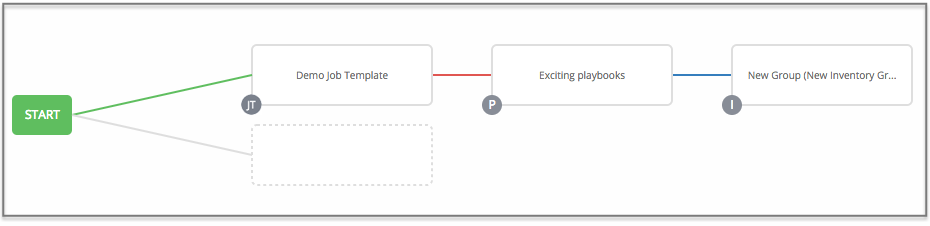
Once the node is created, it is labeled with its job type. A template that is associated with each workflow node will run based on the selected run scenario as it proceeds. Click the compass () icon to display the legend for each run scenario and their job types.
Hovering over a node allows you to add another node, edit an existing link , or delete the selected node.
When done adding/editing a node, click Select to save any modifications and render it on the graphical view. For possible ways to build your workflow, see Node building scenarios.
When done with building your workflow template, click Save to save your entire workflow template and return to the new Workflow Template details page.
Important
Clicking Close on this pane will not save your work, but instead, closes the entire Workflow Visualizer and you will have to start over.
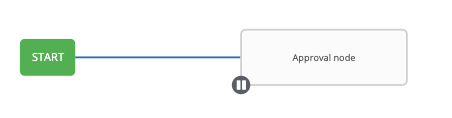
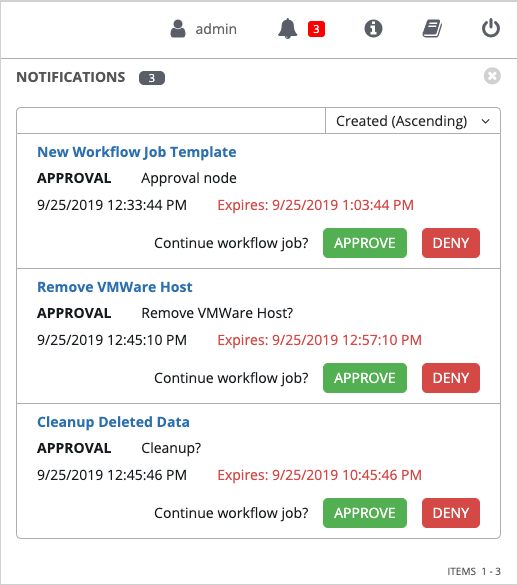
Choosing an Approval node requires user intervention in order to advance the workflow. This functions as a means to pause the workflow in between playbooks so that a user can give approval to continue on to the next playbook in the workflow, giving the user a specified amount of time to intervene, but also allows the user to continue as quickly as possible without having to wait on some other trigger.
The default for the timeout is none, but you can specify the length of time before the request expires and automatically gets denied. After selecting and supplying the information for the approval node, it displays on the graphical view with a pause () icon next to it.
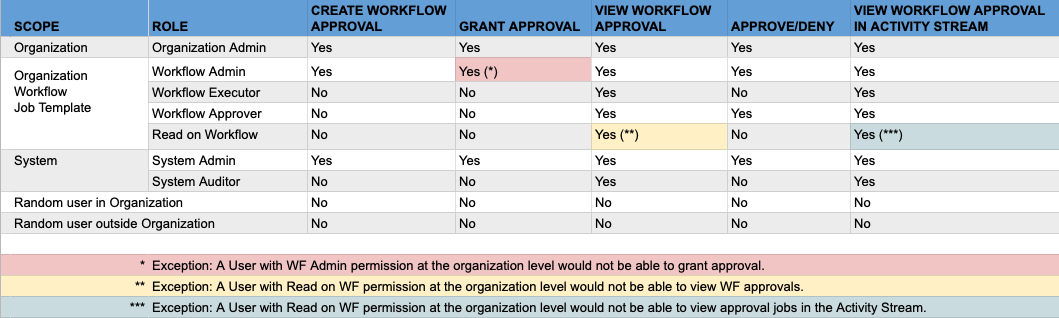
The approver is anyone who can execute the workflow job template containing the approval nodes, has org admin or above privileges (for the org associated with that workflow job template), or any user who has the Approve permission explicitly assigned to them within that specific workflow job template.
If pending approval nodes are not approved within the specified time limit (if an expiration was assigned) or they are denied, then they are marked as “timed out” or “failed”, respectively, and move on to the next “on fail node” or “always node”. If approved, the “on success” path is taken. If you try to POST in the API to a node that has already been approved, denied or timed out, an error message notifies you that this action is redundant, and no further steps will be taken.
Below shows the various levels of permissions allowed on approval workflows:
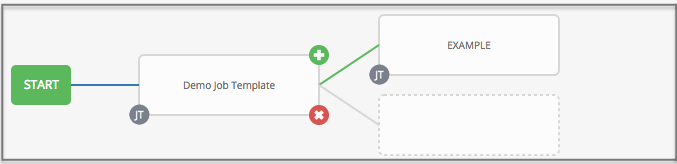
You can add a sibling node by clicking the on the parent node:
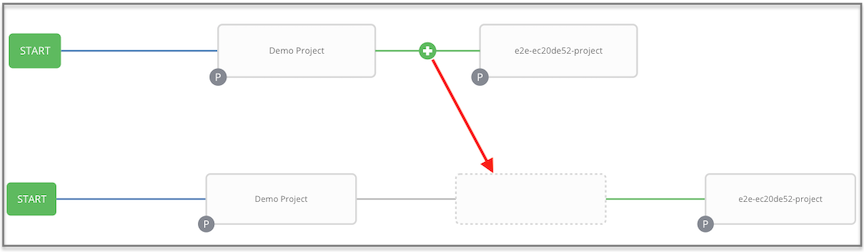
You can insert another node in between nodes by hovering over the line that connects the two until the appears. Clicking on the automatically inserts the node between the two nodes.
To add a root node to depict a split scenario, click the button again:
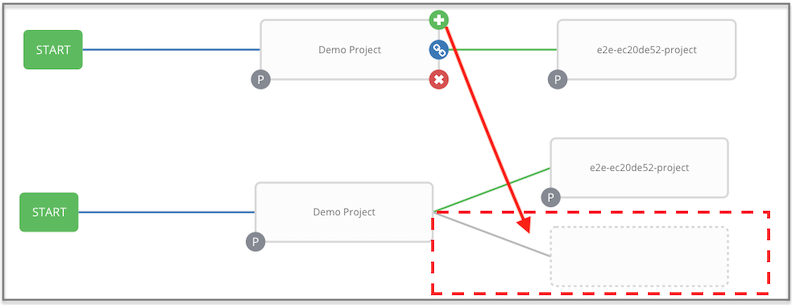
At any node where you want to create a split scenario, hover over the node from which the split scenario begins and click the . This essentially adds multiple nodes from the same parent node, creating sibling nodes:
Note
When adding a new node, the PROMPT button applies to workflow templates as well. Workflow templates will prompt for inventory and surveys.
If you want to undo the last inserted node, click on another node without making a selection from the right pane. Or, click Cancel from the right pane.
Below is an example of a workflow that contains all three types of jobs that is initiated by a job template that if it fails to run, proceed to the project sync job, and regardless of whether that fails or succeeds, proceed to the inventory sync job.
Remember to refer to the Key at the top of the window to identify the meaning of the symbols and colors associated with the graphical depiction.
Note
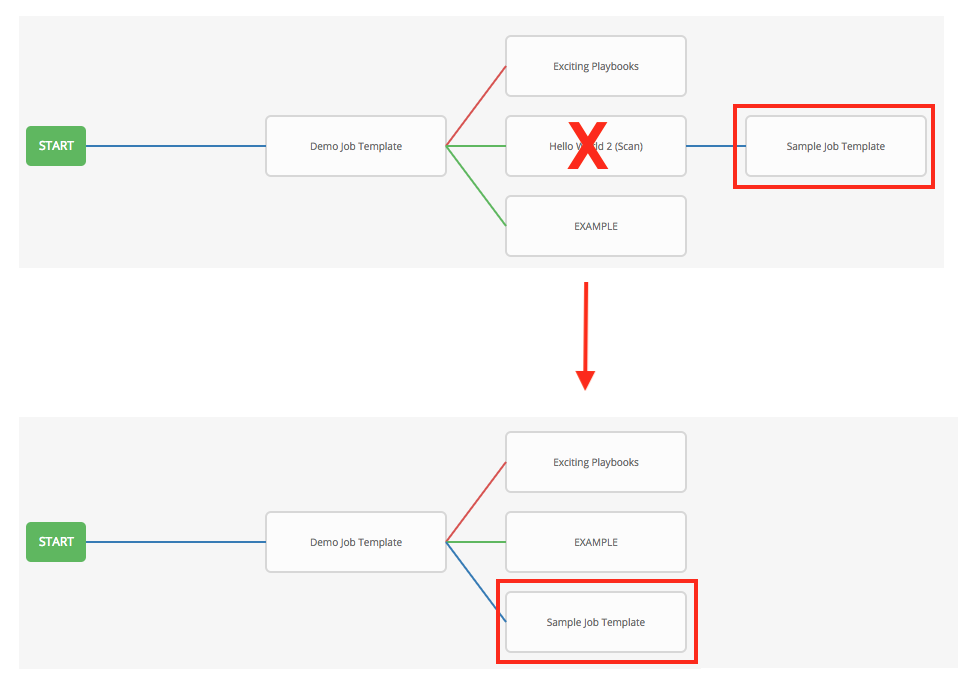
In a workflow with a set of sibling nodes having varying edge types, and you remove a node that has a follow-on node attached to it, the attached node automatically joins the set of sibling nodes and retains its edge type:
The following ways you can modify your nodes:
If you want to edit a node, click on the node you want to edit. The right pane displays the current selections. Make your changes and click Select to apply them to the graphical view.
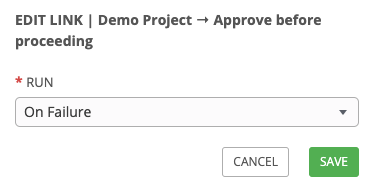
To edit the edge type for an existing link (success/failure/always), click on the link. The right pane displays the current selection. Make your changes and click Save to apply them to the graphical view.
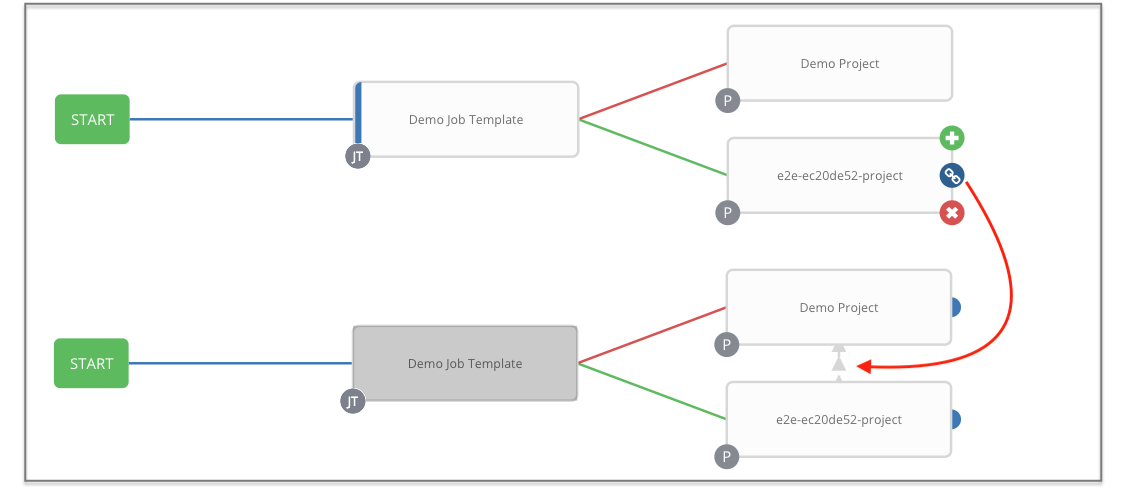
To add a new link from one node to another, click the link icon that appears on each node. Doing this highlights the nodes that are possible to link to. These feasible options are indicated by the dotted lines. Invalid options are indicated by grayed out boxes (nodes) that would otherwise produce an invalid link. The example below shows the Demo Project as a possible option for the e2e-ec20de52-project to link to, as indicated by the arrows:
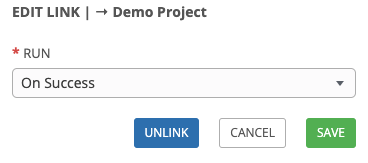
To remove a link, click the link and click the Unlink button.
This button only appears in the right hand panel if the target or child node has more than one parent. All nodes must be linked to at least one other node at all times so you must create a new link before removing an old one.
Click the settings icon () to zoom, pan, or reposition the view. Alternatively, you can drag the workflow diagram to reposition it on the screen or use the scroll on your mouse to zoom.
Launch a workflow template by any of the following ways:
Access the workflow template list from the navigational link or while in the Workflow Template Details view, scroll to the bottom to access the button from the list of templates.
While in the Job Template Details view of the job template you want to launch, click Launch.
Along with any extra variables set in the job template and survey, Tower automatically adds the same variables as those added for a job template upon launch. Additionally, Tower automatically redirects the web browser to the Jobs Details page for this job, displaying the progress and the results.
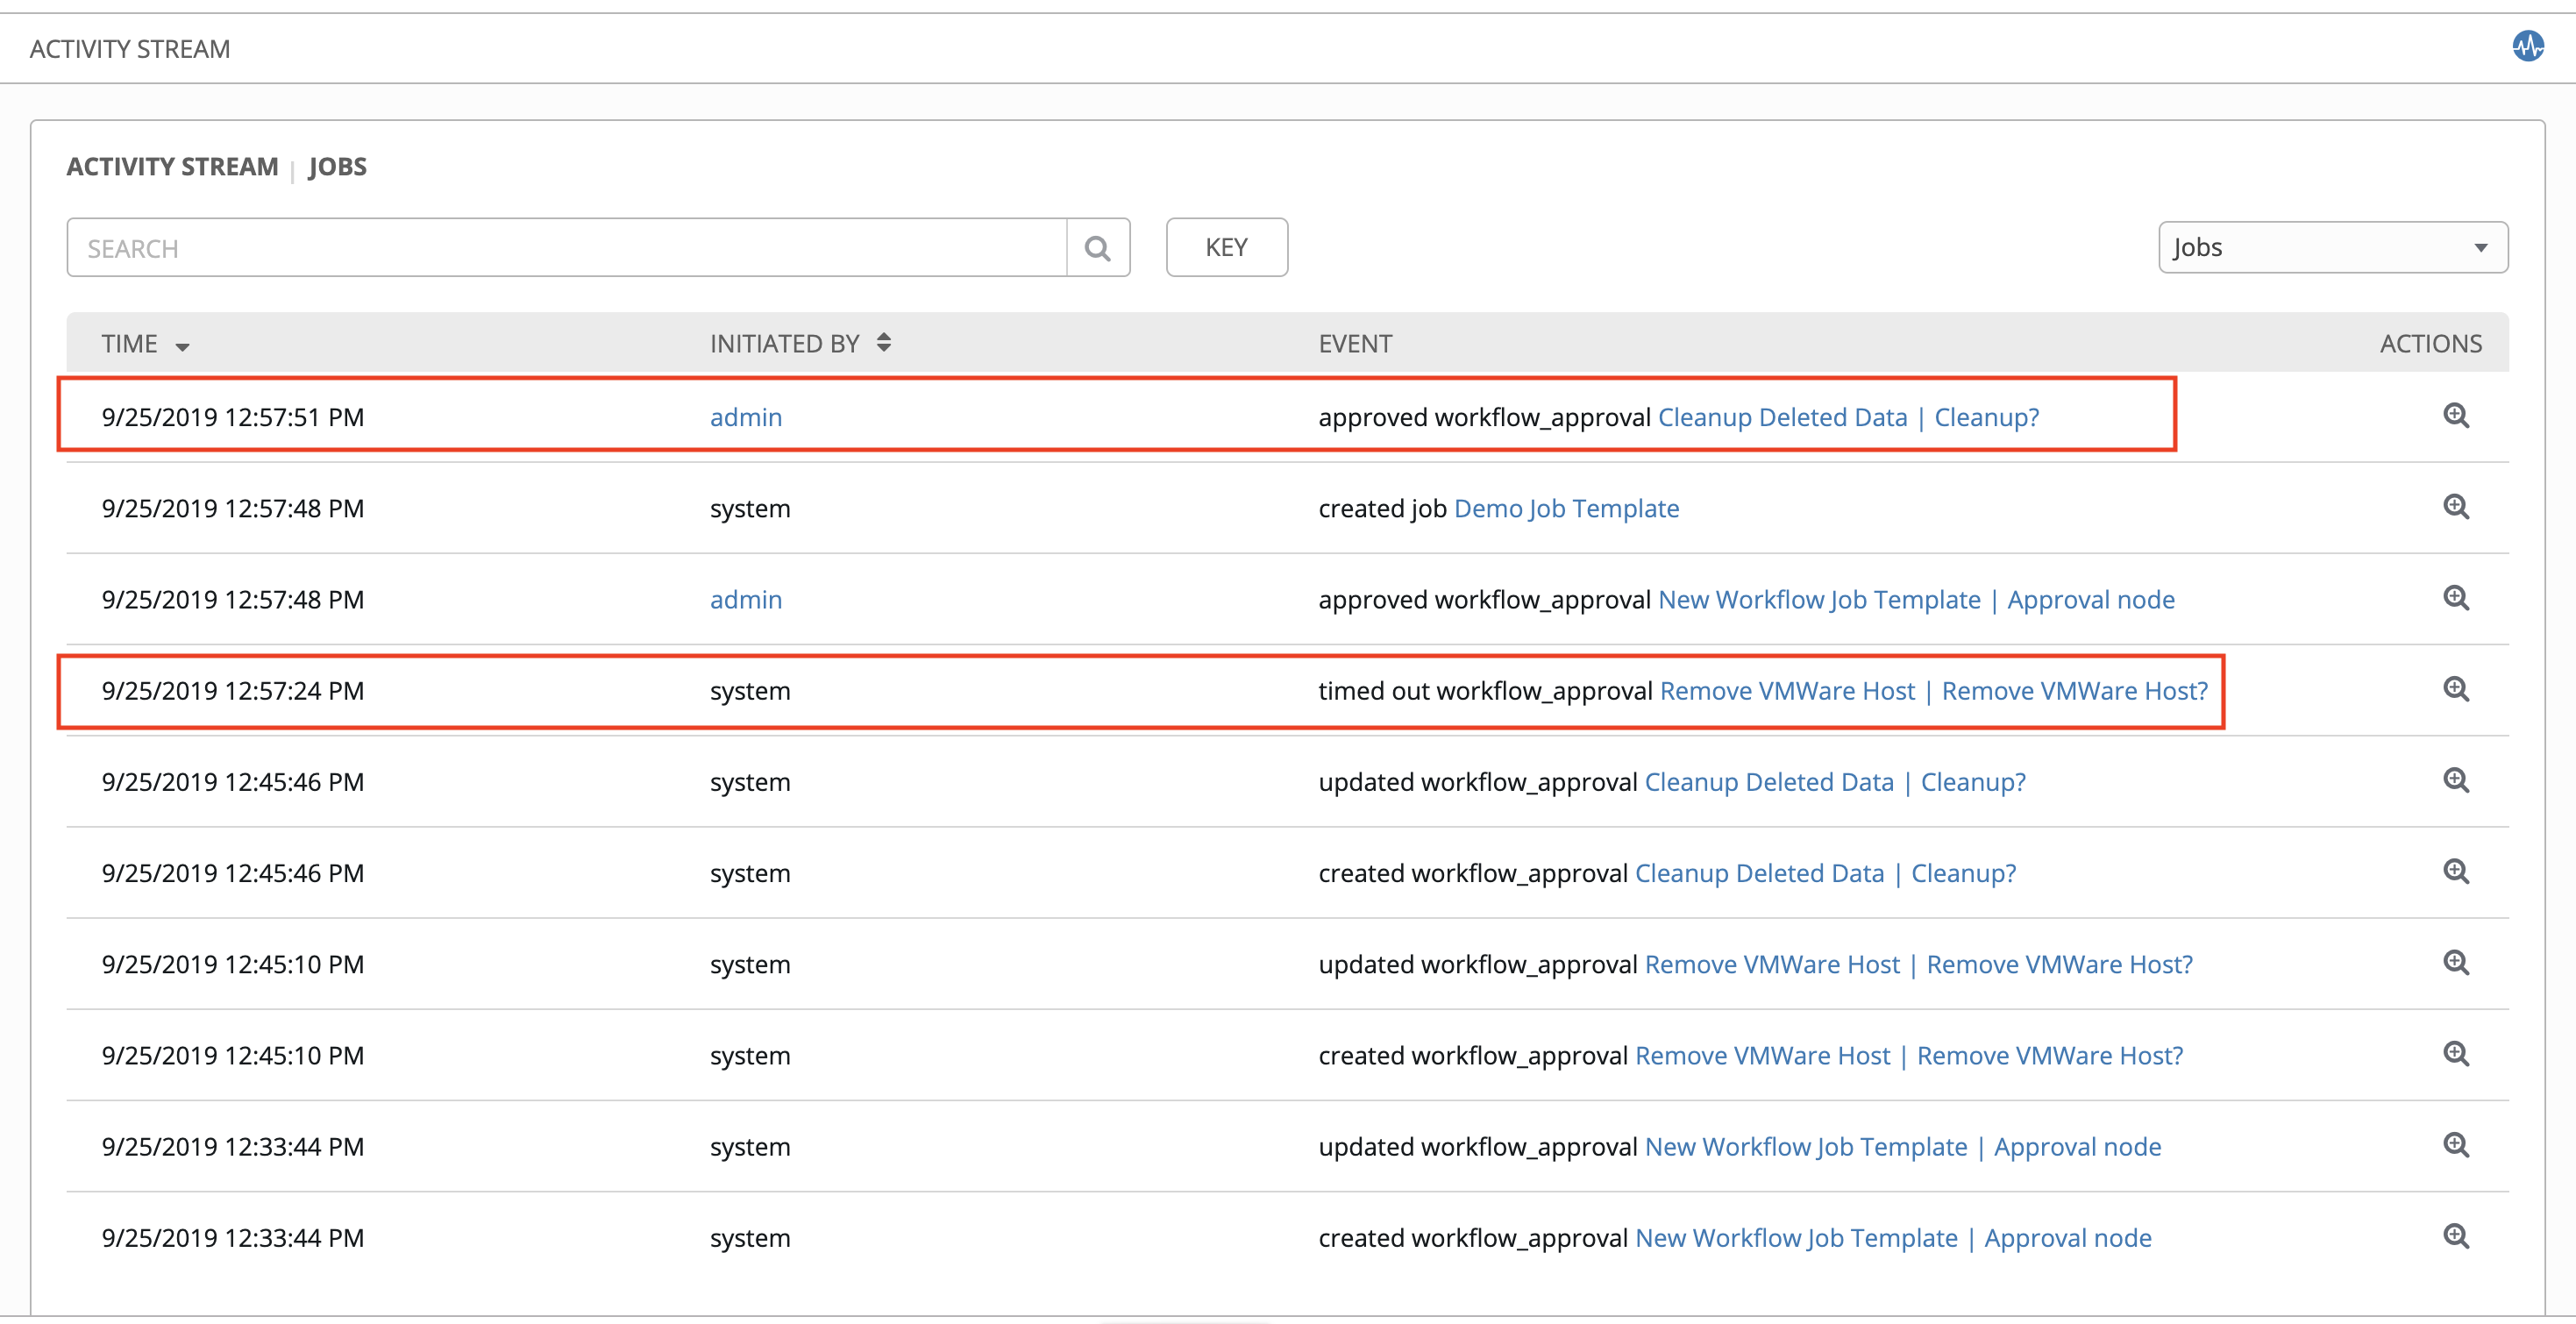
Events related to approvals on workflows display in the Activity Stream () with detailed information about the approval requests.
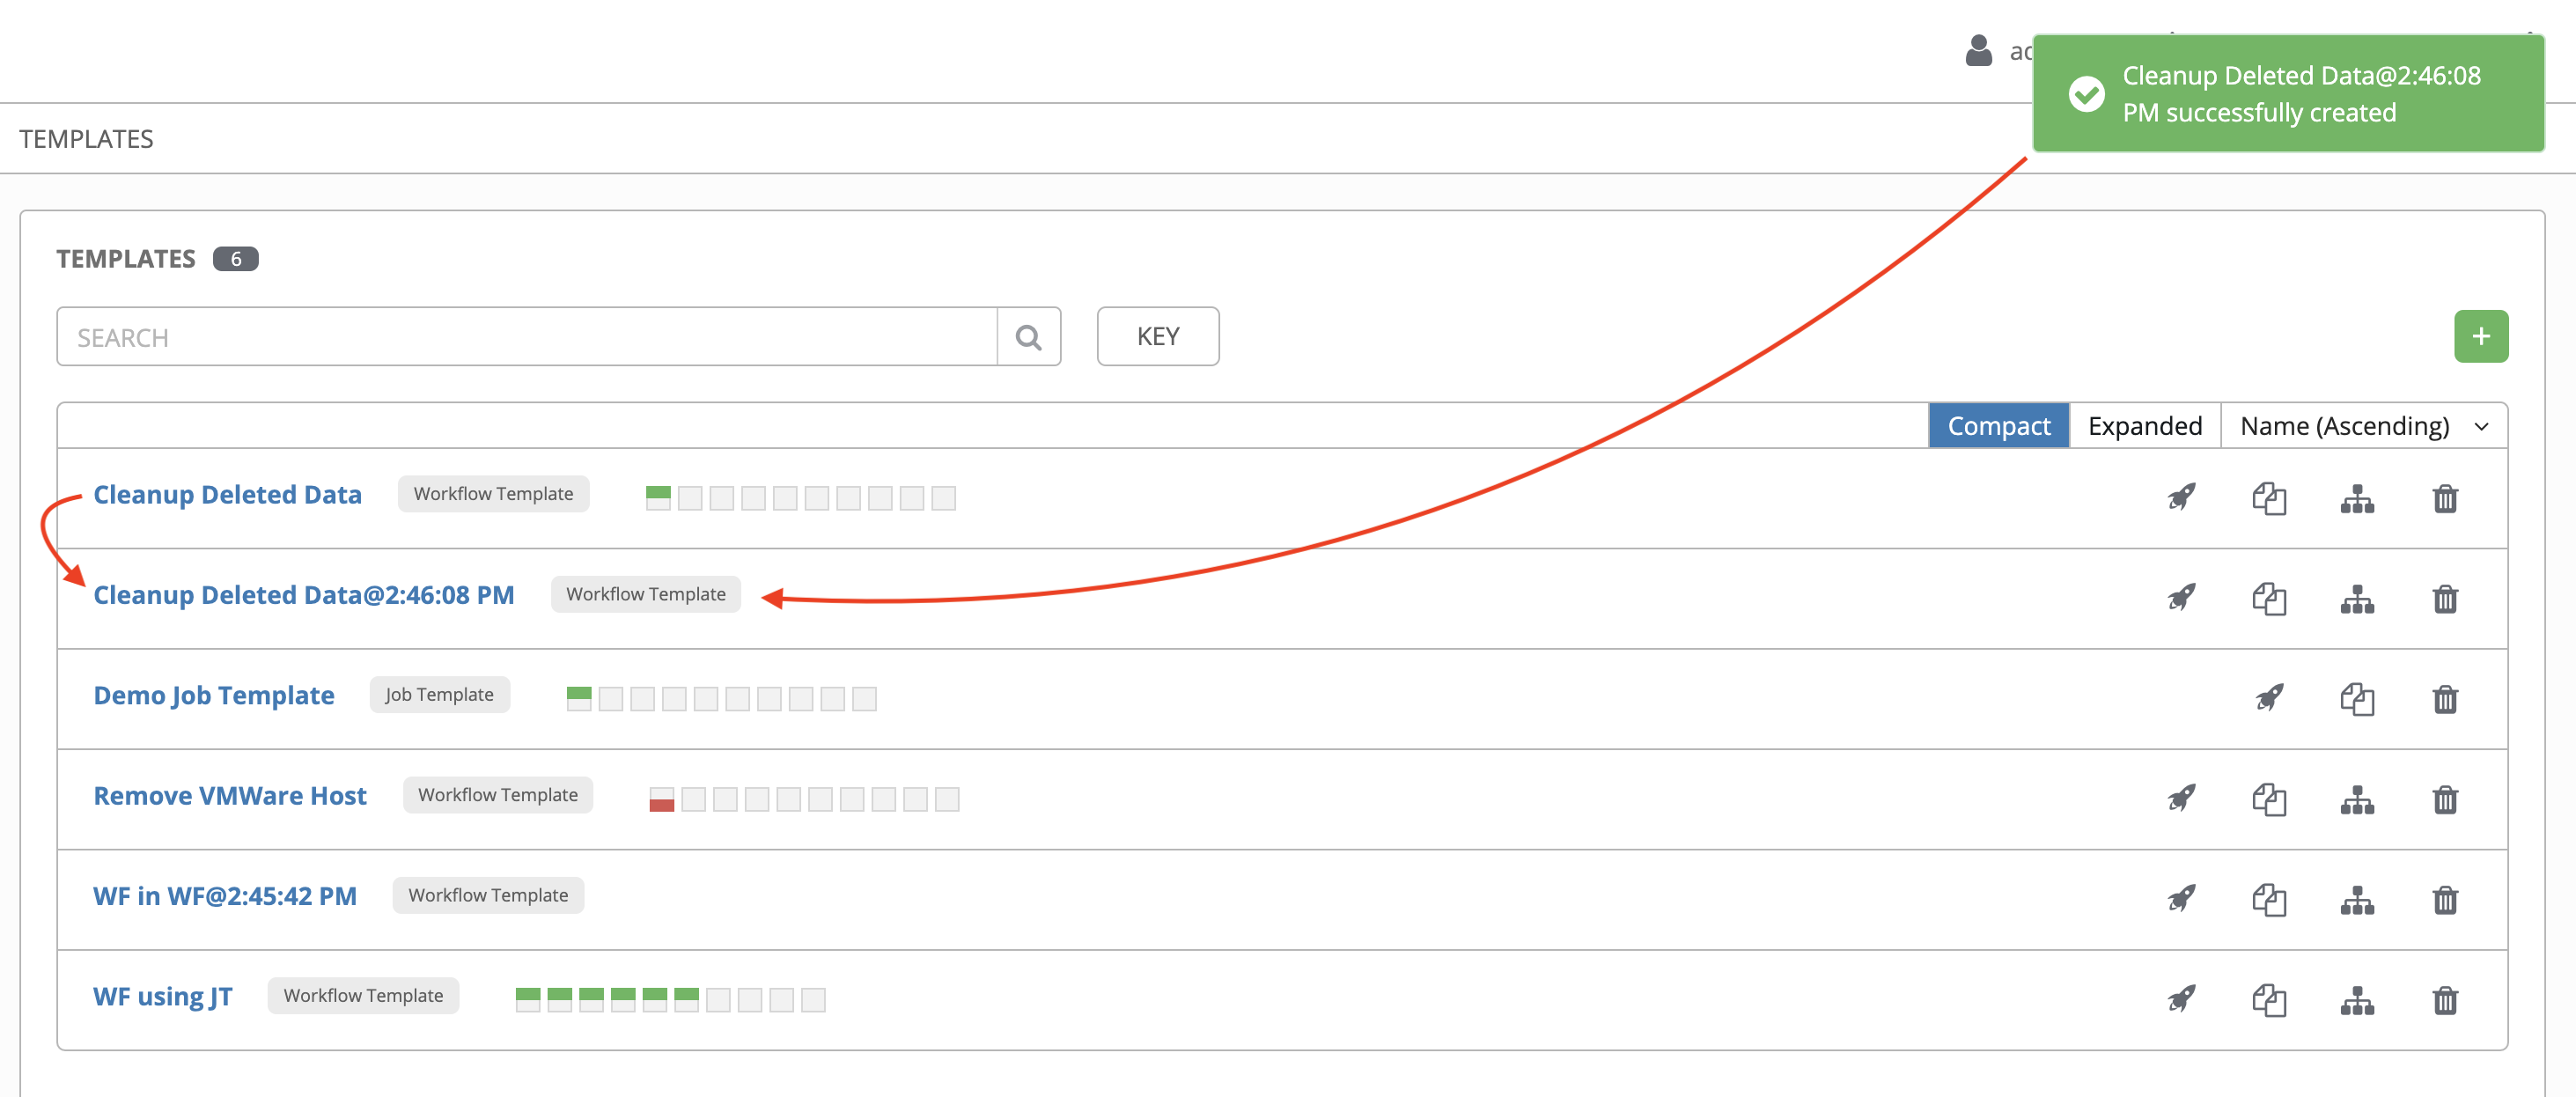
Ansible Tower allows you the ability to copy a workflow template. If you choose to copy a workflow template, it does not copy any associated schedule, notifications, or permissions. Schedules and notifications must be recreated by the user or admin creating the copy of the workflow template. The user copying the workflow template will be granted the admin permission, but no permissions are assigned (copied) to the workflow template.
Access the workflow template that you want to copy from the Templates navigational link () or while in the Workflow Job Template Details view, scroll to the bottom to access it from a list of templates.
Click the button.
A new template opens with the name of the template from which you copied and a timestamp.
Select the copied template and replace the contents of the Name field with a new name, and provide or modify the entries in the other fields to complete this template.
Click Save when done.
Note
If a resource has a related resource that you don’t have the right level of permission to, you cannot copy the resource, such as in the case where a project uses a credential that a current user only has Read access. However, for a workflow template, if any of its nodes uses an unauthorized job template, inventory, or credential, the workflow template can still be copied. But in the copied workflow template, the corresponding fields in the workflow template node will be absent.
extra_vars passed to the job launch API are only honored if one of the following is true:
They correspond to variables in an enabled survey
ask_variables_on_launch is set to True
When you pass survey variables, they are passed as extra variables (extra_vars) within Tower. This can be tricky, as passing extra variables to a workflow template (as you would do with a survey) can override other variables being passed from the inventory and project.
For example, say that you have a defined variable for an inventory for debug=true. It is entirely possible that this variable, debug=true, can be overridden in a workflow template survey.
To ensure that the variables you need to pass are not overridden, ensure they are included by redefining them in the survey. Keep in mind that extra variables can be defined at the inventory, group, and host levels.
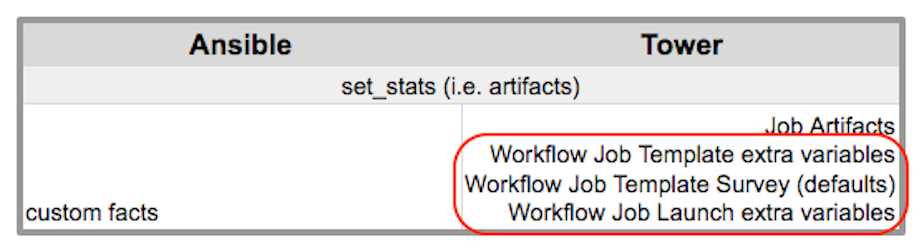
The following table notes the behavior (hierarchy) of variable precedence in Ansible Tower as it compares to variable precedence in Ansible.
 ), copy (
  ), and remove (
  ) a job template. Before deleting a job template, be sure it is not used in a workflow job template.
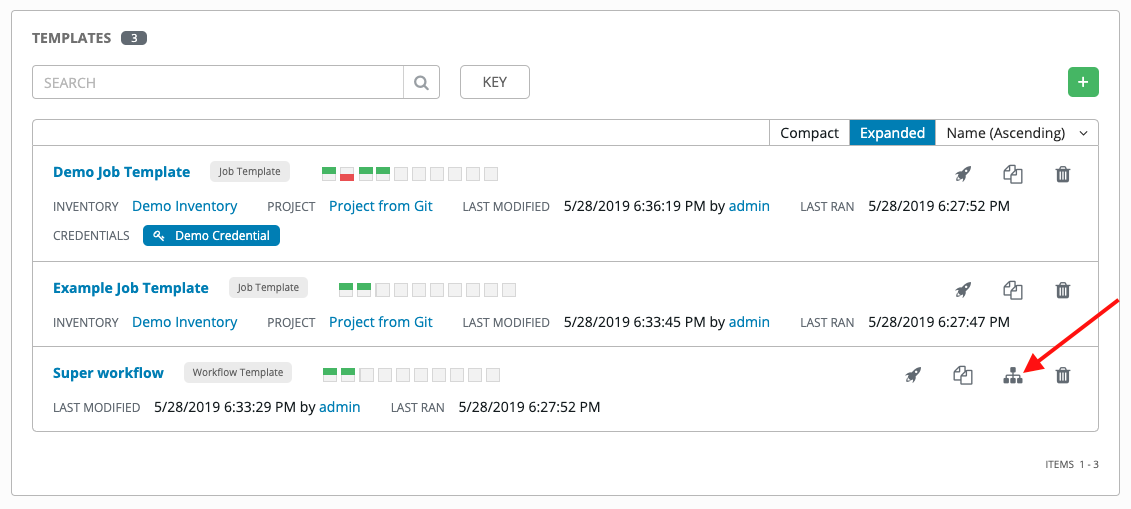
 button then select Workflow Template from the menu list.
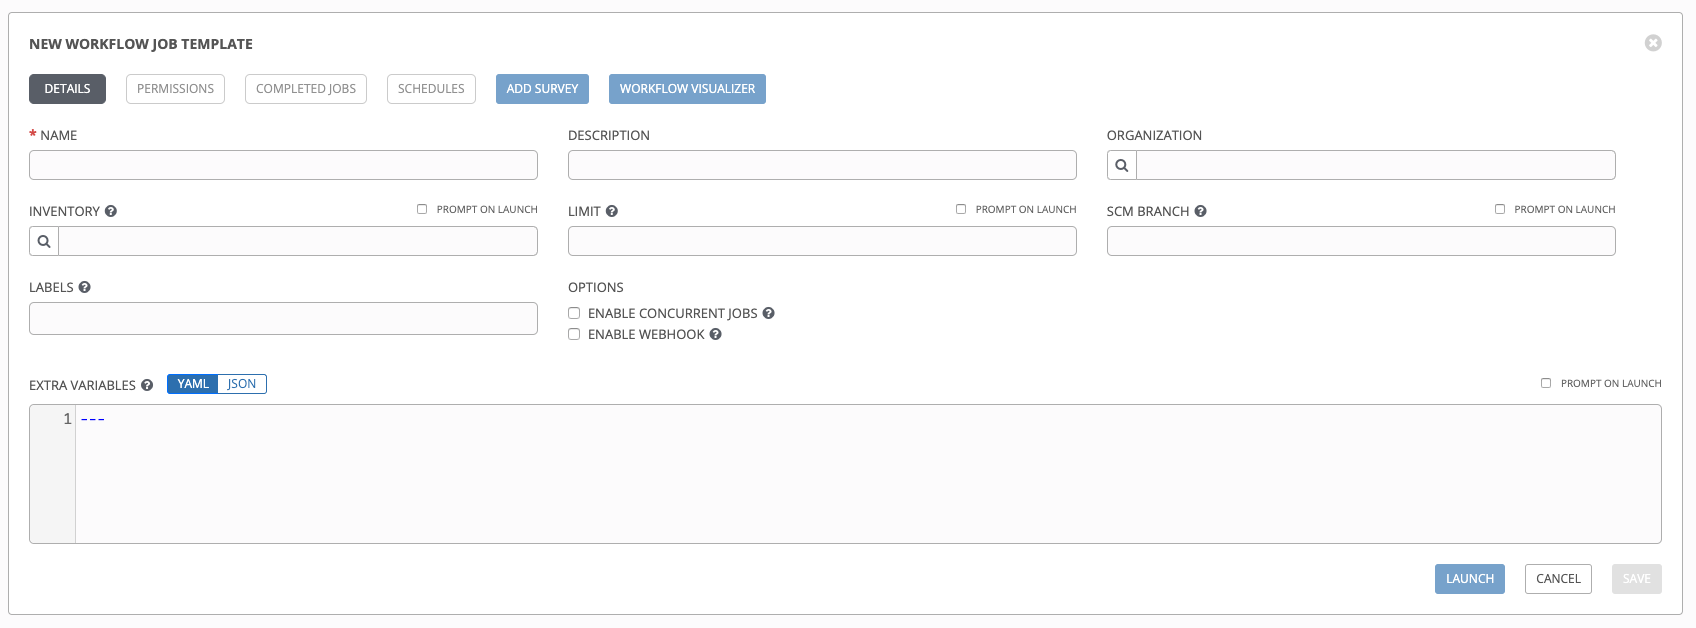


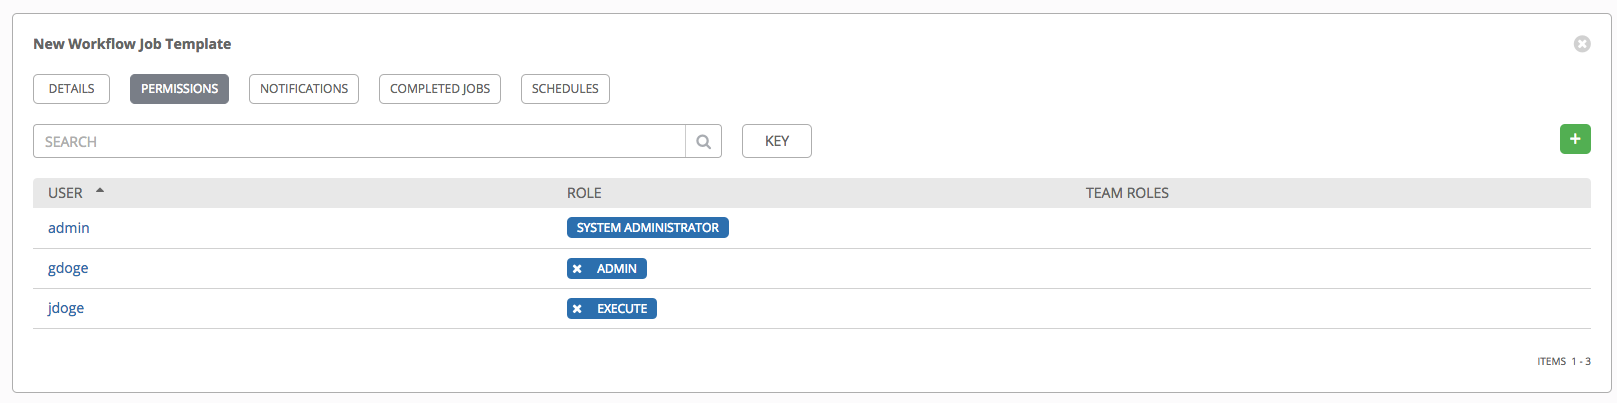
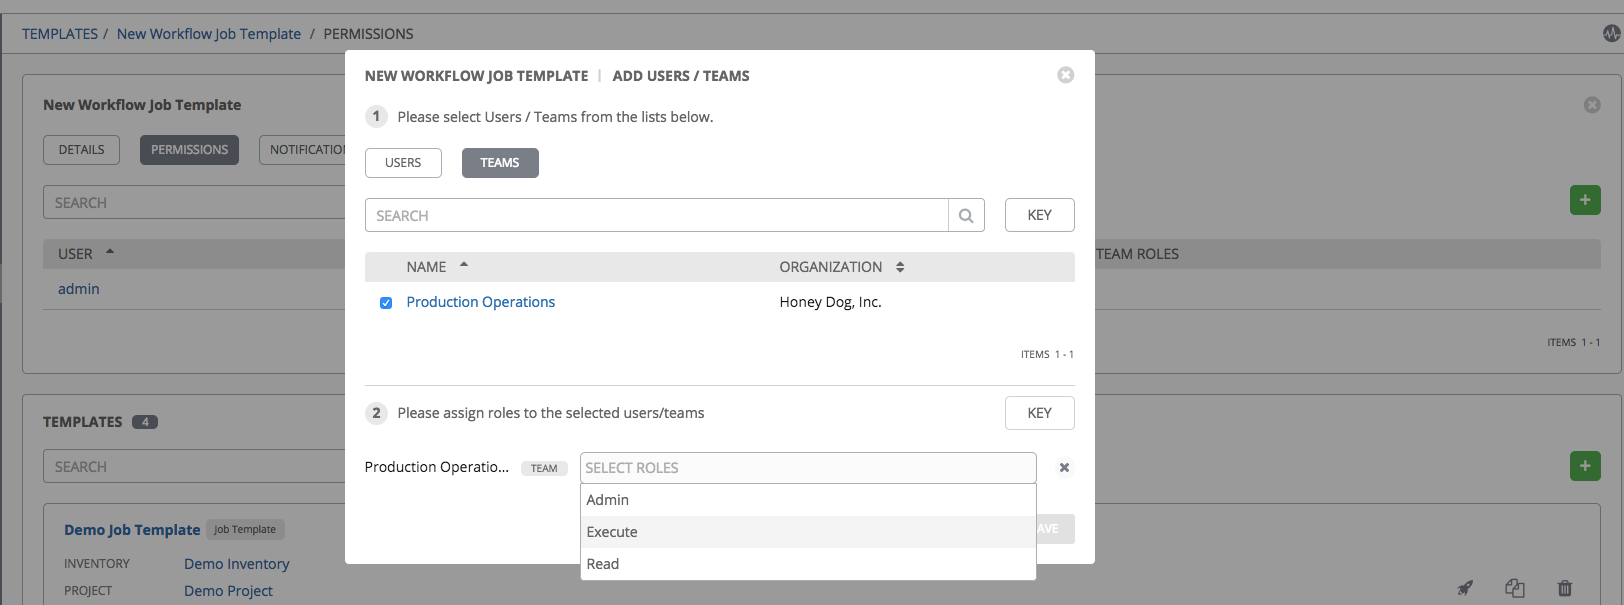
button to create new permissions for this workflow template.


button to create a survey.
button or from the Templates list view, click the (
) icon to launch the Workflow Visualizer.

button to display a list of nodes to add to your workflow.


) icon to display the legend for each run scenario and their job types.

another node, edit an existing link
, or delete
the selected node.
) icon next to it.

) to zoom, pan, or reposition the view. Alternatively, you can drag the workflow diagram to reposition it on the screen or use the scroll on your mouse to zoom.
navigational link or while in the Workflow Template Details view, scroll to the bottom to access the
) with detailed information about the approval requests.