17. インベントリー
An Inventory is a collection of hosts against which jobs may be launched, the same as an Ansible inventory file. Inventories are divided into groups and these groups contain the actual hosts. Groups may be sourced manually, by entering host names into Tower, or from one of Ansible Tower's supported cloud providers.
注釈
If you have a custom dynamic inventory script, or a cloud provider that is not yet supported natively in Tower, you can also import that into Tower. Refer to インベントリーファイルのインポート in the Automation Controller Administration Guide.
インベントリー画面は、現在利用できるインベントリーの一覧が表示されます。インベントリーの一覧は、名前、タイプ、または 組織 で並べ替えて、検索できます。
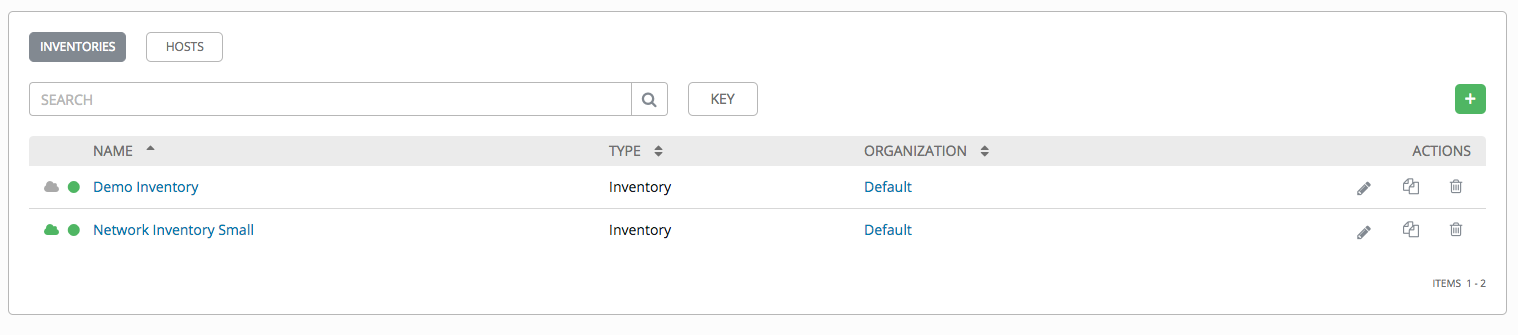
インベントリーの詳細の一覧には、以下が含まれます。
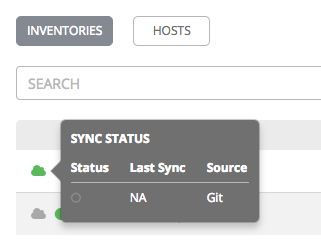
インベントリー同期 (
 ): 緑はインベントリーの同期が成功したことを示し、赤は同期が失敗したことを示します。このアイコンをクリックすると、インベントリーに同期できるソースがある場合、直近の 5 回のインベントリーソースの同期ステータスとソース情報が表示されます。
Status Dot (ステータスを示す丸い点): このインベントリーの最近のジョブのステータスを表示します。
名前: インベントリー名。インベントリー名をクリックすると、選択したインベントリーのプロパティー画面に移動します。ここでは、インベントリーのグループおよびホストが表示されます (このビューは
 アイコンからアクセスすることもできます)。
タイプ: これが標準インベントリーか、またはスマートインベントリーであるかどうかを特定します。
組織: インベントリーが属する組織。
アクション: 以下のアクションを選択したインベントリーについて実行できます。
編集 (
): 選択したインベントリーのプロパティーを編集します。コピー (
 ): 新しいインベントリーの作成用のテンプレートとして、既存のインベントリーのコピーを作成します。
削除 (
 ): 選択したインベントリーを削除します。この操作は取り消すことができません!
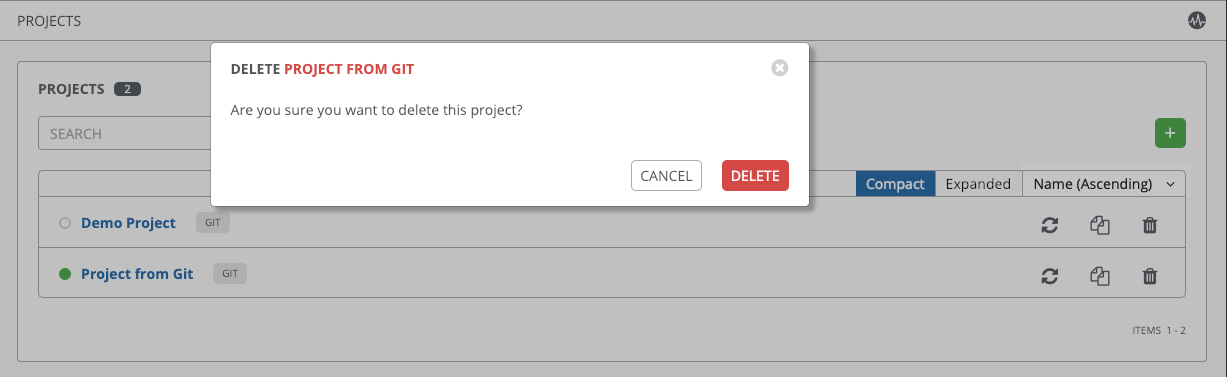
注釈
他の作業アイテムが使用するアイテムを削除する場合は、メッセージが開き、削除されるアイテムと、削除の確認を促すプロンプトが表示されます。画面によっては、無効なアイテムや、過去に削除されたアイテムが含まれる場合があるので、それらのアイテムは実行に失敗します。以下は、これらのメッセージ例です。
17.1. スマートインベントリー
A Smart Inventory is a collection of hosts defined by a stored search that can be viewed like a standard inventory and made to be easily used with job runs. Organization administrators have admin permission to inventories in their organization and can create Smart Inventories. A Smart Inventory is identified by KIND=smart. You can define a Smart Inventory using the same method being used with Tower Search. InventorySource is directly associated with an Inventory.
Inventory モデルには、以下のように、デフォルトで空白となっている新規フィールドが含まれていますが、スマートインベントリー向けに以下のように設定されます。
スマートインベントリーの場合には、
kindはsmartに設定されるスマートインベントリーの場合には、
host_filterとkindはsmartに設定される
host モデルには関連するエンドポイント (ホストが関連付けられているすべてのスマートインベントリーのセットを識別する smart_inventories) があります。メンバーシップテーブルは、スマートインベントリーに対してジョブが実行されるたびに更新されます。
注釈
メンバーシップをより頻繁に更新するには、ファイルベースの設定 AWX_REBUILD_SMART_MEMBERSHIP を True (デフォルトは False) に変更します。これにより、次のイベントのメンバーシップが更新されます。
新規ホストが追加される
既存ホストが変更される (更新または削除される)
新規スマートインベントリーが追加される
既存スマートインベントリーが変更される (更新または削除される)
実際のインベントリーは、編集可能にせずに表示することができます。
ホストおよびグループの名前はインベントリーソースの同期の結果として作成されます。
グループのレコードは編集したり、移動したりすることはできません。
通常のインベントリーと同様に、スマートインベントリーのホストエンドポイント (/inventories/N/hosts/) からホストを作成することはできません。スマートインベントリーの管理者には、名前、説明、変数および削除機能などのフィールドを編集するパーミッションがありますが、host_filter を変更するパーミッションはありません。これを変更すると、(別のインベントリー内にプライマリーメンバーシップを有する) ホストの中のどのホストがスマートインベントリーに組み込まれるかに影響があるためです。host_filter はスマートインベントリーの組織内のインベントリーに含まれるホストのみに適用されることに注意してください。
host_filter を変更するには、インベントリーの組織の組織管理者である必要があります。組織管理者には組織内のすべてのインベントリーへの暗黙的な「管理」アクセスをすでに有しているため、組織管理者が有していないパーミッションが必要になることはありません。
スマートインベントリーの管理者は、(組織の管理者ではない) 他のユーザーに対し、スマートインベントリーへの「使用」や「アドホック」などのパーミッションを付与することができ、これらのパーミッションは、他の標準インベントリーの場合と同様にロールが示唆する各種アクションを許可します。ただし、これにより、これらの管理者に (異なるインベントリーにある) ホストへの特別なパーミッションが付与される訳ではありません。それらの管理者は、スマートインベントリーホストの一覧でホストを閲覧できますが、ホストの直接の読み取りパーミッションが付与される訳ではなく、/#/hosts/ で追加のホストを確認できる訳でもありません。
ある状況では、以下を変更することができます。
インベントリーソースを使ってインベントリーで手動で作成された新規ホスト
インベントリーソースの同期の結果として作成されたグループ
変更可能なホストおよびグループの変数
スマートインベントリーに関連付けられたホストは表示される際に明示されます。スマートインベントリーの結果に同じホスト名を持つ複数のホストが含まれる場合、一致するホストの 1 つのみがスマートインベントリーの一部として組み込まれ、ホスト ID 別に並べ替えられます。
17.2. inventory プラグイン
Inventory updates use dynamically-generated YAML files which are parsed by their respective inventory plugin. In Automation Controller Version 4.0.0, users can provide the new style inventory plugin config directly to Tower via the inventory source source_vars for all the following inventory sources:
Newly created configurations for inventory sources will contain the default plugin configuration values. If you want your newly created inventory sources in 3.8 to match the output of a 3.7 source, you must apply a specific set of configuration values for that source. To ensure backward compatibility, Tower uses "templates" for each of these sources to force the output of inventory plugins into the legacy format. Refer to Supported Inventory Plugin Templates section of this guide for each source and their respective templates to help you migrate to the new style inventory plugin output.
トップレベルキーとして plugin: foo.bar.baz が含まれる source_vars では、InventorySource ソースに基づいてランタイム時に適切な完全修飾インベントリープラグイン名に置き換えられます。たとえば、実行時に InventorySource に ec2 が選択されると、プラグインが amazon.aws.aws_ec2 に設定されます。
17.3. 新規インベントリーの追加
新規インベントリーの追加には、複数のコンポーネントが必要です。以下をクリックして、各コンポーネントに移動します。
新規インベントリーまたはスマートインベントリーを作成するには、以下を実行します。
Click the Add button, and select the type of inventory to create.
インベントリーのタイプは、ラベルや作成フォームの先頭にあるタブの行で識別できます。
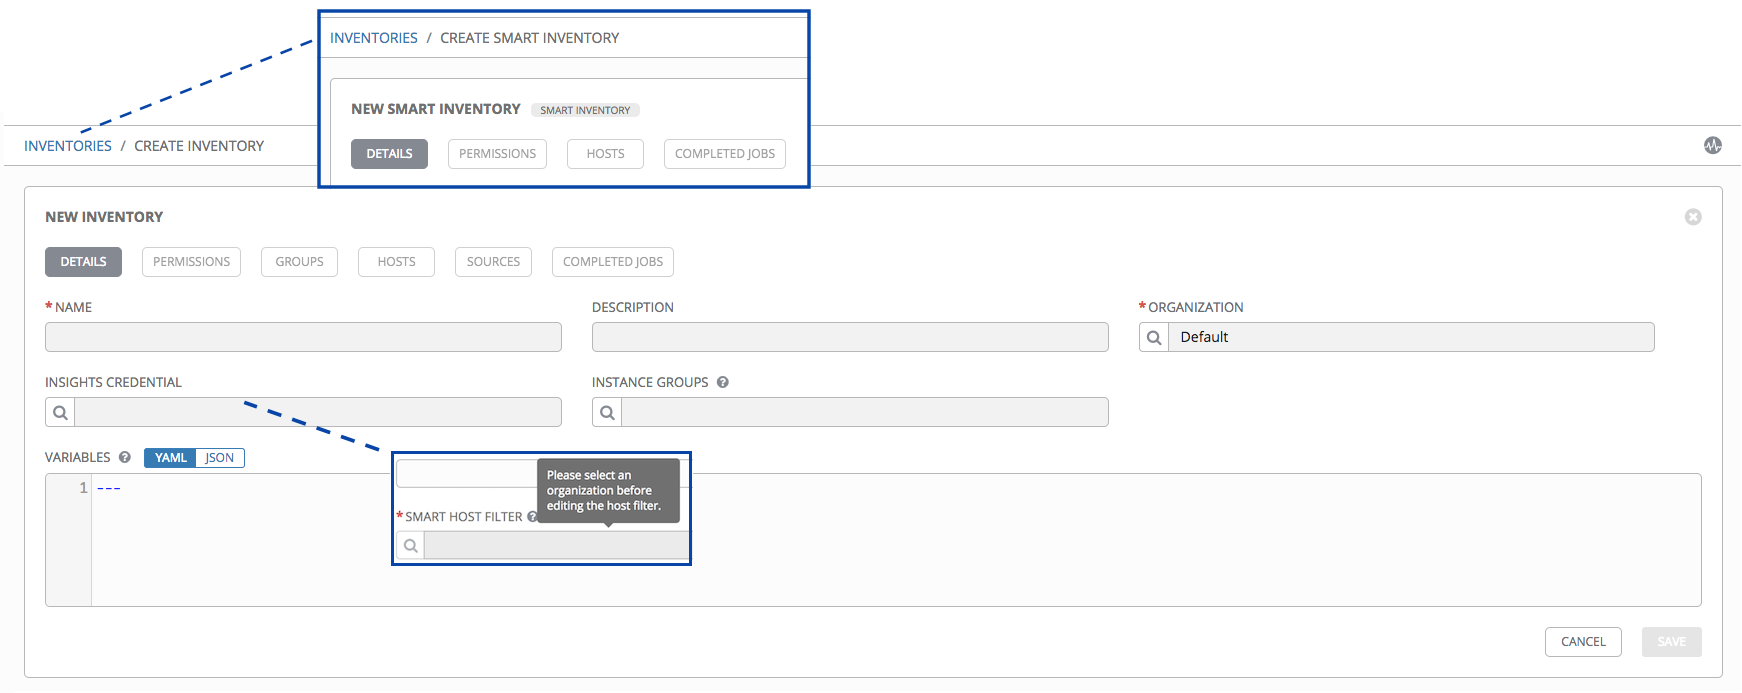
以下のフィールドに該当する詳細を入力します。
名前: このインベントリーに適した名前を入力します。
説明: 任意の説明を入力します (オプション)。
組織: 必須。利用可能な組織から選択します。
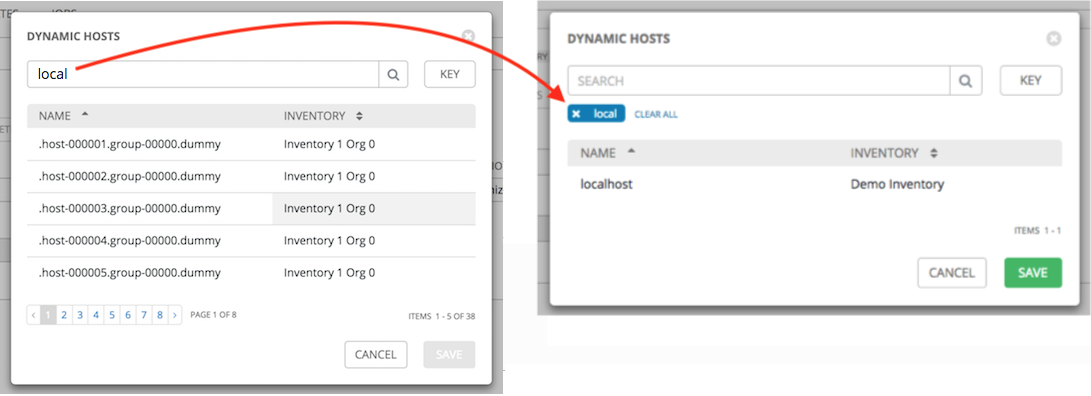
スマートホストフィルター: (スマートインベントリーのみに適用)
 ボタンをクリックして別個の動的ホストウィンドウを開き、このインベントリーのホストをフィルターします。これらのオプションは、選択した組織に基づくものです。
フィルターは、タグを使用して該当の名前を含むホストをフィルターする点で、タグに似ています。そのため、スマートホストフィルター フィールドにデータを投入するには、実際にホスト自体を選択するのではなく、希望のホストを含むタグを指定します。検索 フィールドにタグを入力して、[Enter] を押します。 フィルターでは、大文字と小文字が区別されます。詳細は、「スマートホストフィルター」セクションを参照してください。
インスタンスグループ:
ボタンをクリックして別個のウィンドウを開きます。このインベントリーの実行に使用するインスタンスグループを選択します。一覧に多くのオプションが含まれる場合、検索を使用してオプションの範囲を絞ります。変数: このインベントリーのすべてのホストに適用される変数の定義および値。JSON または YAML 構文を使用して変数を入力します。ラジオボタンを使用してこれら 2 つの間の切り替えを行います。
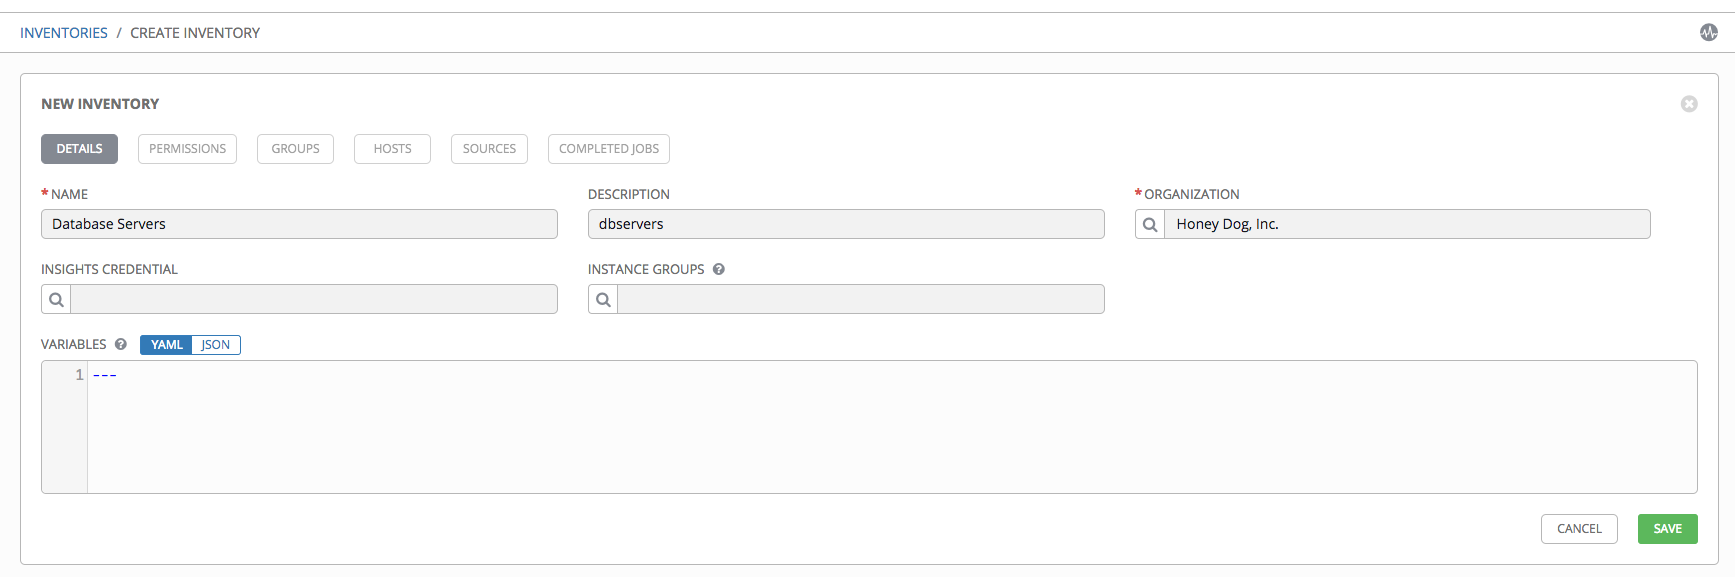
完了したら 保存 をクリックします。
After Tower saves the new inventory, you can proceed with configuring permissions, groups, hosts, sources, and view completed jobs, if applicable to the type of inventory. For more instructions, refer to the subsequent sections.
17.3.1. パーミッションの追加
In the Access tab, click the Add button.
Select a user or team to add and click Next
Select one or more users or teams from the list by clicking the check box(es) next to the name(s) to add them as members and click Next.
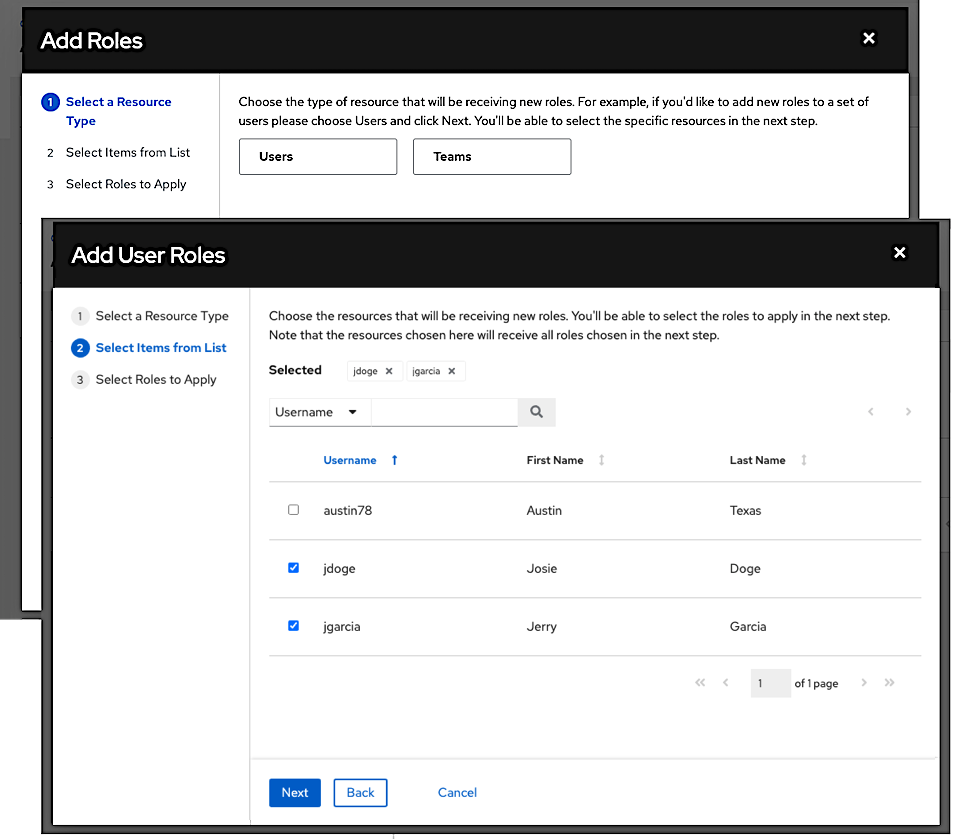
In this example, two users have been selected to be added.
Select the role(s) you want the selected user(s) or team(s) to have. Be sure to scroll down for a complete list of roles. Different resources have different options available.
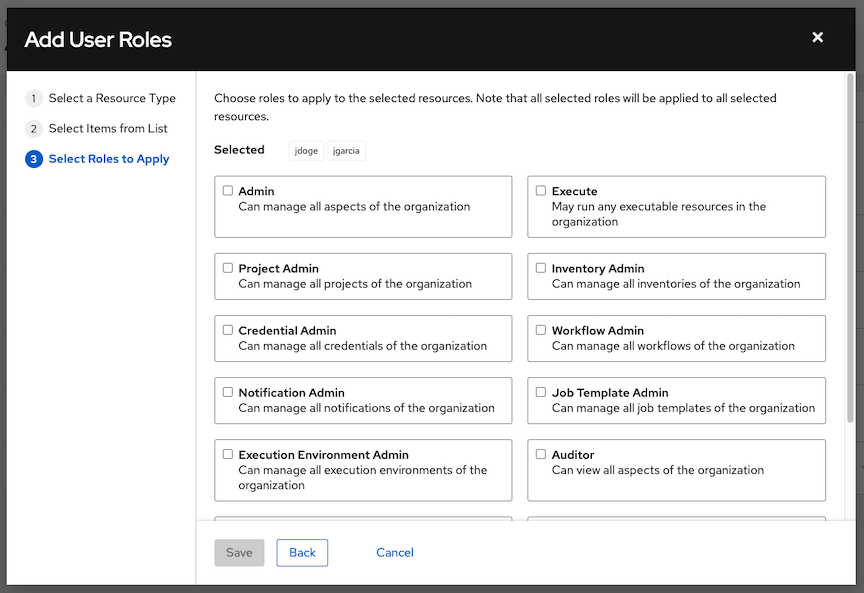
Click the Save button to apply the roles to the selected user(s) or team(s) and to add them as members.
The Add Users/Teams window closes to display the updated roles assigned for each user and team.
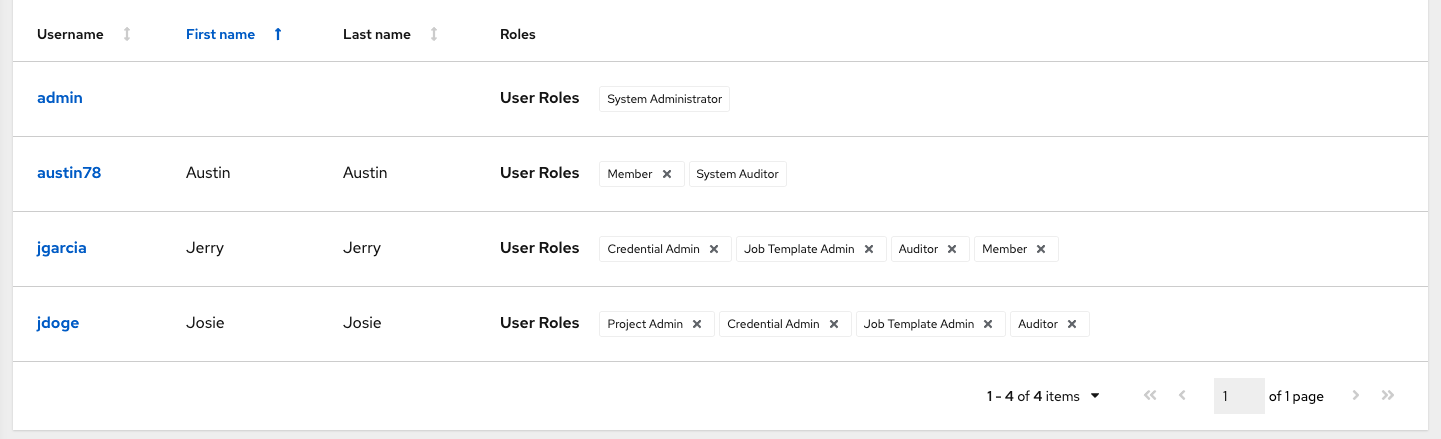
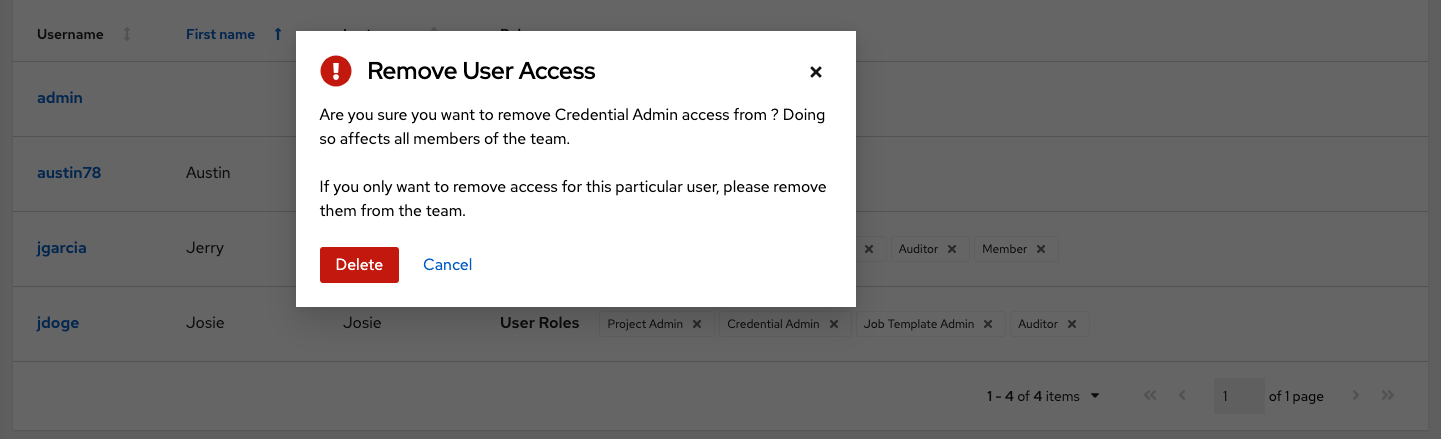
To remove roles for a particular user, click the disassociate (x) button next to its resource.
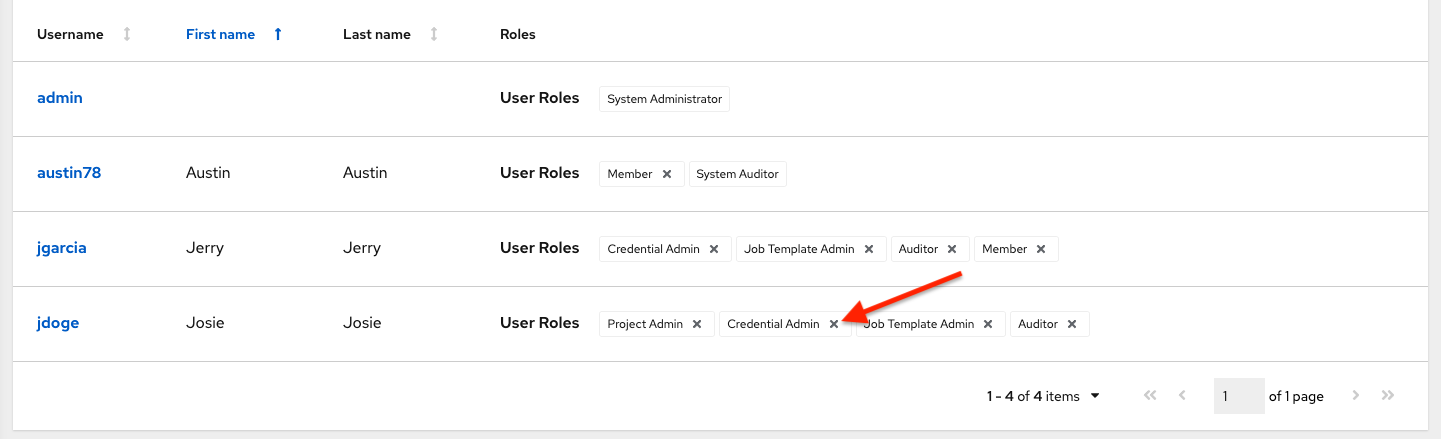
これにより確認ダイアログが起動し、関連付けの解除を確定するように求められます。
17.3.2. グループの追加
インベントリーは、ホストおよび他のグループか、またはホストが含まれるグループに分類されます。グループは標準インベントリーのみに適用され、スマートインベントリーから直接設定することはできません。既存グループは、標準インベントリーで使用されるホストに関連付けることができます。標準インベントリーで選択可能なアクションには以下が含まれます。
新規グループの作成
新規ホストの作成
選択したインベントリーでのコマンドの実行
インベントリープロパティーの編集
グループおよびホストのアクティビティーストリームの表示
インベントリーの構築に関するヘルプの取得
注釈
インベントリーソースはグループに関連付けられなくなりました。以前のバージョンでは、生成されるグループやホストはインベントリーソースグループの子となりました。現在、生成されるグループは最上位に置かれます。これらのグループには子グループを持たせることができ、これらの生成されるすべてのグループにホストを含めることができます。
インベントリーの新規グループを作成するには、以下を実行します。
Click the Add button to open the Create Group window.
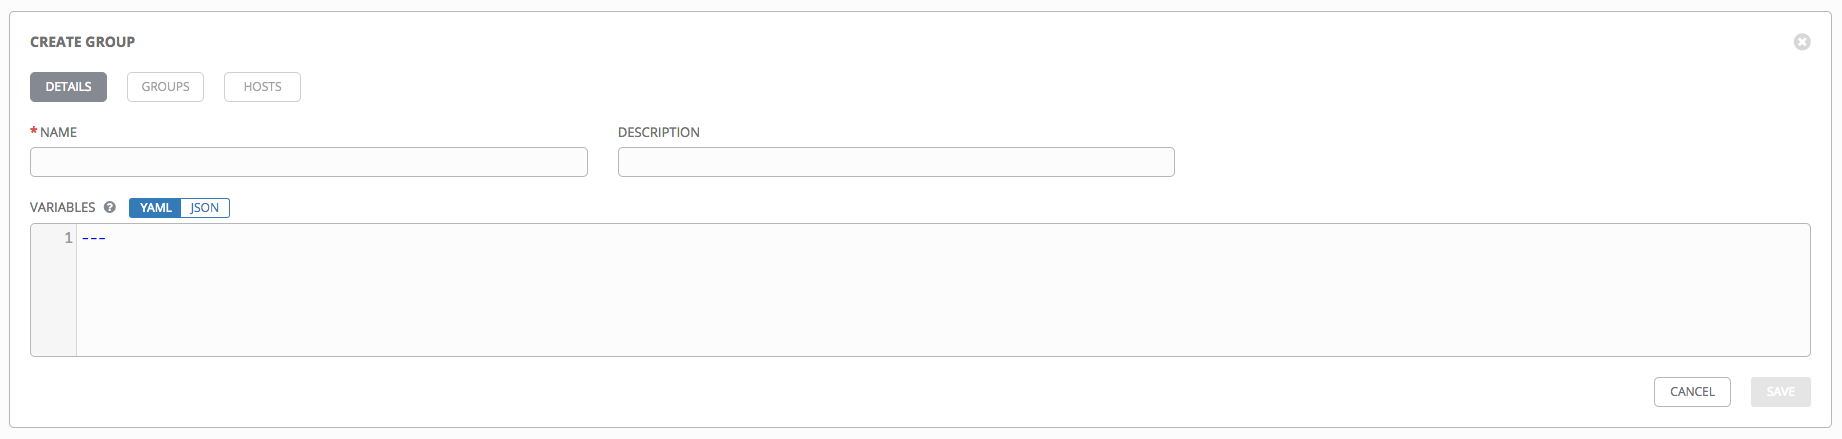
必須およびオプションのフィールドに該当する詳細を入力します。
名前: 必須
説明: 任意の説明を入力します (オプション)。
変数: このグループのすべてのホストに適用される定義および値を入力します。JSON または YAML 構文のいずれかを使用して変数を入力します。ラジオボタンを使用してこれら 2 つの間の切り替えを行います。
完了したら、保存 をクリックします。
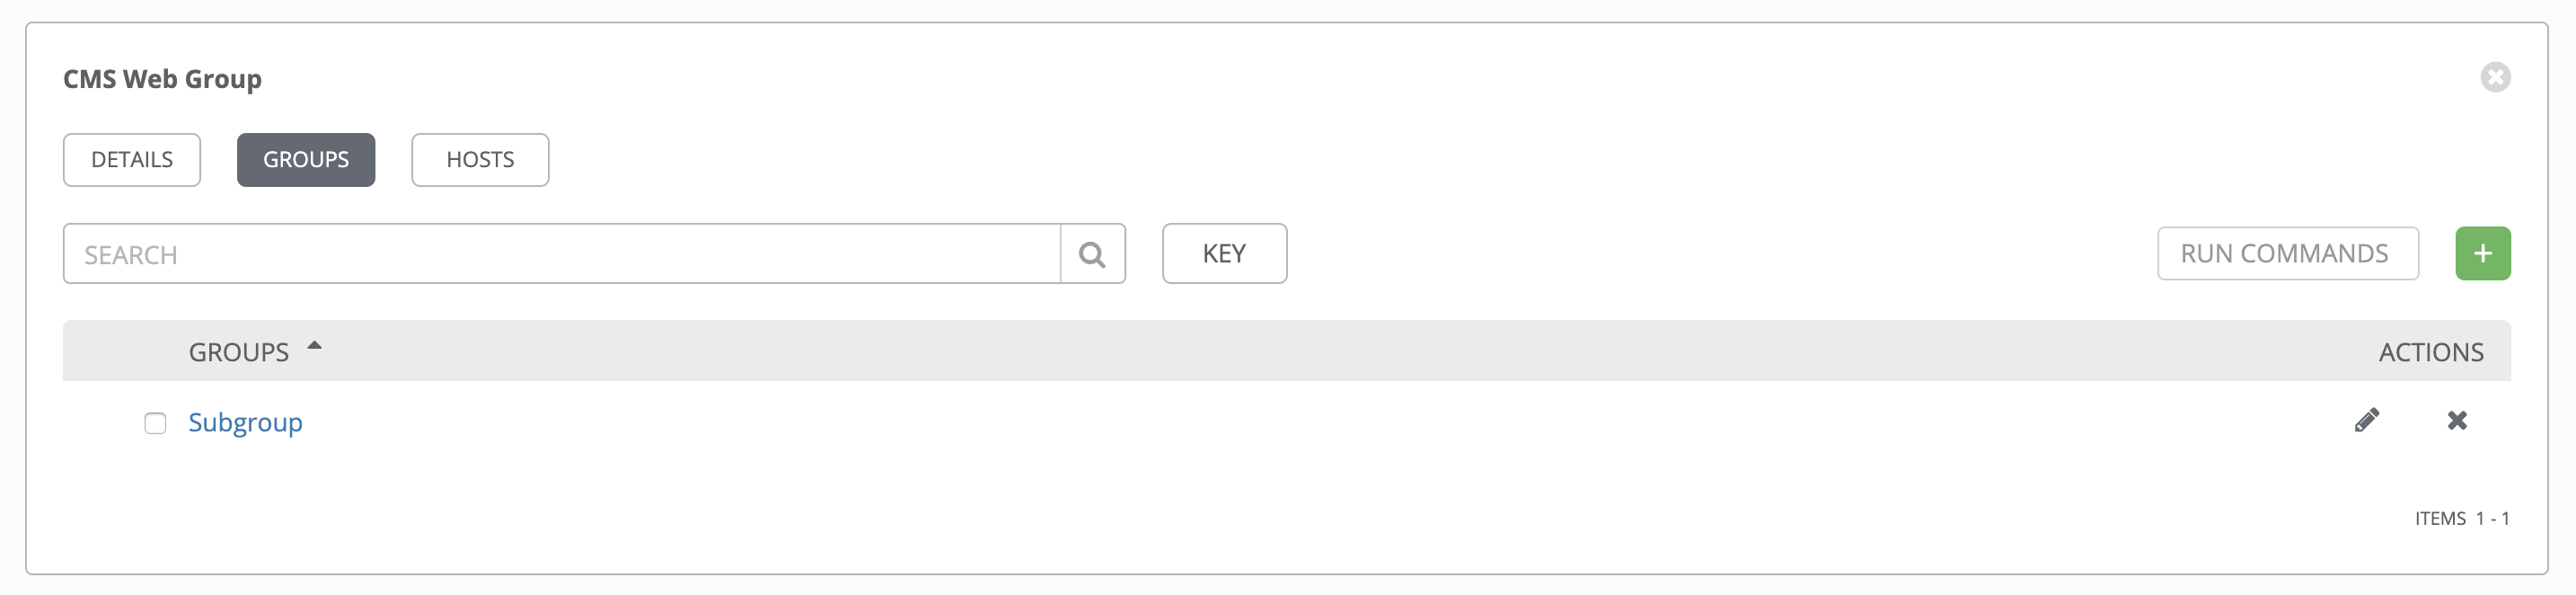
17.3.2.1. グループ内でのグループの追加
グループ内にグループを追加するには、以下を実行します。
グループ タブをクリックします。
Click the Add button, and select whether to add a group that already exists in your configuration or create a new group.
新規グループを作成する場合、該当する詳細情報を必須およびオプションフィールドに入力します。
名前: 必須
説明: 任意の説明を入力します (オプション)。
変数: このグループのすべてのホストに適用される定義および値を入力します。JSON または YAML 構文のいずれかを使用して変数を入力します。ラジオボタンを使用してこれら 2 つの間の切り替えを行います。
完了したら、保存 をクリックします。
グループの作成 ウィンドウが閉じ、新規に作成されたグループが、元のグループに関連付けられたグループの一覧のエントリーとして表示されます。
既存グループを追加する選択をした場合、選択可能なグループが別個の選択ウィンドウに表示されます。
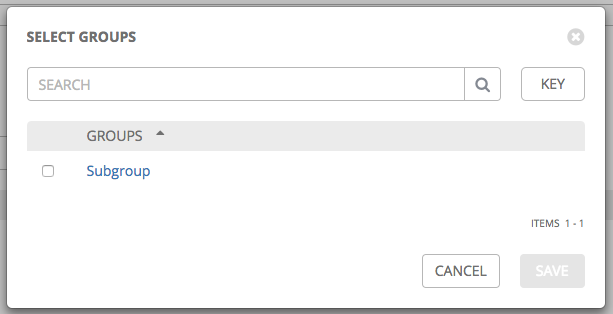
グループが選択されると、グループに関連付けられたグループの一覧のエントリーとして表示されます。
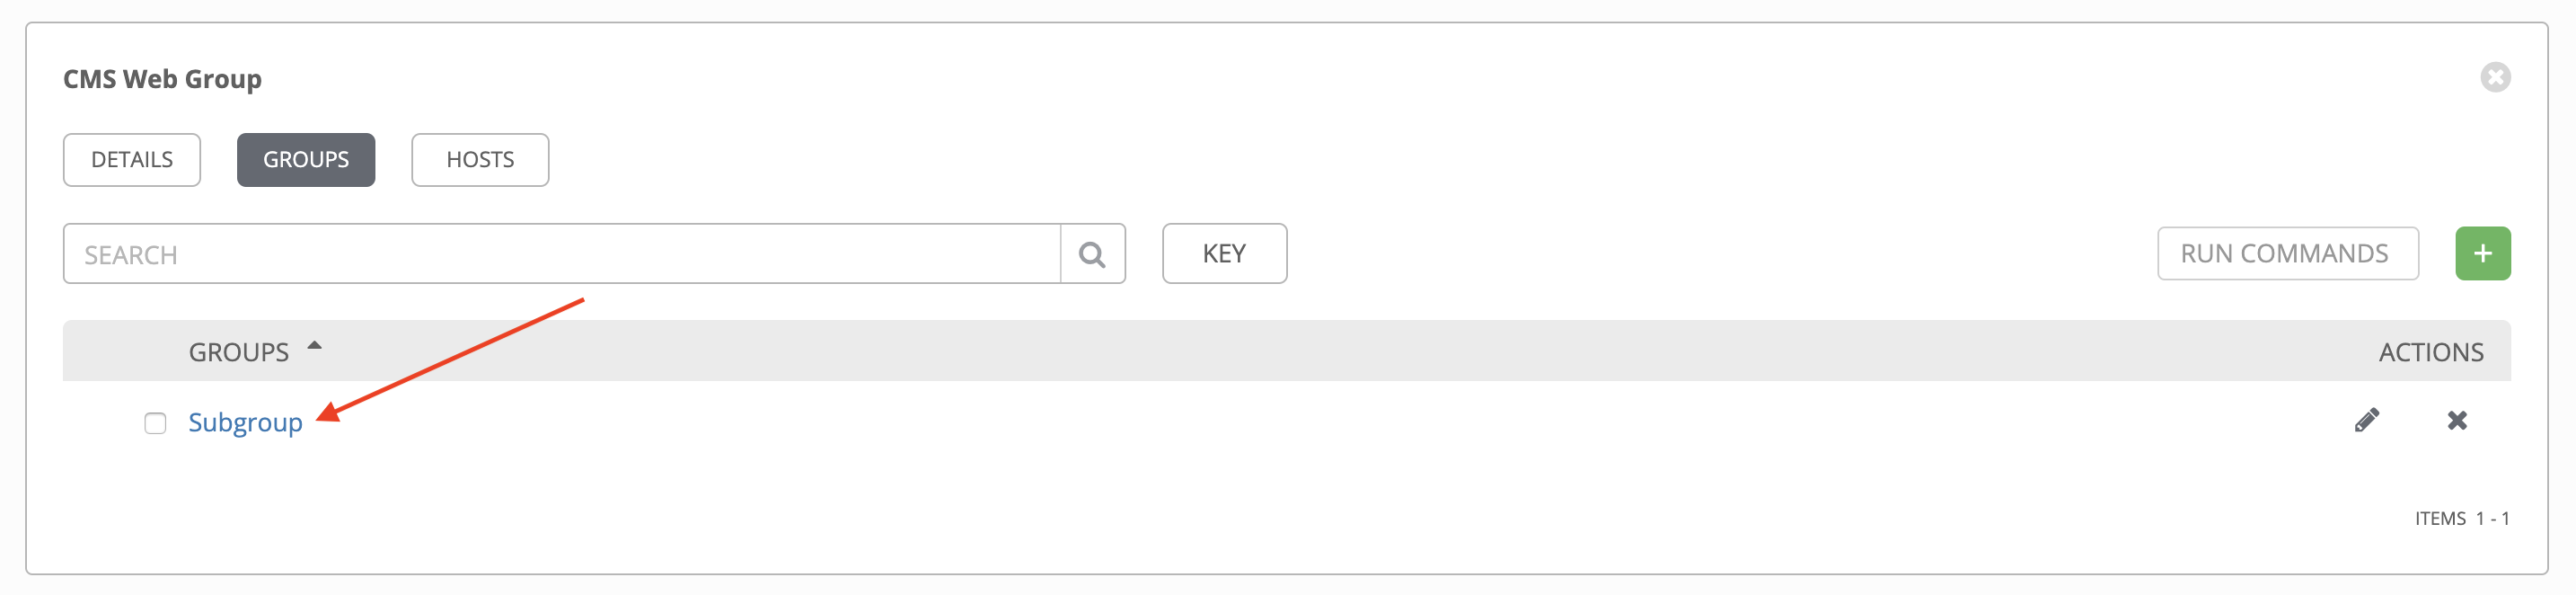
5. To configure additional groups and hosts under the subgroup, click on the name of the subgroup from the list of groups and repeat the same steps described in this section.
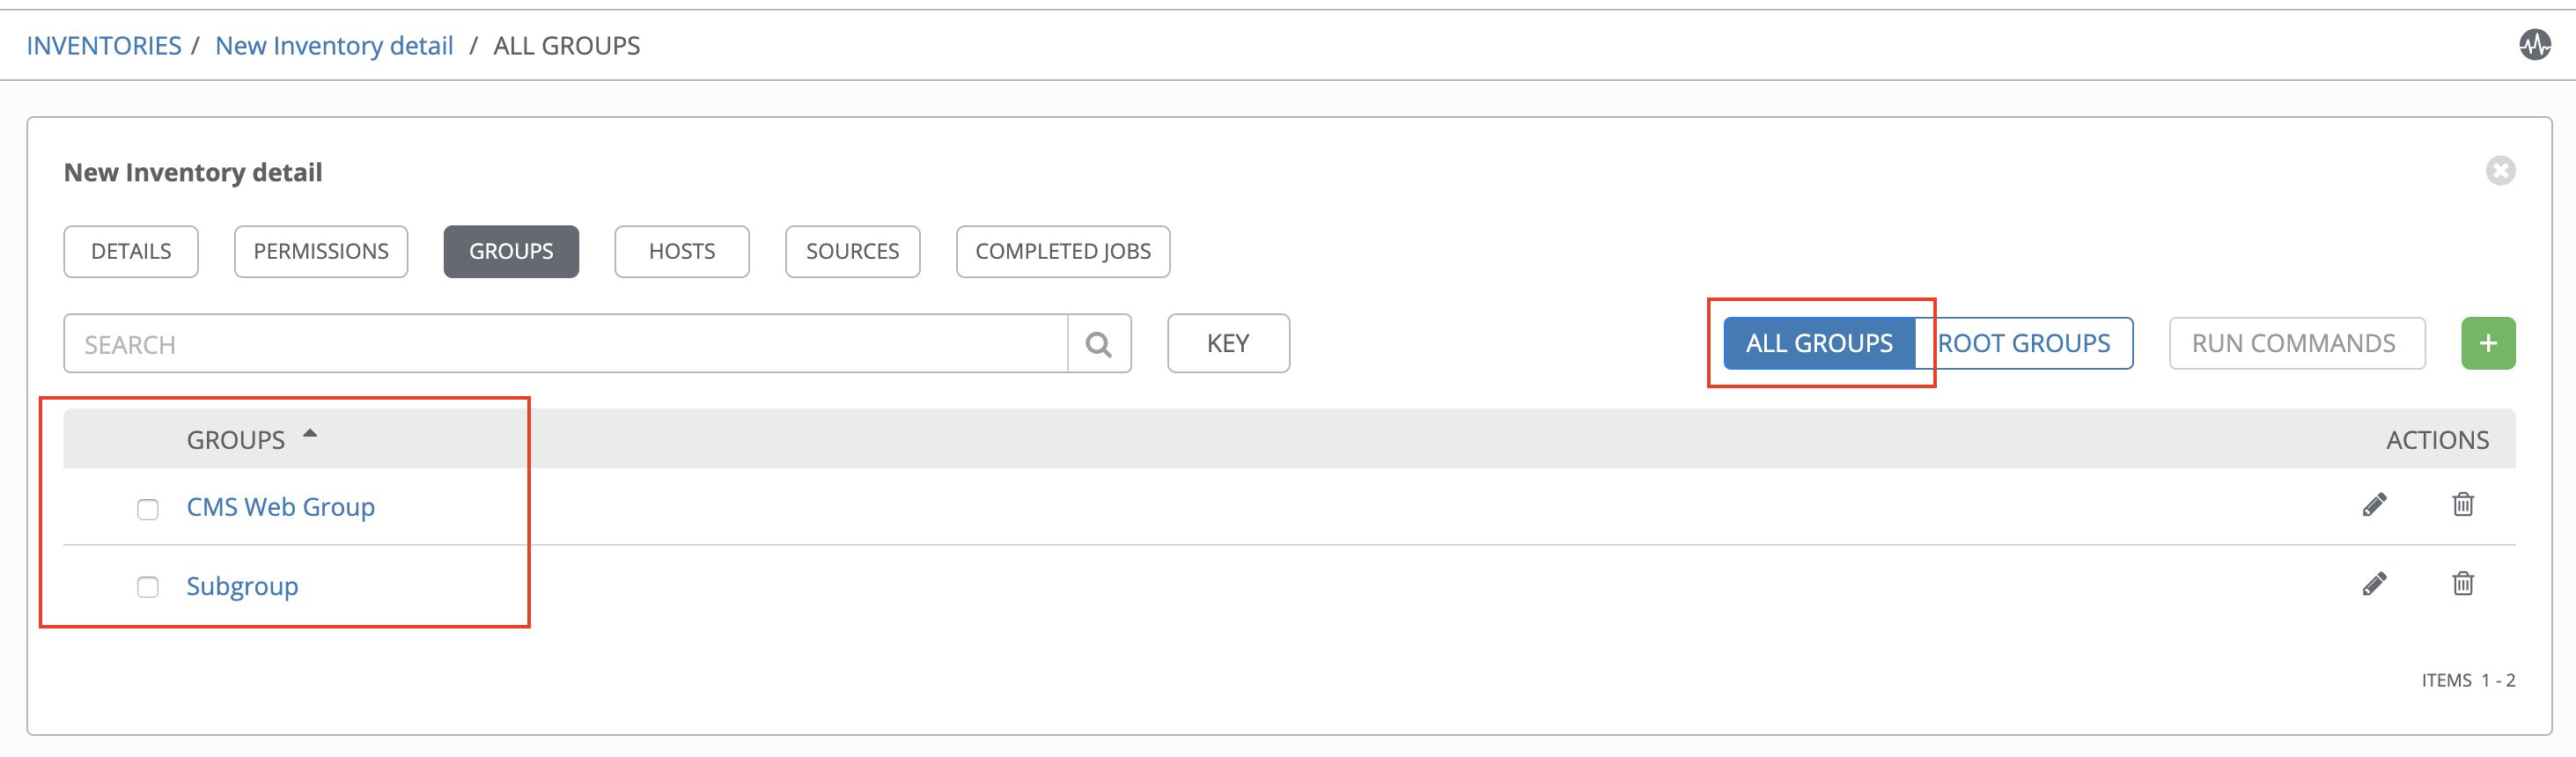
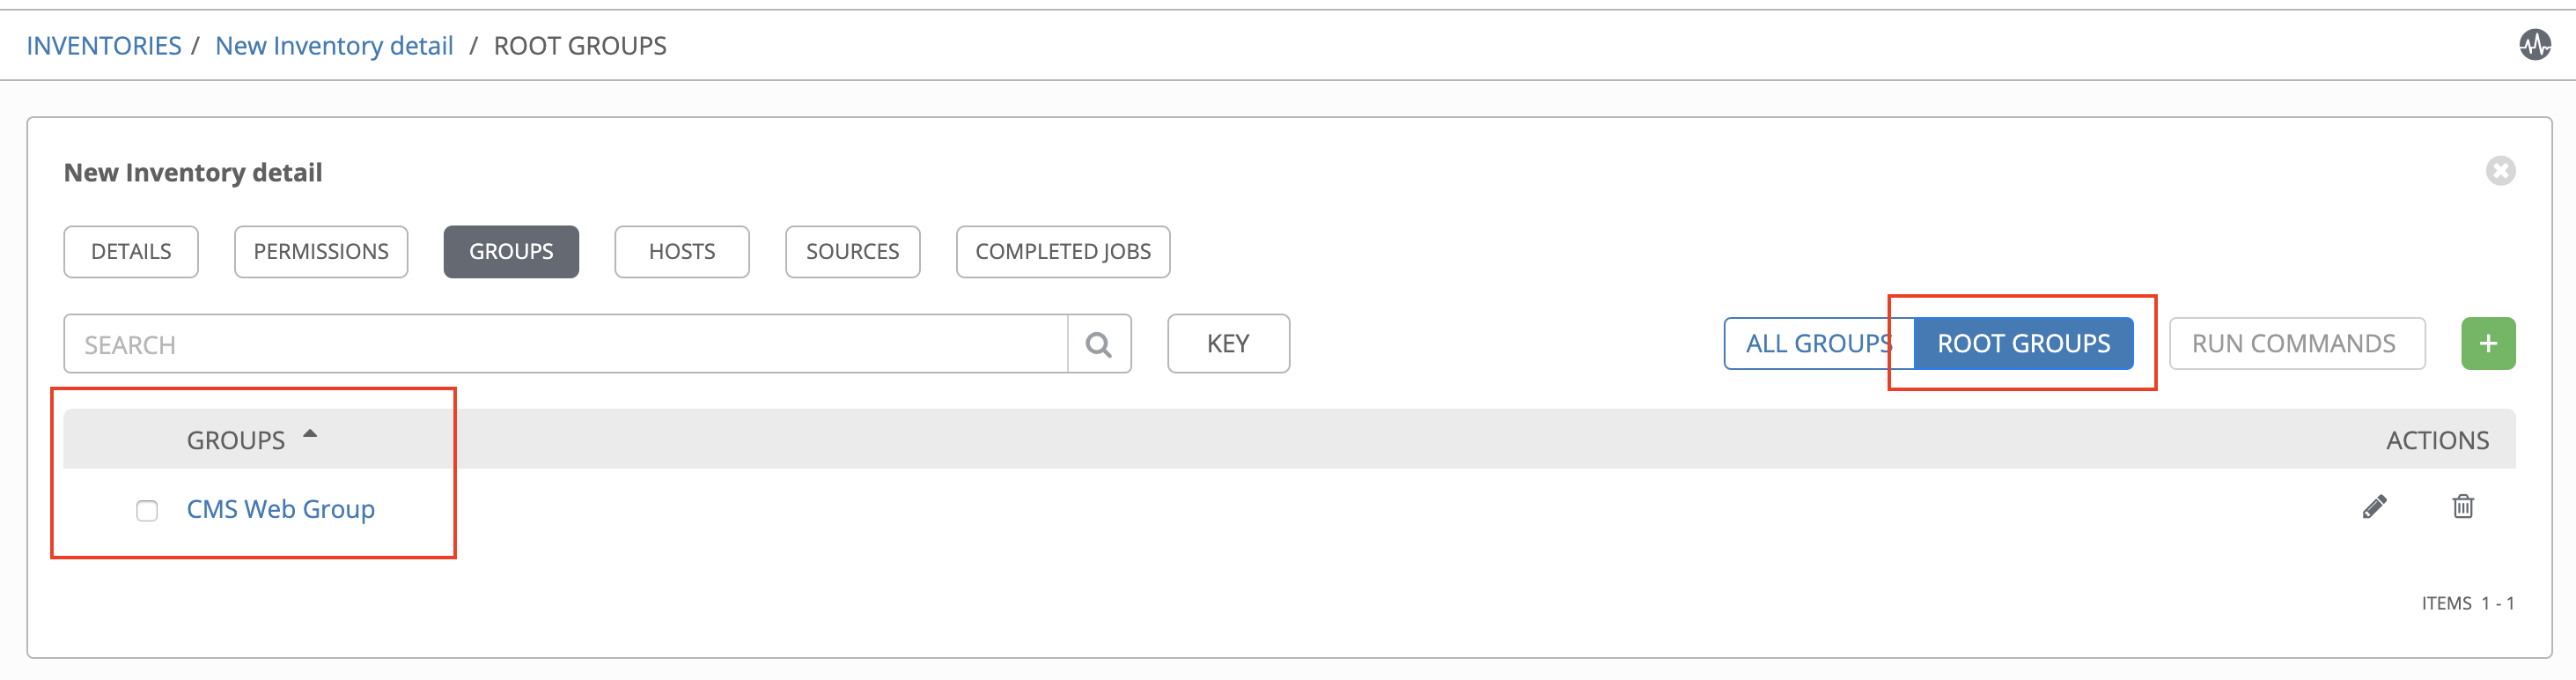
17.3.2.2. インベントリーグループの表示または編集
automation controller 3.5 以降、一度にすべてのインベントリーグループを表示するか、フィルタリングして root グループのみを表示できるようになりました。インベントリーグループは、別のグループのサブセットでない場合には、root グループとみなされます。
You may be able to delete a subgroup without concern for dependencies, but if you want to delete a root group, Tower will look for dependencies such as any child groups or hosts. If the root group you want to delete has both, a confirmation dialog displays for you to choose whether to delete the root group and all of its subgroups and hosts; or promote the subgroup(s) so they become the top-level inventory group(s), along with their host(s).
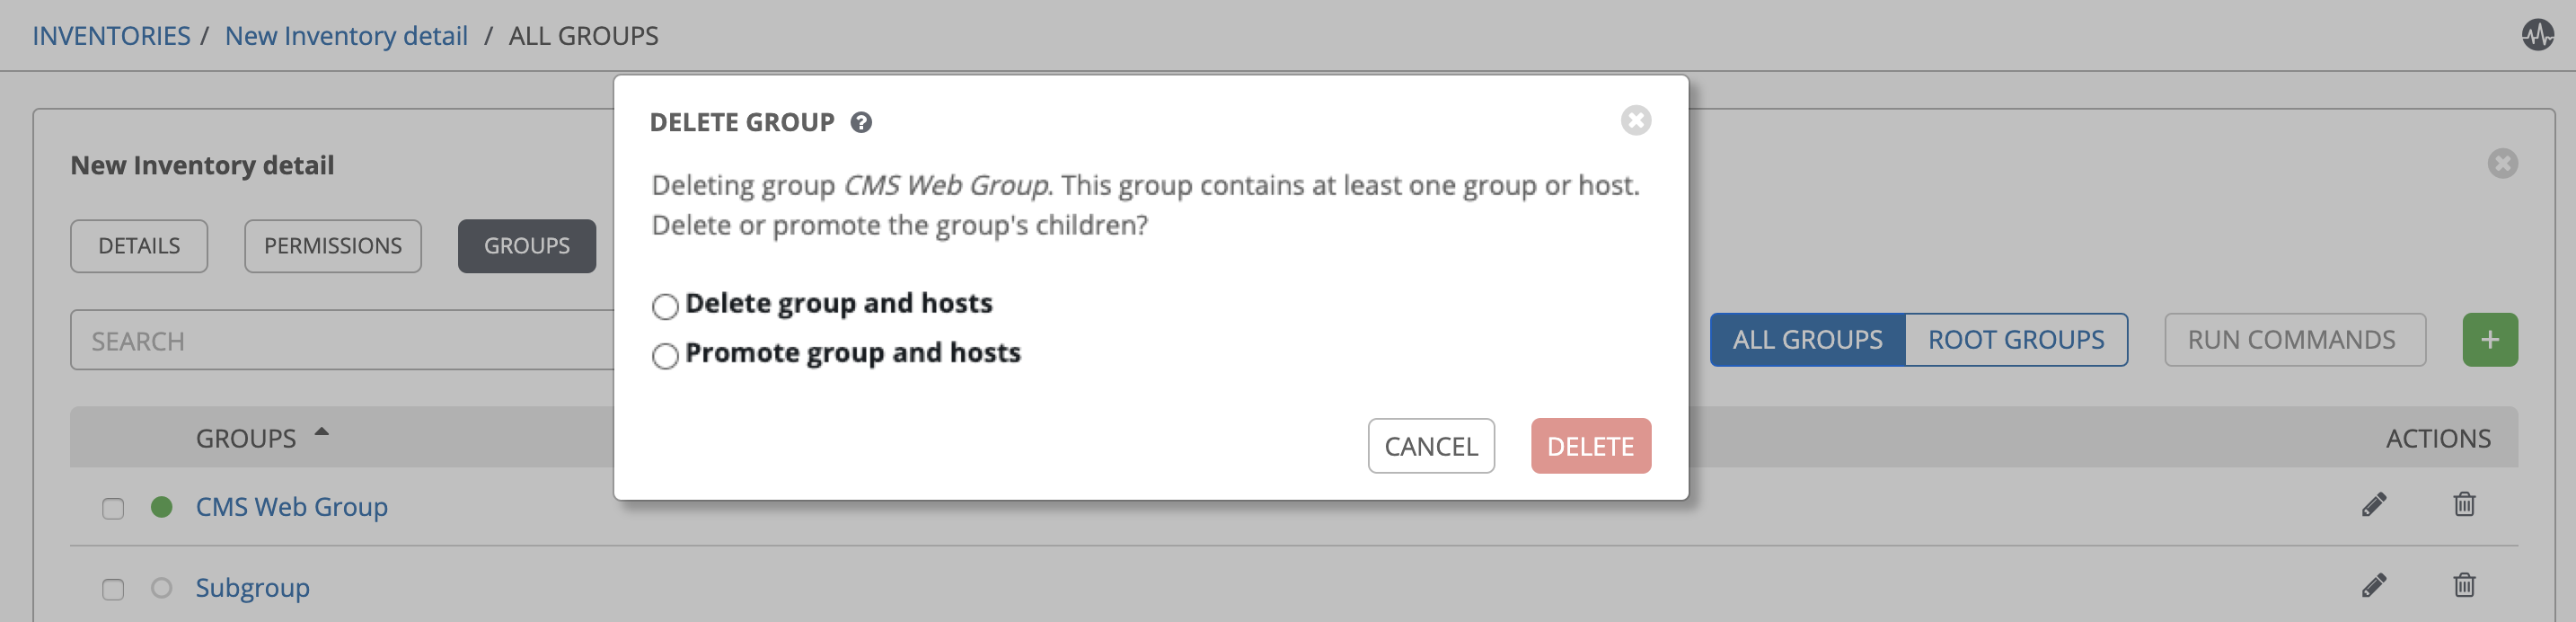
root グループに含まれるサブグループにホストがない場合には、単にすべて削除するか、グループをプロモートするかの確認ダイアログが表示されます。

17.3.3. ホストの追加
ホストをインベントリー、グループおよびグループ内のグループ用に設定することができます。ホストを設定するには、以下を実行します。
ホスト タブをクリックします。
Click the Add button, and select whether to add a host that already exists in your configuration or create a new host.
新規ホストを作成する場合は、
 ボタンを選択して、ジョブの実行中にこのホストを組み込むかどうかを指定します。
必須およびオプションのフィールドに該当する詳細を入力します。
ホスト名: 必須
説明: 任意の説明を入力します (オプション)。
変数: このグループのすべてのホストに適用される定義および値を入力します。JSON または YAML 構文のいずれかを使用して変数を入力します。ラジオボタンを使用してこれら 2 つの間の切り替えを行います。
完了したら、保存 をクリックします。
ホストの作成 ウィンドウが閉じ、新規に作成されたホストが、元のグループに関連付けられたホストの一覧のエントリーとして表示されます。
注釈
この画面からアドホックのコマンドを実行することもできます。詳細は、「アドホックコマンドの実行」を参照してください。
既存ホストを追加する選択をした場合、選択可能なホストが別個の選択ウィンドウに表示されます。
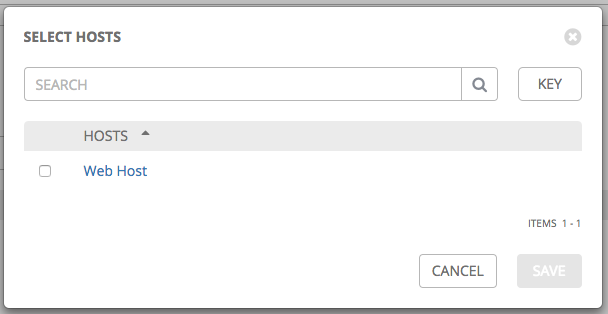
ホストが選択されると、そのホストがグループに関連付けられたホストの一覧のエントリーとして表示されます。
6. To configure facts and additional groups for the host, click on the name of the host from the list of hosts.

これにより、選択したホストの「詳細」タブが開きます。
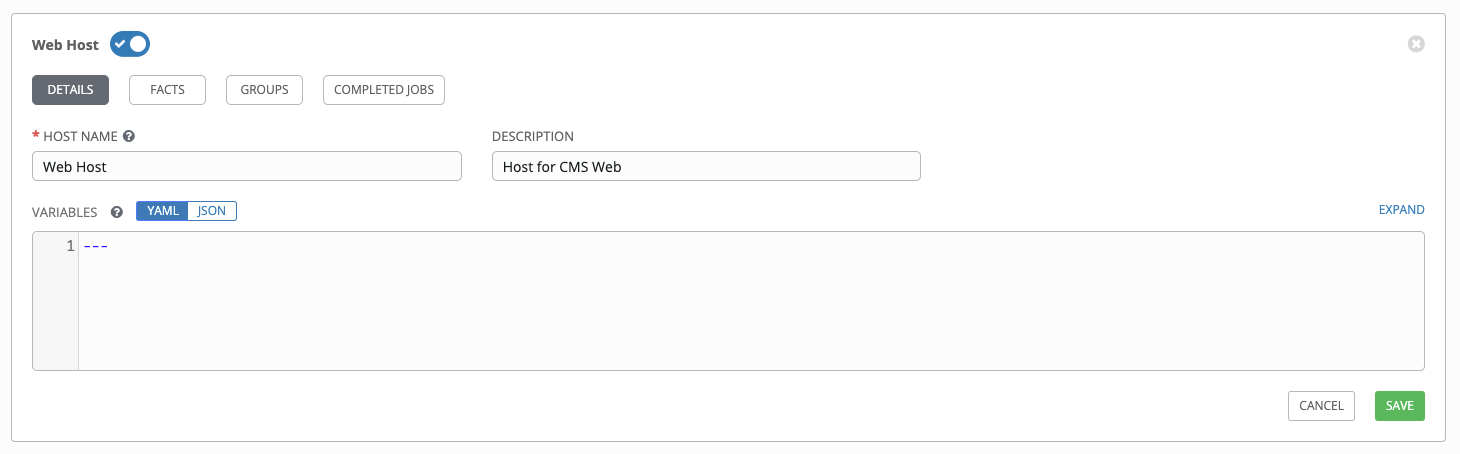
ファクト タブをクリックして、収集するファクトを入力します。ファクトについて詳しくは、「ファクトのキャッシング」セクションを参照してください。
グループ タブをクリックして、ホストのグループを設定します。
Click the Add button to associate the host with an existing group.
選択可能なグループが別個の選択ウィンドウに表示されます。
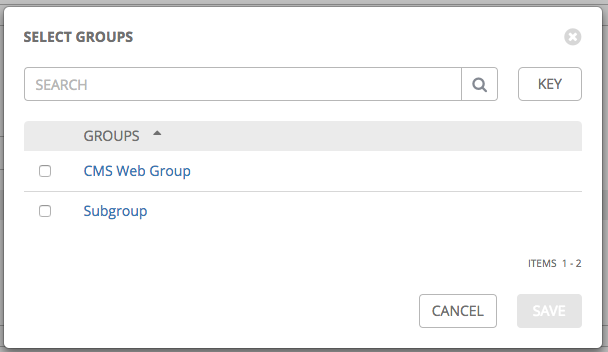
クリックして、ホストに関連付けるグループを選択し、保存 をクリックします。
グループが関連付けられると、そのグループがホストに関連付けられたグループの一覧にエントリーとして表示されます。
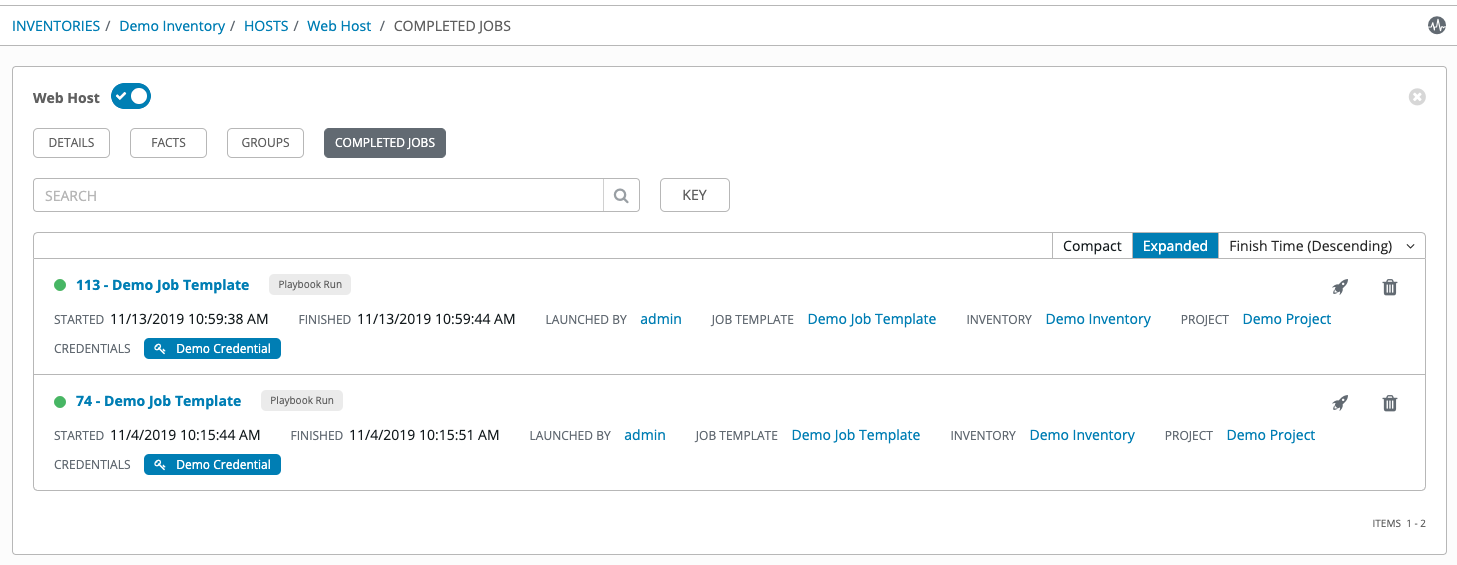
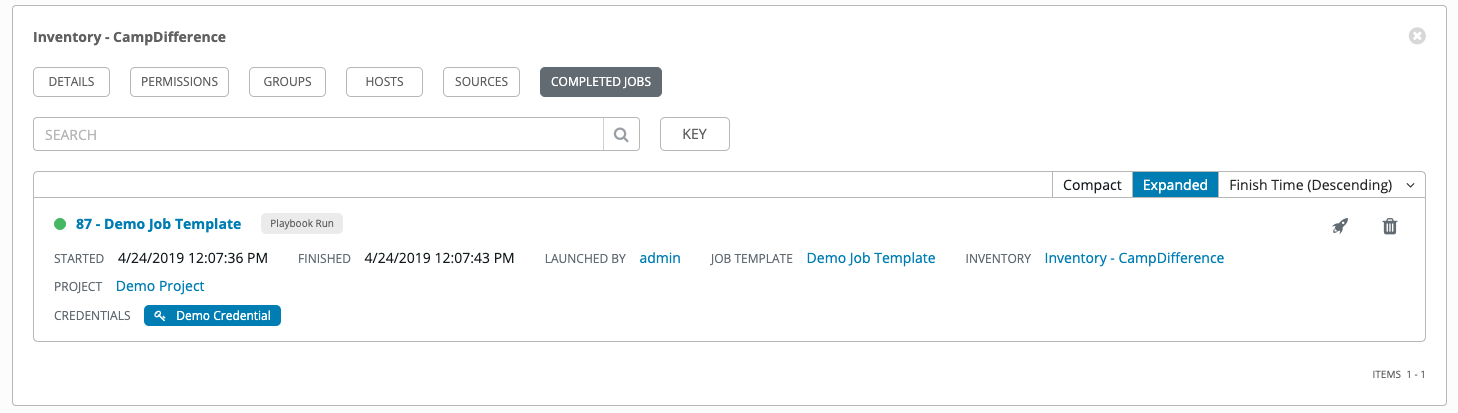
ホストがジョブの実行に使用されている場合には、このジョブの詳細は、ホストの 完了したジョブ タブで確認できます。各ジョブの詳細を表示するには、展開 をクリックします。
17.3.4. ソースの追加
インベントリーソースはグループに関連付けられなくなりました。automation controller 3.2 より前のバージョンでは、生成されるグループやホストはインベントリーソースグループの子となりました。現在、生成されるグループは最上位に置かれます。これらのグループには子グループを持たせることができ、これらの生成されるすべてのグループにホストを含めることができます。
ソースのインベントリーへの追加は、標準インベントリーのみに適用されます。スマートインベントリーの場合、それらが関連付けられている標準インベントリーからソースを継承します。インベントリーのソースを設定するには、以下を実行します。
ソースを追加するインベントリーで、ソース タブをクリックします。
Click the Add button.
これにより、「ソースの作成」ウィンドウが開きます。
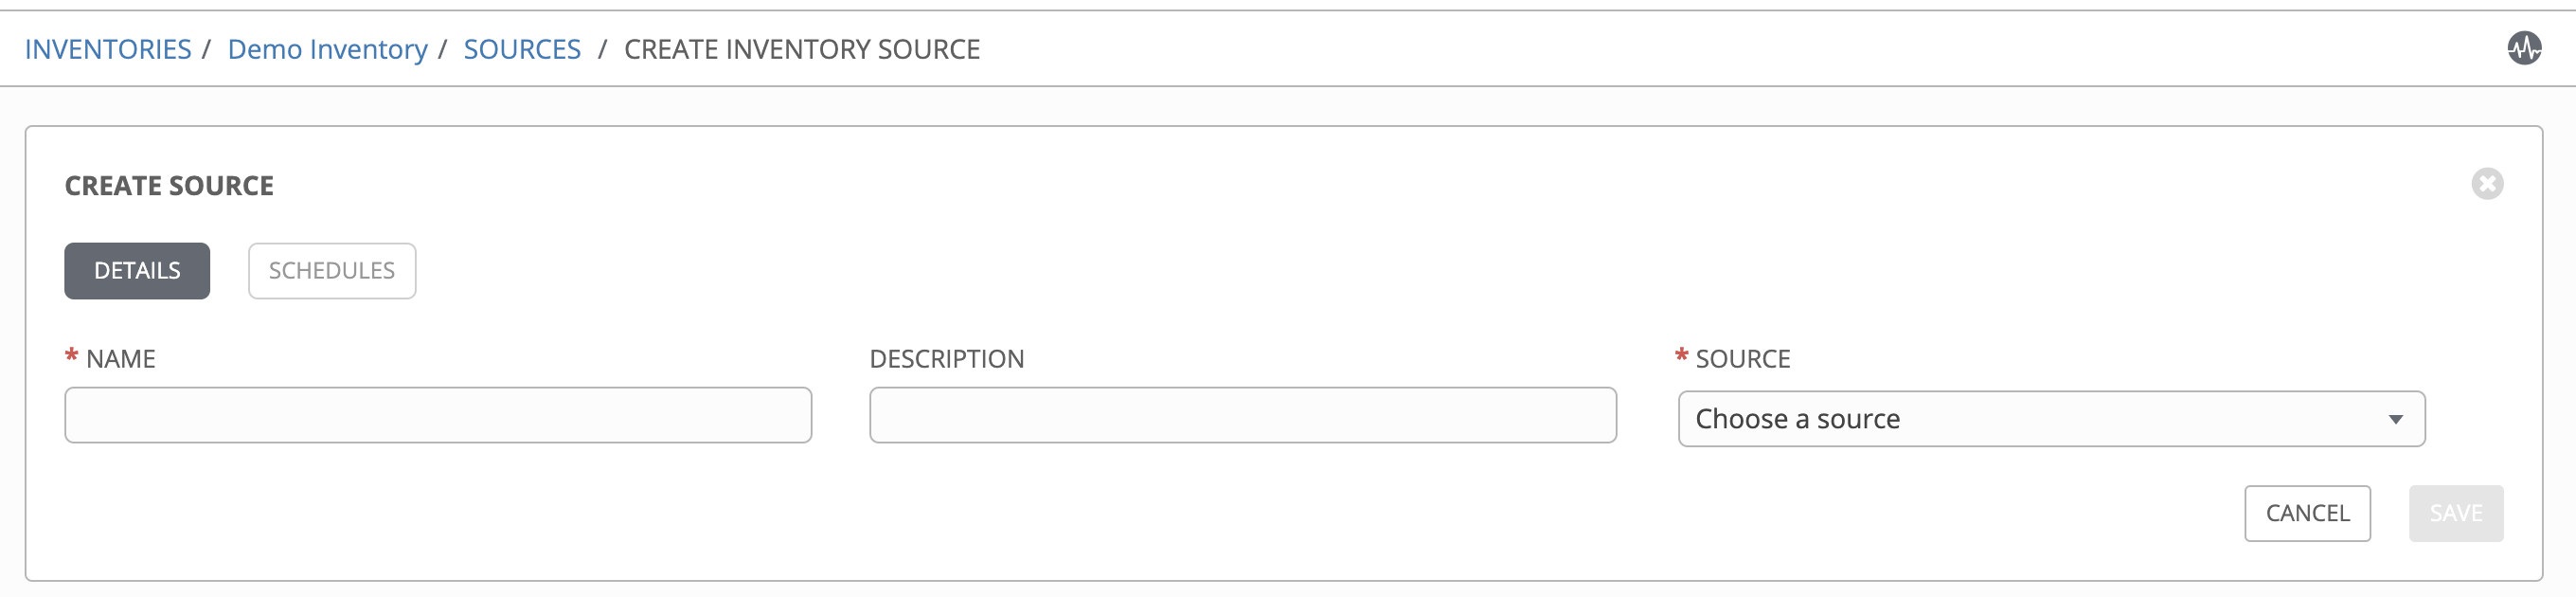
必須およびオプションのフィールドに該当する詳細を入力します。
名前: 必須
説明: 任意の説明を入力します (オプション)。
ソース: インベントリーのソースを選択します。それぞれのソースや適切な情報を入力する詳細な方法は、「インベントリーソース」セクションを参照してください。automation controller バージョン 3.2 以降、Rackspace Cloud Servers のサポートは廃止されました。
Ansible 環境: このフィールドは、カスタムの仮想環境 (venv) が設定されている場合のみ表示されます。インベントリーのインポートを実行する venv を選択します。カスタムの venv の設定に関する詳細は、「Using virtualenv with Ansible Tower」を参照してください。

選択した inventory source の情報を入力したら、必要に応じて、詳細、ホストフィルター、変数などのその他の共通パラメーターも指定します。
注釈
フィールドの リージョン、インスタンスフィルター、および グループ化のみ は automation controller 3.8 で削除されました。
詳細 ドロップダウンメニューから、インベントリーソースの更新ジョブで適切な出力レベルを選択します。
Use the Host Filter field to specify only matching host names to be imported into Tower.
In the Enabled Variable, specify Tower to retrieve the enabled state from the given dictionary of host variables. The enabled variable may be specified using dot notation as 'foo.bar', in which case the lookup will traverse into nested dicts, equivalent to:
from_dict.get('foo', {}).get('bar', default).有効な変数 フィールドでホスト変数のディクショナリーを指定した場合は、インポート時に有効にする値を指定できます。たとえば、
enabled_var='status.power_state'およびenabled_value='powered_on'で以下のホスト変数を使用する場合は、ホストが有効とマークされます。
{
"status": {
"power_state": "powered_on",
"created": "2020-08-04T18:13:04+00:00",
"healthy": true
},
"name": "foobar",
"ip_address": "192.168.2.1"
}
If
power_statewere any value other thanpowered_on, then the host would be disabled when imported into Tower. If the key is not found, then the host will be enabled.
すべてのクラウドインベントリーソースには、以下の更新オプションがあります。
Overwrite: If checked, any hosts and groups that were previously present on the external source but are now removed, will be removed from the Tower inventory. Hosts and groups that were not managed by the inventory source will be promoted to the next manually created group, or if there is no manually created group to promote them into, they will be left in the "all" default group for the inventory.
チェックが付けられていない場合、外部ソースにないローカルの子ホストおよびグループは、インベントリーの更新プロセスによって処理されないままになります。
変数の上書き: チェックが付いている場合、子グループおよびホストの変数はすべて削除され、外部ソースで見つかったものに置き換えられます。チェックが付いていないと、マージが実行し、ローカル変数と、外部ソースで見つかったものが組み合わされます。
起動時の更新: このインベントリーを使用してジョブを実行するたびに、ジョブタスクの実行前に選択したソースからインベントリーの更新が実行されます。ジョブの生成速度がインベントリーの同期速度を上回る場合のジョブのオーバーフローを避けるために、これを選択して、特定の期間 (秒単位) 以前のインベントリーの同期をキャッシュするよう**キャッシュタイムアウト**を設定できます。
The "Update on Launch" setting refers to a dependency system for projects and inventory, and it will not specifically exclude two jobs from running at the same time. If a cache timeout is specified, then the dependencies for the second job is created and it uses the project and inventory update that the first job spawned. Both jobs then wait for that project and/or inventory update to finish before proceeding. If they are different job templates, they can then both start and run at the same time, if the system has the capacity to do so. If you intend to use Tower's provisioning callback feature with a dynamic inventory source, "Update on Launch" should be set for the inventory group.
実行後にエントリーおよび選択を確認し、保存 をクリックします。これにより、通知やスケジュールなど、詳細をさらに設定することができます。
注釈
通知 タブは、新しく作成したソースを保存した後にのみ表示されます。
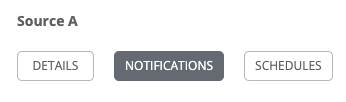
ソースの通知を設定するには、通知 タブをクリックします。
通知がすでに設定されている場合は、トグルを使用して、特定のソースで使用する通知を有効または無効にします。詳細については「通知の有効化と無効化」を参照してください。
通知が設定されていない場合には、詳細情報を「通知」で参照してください。
このインベントリーソースに関連付けられているスケジュールを設定するには、スケジュール タブをクリックします。
スケジュールがすでに設定されている場合には、スケジュールの設定をレビュー、編集、または有効化/無効化します。
スケジュールが設定されていない場合には、詳細情報を「スケジュール」で参照してください。
実行後にエントリーおよび選択を確認し、保存 をクリックします。
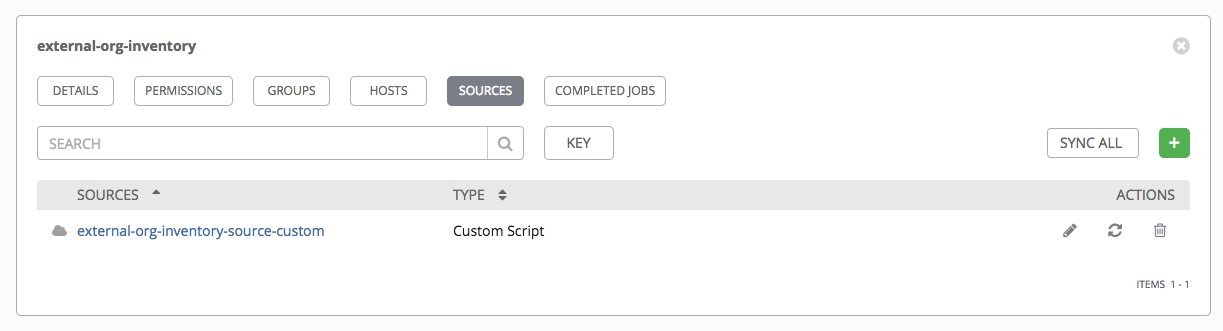
ソースが定義されると、インベントリーに関連付けられたソースの一覧のエントリーとして表示されます。ソース タブから、単一ソースに対して同期を実行することも、1 度にすべての同期を実行することもできます。また、同期プロセスのスケジュールやソースの編集または削除など、追加のアクションを実行することもできます。
17.3.4.1. インベントリーソース
ホストを入力できるインベントリータイプに一致するソースを選択します。
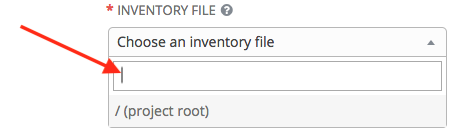
17.3.4.1.1. ソース: プロジェクト
An inventory that is sourced from a project means that is uses the SCM type from the project it is tied to. For example, if the project's source is from GitHub, then the inventory will use the same source.
プロジェクトから取得されるインベントリーを設定するには、「ソース」フィールドから ソース: プロジェクト を選択します。
「ソースの作成」ウィンドウは追加フィールドと共に展開されます。以下の詳細を入力します。
認証情報: 必要に応じて、このソースに使用する認証情報を指定します。
プロジェクト: 必須。このインベントリーがソースとして使用しているプロジェクトを指定します。
インベントリーファイル: 必須。取得されたプロジェクトに関連付けられたインベントリーファイルを選択します。データが入力されていない場合には、ドロップダウンメニューのテキストフィールドに、データを入力して異種のファイルタイプをフィルタリングします。フラットファイルインベントリー以外に、ディレクトリーやインベントリースクリプトを参照することもできます。
必要に応じて、adding a source の主な手順で説明されているように、詳細、ホストフィルター、有効な変数/値、および更新オプションを指定できます。
クラウドインベントリーソースで選択できる更新オプションのほかに、プロジェクトの変更時に更新するかどうかを指定できます。Update on Project Update オプションにチェックを付けて、SCM リビジョンが変更されるプロジェクトの毎回の更新後に、選択されたソースのインベントリーを更新してからジョブのタスクを実行します。詳細は、『Automation Controller Administration Guide』の「Update on Project Update」を参照してください。
カスタムインベントリースクリプトに渡すには、オプションで 環境変数 フィールドに環境変数を設定できます。
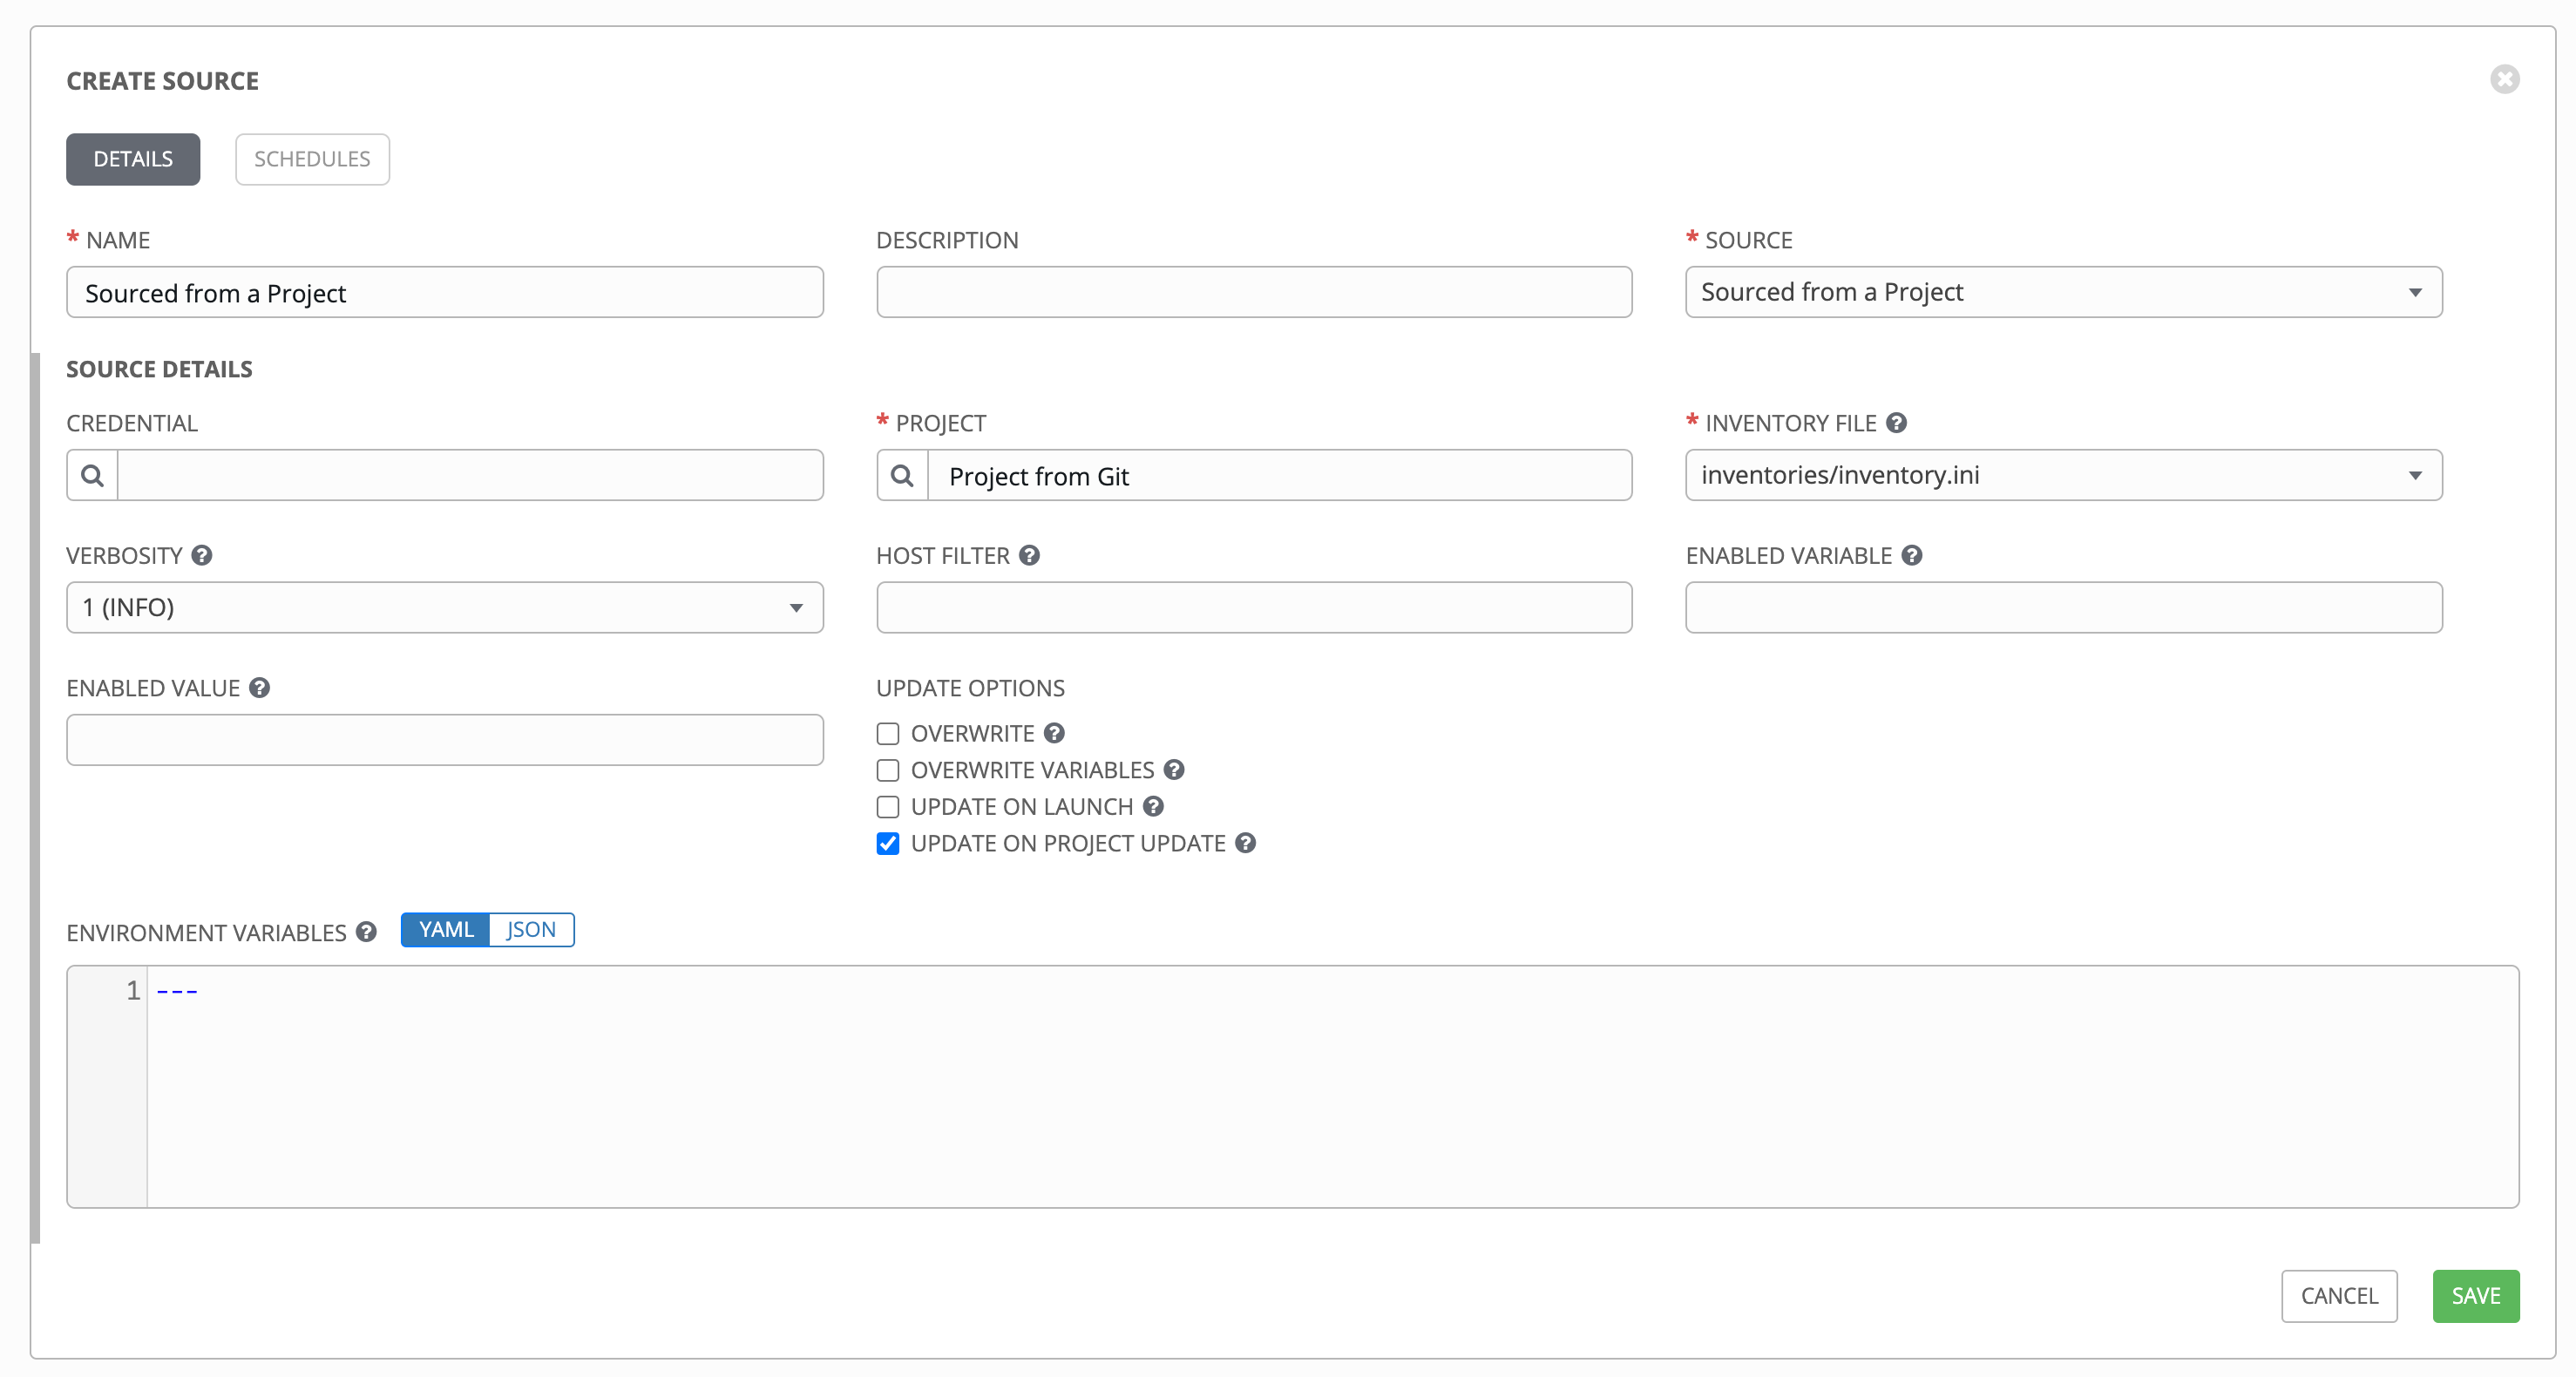
注釈
If you are executing a custom inventory script from SCM, please make sure you set the execution bit (i.e. chmod +x) on the script in your upstream source control. If you do not, Tower will throw a [Errno 13] Permission denied error upon execution.
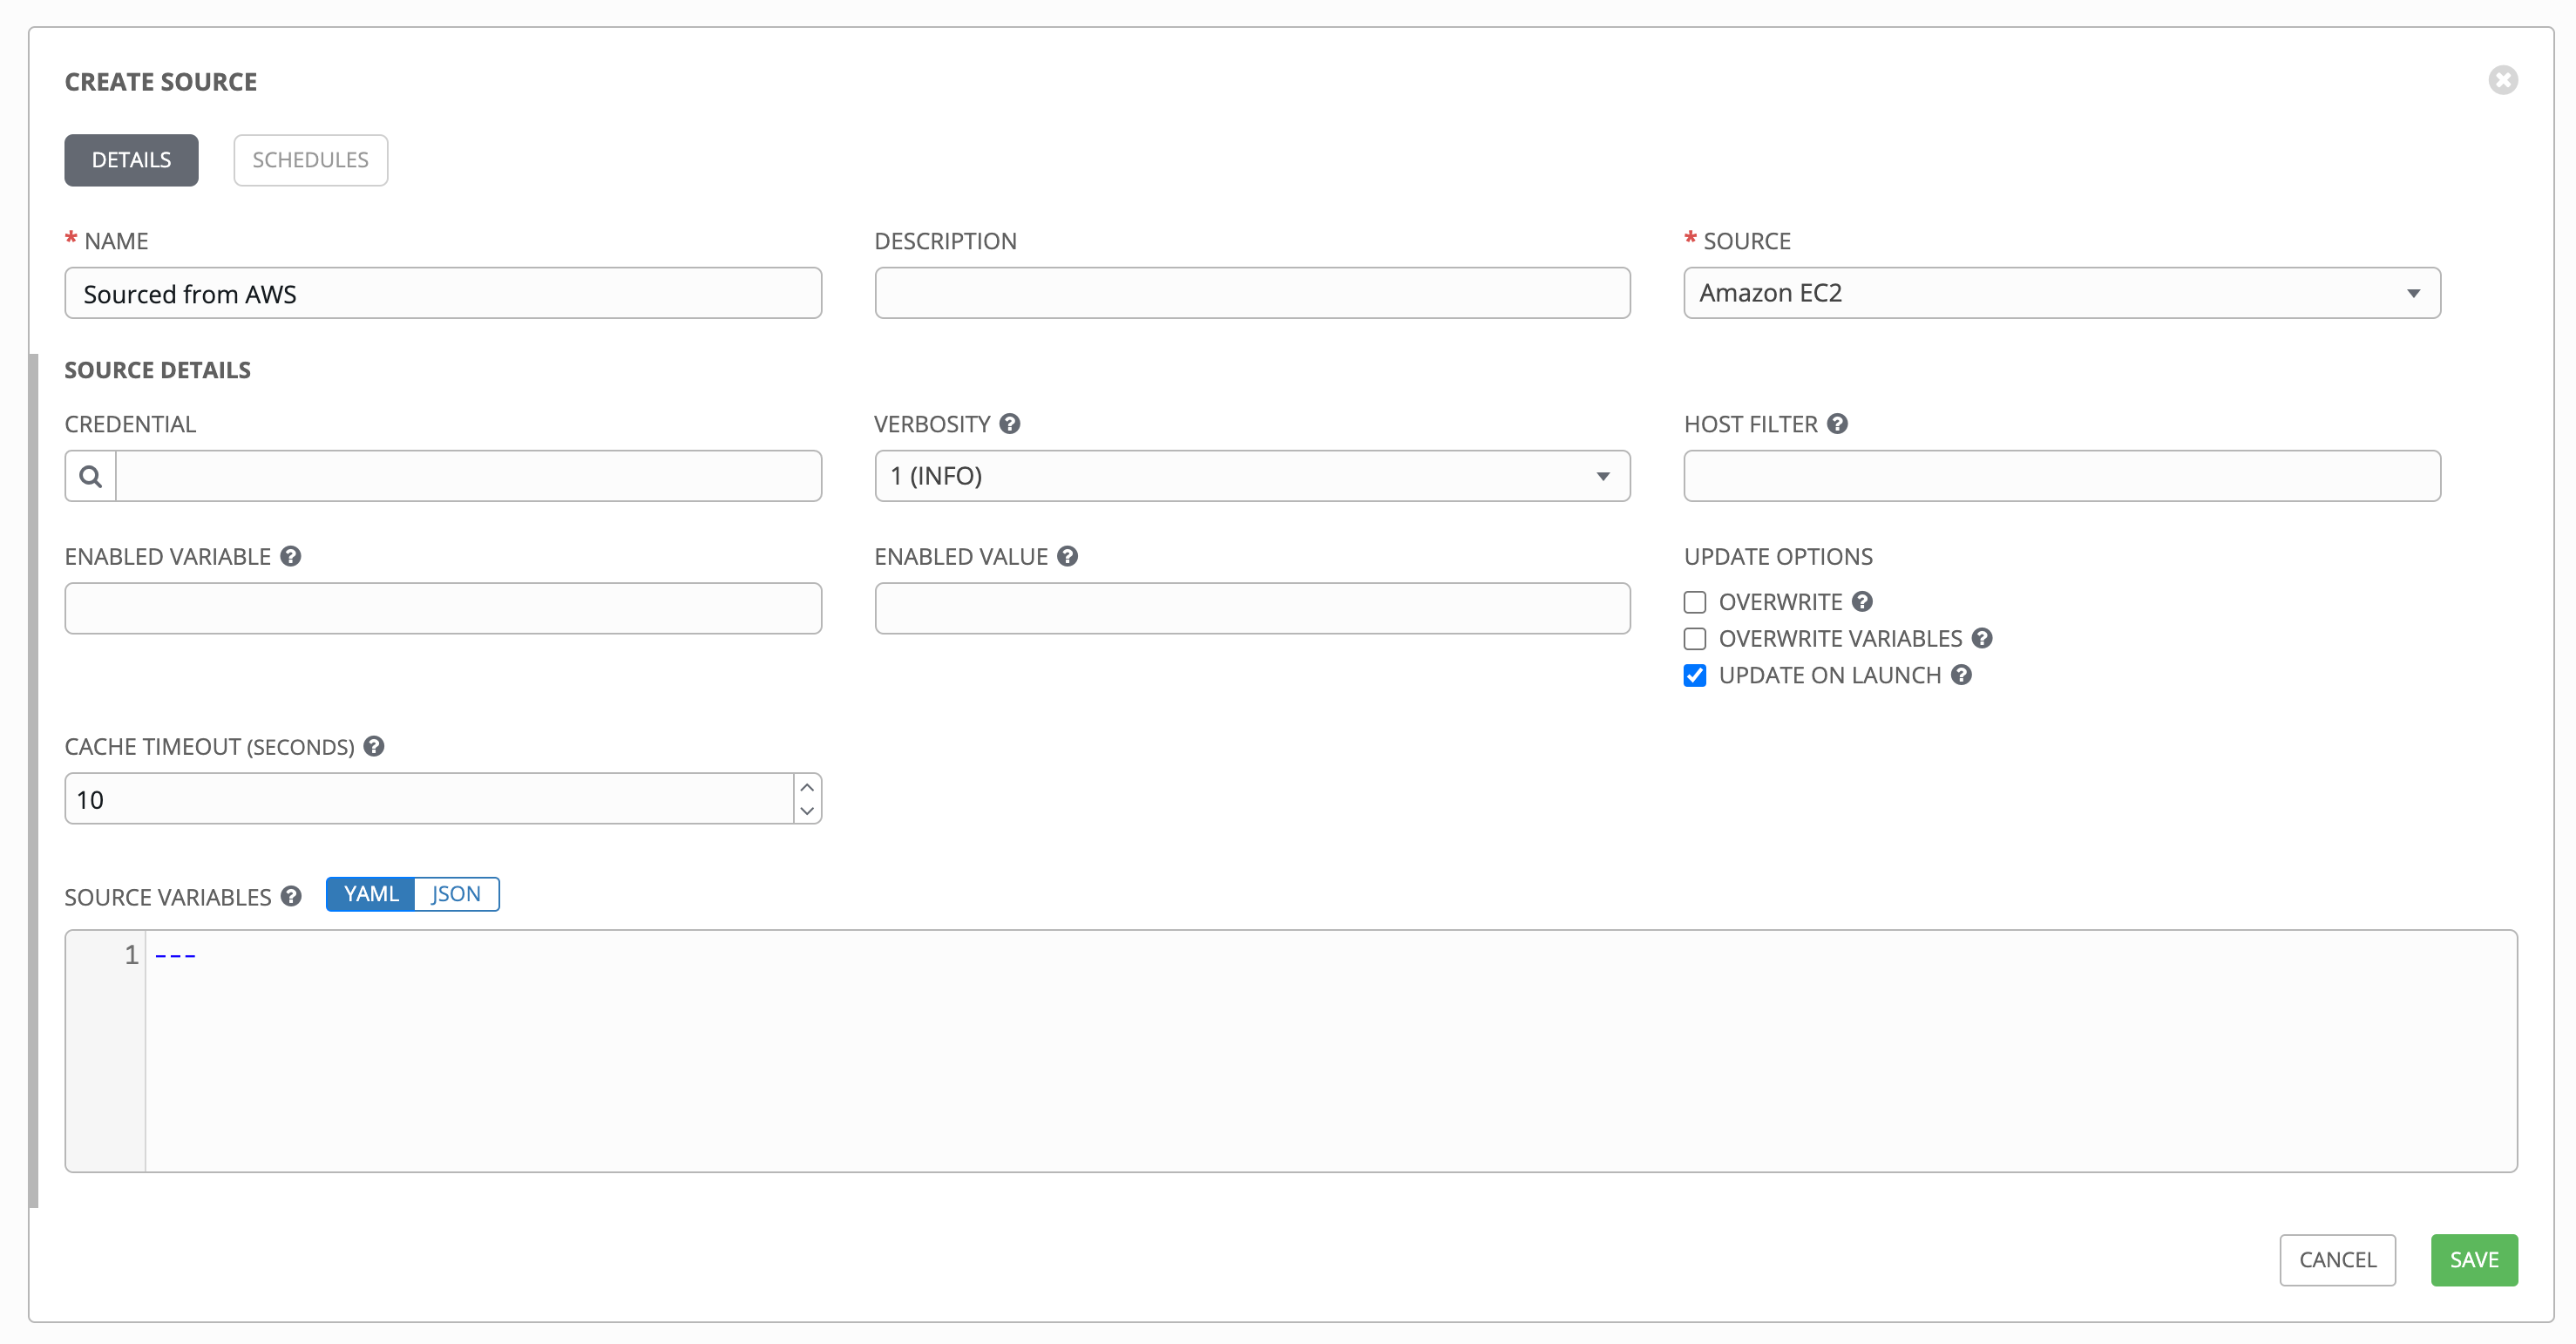
17.3.4.1.2. Amazon Web Services EC2
AWS EC2 から取得されるインベントリーを設定するには、「ソース」フィールドから Amazon EC2 を選択します。
「ソースの作成」ウィンドウは追加フィールドと共に展開されます。以下の詳細を入力します。
Credential: Optionally choose from an existing AWS credential (for more information, refer to 認証情報).
If Tower is running on an EC2 instance with an assigned IAM Role, the credential may be omitted, and the security credentials from the instance metadata will be used instead. For more information on using IAM Roles, refer to the IAM_Roles_for_Amazon_EC2_documentation_at_Amazon.
必要に応じて、adding a source の主な手順で説明されているように、詳細、ホストフィルター、有効な変数/値、および更新オプションを指定できます。
Use the Source Variables field to override variables used by the
aws_ec2inventory plugin. Enter variables using either JSON or YAML syntax. Use the radio button to toggle between the two. For a detailed description of these variables, view the aws_ec2 inventory plugin documenation.
17.3.4.1.3. Google Compute Engine
Google から取得されるインベントリーを設定するには、「ソース」フィールドから Google Compute Engine を選択します。
The Create Source window expands with the required Credential field. Choose from an existing GCE Credential. For more information, refer to 認証情報.
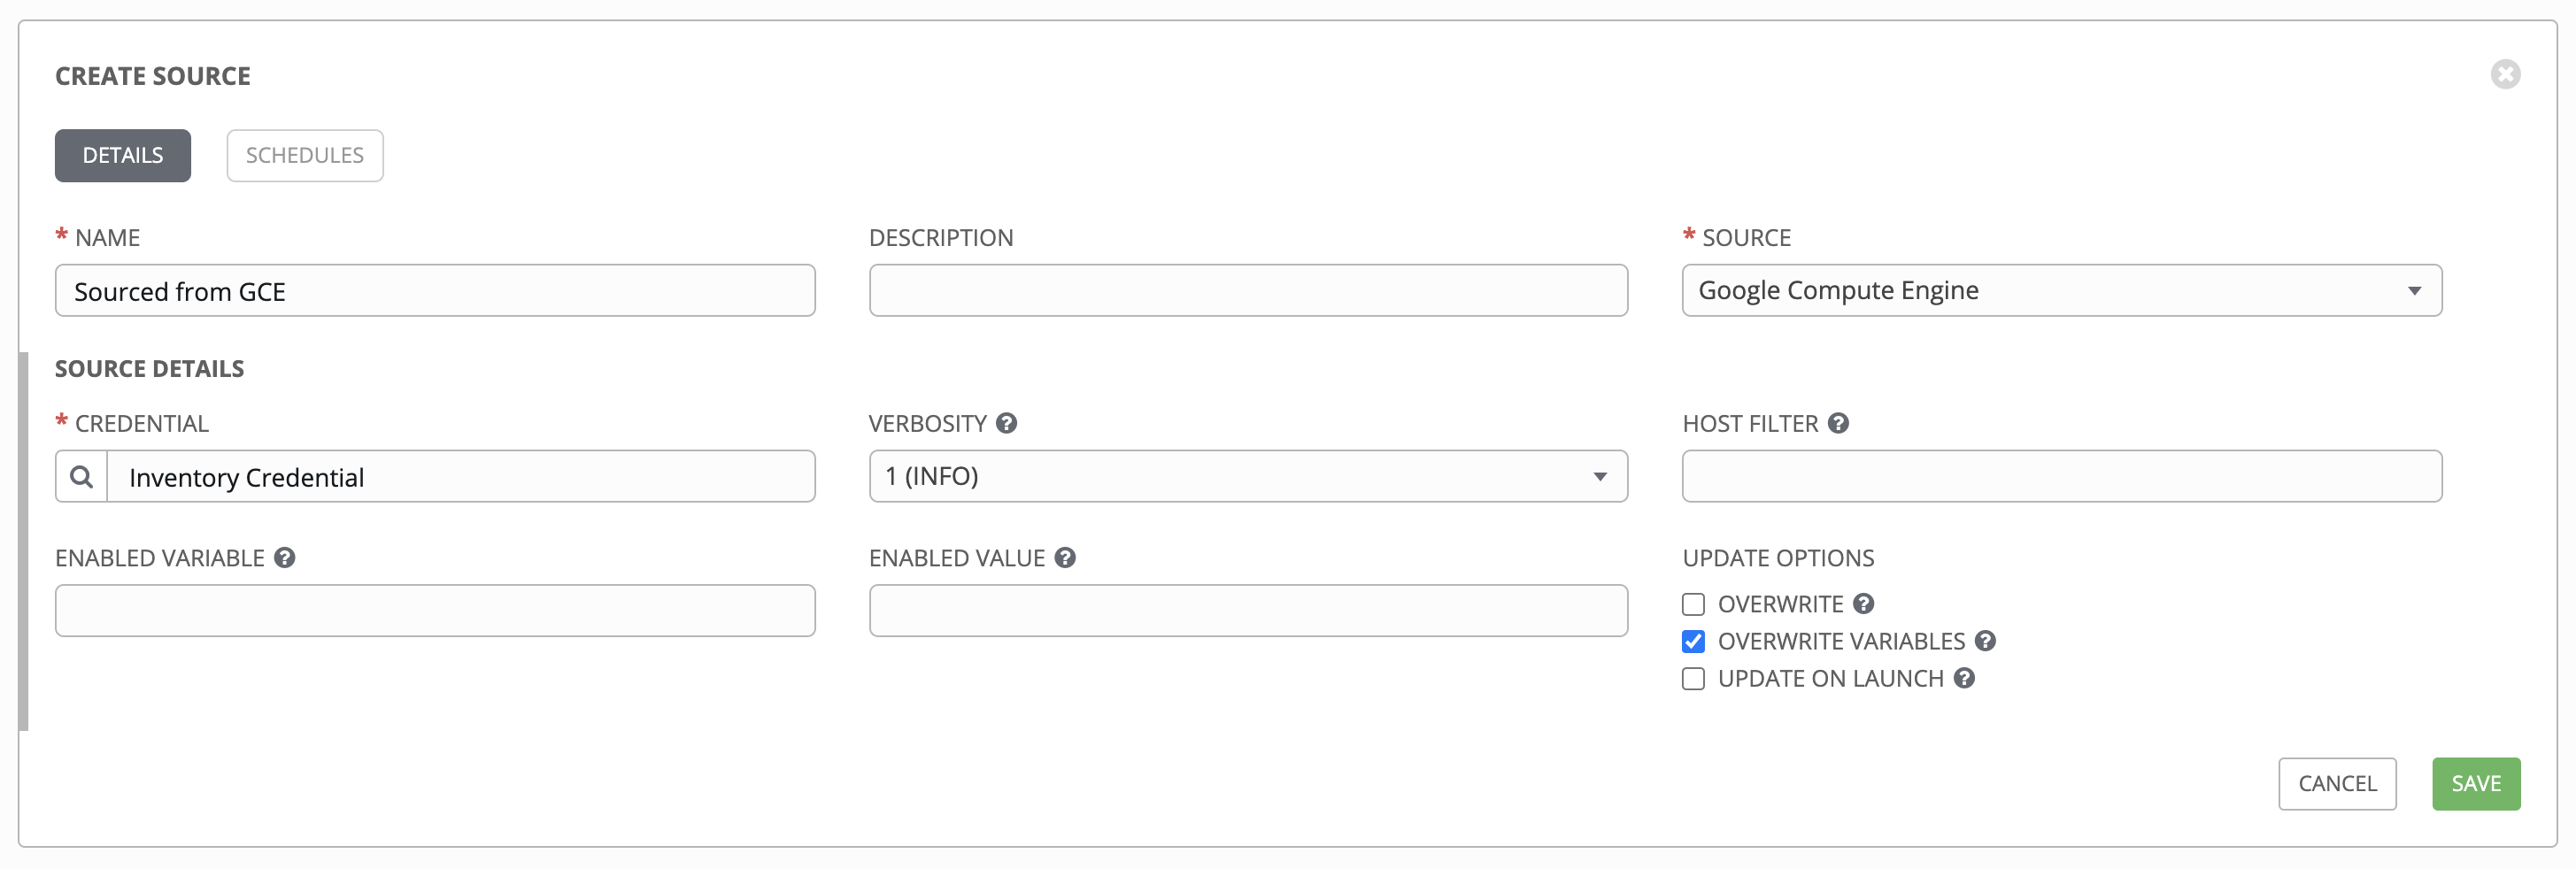
必要に応じて、adding a source の主な手順で説明されているように、詳細、ホストフィルター、有効な変数/値、および更新オプションを指定できます。
Use the Source Variables field to override variables used by the
gcp_computeinventory plugin. Enter variables using either JSON or YAML syntax. Use the radio button to toggle between the two. For a detailed description of these variables, view the gcp_compute inventory plugin documenation.
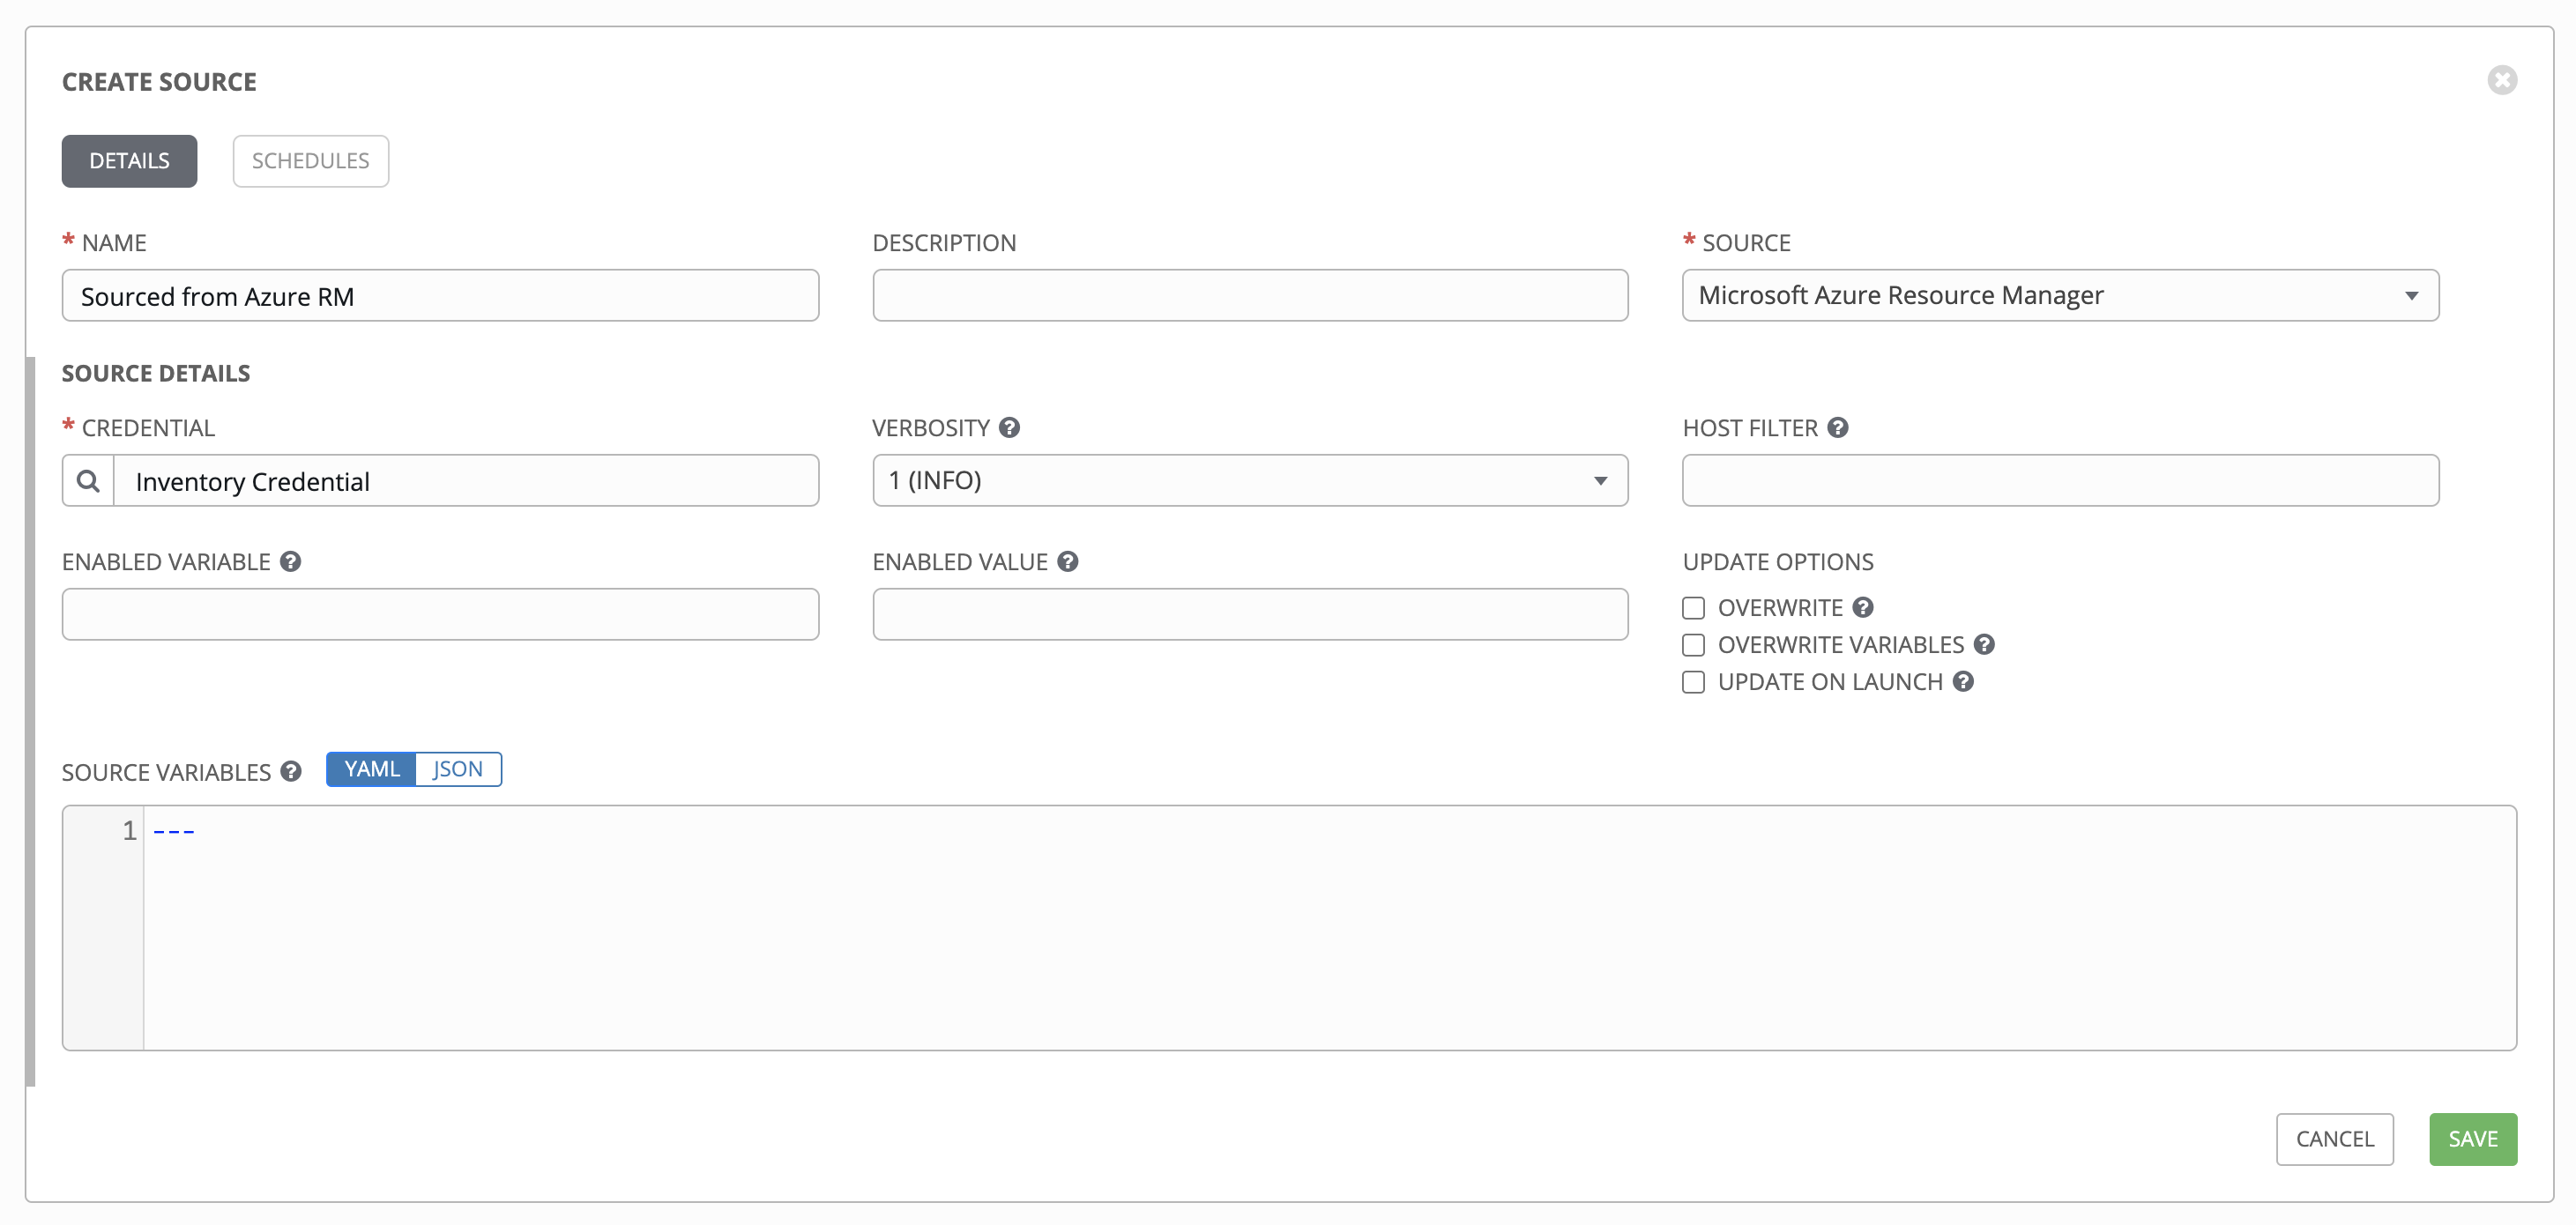
17.3.4.1.4. Microsoft Azure Resource Manager
Azure Resource Manager から取得されるインベントリーを設定するには、「ソース」フィールドから Microsoft Azure Resource Managee を選択します。
The Create Source window expands with the required Credential field. Choose from an existing Azure Credential. For more information, refer to 認証情報.
必要に応じて、adding a source の主な手順で説明されているように、詳細、ホストフィルター、有効な変数/値、および更新オプションを指定できます。
Use the Source Variables field to override variables used by the
azure_rminventory plugin. Enter variables using either JSON or YAML syntax. Use the radio button to toggle between the two. For a detailed description of these variables, view the azure_rm inventory plugin documentation.
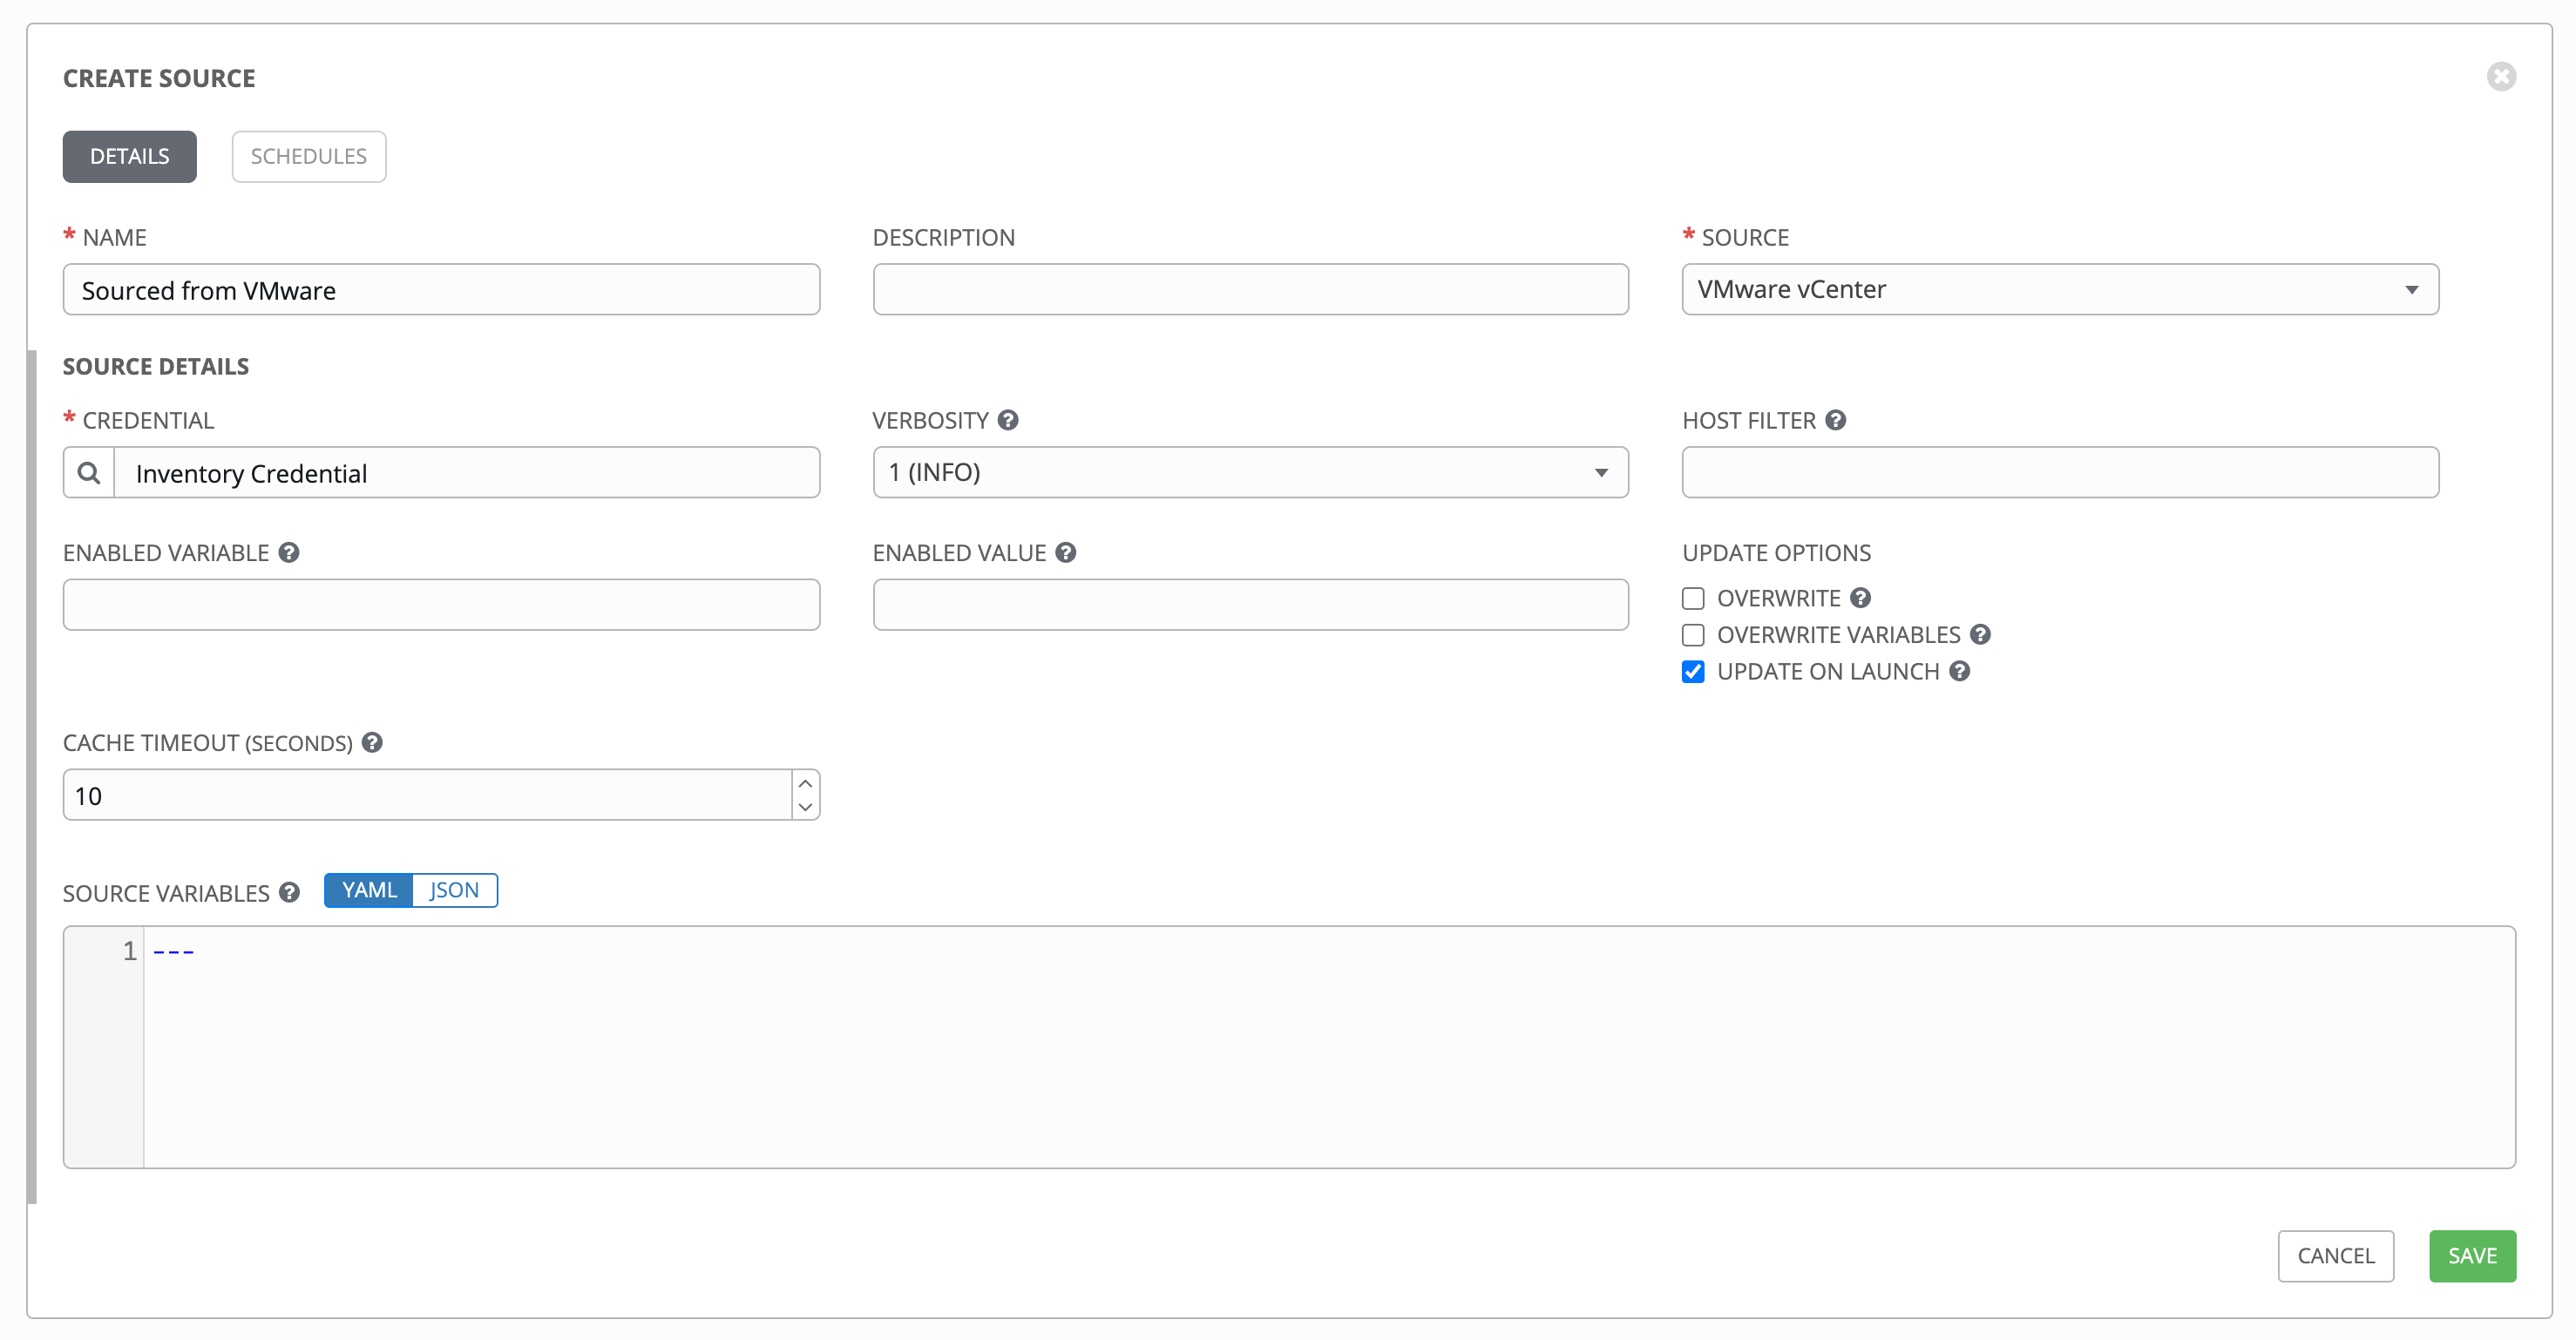
17.3.4.1.5. VMware vCenter
VMWare から取得されるインベントリーを設定するには、「ソース」フィールドから VMware vCenter を選択します。
The Create Source window expands with the required Credential field. Choose from an existing VMware Credential. For more information, refer to 認証情報.
必要に応じて、adding a source の主な手順で説明されているように、詳細、ホストフィルター、有効な変数/値、および更新オプションを指定できます。
Use the Source Variables field to override variables used by the
vmware_inventoryinventory plugin. Enter variables using either JSON or YAML syntax. Use the radio button to toggle between the two. For a detailed description of these variables, view the vmware_inventory inventory plugin.
Starting with Ansible 2.9, VMWare properties have changed from lower case to camelCase. Tower provides aliases for the top-level keys, but lower case keys in nested properties have been discontinued. For a list of valid and supported properties starting with Ansible 2.9, refer to the primary documentation for hostvars from VMWare inventory imports in GitHub.
17.3.4.1.6. Red Hat Satellite 6
Red Hat Satellite から取得されるインベントリーを設定するには、「ソース」フィールドから Red Hat Satellite を選択します。
The Create Source window expands with the required Credential field. Choose from an existing Satellite Credential. For more information, refer to 認証情報.
必要に応じて、adding a source の主な手順で説明されているように、詳細、ホストフィルター、有効な変数/値、および更新オプションを指定できます。
Use the Source Variables field to override variables used by the
foremaninventory plugin. Enter variables using either JSON or YAML syntax. Use the radio button to toggle between the two. For a detailed description of these variables, view the foreman inventory plugin.

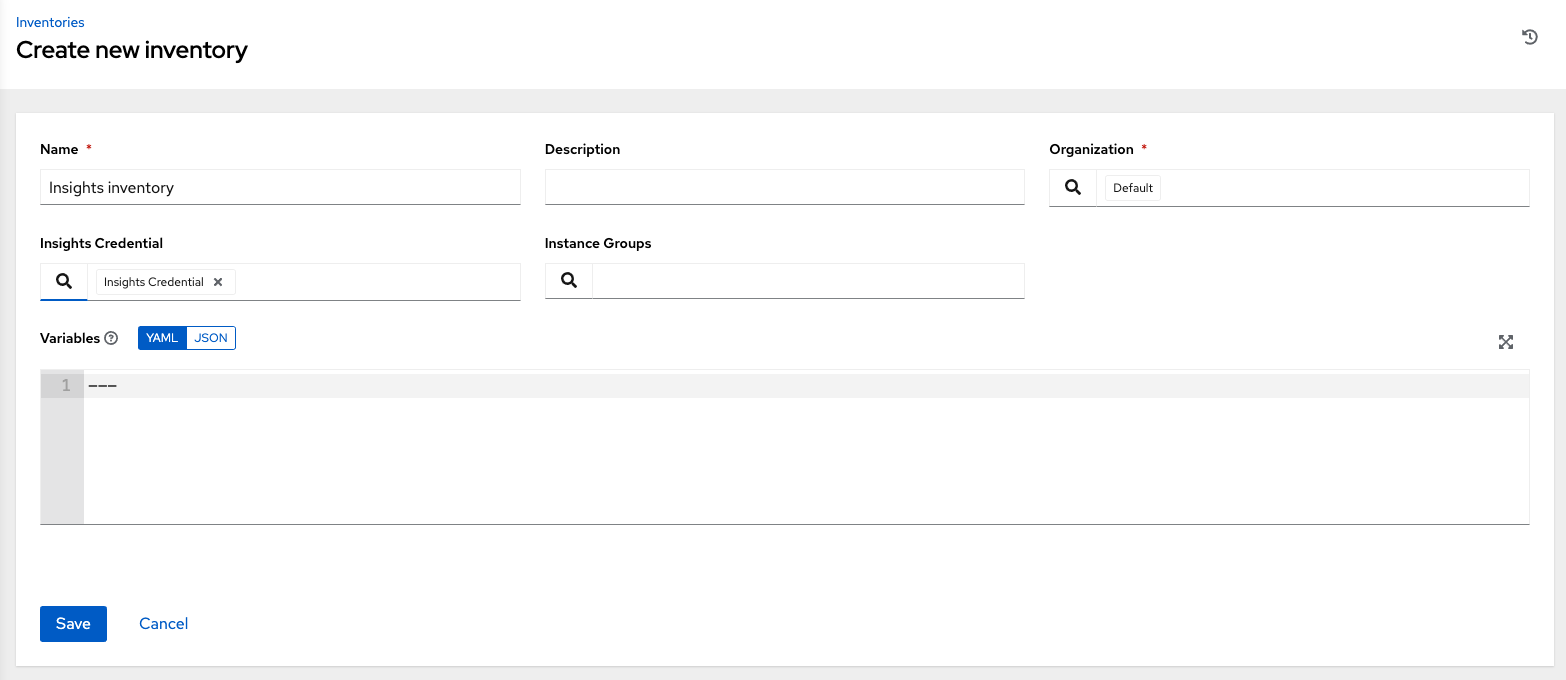
17.3.4.1.7. Red Hat Insights
To configure a Red Hat Insights-sourced inventory, select Red Hat Insights from the Source field.
The Create Source window expands with the required Credential field. Choose from an existing Insights Credential. For more information, refer to 認証情報.
必要に応じて、adding a source の主な手順で説明されているように、詳細、ホストフィルター、有効な変数/値、および更新オプションを指定できます。
Use the Source Variables field to override variables used by the
insightsinventory plugin. Enter variables using either JSON or YAML syntax. Use the radio button to toggle between the two. For a detailed description of these variables, view the insights inventory plugin.
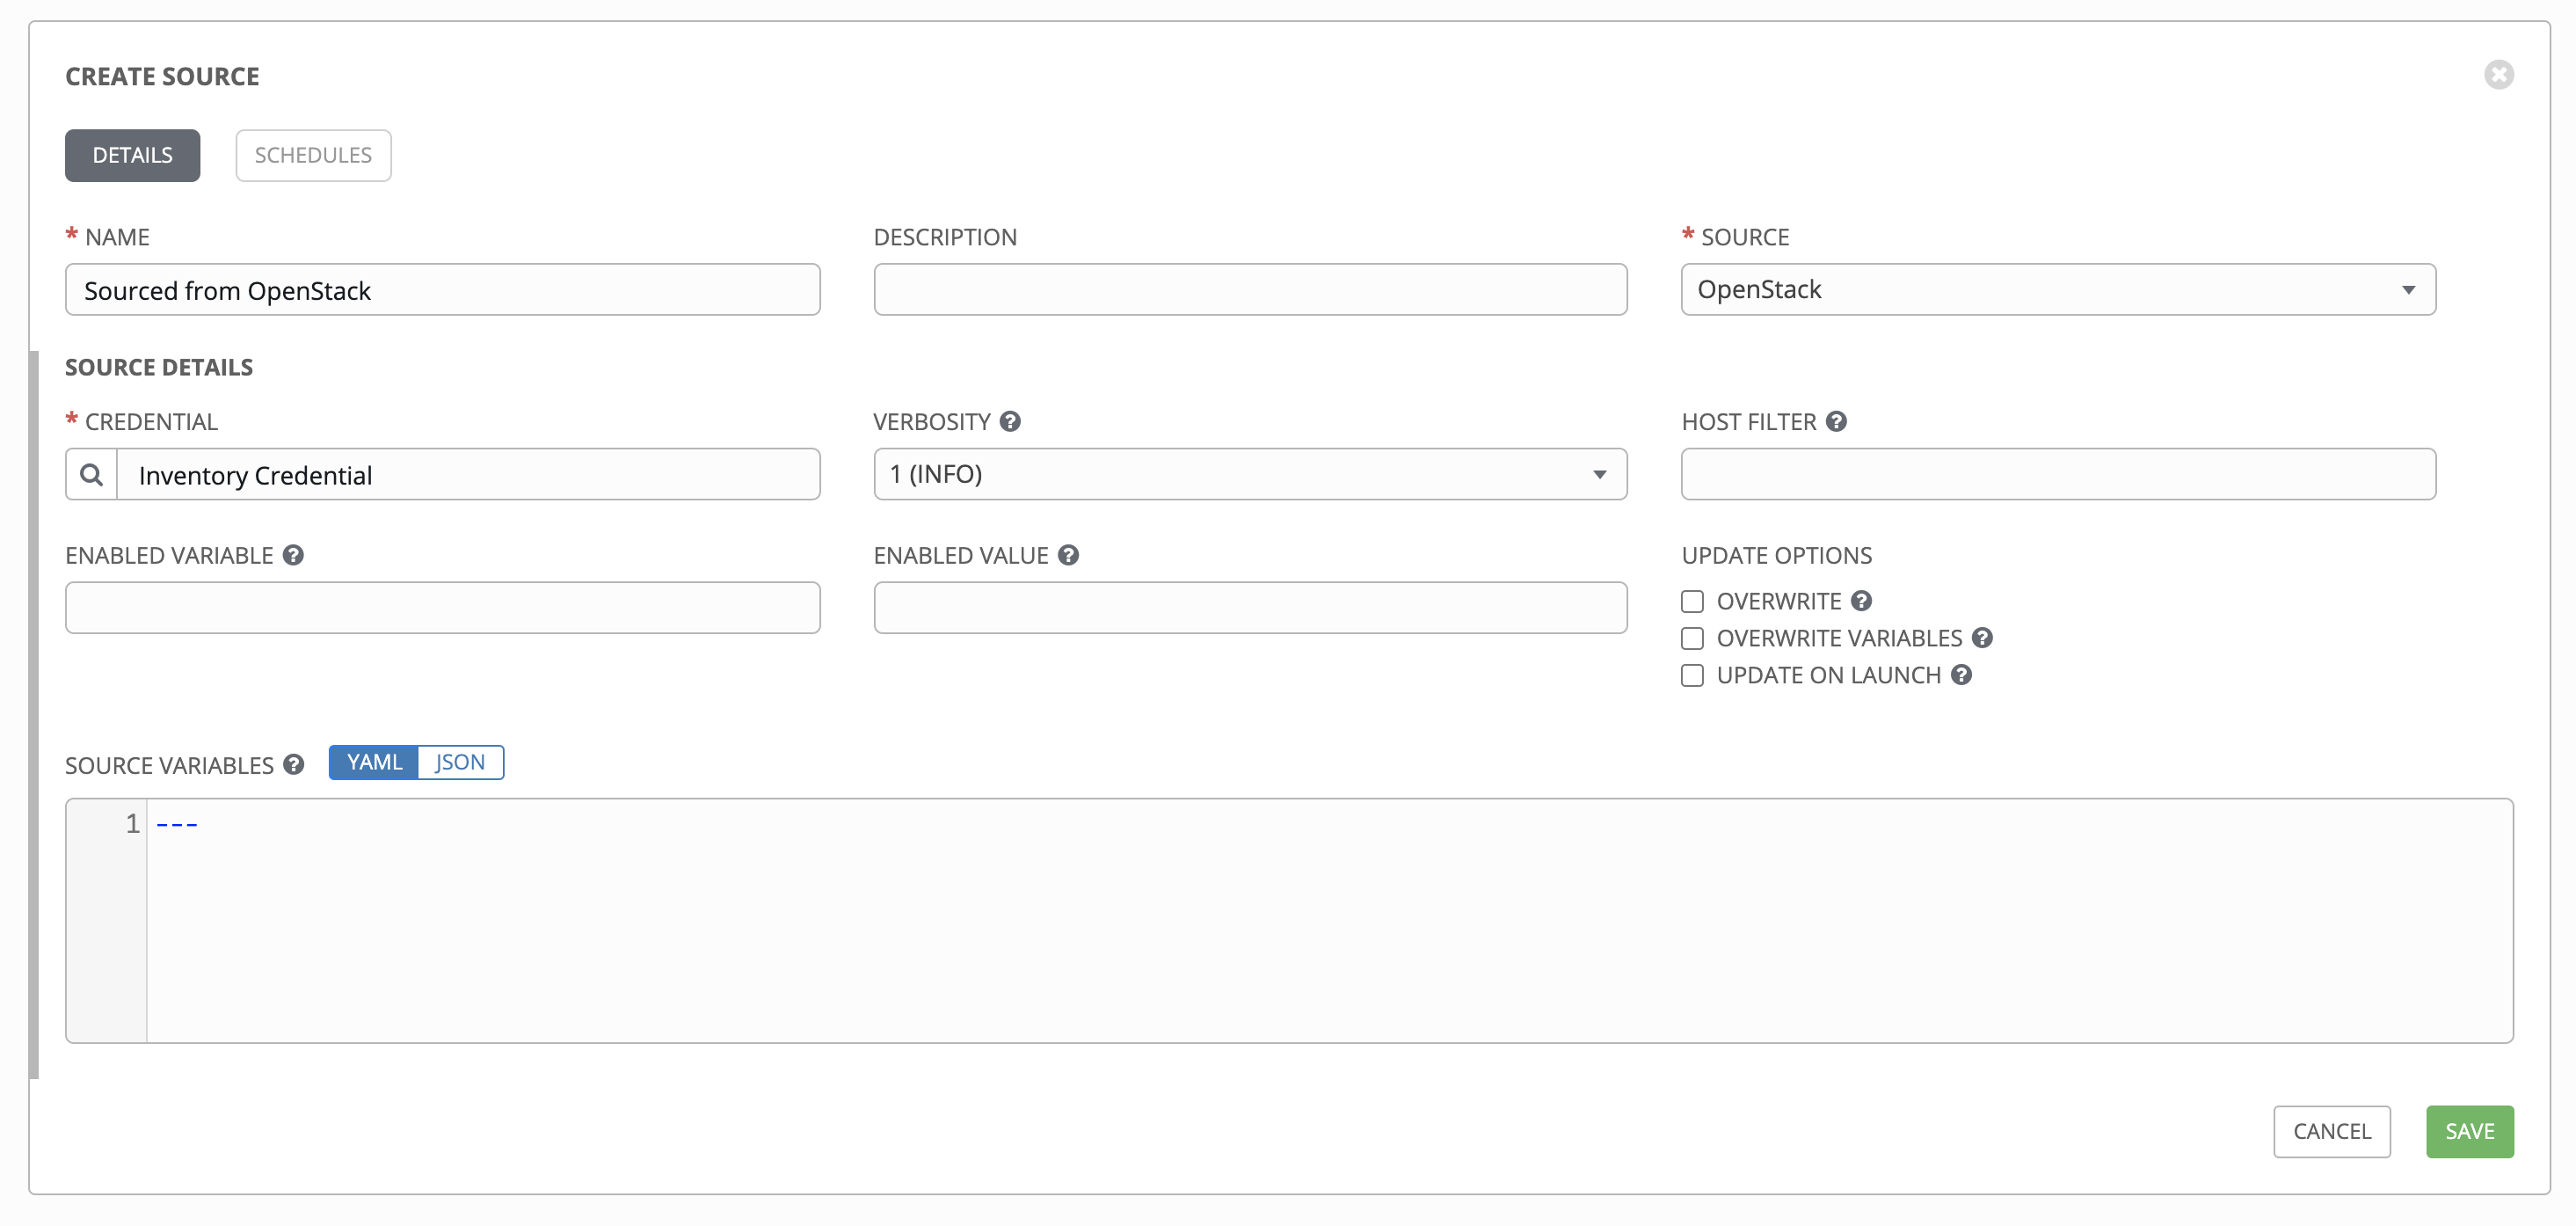
17.3.4.1.8. OpenStack
OpenStack から取得されるインベントリーを設定するには、「ソース」フィールドから OpenStack を選択します。
The Create Source window expands with the required Credential field. Choose from an existing OpenStack Credential. For more information, refer to 認証情報.
必要に応じて、adding a source の主な手順で説明されているように、詳細、ホストフィルター、有効な変数/値、および更新オプションを指定できます。
Use the Source Variables field to override variables used by the
openstackinventory plugin. Enter variables using either JSON or YAML syntax. Use the radio button to toggle between the two. For a detailed description of these variables, view the openstack inventory plugin.
17.3.4.1.9. Red Hat Virtualization
Red Hat Virtualization から取得されるインベントリーを設定するには、「ソース」フィールドから Red Hat Virtualization を選択します。
The Create Source window expands with the required Credential field. Choose from an existing Red Hat Virtualization Credential. For more information, refer to 認証情報.
必要に応じて、adding a source の主な手順で説明されているように、詳細、ホストフィルター、有効な変数/値、および更新オプションを指定できます。
Use the Source Variables field to override variables used by the
ovirtinventory plugin. Enter variables using either JSON or YAML syntax. Use the radio button to toggle between the two. For a detailed description of these variables, view the ovirt inventory plugin.
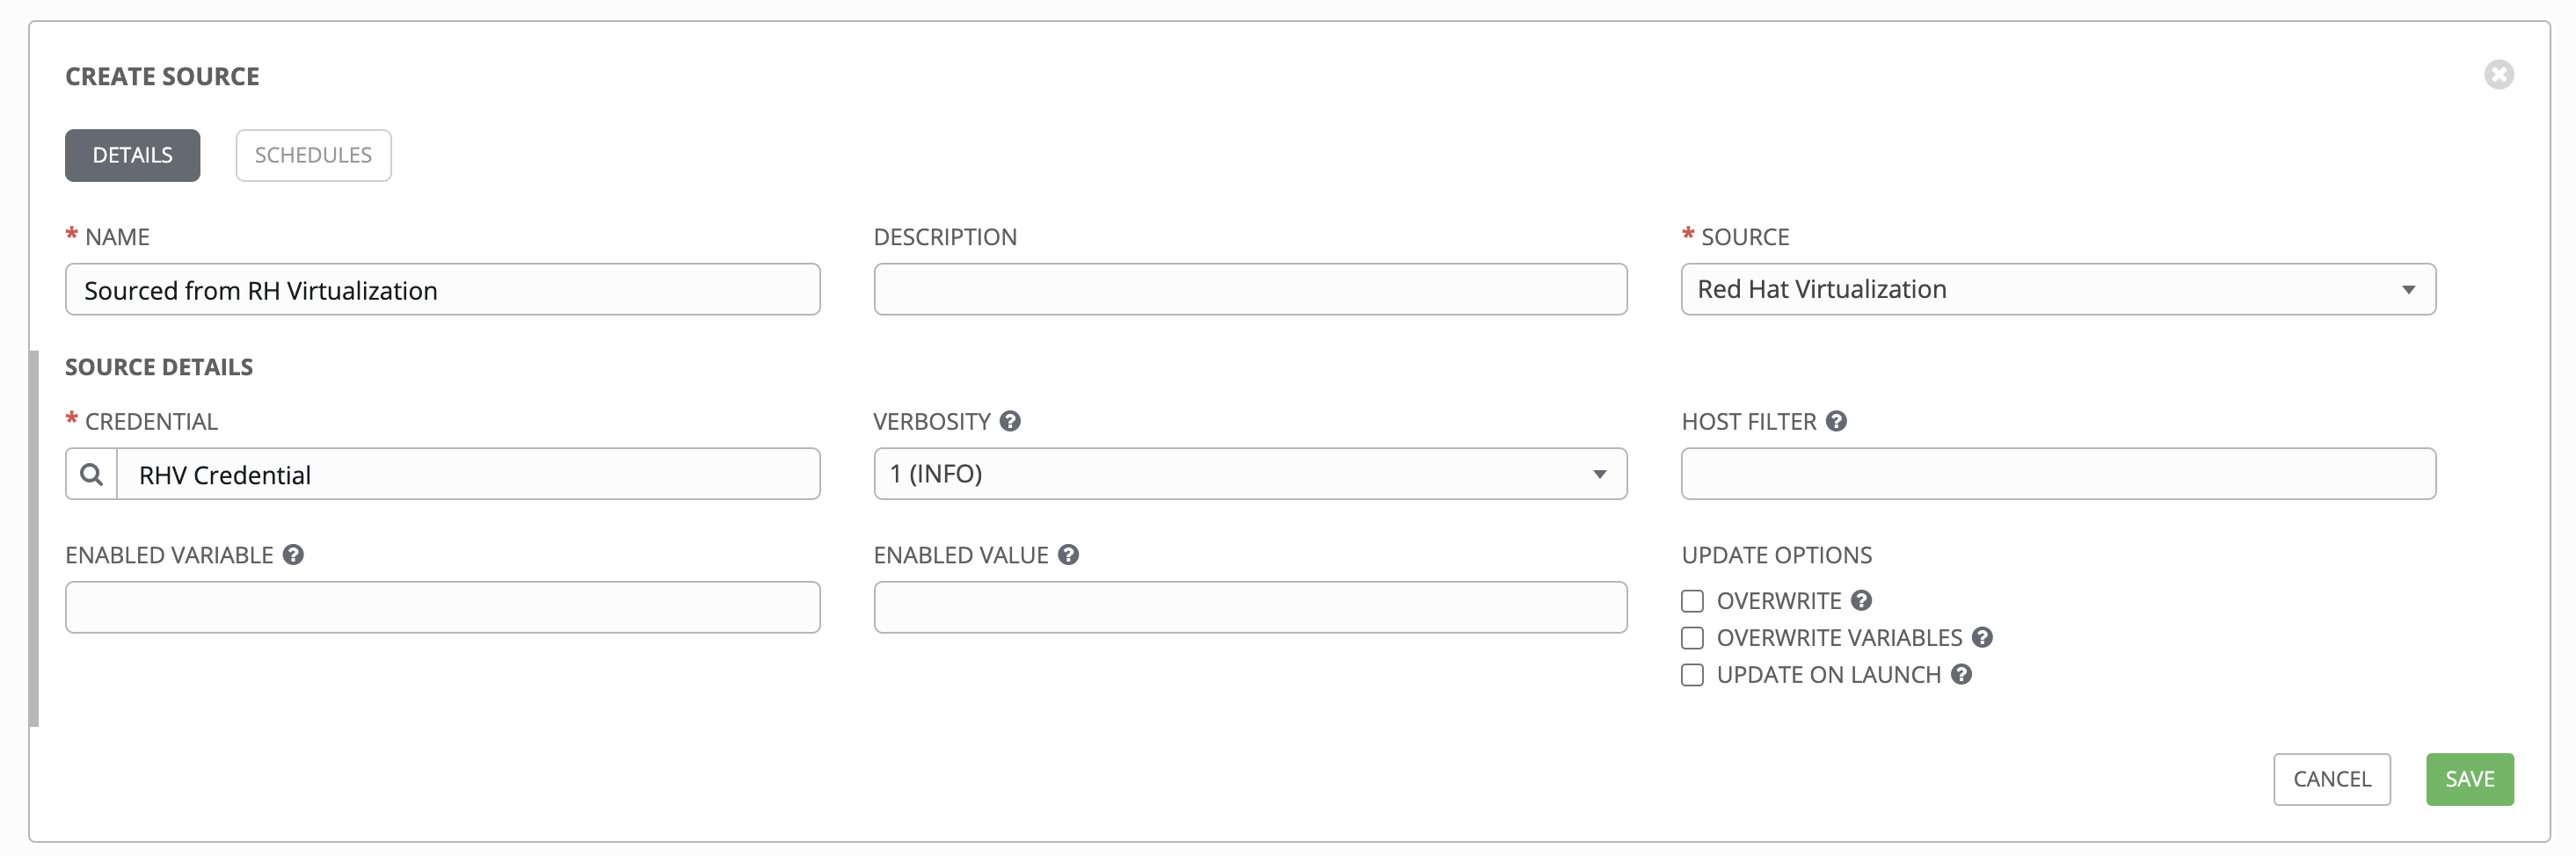
注釈
Red Hat Virtualization (ovirt) インベントリーのソース要求はデフォルトで保護されています。このデフォルト設定を変更するには、source_variables のキー ovirt_insecure を true に設定します。これは /api/v2/inventory_sources/N/ エンドポイントのインベントリーソースの API の詳細からしか入手できません。
17.3.4.1.10. Red Hat Ansible Automation Platform
To configure a automation controller-sourced inventory, select Ansible Tower from the Source field.
The Create Source window expands with the required Credential field. Choose from an existing Ansible Automation Platform Credential. For more information, refer to 認証情報.
必要に応じて、adding a source の主な手順で説明されているように、詳細、ホストフィルター、有効な変数/値、および更新オプションを指定できます。
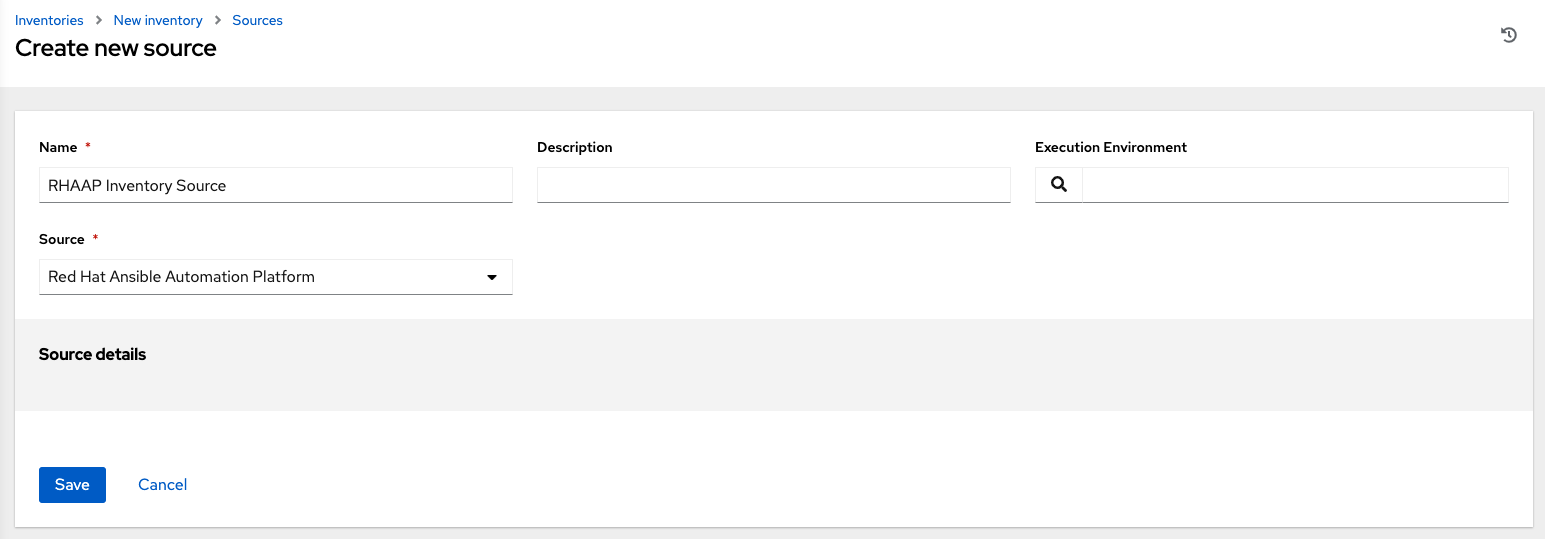
Use the Source Variables field to override variables used by the
controllerinventory plugin. Enter variables using either JSON or YAML syntax. Use the radio button to toggle between the two. For a detailed description of these variables, view the controller inventory plugin.
17.3.4.1.11. Custom Script
Tower allows you to use a custom dynamic inventory script, if your administrator has added one.
To configure a Custom Script-sourced inventory, select Custom Script from the Source field.
「ソースの作成」ウィンドウは追加フィールドと共に展開されます。以下の詳細を入力します。
Credential: You can optionally provide a credential for custom sources. The kind of credential is limited to cloud and network. Refer to カスタム認証情報タイプ for more information.
Custom Inventory Script: Required. Choose from an existing Inventory Script (for more information, refer to カスタムインベントリースクリプト).
必要に応じて、adding a source の主な手順で説明されているように、詳細、ホストフィルター、有効な変数/値、および更新オプションを指定できます。
Use the Environment Variables field to set variables in the environment to be used by the inventory update script. The variables would be specific to the script that you have written. Enter variables using either JSON or YAML syntax. Use the radio button to toggle between the two.

For more information on syncing or using custom inventory scripts, refer to カスタムインベントリースクリプト in the Automation Controller Administration Guide.
17.3.5. 完了したジョブの表示
インベントリーがジョブの実行に使用されている場合には、このジョブの詳細は、インベントリーの 完了したジョブ タブで確認できます。各ジョブの詳細を表示するには、展開 をクリックします。
17.3.5.1. スマートホストフィルター
検索フィルターを使用してインベントリーのホストを設定できます。この機能では、ファクト検索機能を利用できます。
Facts generated by an Ansible playbook during a Job Template run are stored by Tower into the database whenever use_fact_cache=True is set per-Job Template. New facts are merged with existing facts and are per-host. These stored facts can be used to filter hosts via the /api/v2/hosts endpoint, using the GET query parameter host_filter For example: /api/v2/hosts?host_filter=ansible_facts__ansible_processor_vcpus=8
host_filter パラメーターでは、以下が可能です。
() でのグループ化
ブール値および演算子の使用:
__: 関連付けられたフィールドの関連フィールドを参照します。__: JSON キーパスでキーを分離するために ansible_facts で使用されます。[]: パスの指定で json アレイを表すために使用されます。"": 値にスペースが必要な場合、その値に使用されます。
「標準的な」Django クエリーを
host_filterに組み込むことができる
例:
/api/v2/hosts/?host_filter=name=localhost
/api/v2/hosts/?host_filter=ansible_facts__ansible_date_time__weekday_number="3"
/api/v2/hosts/?host_filter=ansible_facts__ansible_processor[]="GenuineIntel"
/api/v2/hosts/?host_filter=ansible_facts__ansible_lo__ipv6[]__scope="host"
/api/v2/hosts/?host_filter=ansible_facts__ansible_processor_vcpus=8
/api/v2/hosts/?host_filter=ansible_facts__ansible_env__PYTHONUNBUFFERED="true"
/api/v2/hosts/?host_filter=(name=localhost or name=database) and (groups__name=east or groups__name="west coast") and ansible_facts__an
host_filter はホスト名、グループ名、および Ansible ファクト別に検索できます。
グループ検索の形式は以下のようになります。
groups.name:groupA
ファクト検索の形式は以下の ようになります。
ansible_facts.ansible_fips:false
また、ホスト名とホストの説明で構成されるスマート検索の検索を実行することもできます。
host_filter=name=my_host
If a search term in host_filter is of string type, to make the value a number (e.g. 2.66), or a JSON keyword (e.g. null, true or false) valid, add double quotations around the value to prevent Tower from mistakenly parsing it as a non-string:
host_filter=ansible_facts__packages__dnsmasq[]__version="2.66"
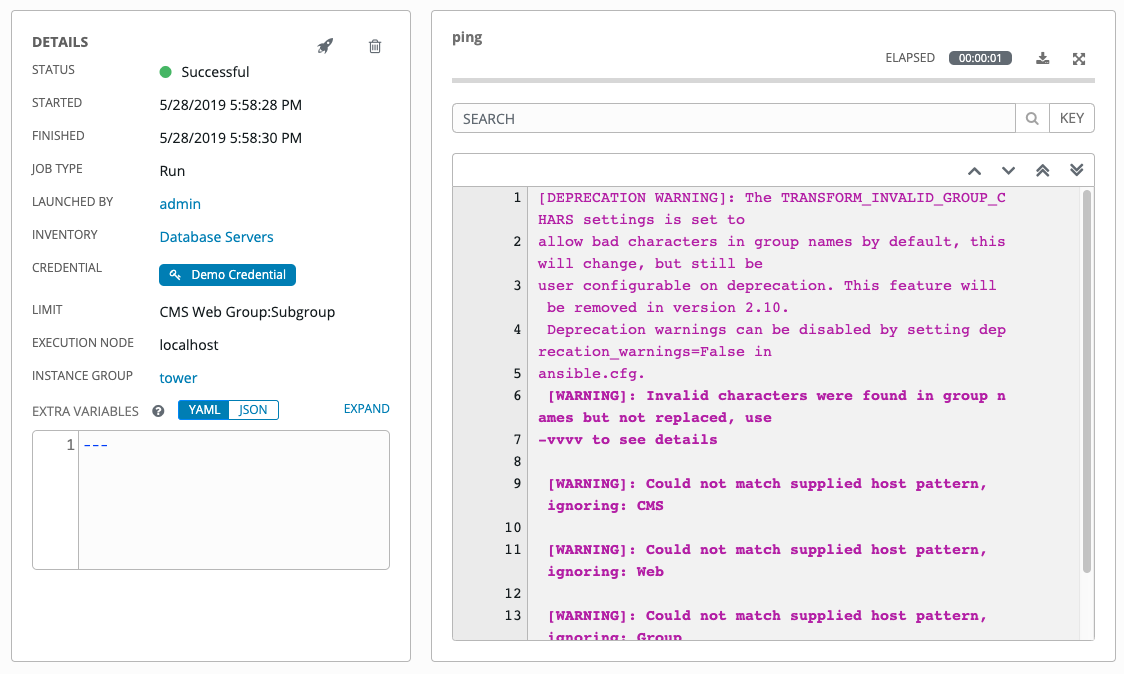
17.4. アドホックコマンドの実行
アドホックコマンドを実行するには、以下を実行します。
ホストまたはグループの一覧からインベントリーソースを選択します。インベントリーソースは単一グループまたはホストにすることも、複数のホストのセレクションや複数グループのセレクションにすることもできます。
 ボタンをクリックします。
「コマンドの実行」ウィンドウが開きます。
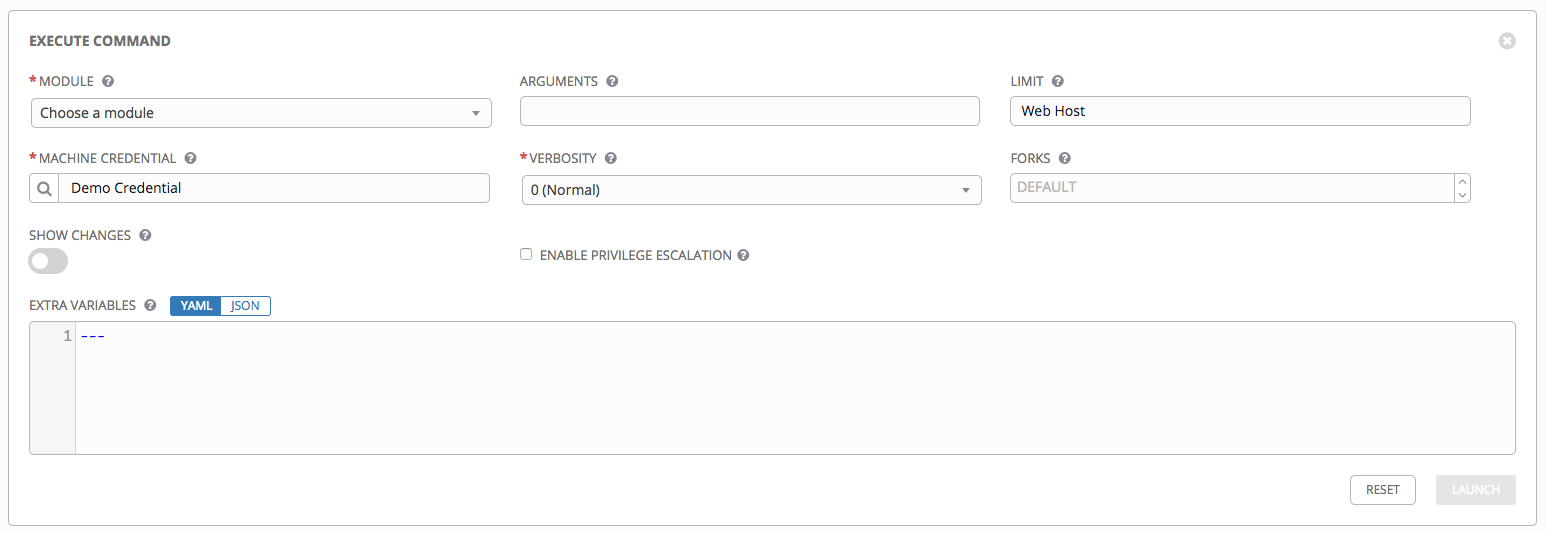
以下のフィールドに詳細を記入します。
Module: Select one of the modules that Tower supports running commands against.
command
apt_repository
mount
win_service
shell
apt_rpm
ping
win_updates
yum
service
selinux
win_group
apt
group
setup
win_user
apt_key
user
win_ping
引数: 選択したモジュールで使用する引数を指定します。
制限: インベントリー内でホストをターゲットとして使用できる上限を入力します。インベントリー内の全ホストをターゲットに設定するには、
allまたは*を入力するか、またはフィールドを空白にします。これは、起動ボタンをクリックする前のビューで選択した内容が自動的に投入されます。マシンの認証情報: コマンドを実行するためにリモートホストにアクセスする際に使用する認証情報を選択します。Ansible がリモートホストにログインするのに必要なユーザー名および SSH キーまたはパスワードが含まれる認証情報を選択します。
詳細: 標準出力の詳細レベルを選択します。
フォーク: 必要な場合には、コマンドの実行中に使用する並列または同時プロセスの数を選択します。
変更の表示: 選択して標準出力での Ansible の変更の表示を有効にします。デフォルトはオフになります。
権限昇格の有効化: 有効な場合には、Playbook は管理者権限を使用して実行されます。これは
--becomeオプションをansibleコマンドに渡すのと同等です。追加変数: このインベントリーの実行時に適用される追加のコマンドライン変数を指定します。JSON または YAML 構文のいずれかを使用して変数を入力します。ラジオボタンを使用してこれら 2 つの間の切り替えを行います。
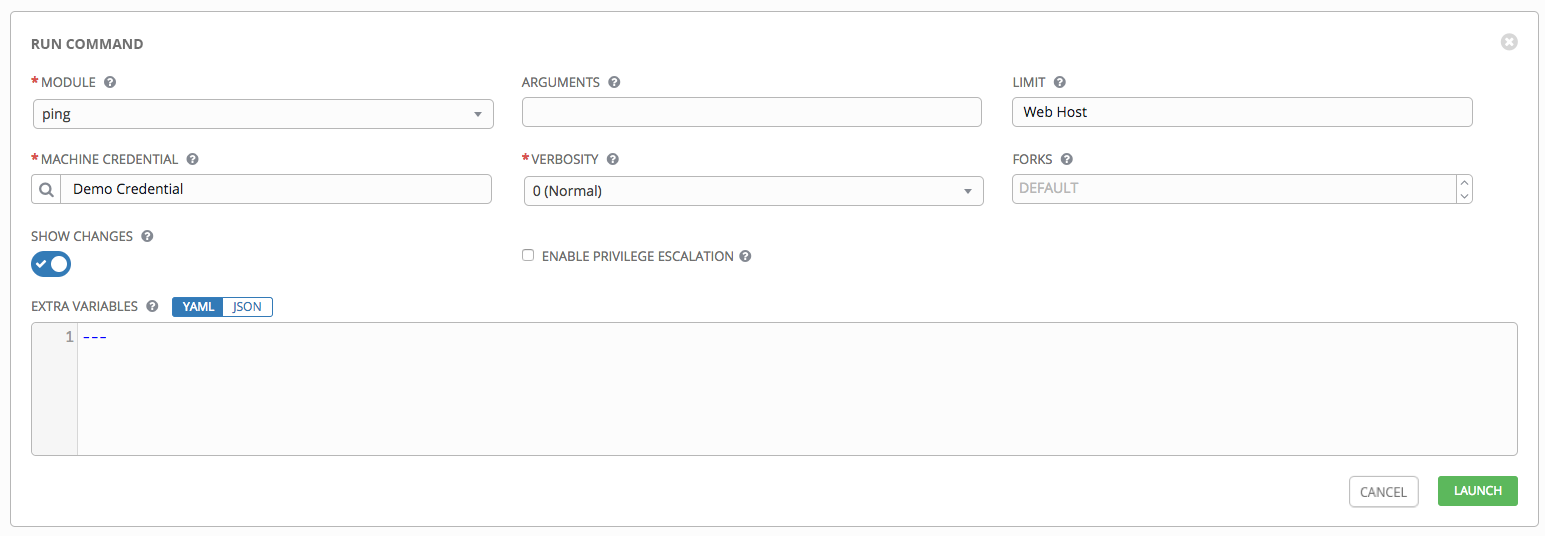
 ボタンをクリックして、このアドホックコマンドを実行します。
この結果は詳細ペインおよび「標準出力」ウィンドウに表示されます。