7. Clustering
Ansible Tower 3.1 introduces Clustering as an alternate approach to redundancy, replacing the redundancy solution configured with the active-passive nodes that involves primary and secondary instances. For versions older than 3.1, refer to the older versions of this chapter of the Ansible Tower Administration Guide.
Clustering is sharing load between hosts. Each instance should be able to act as an entry point for UI and API access. This should enable Tower administrators to use load balancers in front of as many instances as they wish and maintain good data visibility.
Note
Load balancing is optional and is entirely possible to have ingress on one or all instances as needed.
Each instance should be able to join the Tower cluster and expand its ability to execute jobs. This is a simple system where jobs can and will run anywhere rather than be directed on where to run. Ansible Tower 3.2 introduced the ability for clustered instances to be grouped into different pools/queues.
Instances can be grouped into one or more Instance Groups. Instance groups can be assigned to one or more of the resources listed below.
Organizations
Inventories
Job Templates
When a job associated with one of the resources executes, it will be assigned to the instance group associated with the resource. During the execution process, instance groups associated with Job Templates are checked before those associated with Inventories. Similarly, instance groups associated with Inventories are checked before those associated with Organizations. Thus, Instance Group assignments for the three resources form a hierarchy: Job Template > Inventory > Organization.
Ansible Tower 3.3 adds support for container-based clusters using OpenShift or Kubernetes, meaning new Tower instances can be installed on these platforms without any variation or diversion in functionality. However, the OpenShift Tower configuration has some differences that must be considered. For more detail about Tower OpenShift, see the OpenShift Deployment and Configuration section of this Ansible Tower Administration Guide.
Supported Operating Systems
The following operating systems are supported for establishing a clustered environment:
RHEL-7 (can be either RHEL-7 or Centos-7 instances)
Ubuntu 16
Isolated instances can be installed only on RHEL-7 at this time
Note
Isolated instances are not supported in conjunction with running Ansible Tower in OpenShift.
7.1. Setup Considerations
This section covers initial setup of clusters only. For upgrading an existing cluster, refer to Upgrade Planning of the Ansible Tower Upgrade and Migration Guide.
Important considerations to note in the new clustering environment:
PostgreSQL is still a standalone instance and is not clustered. Tower does not manage replica configuration or database failover (if the user configures standby replicas).
The number of instances in a cluster should always be an odd number and it is strongly recommended that a minimum of three Tower instances be in a cluster and the supported maximum is 20. When it gets that high, the requirement for odd number of nodes becomes less important.
All instances should be reachable from all other instances and they should be able to reach the database. It is also important for the hosts to have a stable address and/or hostname (depending on how the Tower host is configured).
All instances must be geographically collocated, with reliable low-latency connections between instances.
RabbitMQ is the cornerstone of Tower’s clustering system. A lot of the configuration requirements and behavior is dictated by its needs. Therefore, customization beyond Tower’s setup playbook is limited. Each Tower instance has a deployment of RabbitMQ that will cluster with the other instances’ RabbitMQ instances.
For purposes of upgrading to a clustered environment, your primary instance must be part of the
towergroup in the inventory AND it needs to be the first host listed in thetowergroup.Manual projects must be manually synced to all instances by the customer, and updated on all instances at once.
There is no concept of primary/secondary in the new Tower system. All systems are primary.
Setup playbook changes to configure RabbitMQ and provide the type of network the hosts are on.
The
inventoryfile for Tower deployments should be saved/persisted. If new instances are to be provisioned, the passwords and configuration options, as well as host names, must be made available to the installer.Do not create a group named
instance_group_tower.Do not name any instance the same as a group name.
7.2. Install and Configure
Provisioning new instances involves updating the inventory file and re-running the setup playbook. It is important that the inventory file contains all passwords and information used when installing the cluster or other instances may be reconfigured. The current standalone instance configuration does not change for a 3.1 or later deployment. The inventory file does change in some important ways:
Since there is no primary/secondary configuration, those inventory groups go away and are replaced with a single inventory group,
tower.You may optionally define other groups and group instances in those groups. These groups should be prefixed with
instance_group_. Instances are not required to be in the tower group alongside otherinstance_group_groups, but one instance must be present in thetowergroup. Technically,toweris a group like any otherinstance_group_group, but it must always be present, and if a specific group is not associated with a specific resource, then job execution will always fall back to thetowergroup. In 3.3, thetowerinstance group always exists (it cannot be deleted nor renamed).
Note
All instances are responsible for various housekeeping tasks related to task scheduling, like determining where jobs are supposed to be launched and processing playbook events, as well as periodic cleanup.
[tower]
hostA
hostB
hostC

[instance_group_east]
hostB
hostC

[instance_group_west]
hostC
hostD
Note
If no groups are selected for a resource then the tower group is used, but if any other group is selected, then the tower group will not be used in any way.
The database group remains for specifying an external Postgres. If the database host is provisioned separately, this group should be empty:
[tower]
hostA
hostB
hostC

[database]
hostDB
It is common to provision Tower instances externally, but it is best to reference them by internal addressing. This is most significant for RabbitMQ clustering where the service is not available at all on an external interface. For this purpose, it is necessary to assign the internal address for RabbitMQ links as such:
[tower]
hostA rabbitmq_host=10.1.0.2
hostB rabbitmq_host=10.1.0.3
hostC rabbitmq_host=10.1.0.4
Note
The number of instances in a cluster should always be an odd number and it is strongly recommended that a minimum of three Tower instances be in a cluster and the supported maximum is 20. When it gets that high, the requirement for odd number of nodes becomes less important.
The
redis_passwordfield is removed from[all:vars]Fields for RabbitMQ are as follows:
rabbitmq_port=5672: RabbitMQ is installed on each instance and is not optional, it is also not possible to externalize it. This setting configures what port it listens on.rabbitmq_vhost=tower: Controls the setting for which Tower configures a RabbitMQ virtualhost to isolate itself.rabbitmq_username=towerandrabbitmq_password=tower: Each instance and each instance’s Tower instance are configured with these values. This is similar to Tower’s other uses of usernames/passwords.rabbitmq_cookie=<somevalue>: This value is unused in a standalone deployment but is critical for clustered deployments. This acts as the secret key that allows RabbitMQ cluster members to identify each other.rabbitmq_enable_manager: Set this totrueto expose the RabbitMQ Management Web Console on each instance.
7.2.1. RabbitMQ Default Settings
The following configuration shows the default settings for RabbitMQ:
rabbitmq_port=5672
rabbitmq_vhost=tower
rabbitmq_username=tower
rabbitmq_password=''
rabbitmq_cookie=cookiemonster
Note
rabbitmq_cookie is a sensitive value, it should be treated like the secret key in Tower.
7.2.2. Instances and Ports Used by Tower
Ports and instances used by Tower are as follows:
80, 443 (normal Tower ports)
22 (ssh)
5432 (database instance - if the database is installed on an external instance, needs to be opened to the tower instances)
Clustering/RabbitMQ ports:
4369, 25672 (ports specifically used by RabbitMQ to maintain a cluster, needs to be open between each instance)
15672 (if the RabbitMQ Management Interface is enabled, this port needs to be opened (optional))
7.3. Configuring Instances and Instance Groups from the API
Instance groups can be created by POSTing to /api/v2/instance_groups as a system administrator.
Once created, instances can be associated with an instance group with:
HTTP POST /api/v2/instance_groups/x/instances/ {'id': y}`
An instance that is added to an instance group will automatically reconfigure itself to listen on the group’s work queue. See the following section, Instance group policies, for more details.
7.4. Instance group policies
Starting with Ansible Tower 3.3, users have the ability to configure Tower instances to automatically join Instance Groups when they come online by defining a policy. These policies are evaluated for every new instance that comes online.
Instance Group Policies are controlled by three optional fields on an Instance Group:
policy_instance_percentage: This is a number between 0 - 100. It guarantees that this percentage of active Tower instances will be added to this Instance Group. As new instances come online, if the number of Instances in this group relative to the total number of instances is less than the given percentage, then new ones will be added until the percentage condition is satisfied.policy_instance_minimum: This policy attempts to keep at least this many instances in the Instance Group. If the number of available instances is lower than this minimum, then all instances will be placed in this Instance Group.policy_instance_list: This is a fixed list of instance names to always include in this Instance Group.
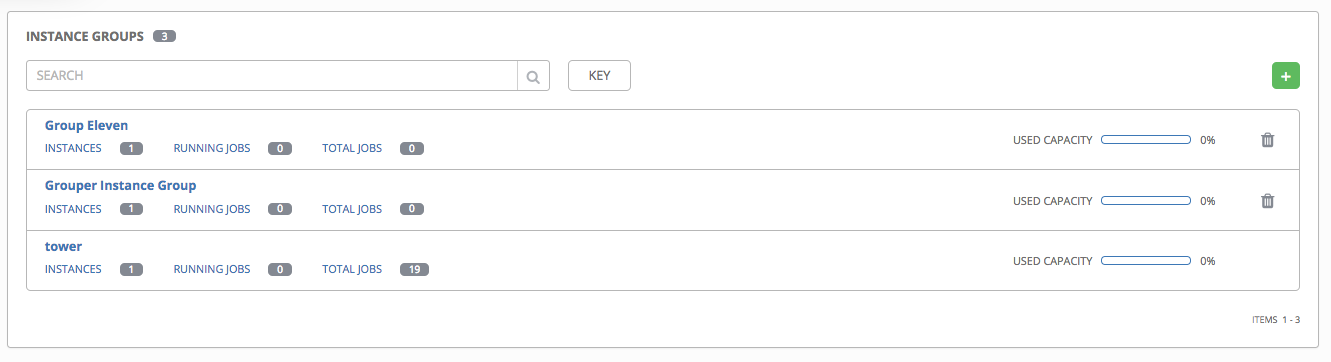
The Instance Groups list view from the Ansible Tower User Interface provides a summary of the capacity levels for each instance group according to instance group policies:
7.4.1. Notable policy considerations
policy_instance_percentageandpolicy_instance_minimumboth set minimum allocations. The rule that results in more instances assigned to the group will take effect. For example, if you have apolicy_instance_percentageof 50% and apolicy_instance_minimumof 2 and you start 6 instances, 3 of them would be assigned to the Instance Group. If you reduce the number of total instances in the cluster to 2, then both of them would be assigned to the Instance Group to satisfypolicy_instance_minimum. This way, you can set a lower bound on the amount of available resources.Policies do not actively prevent instances from being associated with multiple Instance Groups, but this can effectively be achieved by making the percentages add up to 100. If you have 4 instance groups, assign each a percentage value of 25 and the instances will be distributed among them with no overlap.
7.4.2. Manually pinning instances to specific groups
If you have a special instance which needs to be exclusively assigned to a specific Instance Group but don’t want it to automatically join other groups via “percentage” or “minimum” policies:
Add the instance to one or more Instance Groups’
policy_instance_listUpdate the instance’s
managed_by_policyproperty to beFalse.
This will prevent the Instance from being automatically added to other groups based on percentage and minimum policy; it will only belong to the groups you’ve manually assigned it to:
HTTP PATCH /api/v2/instance_groups/N/
{
"policy_instance_list": ["special-instance"]
}

HTTP PATCH /api/v2/instances/X/
{
"managed_by_policy": False
}
7.5. Isolated Instance Groups
Ansible Tower versions 3.2 and later added the ability to optionally define isolated groups inside security-restricted networking zones from which to run jobs and ad hoc commands. Instances in these groups will not have a full installation of Tower, but will have a minimal set of utilities used to run jobs. Isolated groups must be specified in the inventory file prefixed with isolated_group_. Below is an example of an inventory file for an isolated instance group.
[tower]
towerA
towerB
towerC

[instance_group_security]
towerB
towerC

[isolated_group_govcloud]
isolatedA
isolatedB

[isolated_group_govcloud:vars]
controller=security
In the isolated instance group model, “controller” instances interact with “isolated” instances via a series of Ansible playbooks over SSH. At installation time, by default, a randomized RSA key is generated and distributed as an authorized key to all “isolated” instances. The private half of the key is encrypted and stored within the Tower database, and is used to authenticate from “controller” instances to “isolated” instances when jobs are run.
When a job is scheduled to run on an “isolated” instance:
The “controller” instance compiles metadata required to run the job and copies it to the “isolated” instance.
Once the metadata has been synchronized to the isolated host, the “controller” instance starts a process on the “isolated” instance, which consumes the metadata and starts running
ansible/ansible-playbook. As the playbook runs, job artifacts (such as stdout and job events) are written to disk on the “isolated” instance.While the job runs on the “isolated” instance, the “controller” instance periodically copies job artifacts (stdout and job events) from the “isolated” instance. It consumes these until the job finishes running on the “isolated” instance.
Note
Controller nodes fail if they go offline in the middle of an isolated run. If a Tower node restarts, or the dispatcher stops during playbook runs, jobs running on that node fails and won’t start again when the dispatcher comes online.
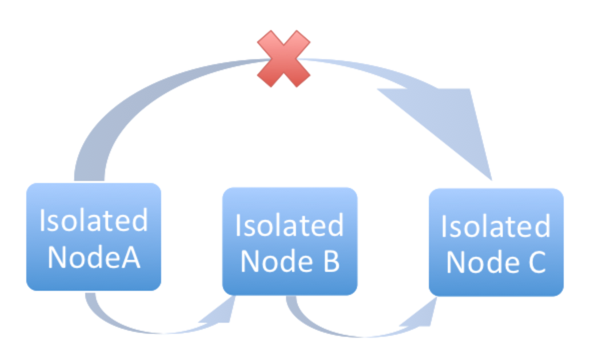
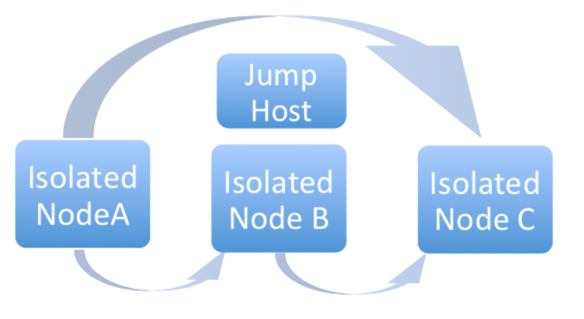
Isolated groups (nodes) may be created in a way that allow them to exist inside of a VPC with security rules that only permit the instances in its controller group to access them; only ingress SSH traffic from “controller” instances to “isolated” instances is required. When provisioning isolated nodes, your install machine needs to be able to have connectivity to the isolated nodes. In cases where an isolated node is not directly accessible but can be reached indirectly through other hosts, you can designate a “jump host” by using ProxyCommand in your SSH configuration to specify the jump host and then run the installer.
The recommended system configurations with isolated groups are as follows:
Do not create a group named
isolated_group_tower.Do not put any isolated instances inside the tower group or other ordinary instance groups.
Define the controller variable as either a group variable or as a host variable on all the instances in the isolated group. Do not allow isolated instances in the same group to have a different value for this variable - the behavior in this case cannot be predicted.
Do not put an isolated instance in more than one isolated group.
Do not put an instance in both ordinary groups and isolated groups.
Do not use fact caching with isolated instances.
7.5.1. Optional SSH Authentication
For users who wish to manage SSH authentication from “controller” nodes to “isolated” nodes via some system outside of Tower (such as externally-managed passwordless SSH keys), this behavior can be disabled by unsetting two Tower API settings values:
HTTP PATCH /api/v2/settings/jobs/ {'AWX_ISOLATED_PRIVATE_KEY': '', 'AWX_ISOLATED_PUBLIC_KEY': ''}
7.6. Status and Monitoring via Browser API
Tower itself reports as much status as it can via the Browsable API at /api/v2/ping in order to provide validation of the health of the cluster, including:
The instance servicing the HTTP request
The timestamps of the last heartbeat of all other instances in the cluster
Instance Groups and Instance membership in those groups
View more details about Instances and Instance Groups, including running jobs and membership information at /api/v2/instances/ and /api/v2/instance_groups/.
7.7. Instance Services and Failure Behavior
Each Tower instance is made up of several different services working collaboratively:
HTTP Services - This includes the Tower application itself as well as external web services.
Callback Receiver - Receives job events from running Ansible jobs.
Dispatcher - The worker queue that processes and runs all jobs.
RabbitMQ - This message broker is used as a signaling mechanism for the dispatcher as well as any event data propagated to the application.
Memcached - local caching service for the instance it lives on.
Tower is configured in such a way that if any of these services or their components fail, then all services are restarted. If these fail sufficiently often in a short span of time, then the entire instance will be placed offline in an automated fashion in order to allow remediation without causing unexpected behavior.
For backing up and restoring a clustered environment, refer to Backup and Restore for Clustered Environments section.
7.8. Job Runtime Behavior
The way jobs are run and reported to a ‘normal’ user of Tower does not change. On the system side, some differences are worth noting:
When a job is submitted from the API interface it gets pushed into the dispatcher queue on RabbitMQ. A single RabbitMQ instance is the responsible master for individual queues but each Tower instance will connect to and receive jobs from that queue using a particular scheduling algorithm. Any instance in the cluster is just as likely to receive the work and execute the task. If a instance fails while executing jobs, then the work is marked as permanently failed.

If a cluster is divided into separate instance groups, then the behavior is similar to the cluster as a whole. If two instances are assigned to a group then either one is just as likely to receive a job as any other in the same group.
As Tower instances are brought online, it effectively expands the work capacity of the Tower system. If those instances are also placed into instance groups, then they also expand that group’s capacity. If an instance is performing work and it is a member of multiple groups, then capacity will be reduced from all groups for which it is a member. De-provisioning an instance will remove capacity from the cluster wherever that instance was assigned. See Deprovision Instances and Instance Groups in the next section for more details.
Note
Not all instances are required to be provisioned with an equal capacity.
Project updates behave differently than they did before. Previously, they were ordinary jobs that ran on a single instance. It is now important that they run successfully on any instance that could potentially run a job. Projects will now sync themselves to the correct version on the instance immediately prior to running the job.
If an instance group is configured but all instances in that group are offline or unavailable, any jobs that are launched targeting only that group will be stuck in a waiting state until instances become available. Fallback or backup resources should be provisioned to handle any work that might encounter this scenario.
7.8.1. Control Where a Job Runs
By default, when a job is submitted to the tower queue, it can be picked up by any of the workers. However, you can control where a particular job runs, such as restricting the instances from which a job runs on. If any of the job template, inventory, or organization has instance groups associated with them, a job ran from that job template will not be eligible for the default behavior. That means that if all of the instances inside of the instance groups associated with these 3 resources are out of capacity, the job will remain in the pending state until capacity becomes available.
The order of preference in determining which instance group to submit the job to is as follows:
job template
inventory
organization (by way of project)
If instance groups are associated with the job template, and all of these are at capacity, then the job will be submitted to instance groups specified on inventory, and then organization. Jobs should execute in those groups in preferential order as resources are available.
The global tower group can still be associated with a resource, just like any of the custom instance groups defined in the playbook. This can be used to specify a preferred instance group on the job template or inventory, but still allow the job to be submitted to any instance if those are out of capacity.
In order to support temporarily taking an instance offline, there is a property enabled defined on each instance. When this property is disabled, no jobs will be assigned to that instance. Existing jobs will finish, but no new work will be assigned.
7.8.1.1. Job Run Examples
As an example, by associating group_a with a Job Template and also associating the tower group with its inventory, you allow the tower group to be used as a fallback in case group_a gets out of capacity.
In addition, it is possible to not associate an instance group with one resource but designate another resource as the fallback. For example, not associating an instance group with a job template and have it fall back to the inventory and/or the organization’s instance group.
This presents two other great use cases:
Associating instance groups with an inventory (omitting assigning the job template to an instance group) will allow the user to ensure that any playbook run against a specific inventory will run only on the group associated with it. This can be super useful in the situation where only those instances have a direct link to the managed nodes.
An administrator can assign instance groups to organizations. This effectively allows the administrator to segment out the entire infrastructure and guarantee that each organization has capacity to run jobs without interfering with any other organization’s ability to run jobs.
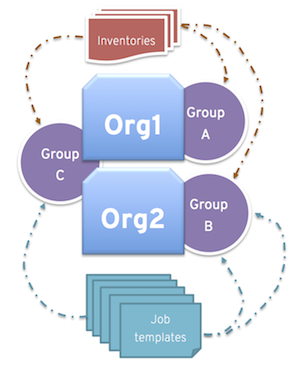
Likewise, an administrator could assign multiple groups to each organization as desired, as in the following scenario:
There are three instance groups: A, B, and C. There are two organizations: Org1 and Org2.
The administrator assigns group A to Org1, group B to Org2 and then assign group C to both Org1 and Org2 as an overflow for any extra capacity that may be needed.
The organization administrators are then free to assign inventory or job templates to whichever group they want (or just let them inherit the default order from the organization).
Arranging resources in this way offers a lot of flexibility. Also, you can create instance groups with only one instance, thus allowing you to direct work towards a very specific Host in the Tower cluster.
7.9. Deprovision Instances and Instance Groups
Re-running the setup playbook does not automatically deprovision instances since clusters do not currently distinguish between an instance that was taken offline intentionally or due to failure. Instead, shut down all services on the Tower instance and then run the deprovisioning tool from any other instance:
Shut down the instance or stop the service with the command,
ansible-tower-service stop.Run the deprovision command
$ awx-manage deprovision_instance --hostname=<name used in inventory file>from another instance to remove it from the Tower cluster registry AND the RabbitMQ cluster registry.Example:
awx-manage deprovision_instance --hostname=hostB
Similarly, deprovisioning instance groups in Tower does not automatically deprovision or remove instance groups, even though re-provisioning will often cause these to be unused. They may still show up in API endpoints and stats monitoring. These groups can be removed with the following command:
Example:
awx-manage unregister_queue --queuename=<name>
Removing an instance’s membership from an instance group in the inventory file and re-running the setup playbook does not ensure the instance won’t be added back to a group. To be sure that an instance will not be added back to a group, remove via the API and also remove it in your inventory file, or you can stop defining instance groups in the inventory file altogether. You can also manage instance group topology through the Ansible Tower User Interface. For more information on managing instance groups in the UI, refer to Instance Groups in the Ansible Tower User Guide.